Navigation

    • Register
    • Login
    • Search
    • OpenHardware.io
    • Categories
    • Recent
    • Tags
    • Popular
    1. Home
    2. manutremo
    3. Best
    • Profile
    • Following
    • Followers
    • Topics
    • Posts
    • Best
    • Groups

    Best posts made by manutremo

    • RE: ๐Ÿ’ฌ Soil Moisture Sensor

      Just to summarize since the thread is becoming a bit confusing.

      The sensor shown in the example and the shopping guide is no more than a device that measures the resistance between the two pins of the fork. That is done by the boards, which includes an analog output and a digital output.

      Should you just need to know when moisture is over or below a certain degree, just connect the digital output to a digital pin in the Arduino. Then use the potentiometer in the board to decide the switching point. In a battery powered node, this could be connected to an interrupt pin so the node sleeps and is only waken up when the moisture falls under the predetermined level to send an alert to the controller. But if you want to know track how moisture evolves, you may connect the analog output of the board to an analog pin in the arduino, which will provide a numerical value. Then the sensor needs to be calibrated; there are several forms but one involves measuring the output when the fork is submerged in water (which would be 100% moisture) and then when it's in air (that would be 0%). You can then map this scale to a moisture scale, typically a cb scale.

      The negative side of using that board is that the current always flows in the same direction through the fork. The same occurs with another similar type of sensor like the sparkfun here. This will lead in some time to corrosion of the fork, even if it's one of the latest nickeled ones. Reports in the internet vary from weeks to months, but in any case the form will corrode and as a result the measurement will drift slowly.

      The alternating polarization strategy tries to overcome this problem. To do so, the board is removed and only the fork is used. Instead of connecting it to Vcc and GND, the two terminals are connected so that the fork is actually one of the resistors in a voltage divider. The other resistor is usually a 10k resistor. In this setup, one of the digital pins is connected to one leg of the resistor, the other resistor leg is connected to one side of the fork, and the other side of the fork is connected to the other digital pin on the Arduino. Another wire needs then to be connected between the connection between the resistor and the fork, to an analog pin of the Arduino, which will read a value that will be proportional to the resistance of the fork, therefore to the moisture level. Then, by switching the pins from INPUT to OUTPUT, and from HIGH to LOW, you can have the current flow in one direction or the opposite one, which significantly delays the corrosion. In my case, the forks still look like new after months of use. Corrosion speed will still obviously depend by time between readings, reading time, soil type and other factors. I've never experimented with this sensor but with a rain sensor I could see corrosion symptoms after some minutes of continuous readings. This sensor also needs to be calibrated in a similar way as the former one. This setup makes the sketch a bit more complex but there are multiple examples here and in the internet.

      There are also variations on the measurement strategy within this approach. For example, you may just take a reading in one direction, another reading in the other direction, convert them to moisture level, and average them. Other people take several readings and average them all. I realized that if the reading is repeated, the value increases with each reading until it stabilizes at a certain value, so I decided to have the sketch iterate until two consecutive readings get the same result. The measuring time also needs to be asessed; in my investigation, the shorter the time, the less battery consumption, but at some point around 5ms the readings started to be unreliable. On the other hand, the longer the measurement the more realiable, but the span of the measurements in analog pin where closer and closer which led to loss of accuracy, and of course higher battery consumption. I decided 10ms was a good balance but others' milage may vary.

      Finally, there are other completely types of moisture sensor that measure the soil dielectric constant instead of its resistance. They are said to be more reliable, and additionally they do not suffer from corrosion since they do not need to be conductive, hence they are covered by a layer of non-metal material (probably epoxy?). This makes them more durable but also more expensive. I have no experience with those.

      I hope this contributes to clarify this topic a little bit. This thread contains additional information on the same topic.

      posted in Announcements
      manutremo
      manutremo
    • RE: Alternatives for nRF24L01+ ?

      I went through a lot of problems when trying to build my network using the nrf24 modules. I jept using more and more powerful modules but never really managed to get a robust connection at all nodes.

      The nrf24L01 do not provide signal level reporting capabilities, so it's not easy to imagine what's oging on when communication fails.

      I finally understood by using the connection quality meter here. BY using I found that:

      • Increasing the power is sometimes a problem instead of a solution, since the nrf24L01 tend to overload at some point.
      • In my home there where "shadow" areas where the 2.4GHz simply didn't reach at a good enough level. I then checked the 2.4GHz signal from my router and found that it was also weak (not as weak as the nrf24L01, of course, but you could see the decrease).
      • Isolating the nrf24L01 by wrapping them on a plastic film foil and then another later of tin foil helped a litlle.

      From the results of my investigation I decided to move to using rfm69 modules, which have a better penetration power. They are working quite well, and certainly much better than the nrf24's.

      Maybe in your case it might be worth using a similar tool to understand what is going on.

      posted in General Discussion
      manutremo
      manutremo
    • RE: ๐Ÿ’ฌ Soil Moisture Sensor

      The sketch does not correspond to the sensor shown in the images. It is much better to use the 2-pin sensors and drive them directly using digital outputs. Search for FC28 (better) or YL-69 in ebay or amazon. I use a voltage divider with a 10k resistor

      I've been using the alternating polarity approach on about 20 sensors, with perfect results and no signs of corrosion after around 6 months. I run some tests to determine the effect of measuring time and finally came up with 5ms with no averaging. The batteries last for months; I'm not sure how many since I haven't yet had to replace any (status led removed from 3.3v arduino mini pro board).

      As a reference, I tested a rain sensor (same principle) with no alternating current and as soon as a drop of water touched the tracks, small bubbles were produced with indicated that electrolysis was taking place. The effect could be seen on the tracks after just a couple of minutes.

      I'm attaching my sketch below. It reports battery level in addition to moisture. It uses the development branch of the mysensors library in order to use the new version of the rfm69 drivers with RSSI ATC - which btw works more than perfect.

      I'm using Domoticz which includes a predefined device for moisture. This device uses the centibar scale, so I calibrated my sensors in % moisture and then convert to cb.

      #define MY_RADIO_RFM69
      #define MY_RFM69_NEW_DRIVER   // ATC on RFM69 works only with the new driver (not compatible with old=default driver)
      #define MY_IS_RFM69HW
      #define MY_RFM69_FREQUENCY RFM69_868MHZ
      #define MY_RFM69_ATC_TARGET_RSSI_DBM (-70)
      #define MY_RFM69_NETWORKID  100
      
      #define MY_PARENT_NODE_ID 0
      #define MY_PARENT_NODE_IS_STATIC
      #define MY_TRANSPORT_MAX_TX_FAILURES 3
      
      #define MY_DEBUG 
      
      #include <MySensors.h>
      #include <SPI.h>
      #include <Vcc.h>
      #include <Streaming.h>
      #include <math.h>
      
      #define VERSION "1.1"
      /* Measurement probe connected to pins shown below
      I avoided using pins 2 and 3 because they are reserved for IRQ (potential future use) - 2 is also used by the RFM69 module.
      Although this may not actually have a noticeable effect, I also avoided 5 and 6 because they support PWM and hence are a bit slower.
      */
      #define PIN_ALIM1 4                                   // Connect to input of resistor
      #define PIN_ALIM2 7                                   // Connect to input of measuring probe
      #define PIN_LECTURA A0
      
      #define AGUA_DIR 780.0
      #define AGUA_INV 160.0
      #define AIRE_DIR 0.0
      #define AIRE_INV 1023.0
      #define TIEMPO_LECTURA 5
      #define SLEEP_TIME_1h 3132000 // 1 h = 1*60*60000 = 3600000 ms -13% = 3132000 ms(my arduinos show a delay of 8s/min = 13%)
      #define SLEEP_TIME_2h 6264000 // 2 h = 2*60*60000 = 7200000 ms -13% = 6264000 ms
      #define SLEEP_TIME_3h 9396000 // 3 h = 3*60*60000 = 10800000 ms -13% = 9396000 ms
      
      // Battery calibration (Li-ion)
      const float VccMin   = 3.0;                         // Minimum expected Vcc level, in Volts.
      const float VccMax   = 4.2;                         // Maximum expected Vcc level, in Volts.
      const float VccCorrection = 3.82/3.74;              // Measured Vcc by multimeter divided by reported Vcc
      
      #define CHILD_MOIST_ID 1
      MyMessage msgmoist(CHILD_MOIST_ID, V_LEVEL);
      Vcc vcc(VccCorrection);
      
      float oldresultcb=0;
      int oldbat=0, count=0;
      
      void presentation(){
        Serial.begin(115200);
        sendSketchInfo("Sensor de humedad", VERSION);
        present(CHILD_MOIST_ID, S_MOISTURE, "Humedad suelo");
        analogReference(DEFAULT);
        pinMode(PIN_LECTURA, INPUT);
        pinMode(PIN_ALIM1, OUTPUT);
        pinMode(PIN_ALIM2, OUTPUT);
      }
      
      void loop()
      {
        unsigned int value1, value2;
        float result1, result2, resultp, resultcb;
      
      //Measurement of moisture
        wait(TIEMPO_LECTURA);
        digitalWrite(PIN_ALIM1, HIGH);
        digitalWrite(PIN_ALIM2, LOW);
        wait(TIEMPO_LECTURA);
        value1=analogRead(PIN_LECTURA);
        result1=constrain(value1/(AGUA_DIR-AIRE_DIR)*100.0, 1, 100);
      
        digitalWrite(PIN_ALIM1, LOW);
        digitalWrite(PIN_ALIM2, HIGH);
        wait(TIEMPO_LECTURA);
        value2=analogRead(PIN_LECTURA);
        digitalWrite(PIN_ALIM1, LOW);
        digitalWrite(PIN_ALIM2, LOW);
        result2=constrain(100-(value2-AGUA_INV)/(AIRE_INV-AGUA_INV)*100.0,1,100);
      
      /*Conversion from % moisture to cb taken from http://lieth.ucdavis.edu/Research/tens/98/SmtPub.htm
      Another option https://www.researchgate.net/figure/260321179_fig1_Fig-1-Relation-curve-between-water-tension-cb-and-soil-moisture-percentage
      The scale used in Domoticz is explained here http://www.irrometer.com/basics.html and can be checked in file domoticz/main/RFXNames.cpp
        0-10 Saturated Soil. Occurs for a day or two after irrigation 
        10-20 Soil is adequately wet (except coarse sands which are drying out at this range) 
        20-60 Usual range to irrigate or water (most soils except heavy clay soils). 
        60-100 Usual range to irrigate heavy clay soils 
        100-200 Soil is becoming dangerously dry
      */
        resultp=(result1+result2)/2.0;
        resultcb=constrain(square((-2.96699+351.395/resultp)),0,200);                           //Equation fit using stat software
        count++;
        
      //Send the data
        if ((oldresultcb!=resultcb) || (count==4)) send(msgmoist.set((unsigned int)resultcb));
      
      //Measure battery voltage here since it has been under change recently (more reliable)
        float v = vcc.Read_Volts();  
        int p = vcc.Read_Perc(VccMin, VccMax);
        p=constrain(p,0,100);
        if ((p!=oldbat) || (count==4)) sendBatteryLevel(p);
      
      //Save the last values and reset the counter
        oldresultcb=resultcb;
        oldbat=p;
        if (count==4) count=0;
      
      #ifdef MY_DEBUG
        Serial << "Value1=" << value1 << " " << result1 << endl << "Value2=" << value2 << " " << result2 << endl << "Result = " << resultp << "% (" << resultcb << "cb)" << endl;
        Serial << "VCC = " << v << " Volts" << endl << "VCC% = " << p << " %" << endl;
      #endif
      
        sleep(SLEEP_TIME_2h, true);  
        }
      

      And this is how it looks in Domoticz:

      alt text

      I hope this helps.

      posted in Announcements
      manutremo
      manutremo
    • RE: What does --my-is-rfm69hw do?

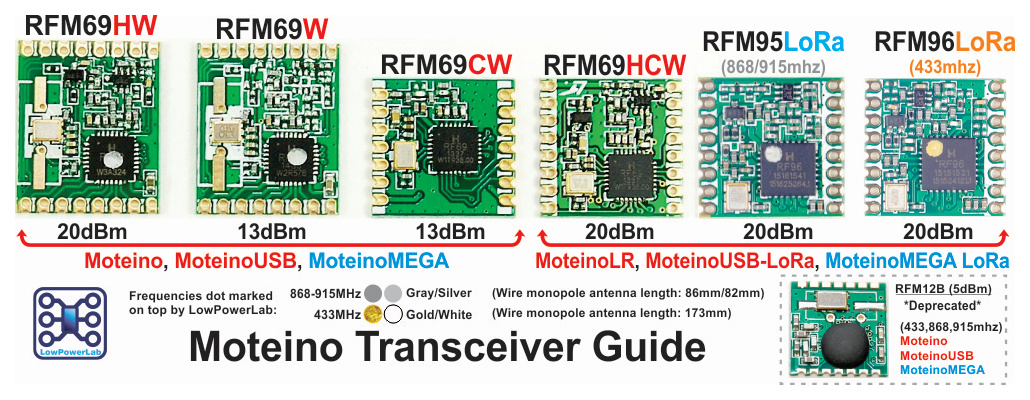
      @SquareKinematics If everything was working well before changing fom MQTT to TCP, and the flag was introduced together with that change, then you most likely have a non hw rfm69 module. That flag is only needed when the rfm69 module is hw type.

      You can see in this image the differences between the two boards so you can check.

      alt text

      posted in General Discussion
      manutremo
      manutremo
    • RE: ๐Ÿ’ฌ Connecting the Radio

      I would not expect anyone to put or take responsability on anyone for a piece of advice. I think we are here to help each other by sharing information and our own experiences.

      The full picture should be more than clear at this point for anyone reading this and other threads, but I will clarify once more. Best practice is using the rfm69 family with a logic level converter when connected with a 5v arduino, given that as of today the manufacturer's datasheet is not 100% clear on this area. From a problem solving perspective, keep in mind, however, that should a converter not be in place for any reason, the setup might or might not work, so if it doesn't don't discard it as a cause but don't take it for granted at 100%. And even if it works, do plan for adding a converter.

      posted in Announcements
      manutremo
      manutremo
    • RE: FOTA flow in sleeping nodes - need two cycles?

      @tekka Tested the new library and both issues seem to be gone now, great job ! ๐Ÿ‘

      I have one more question though ๐Ÿ™‚

      During testing I treid to put things difficult for my radios and move them until reception started to be bad. At some point the FOTA process gave up with a FW UPD FAIL message (line 41146 in attached log). So the node gave up and went to sleep. I was expecting it to try again after wake-up, but it didn't (see lines after 43589).

      36734 !RFM69:SWR:NACK
      36737 RFM69:PTX:NO ADJ
      36771 RFM69:SWR:SEND,TO=0,RETRY=5
      36966 RFM69:SWR:ACK,FROM=0,SEQ=119,RSSI=-55
      36972 RFM69:ATC:ADJ TXL,cR=-55,tR=-80,TXL=12
      36976 RFM69:PTX:LEVEL=12 dBm
      36978 TSF:MSG:SEND,22-22-0-0,s=255,c=4,t=2,pt=6,l=6,sg=0,ft=0,st=OK:010001002005
      36988 OTA:FRQ:FW REQ,T=0001,V=0001,B=0520
      36993 RFM69:SWR:SEND,TO=0,RETRY=0
      37203 !RFM69:SWR:NACK
      37206 RFM69:PTX:LEVEL=13 dBm
      37216 RFM69:SWR:SEND,TO=0,RETRY=1
      37423 !RFM69:SWR:NACK
      37425 RFM69:PTX:NO ADJ
      37459 RFM69:SWR:SEND,TO=0,RETRY=2
      37666 !RFM69:SWR:NACK
      37668 RFM69:PTX:NO ADJ
      37679 RFM69:SWR:SEND,TO=0,RETRY=3
      37885 !RFM69:SWR:NACK
      37888 RFM69:PTX:NO ADJ
      37922 RFM69:SWR:SEND,TO=0,RETRY=4
      38129 !RFM69:SWR:NACK
      38131 RFM69:PTX:NO ADJ
      38174 RFM69:SWR:SEND,TO=0,RETRY=5
      38313 RFM69:SWR:ACK,FROM=0,SEQ=120,RSSI=-56
      38318 RFM69:ATC:ADJ TXL,cR=-56,tR=-80,TXL=12
      38322 RFM69:PTX:LEVEL=12 dBm
      38326 TSF:MSG:SEND,22-22-0-0,s=255,c=4,t=2,pt=6,l=6,sg=0,ft=0,st=OK:010001002005
      38334 OTA:FRQ:FW REQ,T=0001,V=0001,B=0520
      38338 RFM69:SWR:SEND,TO=0,RETRY=0
      38547 !RFM69:SWR:NACK
      38549 RFM69:PTX:LEVEL=13 dBm
      38559 RFM69:SWR:SEND,TO=0,RETRY=1
      38768 !RFM69:SWR:NACK
      38770 RFM69:PTX:NO ADJ
      38805 RFM69:SWR:SEND,TO=0,RETRY=2
      39012 !RFM69:SWR:NACK
      39014 RFM69:PTX:NO ADJ
      39024 RFM69:SWR:SEND,TO=0,RETRY=3
      39231 !RFM69:SWR:NACK
      39233 RFM69:PTX:NO ADJ
      39268 RFM69:SWR:SEND,TO=0,RETRY=4
      39475 !RFM69:SWR:NACK
      39477 RFM69:PTX:NO ADJ
      39520 RFM69:SWR:SEND,TO=0,RETRY=5
      39702 RFM69:SWR:ACK,FROM=0,SEQ=121,RSSI=-54
      39706 RFM69:ATC:ADJ TXL,cR=-54,tR=-80,TXL=12
      39712 RFM69:PTX:LEVEL=12 dBm
      39714 TSF:MSG:SEND,22-22-0-0,s=255,c=4,t=2,pt=6,l=6,sg=0,ft=0,st=OK:010001002005
      39723 OTA:FRQ:FW REQ,T=0001,V=0001,B=0520
      39729 RFM69:SWR:SEND,TO=0,RETRY=0
      39938 !RFM69:SWR:NACK
      39940 RFM69:PTX:LEVEL=13 dBm
      39983 RFM69:SWR:SEND,TO=0,RETRY=1
      40192 !RFM69:SWR:NACK
      40194 RFM69:PTX:NO ADJ
      40228 RFM69:SWR:SEND,TO=0,RETRY=2
      40435 !RFM69:SWR:NACK
      40437 RFM69:PTX:NO ADJ
      40480 RFM69:SWR:SEND,TO=0,RETRY=3
      40687 !RFM69:SWR:NACK
      40689 RFM69:PTX:NO ADJ
      40724 RFM69:SWR:SEND,TO=0,RETRY=4
      40931 !RFM69:SWR:NACK
      40933 RFM69:PTX:NO ADJ
      40943 RFM69:SWR:SEND,TO=0,RETRY=5
      41125 RFM69:SWR:ACK,FROM=0,SEQ=122,RSSI=-54
      41129 RFM69:ATC:ADJ TXL,cR=-54,tR=-80,TXL=12
      41134 RFM69:PTX:LEVEL=12 dBm
      41138 TSF:MSG:SEND,22-22-0-0,s=255,c=4,t=2,pt=6,l=6,sg=0,ft=0,st=OK:010001002005
      41146 !OTA:FRQ:FW UPD FAIL
      41299 RFM69:SWR:SEND,TO=0,RETRY=0
      41506 !RFM69:SWR:NACK
      41508 RFM69:PTX:LEVEL=13 dBm
      41519 RFM69:SWR:SEND,TO=0,RETRY=1
      41725 !RFM69:SWR:NACK
      41728 RFM69:PTX:NO ADJ
      41762 RFM69:SWR:SEND,TO=0,RETRY=2
      41969 !RFM69:SWR:NACK
      41971 RFM69:PTX:NO ADJ
      42014 RFM69:SWR:SEND,TO=0,RETRY=3
      42221 !RFM69:SWR:NACK
      42223 RFM69:PTX:NO ADJ
      42258 RFM69:SWR:SEND,TO=0,RETRY=4
      42465 !RFM69:SWR:NACK
      42467 RFM69:PTX:NO ADJ
      42477 RFM69:SWR:SEND,TO=0,RETRY=5
      42684 !RFM69:SWR:NACK
      42686 RFM69:PTX:NO ADJ
      42721 !TSF:MSG:SEND,22-22-0-0,s=1,c=1,t=16,pt=1,l=1,sg=0,ft=0,st=NACK:0
      42729 RFM69:SWR:SEND,TO=0,RETRY=0
      42950 !RFM69:SWR:NACK
      42952 RFM69:PTX:NO ADJ
      42995 RFM69:SWR:SEND,TO=0,RETRY=1
      43005 RFM69:SWR:ACK,FROM=0,SEQ=124,RSSI=-55
      43010 RFM69:ATC:ADJ TXL,cR=-55,tR=-80,TXL=12
      43014 RFM69:PTX:LEVEL=12 dBm
      43018 TSF:MSG:SEND,22-22-0-0,s=255,c=3,t=0,pt=1,l=1,sg=0,ft=1,st=OK:20
      No detection
      43026 MCO:SLP:MS=30000,SMS=1,I1=1,M1=1,I2=255,M2=255
      43030 RFM69:SWR:SEND,TO=0,RETRY=0
      43065 RFM69:SWR:ACK,FROM=0,SEQ=125,RSSI=-56
      43069 RFM69:ATC:ADJ TXL,cR=-56,tR=-80,TXL=11
      43075 RFM69:PTX:LEVEL=11 dBm
      43077 TSF:MSG:SEND,22-22-0-0,s=255,c=3,t=32,pt=5,l=4,sg=0,ft=0,st=OK:500
      43585 TSF:TDI:TSL
      43587 RFM69:RSL
      43589 MCO:SLP:WUP=-1
      43591 TSF:TRI:TSB
      43593 RFM69:RSB
      43595 RFM69:SWR:SEND,TO=0,RETRY=0
      43606 RFM69:SWR:ACK,FROM=0,SEQ=126,RSSI=-56
      43610 RFM69:ATC:ADJ TXL,cR=-56,tR=-80,TXL=10
      43616 RFM69:PTX:LEVEL=10 dBm
      43618 TSF:MSG:SEND,22-22-0-0,s=255,c=3,t=33,pt=5,l=4,sg=0,ft=0,st=OK:30000
      43778 RFM69:SWR:SEND,TO=0,RETRY=0
      43788 RFM69:SWR:ACK,FROM=0,SEQ=127,RSSI=-59
      43792 RFM69:ATC:ADJ TXL,cR=-59,tR=-80,TXL=9
      43796 RFM69:PTX:LEVEL=9 dBm
      

      So when this occurs the only way I can think of to force another update would be update the sketch, refresh the repo in MysController and assign it to the node again. Therefore I wonder if this is intended behaviour and if so, if there is some other way to force an update after a failed one.

      Thanks.

      posted in General Discussion
      manutremo
      manutremo
    • RE: NRF24 / RFM69????

      @Roloz I guess you are refering to the 3.3v output on the Nano. There are two issues with this:

      • the Nano IO ports are still using 5v levels. Nrf24 is 5v/3.3v tolerant, but rfm69 is not, so you will need to use a converter.

      • if you are using one of the high power versions of the rfm69 and using the high power settings, the Nano might not be able to provide the necessary power.

      If rfm69 is your choice (it is mine) using a 3.3v mini pro really simplifies things.

      posted in Hardware
      manutremo
      manutremo
    • RE: V_LEVEL in Domoticz [resolved]

      @alexsh1 yes it is.

      posted in Domoticz
      manutremo
      manutremo
    • RE: OTA firmware updating is too slow..

      No wonder, I think I found the way... I found there is a function isFirmwareUpdateOngoing() in MyOTAFirmwareUpdate.cpp that seems to provide that functionality in a much easier way ๐Ÿ‘

      posted in Bug Reports
      manutremo
      manutremo
    • RE: RFM69 sleep mode

      Hi @peres,

      My RFM69HW current during sleep is less than 1 uA aprox, which is consistent with what is shown in the datasheet. Interestingly, this is the result when powering the device with a battery; when powering the device from the PC USB serial, it's around 6 uA - still close enough as it's measured with a "normal" multimeter.

      I'Which version of mysensors are you using? I've moved to 2.2.0-beta (due to me needing other functionalities not availabel in 2.1.1, namely ATC which btw works fabulously) and found that support for nrf69 is - although not yet 100% completed - significantly improved. Maybe worth a try to see if that fixes your sleep consumption?

      Remember adding

      #define MY_RFM69_NEW_DRIVER
      

      to enable the new driver.

      Let us know how it goes ๐Ÿ™‚

      posted in General Discussion
      manutremo
      manutremo
    • RE: OTA flash types for MySensors

      @Nca78 Thanks for the hint. I actually purchased from this seller who is chaper:

      http://www.ebay.es/itm/Module-De-Memoire-Dinterface-1Pcs-Spi-W25q32b-Haute-Capacite-Ic-Nouveau-K-/162656857086?hash=item25df1aabfe:g:1Z8AAOSwSblZqs0q

      While the ebay seller shipped for free, Aliexpress would charge me 1.24โ‚ฌ for shipping to my country so the total price would be 2.63, significantly more expensive.

      Many thanks anyways!

      posted in Hardware
      manutremo
      manutremo
    • RE: OTA firmware updating is too slow..

      If I understood correctly, it should as simple as in loop:

      if (!isFirmwareUpdateOngoing()) {
      <do whatever>
      }

      but for the moment take it with a pinch of salt...

      posted in Bug Reports
      manutremo
      manutremo
    • FOTA flow in sleeping nodes - need two cycles?

      I've finally managed to get my RFM69 radios working almost 100% and am testing FOTA on my battery powered nodes.

      These nodes sleep for 3h, wake up, do some processing, and then go back to sleep.

      The summarized sketch is as follows:

      void loop()
      {
        if (!isFirmwareUpdateOngoing()) {
      
           < read sensors and do the processing>
      
          sleep(SLEEP_TIME_3h, true);
        }
      

      When I upload a new fw to MYSController, the new fw is detected and the download appears to start for a few lines, but then the node goes to sleep and the update doesn't continue until the next wake-up cycle. This is the node log:

      0 MCO:BGN:INIT NODE,CP=RPONA---,VER=2.2.0-rc.1
      4 TSM:INIT
      4 TSF:WUR:MS=0
      8 TSM:INIT:TSP OK
      10 TSF:SID:OK,ID=8
      12 TSM:FPAR
      12 TSM:FPAR:STATP=0
      14 TSM:ID
      16 TSM:ID:OK
      18 TSM:UPL
      24 TSF:MSG:SEND,8-8-0-0,s=255,c=3,t=24,pt=1,l=1,sg=0,ft=0,st=OK:1
      45 TSF:MSG:READ,0-0-8,s=255,c=3,t=25,pt=1,l=1,sg=0:1
      49 TSF:MSG:PONG RECV,HP=1
      53 TSM:UPL:OK
      55 TSM:READY:ID=8,PAR=0,DIS=1
      65 TSF:MSG:SEND,8-8-0-0,s=255,c=4,t=0,pt=6,l=10,sg=0,ft=0,st=OK:03000000400547620300
      133 TSF:MSG:SEND,8-8-0-0,s=255,c=3,t=15,pt=6,l=2,sg=0,ft=0,st=OK:0100
      145 TSF:MSG:READ,0-0-8,s=255,c=3,t=15,pt=6,l=2,sg=0:0100
      159 TSF:MSG:SEND,8-8-0-0,s=255,c=0,t=17,pt=0,l=10,sg=0,ft=0,st=OK:2.2.0-rc.1
      225 TSF:MSG:SEND,8-8-0-0,s=255,c=3,t=6,pt=1,l=1,sg=0,ft=0,st=OK:0
      258 TSF:MSG:READ,0-0-8,s=255,c=3,t=6,pt=0,l=1,sg=0:M
      272 TSF:MSG:SEND,8-8-0-0,s=255,c=3,t=11,pt=0,l=17,sg=0,ft=0,st=OK:Sensor de humedad
      337 TSF:MSG:SEND,8-8-0-0,s=255,c=3,t=12,pt=0,l=3,sg=0,ft=0,st=OK:3.0
      446 TSF:MSG:SEND,8-8-0-0,s=1,c=0,t=35,pt=0,l=13,sg=0,ft=0,st=OK:Humedad suelo
      454 MCO:REG:REQ
      509 TSF:MSG:SEND,8-8-0-0,s=255,c=3,t=26,pt=1,l=1,sg=0,ft=0,st=OK:2
      524 TSF:MSG:READ,0-0-8,s=255,c=3,t=27,pt=1,l=1,sg=0:1
      530 MCO:PIM:NODE REG=1
      534 MCO:BGN:STP
      534 MCO:BGN:INIT OK,TSP=1
      540 TSF:MSG:READ,0-0-8,s=255,c=3,t=6,pt=0,l=1,sg=0:M
      737 TSF:MSG:SEND,8-8-0-0,s=1,c=1,t=37,pt=3,l=2,sg=0,ft=0,st=OK:0
      804 TSF:MSG:SEND,8-8-0-0,s=255,c=3,t=0,pt=1,l=1,sg=0,ft=0,st=OK:25
      Value1=775 96.87
      Value2=185 97.10
      Result = 96.99% (0.43cb)
      VCC = 3.30 Volts
      VCC% = 25 %
      819 MCO:SLP:MS=30000,SMS=1,I1=255,M1=255,I2=255,M2=255
      868 TSF:MSG:SEND,8-8-0-0,s=255,c=3,t=32,pt=5,l=4,sg=0,ft=0,st=OK:500
      899 TSF:MSG:READ,0-0-8,s=0,c=4,t=1,pt=6,l=8,sg=0:0300000040054396
      907 OTA:FWP:UPDATE
      909 OTA:FRQ:FW REQ,T=0003,V=0000,B=053F
      921 TSF:MSG:SEND,8-8-0-0,s=255,c=4,t=2,pt=6,l=6,sg=0,ft=0,st=OK:030000003F05
      958 TSF:MSG:READ,0-0-8,s=255,c=4,t=3,pt=6,l=22,sg=0:030000003F05FFFFFFFFFFFFFFFFFFFFFFFFFFFFFFFF
      968 OTA:FWP:RECV B=053F
      976 OTA:FRQ:FW REQ,T=0003,V=0000,B=053E
      989 TSF:MSG:SEND,8-8-0-0,s=255,c=4,t=2,pt=6,l=6,sg=0,ft=0,st=OK:030000003E05
      1026 TSF:MSG:READ,0-0-8,s=255,c=4,t=3,pt=6,l=22,sg=0:030000003E05003F002100322E322E302D72632E3100
      1036 OTA:FWP:RECV B=053E
      1042 OTA:FRQ:FW REQ,T=0003,V=0000,B=053D
      1054 TSF:MSG:SEND,8-8-0-0,s=255,c=4,t=2,pt=6,l=6,sg=0,ft=0,st=OK:030000003D05
      1093 TSF:MSG:READ,0-0-8,s=255,c=4,t=3,pt=6,l=22,sg=0:030000003D05003C4E4F4E43453E004F4B004E41434B
      1103 OTA:FWP:RECV B=053D
      1110 OTA:FRQ:FW REQ,T=0003,V=0000,B=053C
      1122 TSF:MSG:SEND,8-8-0-0,s=255,c=4,t=2,pt=6,l=6,sg=0,ft=0,st=OK:030000003C05
      1155 TSF:MSG:READ,0-0-8,s=255,c=4,t=3,pt=6,l=22,sg=0:030000003C0525000D0A006E616E00696E66006F7666
      1165 OTA:FWP:RECV B=053C
      1171 OTA:FRQ:FW REQ,T=0003,V=0000,B=053B
      1183 TSF:MSG:SEND,8-8-0-0,s=255,c=4,t=2,pt=6,l=6,sg=0,ft=0,st=OK:030000003B05
      1216 TSF:MSG:READ,0-0-8,s=255,c=4,t=3,pt=6,l=22,sg=0:030000003B0520566F6C74730056434325203D200020
      1226 OTA:FWP:RECV B=053B
      1234 OTA:FRQ:FW REQ,T=0003,V=0000,B=053A
      1247 TSF:MSG:SEND,8-8-0-0,s=255,c=4,t=2,pt=6,l=6,sg=0,ft=0,st=OK:030000003A05
      1286 TSF:MSG:READ,0-0-8,s=255,c=4,t=3,pt=6,l=22,sg=0:030000003A05002520280063622900564343203D2000
      1296 OTA:FWP:RECV B=053A
      1302 OTA:FRQ:FW REQ,T=0003,V=0000,B=0539
      1314 TSF:MSG:SEND,8-8-0-0,s=255,c=4,t=2,pt=6,l=6,sg=0,ft=0,st=OK:030000003905
      1349 TSF:MSG:READ,0-0-8,s=255,c=4,t=3,pt=6,l=22,sg=0:030000003905616C7565323D00526573756C74203D20
      1359 OTA:FWP:RECV B=0539
      1366 OTA:FRQ:FW REQ,T=0003,V=0000,B=0538
      1376 TSF:MSG:SEND,8-8-0-0,s=255,c=4,t=2,pt=6,l=6,sg=0,ft=0,st=OK:030000003805
      1384 TSF:TDI:TSL
      1388 MCO:SLP:WUP=-1
      1390 TSF:TRI:TSB
      1398 TSF:MSG:SEND,8-8-0-0,s=255,c=3,t=33,pt=5,l=4,sg=0,ft=0,st=OK:30000
      1867 OTA:FRQ:FW REQ,T=0003,V=0000,B=0538
      1878 TSF:MSG:SEND,8-8-0-0,s=255,c=4,t=2,pt=6,l=6,sg=0,ft=0,st=OK:030000003805
      1914 TSF:MSG:READ,0-0-8,s=255,c=4,t=3,pt=6,l=22,sg=0:030000003805207375656C6F0056616C7565313D0056
      1925 OTA:FWP:RECV B=0538
      1931 OTA:FRQ:FW REQ,T=0003,V=0000,B=0537
      1943 TSF:MSG:SEND,8-8-0-0,s=255,c=4,t=2,pt=6,l=6,sg=0,ft=0,st=OK:030000003705
      1978 TSF:MSG:READ,0-0-8,s=255,c=4,t=3,pt=6,l=22,sg=0:0300000037056564616400332E300048756D65646164
      1988 OTA:FWP:RECV B=0537
      1996 OTA:FRQ:FW REQ,T=0003,V=0000,B=0536
      2009 TSF:MSG:SEND,8-8-0-0,s=255,c=4,t=2,pt=6,l=6,sg=0,ft=0,st=OK:030000003605
      2045 TSF:MSG:READ,0-0-8,s=255,c=4,t=3,pt=6,l=22,sg=0:03000000360507010353656E736F722064652068756D
      2056 OTA:FWP:RECV B=0536
      2062 OTA:FRQ:FW REQ,T=0003,V=0000,B=0535
      2074 TSF:MSG:SEND,8-8-0-0,s=255,c=4,t=2,pt=6,l=6,sg=0,ft=0,st=OK:030000003505
      2111 TSF:MSG:READ,0-0-8,s=255,c=4,t=3,pt=6,l=22,sg=0:03000000350507070707070707070707070707070707
      2121 OTA:FWP:RECV B=0535
      2127 OTA:FRQ:FW REQ,T=0003,V=0000,B=0534
      2140 TSF:MSG:SEND,8-8-0-0,s=255,c=4,t=2,pt=6,l=6,sg=0,ft=0,st=OK:030000003405
      2174 TSF:MSG:READ,0-0-8,s=255,c=4,t=3,pt=6,l=22,sg=0:03000000340507000204060707070707070707070707
      2185 OTA:FWP:RECV B=0534
      2191 OTA:FRQ:FW REQ,T=0003,V=0000,B=0533
      2203 TSF:MSG:SEND,8-8-0-0,s=255,c=4,t=2,pt=6,l=6,sg=0,ft=0,st=OK:030000003305
      2238 TSF:MSG:READ,0-0-8,s=255,c=4,t=3,pt=6,l=22,sg=0:03000000330500AE0A7E0ADE0A520A760A620A530A05
      2248 OTA:FWP:RECV B=0533
      2256 OTA:FRQ:FW REQ,T=0003,V=0000,B=0532
      2269 TSF:MSG:SEND,8-8-0-0,s=255,c=4,t=2,pt=6,l=6,sg=0,ft=0,st=OK:030000003205
      2304 TSF:MSG:READ,0-0-8,s=255,c=4,t=3,pt=6,l=22,sg=0:0300000032051151117C112B12AD118B119F11000000
      2314 OTA:FWP:RECV B=0532
      2320 OTA:FRQ:FW REQ,T=0003,V=0000,B=0531
      2332 TSF:MSG:SEND,8-8-0-0,s=255,c=4,t=2,pt=6,l=6,sg=0,ft=0,st=OK:030000003105
      2371 TSF:MSG:READ,0-0-8,s=255,c=4,t=3,pt=6,l=22,sg=0:030000003105FF3AFF3C053D106F30FF0000000000E4
      2381 OTA:FWP:RECV B=0531
      2387 OTA:FRQ:FW REQ,T=0003,V=0000,B=0530
      2400 TSF:MSG:SEND,8-8-0-0,s=255,c=4,t=2,pt=6,l=6,sg=0,ft=0,st=OK:030000003005
      2433 TSF:MSG:READ,0-0-8,s=255,c=4,t=3,pt=6,l=22,sg=0:030000003005DC2C002D032E882F2D306437D4384239
      2443 OTA:FWP:RECV B=0530
      2449 OTA:FRQ:FW REQ,T=0003,V=0000,B=052F
      2461 TSF:MSG:SEND,8-8-0-0,s=255,c=4,t=2,pt=6,l=6,sg=0,ft=0,st=OK:030000002F05
      2496 TSF:MSG:READ,0-0-8,s=255,c=4,t=3,pt=6,l=22,sg=0:030000002F0502044005030633188819422607281029
      2506 OTA:FWP:RECV B=052F
      2514 OTA:FRQ:FW REQ,T=0003,V=0000,B=052E
      2527 TSF:MSG:SEND,8-8-0-0,s=255,c=4,t=2,pt=6,l=6,sg=0,ft=0,st=OK:030000002E05
      2562 TSF:MSG:READ,0-0-8,s=255,c=4,t=3,pt=6,l=22,sg=0:030000002E05FF1F0A1F0A01FFF709CF080104020003
      2574 OTA:FWP:RECV B=052E
      2580 OTA:FRQ:FW REQ,T=0003,V=0000,B=052D
      2590 TSF:MSG:SEND,8-8-0-0,s=255,c=4,t=2,pt=6,l=6,sg=0,ft=0,st=OK:030000002D05
      2625 TSF:MSG:READ,0-0-8,s=255,c=4,t=3,pt=6,l=22,sg=0:030000002D056C084208A40856042708D407A8079507
      2635 OTA:FWP:RECV B=052D
      2641 OTA:FRQ:FW REQ,T=0003,V=0000,B=052C
      2654 TSF:MSG:SEND,8-8-0-0,s=255,c=4,t=2,pt=6,l=6,sg=0,ft=0,st=OK:030000002C05
      2689 TSF:MSG:READ,0-0-8,s=255,c=4,t=3,pt=6,l=22,sg=0:030000002C055040E0F70895F894FFCFFFFF5A073207
      2701 OTA:FWP:RECV B=052C
      2705 OTA:FRQ:FW REQ,T=0003,V=0000,B=052B
      2717 TSF:MSG:SEND,8-8-0-0,s=255,c=4,t=2,pt=6,l=6,sg=0,ft=0,st=OK:030000002B05
      2797 TSF:MSG:READ,0-0-8,s=255,c=4,t=3,pt=6,l=22,sg=0:030000002B0548F001900D920020C9F701C01D924150
      2807 OTA:FWP:RECV B=052B
      2818 OTA:FRQ:FW REQ,T=0003,V=0000,B=052A
      2828 TSF:MSG:SEND,8-8-0-0,s=255,c=4,t=2,pt=6,l=6,sg=0,ft=0,st=OK:030000002A05
      2928 TSF:MSG:READ,0-0-8,s=255,c=4,t=3,pt=6,l=22,sg=0:030000002A0541505040D8F70895FB01DC0141505040
      2938 OTA:FWP:RECV B=052A
      <continues>
      

      As can be seen, the node starts, presents itself, etc, does the first processing cycle, and arrives to the sleep instruction (line 819, sleep time reduced to 30s to speed testing). Then some CRC seems to be exchanged with the gw, and it is determined that an fota is needed (line 907). Then some blocks of code are received until the node goes to sleep after receving block 0538 (line 1384). When it returns (line 1388), the update continues with the same block and from there on to the end of the update.

      As a side to this, I've capture occasions where the node determined that no fw update was necessary, went to sleep, and then did an update after waking up, like in this case:

      942 MCO:SLP:MS=30000,SMS=1,I1=255,M1=255,I2=255,M2=255
      993 TSF:MSG:SEND,8-8-0-0,s=255,c=3,t=32,pt=5,l=4,sg=0,ft=0,st=OK:500
      1021 TSF:MSG:READ,0-0-8,s=0,c=4,t=1,pt=6,l=8,sg=0:0300000040054396
      1028 OTA:FWP:UPDATE
      1030 OTA:FRQ:FW REQ,T=0003,V=0000,B=053F
      1042 TSF:MSG:SEND,8-8-0-0,s=255,c=4,t=2,pt=6,l=6,sg=0,ft=0,st=OK:030000003F05
      1071 TSF:MSG:READ,0-0-8,s=0,c=4,t=1,pt=6,l=8,sg=0:0300000040054396
      1077 OTA:FWP:UPDATE SKIPPED
      1089 TSF:MSG:READ,0-0-8,s=0,c=4,t=1,pt=6,l=8,sg=0:0300000040054396
      1097 OTA:FWP:UPDATE SKIPPED
      1501 TSF:TDI:TSL
      1503 MCO:SLP:WUP=-1
      1505 TSF:TRI:TSB
      1513 TSF:MSG:SEND,8-8-0-0,s=255,c=3,t=33,pt=5,l=4,sg=0,ft=0,st=OK:30000
      1531 OTA:FRQ:FW REQ,T=0003,V=0000,B=053F
      1581 TSF:MSG:SEND,8-8-0-0,s=255,c=4,t=2,pt=6,l=6,sg=0,ft=0,st=OK:030000003F05
      1615 TSF:MSG:READ,0-0-8,s=255,c=4,t=3,pt=6,l=22,sg=0:030000003F05FFFFFFFFFFFFFFFFFFFFFFFFFFFFFFFF
      1626 OTA:FWP:RECV B=053F
      1636 OTA:FRQ:FW REQ,T=0003,V=0000,B=053E
      1646 TSF:MSG:SEND,8-8-0-0,s=255,c=4,t=2,pt=6,l=6,sg=0,ft=0,st=OK:030000003E05
      1681 TSF:MSG:READ,0-0-8,s=255,c=4,t=3,pt=6,l=22,sg=0:030000003E05003F002100322E322E302D72632E3100
      1693 OTA:FWP:RECV B=053E
      1697 OTA:FRQ:FW REQ,T=0003,V=0000,B=053D
      1710 TSF:MSG:SEND,8-8-0-0,s=255,c=4,t=2,pt=6,l=6,sg=0,ft=0,st=OK:030000003D05
      1980 TSF:MSG:READ,0-0-8,s=255,c=4,t=3,pt=6,l=22,sg=0:030000003D05003C4E4F4E43453E004F4B004E41434B
      1992 OTA:FWP:RECV B=053D
      1996 OTA:FRQ:FW REQ,T=0003,V=0000,B=053C
      2009 TSF:MSG:SEND,8-8-0-0,s=255,c=4,t=2,pt=6,l=6,sg=0,ft=0,st=OK:030000003C05
      2048 TSF:MSG:READ,0-0-8,s=255,c=4,t=3,pt=6,l=22,sg=0:030000003C0525000D0A006E616E00696E66006F7666
      2058 OTA:FWP:RECV B=053C
      2064 OTA:FRQ:FW REQ,T=0003,V=0000,B=053B
      2076 TSF:MSG:SEND,8-8-0-0,s=255,c=4,t=2,pt=6,l=6,sg=0,ft=0,st=OK:030000003B05
      2111 TSF:MSG:READ,0-0-8,s=255,c=4,t=3,pt=6,l=22,sg=0:030000003B0520566F6C74730056434325203D200020
      2121 OTA:FWP:RECV B=053B
      2129 OTA:FRQ:FW REQ,T=0003,V=0000,B=053A
      2142 TSF:MSG:SEND,8-8-0-0,s=255,c=4,t=2,pt=6,l=6,sg=0,ft=0,st=OK:030000003A05
      2416 TSF:MSG:READ,0-0-8,s=255,c=4,t=3,pt=6,l=22,sg=0:030000003A05002520280063622900564343203D2000
      2426 OTA:FWP:RECV B=053A
      2433 OTA:FRQ:FW REQ,T=0003,V=0000,B=0539
      2445 TSF:MSG:SEND,8-8-0-0,s=255,c=4,t=2,pt=6,l=6,sg=0,ft=0,st=OK:030000003905
      2484 TSF:MSG:READ,0-0-8,s=255,c=4,t=3,pt=6,l=22,sg=0:030000003905616C7565323D00526573756C74203D20
      2494 OTA:FWP:RECV B=0539
      

      Lines 1077 (and 1097 again for some reason) indicate UPDATE SKIPPED; the node goes to sleep, but then an update is launched after wake-up.

      Of course, no changes in the ino.hex file were done while the node was sleeping.

      Would this be expected behaviour or is there some inconsistency? The fact that the firmware update needs to wait until the next wake-up cycle is very inconvenient in this scenario where the node sleeps for hours.

      Alternatively is there some detailed description of the FOTA update process flow where I can try to understand?

      Thanks.

      posted in General Discussion
      manutremo
      manutremo
    • RE: What are these modules?

      I had those blobs modules in the past and returned them because they were fake (sold as nrf24L01). In fact, they worked quite well between them with the proper library; however they were unable to connect to genuine nrf24L01's.

      Those modules tend to contain chip Si24R1, which seems to be a copy of the legit nrf24L01's but they forgot (maybe intentionally?) a small detail which makes them incompatible. This is documented in many internet sites. I actually used those sites to support my claim to get my money returned. I remember I was able to find some library around which had been hacked to make them work, and some workarounds were even mentioned in this forum - see this.

      If they are not even able to connect with each other, the ones you received may just be 100% junk so you should just claim the seller for reimbursement.

      posted in Hardware
      manutremo
      manutremo
    • RE: OTA firmware updating is too slow..

      ok thanks for the clarification, I'm using a mini pro with a I2C memory, which is identified by the MYSController as a sensebender.

      posted in Bug Reports
      manutremo
      manutremo
    • RE: FOTA flow in sleeping nodes - need two cycles?

      By the way - following the above, I made a small modification to the sketch, compiled, etc. Myscontroller detected the new fw corectly and the update run fine at the next wake-up, with no SKIPPED messages.

      20987 MCO:SLP:MS=20000,SMS=1,I1=1,M1=1,I2=255,M2=255
      21041 TSF:MSG:SEND,22-22-0-0,s=255,c=3,t=32,pt=5,l=4,sg=0,ft=0,st=OK:500
      21073 TSF:MSG:READ,0-0-22,s=0,c=4,t=1,pt=6,l=8,sg=0:010001000005990D
      21082 OTA:FWP:UPDATE
      21084 OTA:FRQ:FW REQ,T=0001,V=0001,B=04FF
      21096 TSF:MSG:SEND,22-22-0-0,s=255,c=4,t=2,pt=6,l=6,sg=0,ft=0,st=OK:01000100FF04
      21135 TSF:MSG:READ,0-0-22,s=255,c=4,t=3,pt=6,l=22,sg=0:01000100FF04FFFFFFFFFFFFFFFFFFFFFFFFFFFFFFFF
      21145 OTA:FWP:RECV B=04FF
      21155 OTA:FRQ:FW REQ,T=0001,V=0001,B=04FE
      

      However I then modified the sketch again, uploaded it to Myscontroller, etc, but this time I reset the node. The log showed the UPDATE SKIPPED message again before starting the update.

      18 MCO:BGN:INIT NODE,CP=RPONA---,VER=2.2.0-rc.1
      28 TSM:INIT
      28 TSF:WUR:MS=0
      32 TSM:INIT:TSP OK
      34 TSM:INIT:STATID=22
      36 TSF:SID:OK,ID=22
      38 TSM:FPAR
      38 TSM:FPAR:STATP=0
      40 TSM:ID
      43 TSM:ID:OK
      45 TSM:UPL
      53 TSF:MSG:SEND,22-22-0-0,s=255,c=3,t=24,pt=1,l=1,sg=0,ft=0,st=OK:1
      71 TSF:MSG:READ,0-0-22,s=255,c=3,t=25,pt=1,l=1,sg=0:1
      77 TSF:MSG:PONG RECV,HP=1
      79 TSM:UPL:OK
      81 TSM:READY:ID=22,PAR=0,DIS=1
      94 TSF:MSG:SEND,22-22-0-0,s=255,c=4,t=0,pt=6,l=10,sg=0,ft=0,st=OK:010001000005990D0300
      161 TSF:MSG:SEND,22-22-0-0,s=255,c=3,t=15,pt=6,l=2,sg=0,ft=0,st=OK:0100
      172 TSF:MSG:READ,0-0-22,s=255,c=3,t=15,pt=6,l=2,sg=0:0100
      188 TSF:MSG:SEND,22-22-0-0,s=255,c=0,t=17,pt=0,l=10,sg=0,ft=0,st=OK:2.2.0-rc.1
      253 TSF:MSG:SEND,22-22-0-0,s=255,c=3,t=6,pt=1,l=1,sg=0,ft=0,st=OK:0
      282 TSF:MSG:READ,0-0-22,s=255,c=3,t=6,pt=0,l=1,sg=0:M
      299 TSF:MSG:SEND,22-22-0-0,s=255,c=3,t=11,pt=0,l=23,sg=0,ft=0,st=OK:Sensor de fugas de agua
      364 TSF:MSG:SEND,22-22-0-0,s=255,c=3,t=12,pt=0,l=3,sg=0,ft=0,st=OK:1.1
      428 TSF:MSG:SEND,22-22-0-0,s=1,c=0,t=32,pt=0,l=13,sg=0,ft=0,st=OK:Fugas de agua
      436 MCO:REG:REQ
      489 TSF:MSG:SEND,22-22-0-0,s=255,c=3,t=26,pt=1,l=1,sg=0,ft=0,st=OK:2
      505 TSF:MSG:READ,0-0-22,s=255,c=3,t=27,pt=1,l=1,sg=0:1
      512 MCO:PIM:NODE REG=1
      514 MCO:BGN:STP
      516 MCO:BGN:INIT OK,TSP=1
      675 TSF:MSG:SEND,22-22-0-0,s=1,c=1,t=16,pt=1,l=1,sg=0,ft=0,st=OK:0
      739 TSF:MSG:SEND,22-22-0-0,s=255,c=3,t=0,pt=1,l=1,sg=0,ft=0,st=OK:32
      No detection
      745 MCO:SLP:MS=30000,SMS=1,I1=1,M1=1,I2=255,M2=255
      802 TSF:MSG:SEND,22-22-0-0,s=255,c=3,t=32,pt=5,l=4,sg=0,ft=0,st=OK:500
      831 TSF:MSG:READ,0-0-22,s=0,c=4,t=1,pt=6,l=8,sg=0:0100010000057CC3
      839 OTA:FWP:UPDATE
      841 OTA:FRQ:FW REQ,T=0001,V=0001,B=04FF
      854 TSF:MSG:SEND,22-22-0-0,s=255,c=4,t=2,pt=6,l=6,sg=0,ft=0,st=OK:01000100FF04
      882 TSF:MSG:READ,0-0-22,s=0,c=4,t=1,pt=6,l=8,sg=0:0100010000057CC3
      888 OTA:FWP:UPDATE SKIPPED
      1220 TSF:MSG:READ,0-0-22,s=255,c=3,t=6,pt=0,l=1,sg=0:M
      1288 TSF:MSG:READ,0-0-22,s=255,c=4,t=3,pt=6,l=22,sg=0:01000100FF04FFFFFFFFFFFFFFFFFFFFFFFFFFFFFFFF
      1298 OTA:FWP:RECV B=04FF
      1308 OTA:FRQ:FW REQ,T=0001,V=0001,B=04FE
      1320 TSF:MSG:SEND,22-22-0-0,s=255,c=4,t=2,pt=6,l=6,sg=0,ft=0,st=OK:01000100FE04
      1329 TSF:TDI:TSL
      1331 MCO:SLP:WUP=-1
      1333 TSF:TRI:TSB
      1343 TSF:MSG:SEND,22-22-0-0,s=255,c=3,t=33,pt=5,l=4,sg=0,ft=0,st=OK:30000
      1810 OTA:FRQ:FW REQ,T=0001,V=0001,B=04FE
      1820 TSF:MSG:SEND,22-22-0-0,s=255,c=4,t=2,pt=6,l=6,sg=0,ft=0,st=OK:01000100FE04
      1859 TSF:MSG:READ,0-0-22,s=255,c=4,t=3,pt=6,l=22,sg=0:01000100FE04FFFFFFFFFFFFFFFFFFFFFFFFFFFFFFFF
      1869 OTA:FWP:RECV B=04FE
      1878 OTA:FRQ:FW REQ,T=0001,V=0001,B=04FD
      1888 TSF:MSG:SEND,22-22-0-0,s=255,c=4,t=2,pt=6,l=6,sg=0,ft=0,st=OK:01000100FD04
      1925 TSF:MSG:READ,0-0-22,s=255,c=4,t=3,pt=6,l=22,sg=0:01000100FD042E310000FFFFFFFFFFFFFFFFFFFFFFFF
      1935 OTA:FWP:RECV B=04FD
      1943 OTA:FRQ:FW REQ,T=0001,V=0001,B=04FC
      1953 TSF:MSG:SEND,22-22-0-0,s=255,c=4,t=2,pt=6,l=6,sg=0,ft=0,st=OK:01000100FC04
      1992 TSF:MSG:READ,0-0-22,s=255,c=4,t=3,pt=6,l=22,sg=0:01000100FC0441434B003F002100322E322E302D7263
      2002 OTA:FWP:RECV B=04FC
      2009 OTA:FRQ:FW REQ,T=0001,V=0001,B=04FB
      2021 TSF:MSG:SEND,22-22-0-0,s=255,c=4,t=2,pt=6,l=6,sg=0,ft=0,st=OK:01000100FB04
      2056 TSF:MSG:READ,0-0-22,s=255,c=4,t=3,pt=6,l=22,sg=0:01000100FB04696F6E003C4E4F4E43453E004F4B004E
      2066 OTA:FWP:RECV B=04FB
      2076 OTA:FRQ:FW REQ,T=0001,V=0001,B=04FA
      2086 TSF:MSG:SEND,22-22-0-0,s=255,c=4,t=2,pt=6,l=6,sg=0,ft=0,st=OK:01000100FA04
      2123 TSF:MSG:READ,0-0-22,s=255,c=4,t=3,pt=6,l=22,sg=0:01000100FA04746564000D0A004E6F20646574656374
      2134 OTA:FWP:RECV B=04FA
      2140 OTA:FRQ:FW REQ,T=0001,V=0001,B=04F9
      2152 TSF:MSG:SEND,22-22-0-0,s=255,c=4,t=2,pt=6,l=6,sg=0,ft=0,st=OK:01000100F904
      2187 TSF:MSG:READ,0-0-22,s=255,c=4,t=3,pt=6,l=22,sg=0:01000100F9046167756100466C6F6F64206465746563
      2197 OTA:FWP:RECV B=04F9
      2203 OTA:FRQ:FW REQ,T=0001,V=0001,B=04F8
      

      So it looks this happens only if right after a node reset. I hope this gives a hint.

      As a side note - I also find interesting that the number of update blocks sent before the node goes to sleep changes between test runs.

      posted in General Discussion
      manutremo
      manutremo
    • RE: NRF24 / RFM69????

      @Roloz My first choice was nrf24. I found multiple problems with; even after all the power feed, etc issues had been solved, some sensors were still showing very unstable connections.

      I finally built a "nrf24 scanner" and found that I had problems of coverage. I tested many combinations of power settings between the gw and the sensors, but was unable to find one that worked for all sensors. If I pushed the power high, the sensors positioned further got good connection, but the closest ones became saturated and failed. With lower settings, the closest worked but the farthest didn't. My home is small and there aren't too many walls; probably the 2.4GHz band is just quite saturated.

      I finally decided to try the rfm69hw and found it more stable. I also migrated to the new development branch which supports automatic power setting and found this helped a whole lot. I had to lower the gw transmission power from the default 20dB to 0-5dB, which means that I should have been fine with non-hw modules, but the price difference is not that high and who knows some day I may need the additional range.

      Just one additional comment - If you are ever using the hw version at full power, keep in mind that the arduino 3.3v vout may not be able to provide the necessary power to the rfm69 module, so you might need to power it separately so it's fully reliable.

      I hope this helps.

      posted in Hardware
      manutremo
      manutremo
    • RE: ๐Ÿ’ฌ Connecting the Radio

      @mfalkvidd Many thanks again... I learn new things every day.

      posted in Announcements
      manutremo
      manutremo
    • RE: RFM868MHZ + EU Zwave - possibility of interference?

      The people that know me well say I'm one of the "need to see to believe" guys.

      Therefore I decided to get my SDR device out and install it on my PC.

      I then looked at the area around the 868MHz frequency. I then launched a fw update on one of my nodes, and waited for some of the zwave nodes to talk to the controller.

      This capture shows how the rfm69 module is talking at the 868MHz (center red band), while a zwave device send some short bursts of data at 868.4MHz.

      alt text

      The two red areas are quite well separated so it doesn't really look like they could interfere. I repeated the test several times and found that some zwave devices seem to be not perfectly tuned to 868.4MHz, and were transmitting at more like 868.35MHz. Even in this case, there are no signs of interference.

      alt text

      I also took the opportunity to take a look at the 915MHz freq. In Spain this band is not free and happens to be reserved for the 4g data cell communication. In my area this band seems to be really clear, so I guess the cellular antennas are not using them. However, it's not an option if you want to follow the regulations.

      alt text

      posted in General Discussion
      manutremo
      manutremo
    • RE: NRF24 / RFM69????

      Not necessarily - I 've been using the rfm69 boards welding wires directly to the board with no problem. Recently I started to use JST PH 2.0mm connectors with good results too.

      posted in Hardware
      manutremo
      manutremo
    • RE: ๐Ÿ’ฌ Soil Moisture Sensor

      @เธฃเธญเน€เธฃ-เธญ I have resistive sensors (YL-69 type) both indoors and outdoors. Both have been working correctly for months now. I'm using a direct-reverse polarization sketch to minimize corrosion and it seems to work well. What I found to be very important in outdoors sensors is the isolation of the connector between the probe and the cable; if rain water or watering stays into there, they tend to corrode and their resistance increases, therefore fooling the sensor into thinking that the soil is drier than it really is. I have a couple of capacitive sensors somewhere but haven't felt the need to try them since the resistive ones are working well.

      posted in Announcements
      manutremo
      manutremo
    • RE: Moving sensors to new gateway

      @signal15 I have an 8266 gateway linked to a Domoticz controller. I've changed the gateway many times for testing purposes. With Domoticz at least, the only requirement is that the new gateway has the same IP. If you are using DHCP, that usually means updating the MAC adress in the DHCP reservations table.

      I even had one instance when I wasn't able to modify the DHCP table nor the IP assignment in the Domoticz config screen; in that case I manually changed the IP in the domoticz database, and it worked. Other controllers may be different.

      On the nodes <-> gw side, as long as the new gateway keep ID 0 and they use the same radio and comms channel, the nodes should be able to communcate with the new gatway with no issue.

      As mentioned above, if using signing things get more complex.

      posted in General Discussion
      manutremo
      manutremo
    • RFM69HW + MCP1700-33 + FOTA = potential overload

      I've been struggling for some time to troubleshoot this combination and now that I think I found the reason I thought I shuold share it with the community in case someone else has had or is facing the same issue.

      In my battery powered nodes I've been using a 16340 lithium battery as a power source. Since these batteries can go up to 4.2v when fresh, I've been using a MCP-1700-33 LDO, which has a very low quiescent power, and are rated to up to 250mA. The MCP reduces the voltage from the batt to 3.3v when it's higher, and then tracks it down when the batt goes below that, until 2.8v when the mini pro stops working.

      On the other side, I'm using rfm69 radios. I chose the HW version since they were cheaper than the non-HW, even though I knew that they were probably overkill for the size of my home. I've been using the 2.2.0 dev branch, and the new RFM69 driver with ATC enabled.

      The nodes have been working well until I tried to implement FOTA. FOTA send slong packets of data so communications needs to be very good for it to succeed. In my case, my nodes were stopping at the middle of the update.

      Long story short, it turned out that if the RFM doesn't get good reception, the ATC bumps up its power and at some point, the MCP1700 gets overloaded, lowering the output voltage, which renders the RFM69HW into a weird state.

      What is interesting is that the RFM69HW datasheet states that the consumption at +20dB is 130mA, which added to the arduino + rest of deviced won't go over the max MCP1700 output of 250 mA. However, there is probably some current peak which goes over that but I'm unable to detect with my multimeter.

      When this happens, the MCP1700 output goes down to about 1.7v and stays at around 130mA, with the RFM69HW sending a constant signal at +20dB and the Arduino seems to get stuck into some waiting loop.

      I've been able to reproduce this in my workbench, and I also found someone else at the lowpowerlab forums who experienced the same here.

      This guy stated that power levels of up to +15dB are fine, so I added

      #define MY_RFM69_MAX_POWER_LEVEL_DBM 13
      

      to my sketch, and problems stopped, so I can now perform FOTA updates with no problem.

      I hope this helps.

      posted in Hardware
      manutremo
      manutremo
    • RE: ๐Ÿ’ฌ Soil Moisture Sensor

      Hi @atzohy

      The info in the page is confusing. The small board between the sensor and the arduino is an on-off level switcher. It provides a digital binary singnal so can't be connected to an analog pin on the arduino.

      If you wish to measure the moisture level with an analogic scale, you need to eliminate that board and then use a voltage divider and an analog pin. The sketch will be also different. Everything in explained above in the thread.

      You may want to read the full thread and then don't hesitate to come back with your questions.

      posted in Announcements
      manutremo
      manutremo
    • RE: Soil Mosisture Sensor: Battery Issue

      The sketch looks correct. I had a similar issue. Measure how much current is the arduino using to check if it's actually sleeping or not. If it is, measure the current going to the nrf24. You can just build a simple sketch which loops for some seconds and then goes to sleep for some more seconds so you can see the changes in a multimeter. There seem to be a number of those modules that are unable to sleep even when things took do so. In my case 1 of my 10 modules showed this issue. Some people indicate that some of them are recoverable, but in my case I just saved it to use it in a non - battery powered sensor.

      posted in Development
      manutremo
      manutremo
    • RE: More reliable relative humidity measurements?

      @nerukam I'm also using the BME280 with good results for the moment. I say "for the moment" because there are reports around saying that these sensors tend to drift/fail after 2-3 years because of sensitive element degradation or dirt accumulation.

      I never calibrated mine but the readings it provides seem ot be consistent with other weather stations around, considering that humidity measurement should not be expected to be a high accuracy measurement type.

      Some users recommend protecting them with a sheet of PTFE - if I remember correctly, Bosch sells a variant which includes a PTFE protection filter as an option, to protect the sensor when used outdoors or close to saline environments for example.

      posted in Hardware
      manutremo
      manutremo
    • RE: ๐Ÿ’ฌ FOTA (Wireless Programming)

      @mmanzanelli I don't think you can, the Mega has a different memory structure not supported by the present bootloaders.

      posted in Announcements
      manutremo
      manutremo
    • RE: OTA FW update using I2C EEPROM

      Hi, I just wanted to report that I was able to compile and use the dualoptiboot bootloader with I2C support on a Mini Pro 8MHz board with an I2C AT24C256 breakout board and a RFM69HW radio. With this setup I've been able to to update several sketches via OTA using MysController.

      I took me some time to understand the workflow and necessary tools since I wasn't able to find a complete, up to date tutorial. Specifically, it took me some time to find out that the compilation of the bootloader with the Arduino IDE requires downgrading to version 1.0.6.

      I also run into some issues with the Arduino IDE not being able to find the extEEPROM.h file (even though it was indeed present at the correct location), and having to copy the i2c.h file to the optiboot folder in addition to the optiboot.c and the Makefile files.

      Also, I finally managed to flash it using avrdudess since I was getting errors when trying to use the IDE.

      So even though the author above that this bootloader isn't yet finished, it's working properly. Granted that I haven't tested it thoroughly under all scenarios, but it certainly looks promising. Can't wait to see it fully implemented in the mysensors framework. I'll continue reporting any additional findings.

      Many thanks!

      posted in Development
      manutremo
      manutremo
    • RE: Spurious .mystools folder in mysensor

      That error has been commented for many libraries around contanining similar folder - for example .github. See one example here.

      While the IDE dev team decides on how to cope with this, you can just ignore it, it doesn't have any impact on the sketches you compile.

      posted in Troubleshooting
      manutremo
      manutremo
    • RE: More reliable relative humidity measurements?

      I'm not sure about the last statement, since the CPU needs to wake-up to make the measurement and send the result even though you use the sensor's own sleep mode. However I've never made that kind of measurement so can't really support this with numbers.

      That said, in my opnion the solution of feeding the sensor from a pin on the arduino makes sense when the sensor doesn't include its own sleep mode... in that case, it may be fed from a pin, or from an external transistor or mosfet device... if it has its own sleep mode, it seems more reasonable using it.

      posted in Hardware
      manutremo
      manutremo
    • RE: OTA FW update using I2C EEPROM

      Hi,

      I just submitted a pull request with the necessary changes to implement timeouts in the wait loops.

      I hope it works!

      posted in Development
      manutremo
      manutremo
    • RE: Problems with sensor node

      I've had nrf24 modules of all sorts, even the blob type, and had to go through many many problems until i got them working. But all of them except for 2 were able to initialize. Of the two that didn't, one of them I fried it myself by connecting it incorrectly, and the other one had a broken track so that the MISO pin was not reaching the corresponding pin on the nrf24 chip.

      So while I agree that from the provided information this looks like a bad wiring or a fried chip, the fact that he has tried 3 different radios from different sellers seems to infer that it might still be worth trying to help the OP go through some troubleshooting - which in turn is how most of us have learnt most of what we know today while building our first sensors.

      By the way henninne - you have replaced the arduino board and the radio... have you tried completely replacing all the wires? I've found some of them that were not correctly crimped (even though bought "ready to use") and causing false contacts.

      posted in Troubleshooting
      manutremo
      manutremo
    • RE: How connect si7021 and bh1750 to arduino mini pro

      @Tommas Hardware-wise, apart from the Vcc and GND pins, both I2C pins marked SDA and SCL should be connected to the I2C pins in the arduino (A4 and A5).

      Software-wise, each library should provide a "constructor" function which returns an object with which you can then read the measurements through the appropriate function. The I2C devices have an internal address which the libraries use to access the correct device through the bus.

      Most of the devices have their I2C adress hardcoded; some allow you to modify it e.g. to avoid conflicts with other devices or to allow connecting two equal devices to the same board. In this case, the constructor will need you to pass the adress as a parameter.

      I have no experience with those two sensors but I have a node with a light sensor similar to the bh1750 (tsl2591), and a temp/hum/baro sensor similar to the si7021 (bme280). Just to give you an idea, the constructor for the bme280 (using the Adafruit library) looks like:

      Adafruit_BME280 bme;
      

      and then the lines to read the measurements look like (in "forced measure" mode):

      bme.takeForcedMeasurement(); 
      temp=float(long(bme.readTemperature()*10))/10.0;  //round to 1 decimal place
      hum=(int) bme.readHumidity();                     //Humidity in domoticz is an integer
      baro=round(bme.readPressure()/100);               //Convert from Pa to hPa (mb) and round to 1 decimal place
      

      While for the TSL2591 the constructor and readings (in IR + visible mode) are like this:

      Adafruit_TSL2591 tsl = Adafruit_TSL2591(2591); // pass in a number for the sensor identifier (for your use later)
      << more code >>
        uint32_t lum = tsl.getFullLuminosity();               //getFullLuminosity in the library already enables and disables the device
        uint16_t ir, full;
        ir = lum >> 16;
        full = lum & 0xFFFF;
        visible=tsl.calculateLux(full, ir);
      

      In addition to this, you may need to initialize the sensor, set some configuration... each library is different and therefore should provide documentation explaining how it works.

      posted in Hardware
      manutremo
      manutremo
    • RE: MYSBootloader 1.3 pre-release & MYSController 1.0.0beta

      @manutremo As expected, it was my fault. FOTA updates work correctly with this version.

      posted in Development
      manutremo
      manutremo
    • RE: ESP gateway flashed but it doesn't start

      @fiets When you run your next tests, have a look at the serial output. Some ESP8266 show a "pll_cal exceeds 2ms" error on startup and get caught into an endless loop. This is caused by a file on the ESP8266 boards package that needs to be replaced.

      If that's you case too, have a look at the solution on arsalanhassanawan's post here.

      posted in Troubleshooting
      manutremo
      manutremo
    • RE: Sensebender/Dualoptiboot OTA HowTo in Mysensors

      @scalz Mycontroller works fine, I just tested it with Dualoptiboot and last package version (ask in the forum).

      posted in Hardware
      manutremo
      manutremo
    • RE: Adaptive sleep time

      @gohan At first approach, I would say the map function should be the way to go.. what is it that it's working weird?

      posted in Development
      manutremo
      manutremo
    • RE: Noob : Cant get Sensor talking to gateway

      @Angelo-Santagata the log parser is useful in these situations.

      https://www.mysensors.org/build/parserlink text

      In your case, it calls my attention that the gw seems to be answering the requests for an ID from the node with an empty payload. I would start the investigation here.

      For a check, assign an static node Id to the node and try see what happens.

      posted in Troubleshooting
      manutremo
      manutremo
    • RE: RFM69HW connection to 2560 Mega Pro board

      Answering to myself... after many tests I decided to start to start working backwards and started to discard assumptions... finally I discarded :

      I know that Mega pins are 5v and in theory RFM69 are 3.3v, but I have more sensors installed in a similar setup with mini Pro 5v and Nano boards that work perfectly.

      So I fit a ttl levels shifter between the Mega Pro and the RFM69 and it started to work right away.

      It looks like AT328 and AT2560 have different levels of sensitivity as of being able to interpret 3.3v correctly as a "1". Interestingly, I checked the datasheets for both chips and the specification is the same, min 0.6Vcc volts, so anything over 3v should be interpreted as a "1"... go see...

      As a final detail, I was able to use a 4way ttl shifter since the MISO line doesn't need to be shifted, which left me with MOSI, SCK, SS and INT. Credit to this forum page for this:

      I can also confirm that pin D2 on these boards is connected to INT0 as standard... I don't know why the pinout diagram indicates something different.

      I hope this helps others.

      posted in Hardware
      manutremo
      manutremo
    • RE: Adaptive sleep time

      @gohan If I understood correctly what you are trying to achieve, do you think this could work?

      #define VOLT_MAX 3.7
      #define VOLT_MIN 3.0
      #define SLEEP_MAX 100000
      #define SLEEP_MIN 10000
      
      void setup() {
        // put your setup code here, to run once:
      
      }
      
      void loop() {
        // put your main code here, to run repeatedly:
      
      float v,p,s;
      
      v=3.5;          // Result from volt reading routine
      
      p=(v-VOLT_MIN)/(VOLT_MAX-VOLT_MIN);
      
      p=constrain(p, 0, 100);
      
      s=map(p, 0, 100, SLEEP_MAX, SLEEP_MIN);
      
      sleep (s, true);             // true for smartsleep, false if otherwise
      }
      
      posted in Development
      manutremo
      manutremo
    • RE: ESP8266 OTA (SOLVED)

      @vanjsy Use the sketch here - you can use it as is (change ssid and pwd of course) or add the missing pieces to yours.

      posted in Troubleshooting
      manutremo
      manutremo
    • VEML6075 high sleep consumption

      I've been reading the thread here, and decided to open a new one since that one is old, and there were no reports of the consumption being fixed.

      I'm in the same situation regarding consumption of my VEML6075 board being around 50 uA while sleeping, when it should be less than 1 uA according to the datasheet.

      My specific board doesn't contain any voltage regulators, just a capacitor and the I2C pullups. Specifically, it's this one:

      alt text

      I'm using the adafruit library but I've tried 3 others with different sleep routines, all with the same result. When active, the consumption is much higher, so the chip is sleeping (sort of) it seems.

      Any help on reducing the sleep consumption would be appreciated.

      posted in Hardware
      manutremo
      manutremo
    • sendTxPowerLevel and sendSignalStrength

      Hi, I'm interested on using the functions in the post title. I'm running Mysensors 2.2.0., and I have

      #define MY_SIGNAL_REPORT_ENABLED
      

      in my sketch.

      If I add something like

      sendSignalStrength (6);
      

      or

      sendTxPowerLevel (6);
      

      to my sketch, the Arduino compiler complains about undefined references.

      What do I need to do to get them working?

      Thanks.

      posted in Development
      manutremo
      manutremo
    • RE: FOTA with MYSController does not work with sleeping Sensebender Micro

      @arrawx may be related to this?

      posted in Troubleshooting
      manutremo
      manutremo
    • RE: Sparkfun8266 Wifi Shield + Arduino Due = WiFi Gateway

      Ups yes I didn't realize that board won't work.

      I'm using a Wemos D1 R2 with support for OTA firmwar updates. I can share the code if you 're interested.

      posted in Troubleshooting
      manutremo
      manutremo
    • RE: Sensebender Gateway RFM69HW Decoupling Capacitor

      I also had to limit power to 13 dBm; in my case I think the reason is that the board needs more power than what the battery can provide when over that level, but I was never able to prove it.

      posted in Troubleshooting
      manutremo
      manutremo
    • RE: WiFi Gateway (ESP8266) - reconnect to wifi router

      I'm not sure i'm following you... from the low the gw seems to be reconnecting, it gets ip 192.168.99.3 after the router restarts and starts to receive messages from what seems to be a node.

      posted in Troubleshooting
      manutremo
      manutremo
    • RE: WiFi Gateway (ESP8266) - reconnect to wifi router

      That's odd - I assume you've checked port, bitrate, etc...

      If your gw is communicating via IP (I guess that's the case since you mention a wifi gw), you can also "spy" the communication between the gw and the controller by telnetting to the gw IP and port 5003 (assuming default hasn't been changed).

      posted in Troubleshooting
      manutremo
      manutremo