Navigation

    • Register
    • Login
    • Search
    • OpenHardware.io
    • Categories
    • Recent
    • Tags
    • Popular
    1. Home
    2. stefaanv
    3. Posts
    • Profile
    • Following
    • Followers
    • Topics
    • Posts
    • Best
    • Groups

    Posts made by stefaanv

    • PlatformIO subcategory

      Can I suggest adding an "IDE" subcategory under the Development category ?
      I'm investigationg PlatformIO as an alternative for the Arduino IDE and Visual Micro for writing MySensors programs and was surprised not to find much info on the forum.
      Maybe having and IDE subcategory could spark some discussion about this - interesting - subject

      posted in Development
      stefaanv
      stefaanv
    • RE: πŸ’¬ Sensebender Micro

      Is there a board definition for sensebender micro for PlatformIO available ?

      posted in OpenHardware.io
      stefaanv
      stefaanv
    • MySensors binding seems to prevent other bindings from working properly

      Hi, I've come across a problem where the MySensors binding seems to make some claim on the serial port of other bindings (RFXcom in my case), preventing the other binding to work properly.
      The case is documented here on github.
      Is this a bug in the MySensors binding or somehow linked to my setup and configuration ?
      Any ideas on how to further investigate / solve this problem ?

      posted in OpenHAB
      stefaanv
      stefaanv
    • Sensebender Micro Mechanical design

      Hi,

      I love the sensebender micro, having about five of them around the house measuring all kinds of things. Being able to buy the assembled PCB from the internet is great !

      The compactness of the design is nice for building really small sensors, but in my humble opinion has one mayor drawback. There is no easy way to mechanically fix the PCB into a housing. Not suprisingly, I haven't seen a compelling case designs for the sensebender micro yet. Most designs have the board and the batteries floating inside.

      I always end up fixing the naked PCB with two-sided tape to a wall or a to a piece of furniture, usually fixing the batteries right next to the sensor PCB in the same manner. The net effect being that my wife is becoming increasingly unsupportive of my MySensors hobby !

      May I suggest that for future designs the wife factor is taken into account ? Two diagonal holes to fit screws and some free PCB space underneath for supports would be very helpfull.

      Stefaan

      posted in Hardware
      stefaanv
      stefaanv
    • RE: πŸ’¬ Sensebender Gateway

      @tbowmo OK, is working now after restarting the bundle in OH.
      Must have been the permission problem after all.
      Thanks for your help !!

      posted in OpenHardware.io
      stefaanv
      stefaanv
    • RE: πŸ’¬ Sensebender Gateway

      @tbowmo Definately ttyACM0
      However, the setserial command returns information that doesn't look good : port0 and IRQ0. Does the board need a driver under Linux ?

      stefaan@home:~$ sudo setserial /dev/ttyACM0
      /dev/ttyACM0, UART: unknown, Port: 0x0000, IRQ: 0, Flags: low_latency```
      posted in OpenHardware.io
      stefaanv
      stefaanv
    • RE: πŸ’¬ Sensebender Gateway

      ttyUSB0 is a (different) RFXcom device

      posted in OpenHardware.io
      stefaanv
      stefaanv
    • RE: πŸ’¬ Sensebender Gateway

      Here is my configuration file (mysensors.things)
      Bridge mysensors:bridge-ser:gateway [ serialPort="/dev/ttyACM0", sendDelay=200 ]
      {
      humidity keuken_vochtigheid [ nodeId="3", childId="2", smartSleep=true ]
      temperature keuken_temperatuur [ nodeId="3", childId="1", smartSleep=true ]
      }

      I suppose ttyACM0 because of
      stefaan@home:~$ dmesg |grep -i tty
      [ 0.000000] console [tty0] enabled
      [ 22.328631] 8086228A:00: ttyS4 at MMIO 0x81420000 (irq = 39, base_baud = 2764800) is a 16550A
      [ 22.329059] 8086228A:01: ttyS5 at MMIO 0x8141e000 (irq = 40, base_baud = 2764800) is a 16550A
      [ 23.106128] usb 1-4: FTDI USB Serial Device converter now attached to ttyUSB0
      [362074.592743] cdc_acm 1-3:1.0: ttyACM0: USB ACM device

      There seems to be a premissions problem om the port :
      stefaan@home:~$ cat /dev/ttyACM0
      cat: /dev/ttyACM0: Permission denied

      doing 'sudo usermod -a -G dialout openhab' doesn't help

      Anyone any ideas ?

      posted in OpenHardware.io
      stefaanv
      stefaanv
    • RE: πŸ’¬ Sensebender Gateway

      Hi, I'm trying to activate a sensebender gateway in OH2 on Ubuntu 16.04, however I'm having trouble setting up the serial port. Is there a how-to somewhere ? I suspect the serial port name is /dev/ttyACM0, but I'm not sure. How can I test ?
      MySensors bundle is reported to be active, but there's no messages coming in. I set the log level for mysensors to DEBUG, but nothing on the log.

      posted in OpenHardware.io
      stefaanv
      stefaanv
    • RE: πŸ’¬ Sensebender Gateway

      Which driver to use on Ubuntu 16.04 ?

      posted in OpenHardware.io
      stefaanv
      stefaanv
    • RE: Are folks here happy with Domoticz?

      I've used domoticz for a few years but got more-and-more stuck on it's limitations. I'm not a great fan of lua either. I'm more a c# and javascript person.
      I have invested my time in OpenHAB2 lately and I'm very happy with it. Much more solid in terms of software design imho. Very large hardware support. Seems to be a larger community as well.
      Setup is not as easy as with Domoticz, takes more reading and getting used to, but in the end I'm happy that I switched to OpenHAB.
      HabPanel is a nice extension to OpenHAB for building UI's.

      posted in Domoticz
      stefaanv
      stefaanv
    • RE: Setting parameters in nodes

      @FredRoot
      Your mqtt-eventbus.cfg configuration should look like this

      broker=mosquitto
      statePublishTopic=openHAB/out/${item}/state
      stateSubscribeTopic=openHAB/in/${item}/state
      commandSubscribeTopic=openHAB/in/${item}/command
      
      posted in Feature Requests
      stefaanv
      stefaanv
    • RE: Setting parameters in nodes

      @FredRoot
      To answer your questions

      1. "mosquitto.clientId=openhab"

      I got my inspiration for setting up the eventbus-to-mqtt bridge from this website
      Basically, in the mqtt.cfg file you're defining which mqtt broker openhab must talk to. Afaik you can freely chose the broker name, but I wasn't very adventurous and simply copied the example configuration.

      You DO have to install an MQTT broker separate from openhab. Mosquitto is the most common one.
      The clientID setting can be about anything, it is like a call name for the broker to identify its counter parts. the clientID is often auto-generated by using random numbers. You can use anything as long as this same ID is not used by anyone else on the same broker (which is a problem in what you're doing further down).

      2.

      In broker=mosquitto the second part must be the same like the part before the dot in mosquitto.clientId=openhab. It is an identification for the MQTT broker that you're using in the different openhab configuration files.

      topic=openHAB/out/test_text/command ... is commandSubscribeTopic=openHAB/in/${item}/command where ${item} was replaced with the name of the item which in this case is test_text. Openhab will do the insertion of the item names for you.

      3. & 4.

      That look OK.
      Best thing to do is to install a program like MQTT-Spy. It allows you to see all the messages being processed by the MQTT broker and send messages in a convenient way. Trying to do this from the Linux CLI is overly courageous.
      Anyway, you should definately not use the -i openhab switch with mosquitto_sub or _pub. You need to use a different clientId than the one openhab is using. You're not trying to trick mosquitto in believing you're openhab. Instead you're trying to talk to openhab through the MQTT boker.

      An interesting one is to enable debug logging for the MySensors binding on the Karaf interface. That way you can see what openhab is sending to your MySensors gateway.

      Here's how you do that

      • Open an ssh connection to your openhab server
      • Type ssh -p 8101 openhab@localhost. The password will probably be habopen. This is the Karaf CLI

      Some usefull Karaf commands

      • log:tail will show the Openhab logs as they come in. You can pipe this command with grep if you're looking for something specific.
      • Use log:set xxxxx to adapt the logging level
      • smarthome:things list to see all your things
      • smarthome:things list to see all your things

      So to see what openhab is sending to the MySensors gateway use these commands

      log.set DEBUG org.openhab.binding.mysensors
      log.tail
      

      Now if you send an MQTT configuration message to openhab using MQTT_Spy, you should see the message being passed to the mysensor gateway. This will help you debug the setup.

      Stefaan

      posted in Feature Requests
      stefaanv
      stefaanv
    • Smartsleep with 20ms polling Timer1 ISR

      I'm developming a node that polls a sensor every 20ms through a Timer1 interrupt. The main loop of the program has a 1000ms wait/sleep cycle that decides whether or not to send MySensors messages depending on the sensor value.
      In orde to preserve energy, I'd like to use smart sleep.

      My question is, will smartSleep work in together with the faster interrupt cycle ? I assume the interrupt will wake the node from smart sleep, but what happens at the end of the interrupt service routine ?
      Does smartSleep resume automatically ?
      Or should I call smartSleep at the end of the ISR ? Does that make sense ? Will smartSleep work properly when it is called every 20 ms ?

      posted in Development
      stefaanv
      stefaanv
    • RE: πŸ’¬ NodeManager

      The configuration service is a good ideaal.
      Even better would be if it would allow setting and reading user parameters.

      posted in OpenHardware.io
      stefaanv
      stefaanv
    • RE: Setting parameters in nodes

      I got this one solved for openHab2, but I guess the same trick can also work with other controllers.
      In openhab, activate the mqtt-eventbus bridge that copies all events on the eventbus to an mqtt broker of your choice.

      The mqtt.cfg configuration file (example)

      mosquitto.url=tcp://localhost:1883
      mosquitto.clientId=openhab
      mosquitto.retain=true
      mosquitto.async=false
      

      The mqtt-eventbus.cfg configuration file (example)

      broker=mosquitto
      statePublishTopic=openHAB/out/${item}/state
      stateSubscribeTopic=openHAB/in/${item}/state
      commandSubscribeTopic=openHAB/in/${item}/command
      

      In the openhab .things configuration file, add a text element elements for the node

      ...
      text         test_text   [ nodeId="4", childId="200"] 
      customSensor gasMeter    [ nodeId="4", childId="1"]
      ...
      

      In the .items configuration file, add the text element as well

      String test_text           "text"         <text> {channel="mysensors:text:gateway:test_text:text"}
      Number gasMeter_teller     "Counter"      <var1> {channel="mysensors:customSensor:gateway:gasMeter:var1"}
      Number gasMeter_pulsLengte "Pulse Lengte" <var2> {channel="mysensors:customSensor:gateway:gasMeter:var2"}
      

      On the node, define an extra S_INFO/V_TEXT child sensor. The below code example parses incoming instructions (in the receive() function).

      #define CHILD_ID_TEXT 200 
      MyMessage textMsg(CHILD_ID_TEXT, V_TEXT);
      
      void presentation()
      {
      	...
      	present(CHILD_ID_TEXT, S_INFO);
      	...
      }
      
      ...
      void receive(const MyMessage &message)
      {
      	if (message.type == V_VAR1)
      	{
      		pulseCounter = message.getLong(); // Update the main counter value at node startup or when updating the value in openhab UI
      	}
      
      	if (message.type == V_TEXT)
      	{
      		//this code could be more professional, just doing it quick and dirty for now
      		String all = message.data;
      		int equalSignPosition = all.indexOf('=');
      		if (equalSignPosition < 0) return;
      		String key = all.substring(0, equalSignPosition);
      		String value = all.substring(equalSignPosition +1, all.length());
      
      		if (key == "debouncePeriod")
      		{
      			int dbPvalue = value.toInt();
      			if (dbPvalue > 5 && dbPvalue < 5000) {
      				debouncePeriod = dbPvalue;
      				SendParameter("Debounce period",debouncePeriod);
      			}
      		}
      		if (key == "timeBeforeSleep")
      		{
      			long tBFSvalue = value.toInt();
      
      			if (tBFSvalue > 1000 && tBFSvalue < 300000) {
      				timeBeforeSleep = tBFSvalue;
      				SendParameter("Time before sleep", timeBeforeSleep);
      			}
      		}
      		if (key == "info")
      		{
      			Serial.print("Sending information");
      			SendParameter("debouncePeriod", debouncePeriod);
      			SendParameter("timeBeforeSleep", timeBeforeSleep);
      			SendParameter("pulseCounter", pulseCounter);
      		}
      	}
      }
      
      void SendParameter(char* parameterName, unsigned long variable)
      {
      	char buffer[30];
      	sprintf(buffer, "%s->%lu", parameterName, variable);
      	Serial.println(buffer);
      	send(textMsg.set(buffer));
      }
      ...
      

      Now parameters can be changed by sending mqtt messages to openhab which will forward the instructions to the node. Feedback is provided in the reverse way for every parameter change.
      For example, to change the debounce period, send an MQTT message with topic= openHAB/in/test_text/command and data=debouncePeriod=<value>. The feedback is provided on topic=openHAB/out/test_text/command with data=debouncePeriod-><value>.
      To get an overview of the parameters, send info=. One message is returned for every parameter and one for the current meter counter value.

      posted in Feature Requests
      stefaanv
      stefaanv
    • Ethernet API/protocol information

      Hi,

      I'm looking for information about the protocol/API to use to connect and talk to an Ehernet gateway. Although there is plenty of information around about the serial protocol, Ethernet protocol seems to be shrouded in mystery.

      How to connect to the gateway (UDP, TCP, ...), how to keep the connection alive, is the serial API somehow embedded into a network stream ....

      Stefaan

      posted in General Discussion
      stefaanv
      stefaanv
    • RE: Internet of Poultry - Fully automated chicken shed

      @Nathan-Overley
      Hi Nathan, it's not nice code, been written too quickly. I have to rewrite it some day. Still, here it is, it may give you idea's. Let me know if you improve it.
      0_1477377889434_Kippenhok_3.ino

      posted in My Project
      stefaanv
      stefaanv
    • RE: [solved] Problem with ioBroker and MySensors 2.0

      @hek
      Hadn't done any of the decoupling. Will do so next.
      However, by moving the controller closer to the shed, The problem is solved !!
      0_1476001429124_upload-ffaeb96a-bf60-48e0-a44e-e5bca67cb6d4
      Thanks a million for the support !

      posted in IOBroker
      stefaanv
      stefaanv
    • RE: [solved] Problem with ioBroker and MySensors 2.0

      @hek
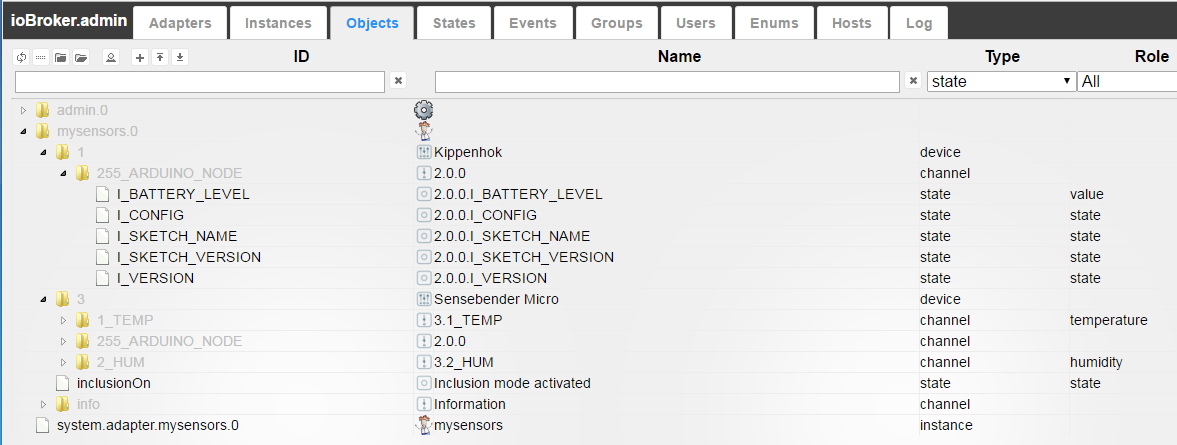
      We're making progress. I'm already seeing both nodes in ioBroker Objects tree. The sensebender node also reports temperature and humidity.
      0_1476000444616_upload-383148d2-26ea-402a-a4a9-8258a2fa346b
      Still, none of the measurements from the chicken shed node get through. Underneath is the log from this node, hope you can make any sense of it. I see a lot of FPAR:FAIL's, hope this is something that can be solved.

      Stefaan

      Starting sensor (RNNNA-, 2.0.0)
      TSM:INIT
      TSM:RADIO:OK
      TSP:ASSIGNID:OK (ID=1)
      TSM:FPAR
      TSP:MSG:SEND 1-1-255-255 s=255,c=3,t=7,pt=0,l=0,sg=0,ft=0,st=bc:
      TSM:FPAR
      TSP:MSG:SEND 1-1-255-255 s=255,c=3,t=7,pt=0,l=0,sg=0,ft=0,st=bc:
      TSM:FPAR
      TSP:MSG:SEND 1-1-255-255 s=255,c=3,t=7,pt=0,l=0,sg=0,ft=0,st=bc:
      TSM:FPAR
      TSP:MSG:SEND 1-1-255-255 s=255,c=3,t=7,pt=0,l=0,sg=0,ft=0,st=bc:
      !TSM:FPAR:FAIL
      !TSM:FAILURE
      TSM:PDT
      TSM:INIT
      TSM:RADIO:OK
      TSP:ASSIGNID:OK (ID=1)
      TSM:FPAR
      TSP:MSG:SEND 1-1-255-255 s=255,c=3,t=7,pt=0,l=0,sg=0,ft=0,st=bc:
      TSM:FPAR
      TSP:MSG:SEND 1-1-255-255 s=255,c=3,t=7,pt=0,l=0,sg=0,ft=0,st=bc:
      TSM:FPAR
      TSP:MSG:SEND 1-1-255-255 s=255,c=3,t=7,pt=0,l=0,sg=0,ft=0,st=bc:
      TSP:MSG:READ 0-0-1 s=255,c=3,t=8,pt=1,l=1,sg=0:0
      TSP:MSG:FPAR RES (ID=0, dist=0)
      TSP:MSG:PAR OK (ID=0, dist=1)
      TSM:FPAR:OK
      TSM:ID
      TSM:CHKID:OK (ID=1)
      TSM:UPL
      TSP:PING:SEND (dest=0)
      TSP:MSG:SEND 1-1-0-0 s=255,c=3,t=24,pt=1,l=1,sg=0,ft=0,st=ok:1
      TSP:MSG:READ 0-0-1 s=255,c=3,t=25,pt=1,l=1,sg=0:1
      TSP:MSG:PONG RECV (hops=1)
      TSP:CHKUPL:OK
      TSM:UPL:OK
      TSM:READY
      Kippenhok_4
      Motor stopped at 60735
      application started
      TSP:MSG:SEND 1-1-0-0 s=255,c=3,t=1,pt=0,l=0,sg=0,ft=0,st=ok:
      TSP:MSG:SEND 1-1-0-0 s=255,c=3,t=15,pt=6,l=2,sg=0,ft=0,st=ok:0100
      !TSP:MSG:SEND 1-1-0-0 s=255,c=0,t=17,pt=0,l=5,sg=0,ft=0,st=fail:2.0.0
      !TSP:MSG:SEND 1-1-0-0 s=255,c=3,t=6,pt=1,l=1,sg=0,ft=1,st=fail:0
      TSP:MSG:READ 0-0-1 s=255,c=3,t=0,pt=0,l=10,sg=0:1476000019
      TSP:MSG:ACK msg
      TSP:MSG:SEND 1-1-0-0 s=255,c=3,t=0,pt=0,l=10,sg=0,ft=2,st=ok:1476000019
      !TSP:MSG:SEND 1-1-0-0 s=255,c=3,t=11,pt=0,l=9,sg=0,ft=0,st=fail:Kippenhok
      !TSP:MSG:SEND 1-1-0-0 s=255,c=3,t=12,pt=0,l=3,sg=0,ft=1,st=fail:1.0
      !TSP:MSG:SEND 1-1-0-0 s=1,c=0,t=16,pt=0,l=0,sg=0,ft=2,st=fail:
      !TSP:MSG:SEND 1-1-0-0 s=2,c=0,t=30,pt=0,l=0,sg=0,ft=3,st=fail:
      !TSP:MSG:SEND 1-1-0-0 s=3,c=0,t=6,pt=0,l=0,sg=0,ft=4,st=fail:
      !TSP:MSG:SEND 1-1-0-0 s=4,c=0,t=7,pt=0,l=0,sg=0,ft=5,st=fail:
      !TSM:UPL FAIL, SNP
      TSM:FPAR
      TSP:MSG:SEND 1-1-255-255 s=255,c=3,t=7,pt=0,l=0,sg=0,ft=0,st=bc:
      !TSP:SEND:TNR
      !TSP:SEND:TNR
      !TSP:SEND:TNR
      !TSP:SEND:TNR
      Request registration...
      !TSP:SEND:TNR
      TSM:FPAR
      TSP:MSG:SEND 1-1-255-255 s=255,c=3,t=7,pt=0,l=0,sg=0,ft=0,st=bc:
      !TSP:SEND:TNR
      TSM:FPAR
      TSP:MSG:SEND 1-1-255-255 s=255,c=3,t=7,pt=0,l=0,sg=0,ft=0,st=bc:
      !TSP:SEND:TNR
      TSM:FPAR
      TSP:MSG:SEND 1-1-255-255 s=255,c=3,t=7,pt=0,l=0,sg=0,ft=0,st=bc:
      !TSP:SEND:TNR
      !TSM:FPAR:FAIL
      !TSM:FAILURE
      TSM:PDT
      Init complete, id=1, parent=255, distance=255, registration=1
        ... loop ...
      !TSP:SEND:TNR
      Door Open, Lux 1407.40, luxState 1, camera off, (-)
      Battery 12.07V, -11.90mA
      !TSP:SEND:TNR
      !TSP:SEND:TNR
      !TSP:SEND:TNR
      !TSP:SEND:TNR
      !TSP:SEND:TNR
      !TSP:SEND:TNR
      !TSP:SEND:TNR
      !TSP:SEND:TNR
      !TSP:SEND:TNR
      --NO-- Time = 5, 0:0:5
        ... loop ...
      !TSP:SEND:TNR
      Door Open, Lux 1384.85, luxState 1, camera off, (-)
      Battery 12.07V, -11.20mA
      !TSP:SEND:TNR
      !TSP:SEND:TNR
      !TSP:SEND:TNR
      !TSP:SEND:TNR
      !TSP:SEND:TNR
      !TSP:SEND:TNR
      !TSP:SEND:TNR
      !TSP:SEND:TNR
      !TSP:SEND:TNR
      --NO-- Time = 10, 0:0:10
      
      
      posted in IOBroker
      stefaanv
      stefaanv
    • RE: Internet of Poultry - Fully automated chicken shed

      @Mark-Swift
      Nope, that's what the Fritz.box router is for. It has remote USB which I usb for the debugging. It's not ideal (always fails after computer hibernation) but it does the trick.

      posted in My Project
      stefaanv
      stefaanv
    • Controller selection matrix

      Not being very happy with Domoticz for various reasons, I'd like to chose a new controller.
      However, I'm baffled by the number of them and by the amount of information available about them. It is not possible to read all the fora about all the controllers to figure out which one suits my personal needs best.

      Would it be possible to have a page on the website with a matrix of properties of the controllers ? If the structure is made by the website people, the content can be filled in by the community.

      Things I would be interested in are

      • Functional features
      • In what language the controller is written
      • What API's are supported
      • What scripting languages are supported
      • Configuration user-friendliness
      • Operation user-friendliness
      • What OS-ses will it run on
      • How wide and active is the supporting community
      • Open-sourced or not
      posted in Controllers
      stefaanv
      stefaanv
    • RE: Selecting a motor

      @breimann
      Yes, worked smoothly during the holidays. Having a short video at door closing time is very comforting.
      The system is still working fine but one of the chickens sometimes forgets to go indoor. Next redesign will be to make the closing time configurable from the controller and to do something smart with the LED light.
      Still need to refactor the program in OOP style as well.
      Playtime has been limited lately 😞

      I doo see that the battery voltage is a lot lower now then it was during summer time. Still need to do some testing with the smart sleep mode as well.

      posted in My Project
      stefaanv
      stefaanv
    • RE: Setting parameters in nodes

      @hek
      VAR1-5 comes very close but is limited to 5 variables only.
      It would be better to have a generic key/value pair mechanism.
      Parameters/settings can be anything like

      • Setpoints
      • Program cycle times
      • Date/time settings
      • Process parameters (motor runtime, how time to wait before going into error mode, ...)
      • Booleans that alter program execution behaviour
        Ideally these can be pushed by the controller and requested by the node.
      posted in Feature Requests
      stefaanv
      stefaanv
    • RE: Parameters and settings

      @pjr
      V_HVAC_SETPOINT_HEAT comes closest to what I need but is still related to the sensor/actuator variable that is being controlled. I also need to send parameters that are totally unrelated to any of the sensor/actuator variables. This could f.i. be the cycle time of the measurements, whether or not sleep mode is used, ...
      I launched a feature request in meantime.

      posted in Development
      stefaanv
      stefaanv
    • Setting parameters in nodes

      I'd like to have some way to set parameters/settings in nodes.
      For example, my chicken shed is one Mysensors node that combines multiple sensors and actuators. I'd like to be able to update settings like sunset, sunrise, lux treshold, light (de-)activation time, etc without having to recompile the arduino sketch.
      I prefer to have the basic logic in the sensor node, not in the controller so that the shed continues to function even when the controller is down.
      I'm building my own micro-services based controller that will be able to handle settings/parameters but need some mechanism to tranverse the MySensors radio path.

      posted in Feature Requests
      stefaanv
      stefaanv
    • RE: Parameters and settings

      @mfalkvidd
      Nope, what I need is variables being set from the controller so that they can be updated/changed without changing the sketch. The scene controller does not do that.

      posted in Development
      stefaanv
      stefaanv
    • RE: Parameters and settings

      @sundberg84, @pjr
      I prefer to have basic automation in the sensor/actuator combination itself. then if the controller is off-line, the chickens still survive.
      Since my controller is a mix of test/production environment it is nog uncommon for it fail. One common thing is that USB ports change names after reboot in which can both the MySensors and the RfxCom devices stop communicating.

      posted in Development
      stefaanv
      stefaanv
    • Parameters and settings

      Hi,

      I'd like to write settings/parameters to my chicken shed sensor/actuator node. For instance lux level settings, sunset and sundown time, light activation time, etc.
      Has anyone done something similar ? If so, what MySensors mechanism did you use ?
      Do you think there is a need for a specific mechanism to send settings to nodes ?

      Stefaan

      posted in Development
      stefaanv
      stefaanv
    • RF24_BASE_RADIO_ID

      What exactly is the function of the RF24_BASE_RADIO_ID parameter ?
      Do I understand correctly that the nRF chip will only accept packets from nodes that emit the same radio ID ?
      What could be typical uses for this parameter ?

      posted in General Discussion
      stefaanv
      stefaanv
    • RE: Sensebender Micro

      @alexsh1 Thanks, got it working now.

      posted in Announcements
      stefaanv
      stefaanv
    • RE: Sensebender Micro

      @alexsh1 I'm using the Uno board. Which one should I use ? Can't find anything in the SenseBender page.

      posted in Announcements
      stefaanv
      stefaanv
    • RE: Sensebender programmer is not responding

      I have the same problem. Any suggestions yet ?

      posted in Troubleshooting
      stefaanv
      stefaanv
    • RE: Sensebender Micro

      I get "not in sync" errors from avrdude if I try uploading a sketch to the sensorbender.
      I do have correct serial communication, when I open the serial monitor, I get the info from the default sketch (which unfortunately uses the 1.4.1 API).
      I tried with a different SenseBender board, same result. Tried with an older IDE version (1.6.9) on an other computer, same result.
      Any suggestions ?

      avrdude: stk500_getsync() attempt 1 of 10: not in sync: resp=0x20
      avrdude: stk500_getsync() attempt 2 of 10: not in sync: resp=0x2d
      avrdude: stk500_getsync() attempt 3 of 10: not in sync: resp=0x20
      avrdude: stk500_getsync() attempt 4 of 10: not in sync: resp=0x4f
      avrdude: stk500_getsync() attempt 5 of 10: not in sync: resp=0x6e
      avrdude: stk500_getsync() attempt 6 of 10: not in sync: resp=0x6c
      avrdude: stk500_getsync() attempt 7 of 10: not in sync: resp=0x69
      avrdude: stk500_getsync() attempt 8 of 10: not in sync: resp=0x6e
      An error occurred while uploading the sketch
      avrdude: stk500_getsync() attempt 9 of 10: not in sync: resp=0x65
      avrdude: stk500_getsync() attempt 10 of 10: not in sync: resp=0x21

      posted in Announcements
      stefaanv
      stefaanv
    • RE: [solved] Problem with ioBroker and MySensors 2.0

      OK. Will take some time, I'll have to recompiler the 1.5 version. It'll be interesting to see if the 1.5 version works with ioBroker out of the box.

      posted in IOBroker
      stefaanv
      stefaanv
    • RE: [solved] Problem with ioBroker and MySensors 2.0

      @hek
      According to the ioBroker people, it's definitely because of 2.0. Here is the link to the forum. http://forum.iobroker.net/viewtopic.php?f=12&t=3577
      Looking at the logs, it seems the adapter has a problem to find the beginning of the MySensors messages. Did something change wrt end-of-line charcters ?

      posted in IOBroker
      stefaanv
      stefaanv
    • [solved] Problem with ioBroker and MySensors 2.0

      Did any of you manage to make ioBorker run with a Mysensors 2.0 serial gateway ? It doesn't work for me. I see the serial messages in the log, but nothing in the States list. When I activate the "Inclusion" mode, it is deactivated all by itself.
      The few tips I get from the ioBroker forum don't make any difference.

      posted in IOBroker
      stefaanv
      stefaanv
    • RE: Internet of Poultry - Fully automated chicken shed

      @breimann
      Here's the pictures of the cleaning. If you make a sliding bottom, do use mechanical sliders (I only have L-profiles) like the ones that are used in kitchen furniture. That way you'll be able to fully extend and your don't have to support the front. Do take care that the whole shed doesn't tip over.
      0_1472822231440_Kuisen 1.jpg

      0_1472822397045_Kuisen 3.jpg

      0_1472822238472_Kuisen 2.jpg

      posted in My Project
      stefaanv
      stefaanv
    • RE: Internet of Poultry - Fully automated chicken shed

      @breimann
      I'm using a cheap indoor dlink camera DCS-933L with night vision. One disadvantage : it can only be powered at 5V so I had to insert a DC/DC converter and it uses a lot of power (up to 200mA). So I only have it powered on about 1 minute every day. Just long enough for the NAS to pick up the signal and take a small clip.

      Great to have someone from the other side of the world interested in my project !!!
      Now I'm really curious, since you walk upside-down compared to us, Do chook in Austalia sleep on top of the roost or do they hang heads-down from the roost ? πŸ™‚

      posted in My Project
      stefaanv
      stefaanv
    • RE: Internet of Poultry - Fully automated chicken shed

      @bjacobse
      OK, in Dutch a "kok" is a chef in a restaurant. However, they typically behave like male chickens, so that is not so far off.

      posted in My Project
      stefaanv
      stefaanv
    • RE: Internet of Poultry - Fully automated chicken shed

      @breimann
      By the way, in what part of the world in a chicken called a chook ? Austalia according to Google Translate ? Correct ?

      posted in My Project
      stefaanv
      stefaanv
    • RE: Internet of Poultry - Fully automated chicken shed

      @breimann
      Just for fun, here is one of the evening recordings that is automatically stored on my Synology NAS every day. It provides evidence that the chickens were inside when the door closed. These recordings help me to set the correct ambient light level at which the door closes.
      0_1472800935919_Evening take.mp4
      It took some tuning, but this works really well now. The only times the chicks are not indoor when the door closes is on hot days when the temperature inside is still high in the evening.

      posted in My Project
      stefaanv
      stefaanv
    • RE: Internet of Poultry - Fully automated chicken shed

      @breimann
      I figured that if I connect the INA to the solar panels, I only get info about energy generation, not about consumption.
      By connecting it to the battery, I get both info's + the battery voltage which is a good indication for the charging level. What I can't see is the solar voltage and the absolute consumption and generation number (I measure the difference). However, there is physical evidence that it get's dark at night at which time the panels don't generate energy. The consumption is 45mA flat unless the camera or the LED's are switched on. So I can deduce all the information I'm not measuring.
      Ideally you should install 2 or even 3 INA's to measure generation, consumption and battery separately, but I found it was better to spend the money elsewhere.

      posted in My Project
      stefaanv
      stefaanv
    • RE: Internet of Poultry - Fully automated chicken shed

      @breimann
      1/ Yes, 2 standard hinges. There's plenty of different types (big, small, different materials, ...) in DIY shops. One thing to consider is if you want the open or closed type. buy the open type if you want to remove the door, else the closed type. The open type comes in left and right types. Make sure to buy the right ones or your door will fall off the hinges πŸ™‚
      2/ There is a chicken crushing protection in the software : if the "door closed" end-of-run isn't read within 4 seconds after the door started closing, then it will fully open again. The end-of-run switches are primarily to stop the motor when the end position is reached. Unlike with a servo or a stepper motor, with a DC motor you don't know at which position the door is. Also the motor is really strong. If it run too far something will break (I assume the internal gears will break first).
      3/ I bought the holding bracket for the motor together with the motor. I found it to be really expensive and badly designed but you can't make everything yourself. (matrimonial peace keeping, remember πŸ˜‰ )

      posted in My Project
      stefaanv
      stefaanv
    • RE: Selecting a motor

      @breimann
      If you have enough height, your best option is a vertically sliding door. Check out http://www.beschermjekippen.be/ for inspiration. In my case it was not an option because the ched is not high enough.
      For easy cleaning, I've put the bottom plate of the ched on sliders. Once a month I slide out the bottom, put an bucket underneath and push the wood chips and dropping into the bucket with a broom. The wood chips are nice because these prevent that the droppings stick to the floor. I didn't invent all this myself, stole the ideas in a few animal shops.
      By the way, in which part of the world is a chicken called a "chook" ??? πŸ™‚

      posted in My Project
      stefaanv
      stefaanv
    • RE: Internet of Poultry - Fully automated chicken shed

      @breimann , Battery and solar panels

      I'm using a Seeeduino instead of an Arduino because it is more flexible. The (measured) power consumption is about 45mA @ 12V. Since I wanted to bridge a 10day holiday period securely (assuming no input from the solar panels), I selected a 10Ah (240h x 45mA = 10800mAh) Sealed Lead Acid battery from dynoeurope.
      0_1472756044098_Batterij.jpg
      For the solar panels, I chose two 1.35 Wp 9V 150mA panels. 2x9V=18V >14.1V which is typically used to charge a 12V lead acid battery.
      0_1472756270084_Solar panel.jpg
      At first, I just connected the 2 panels in series across the battery and the arduino. This turned out to be a really bad idea ! The system stopped working when the battery was depleted to 4.5V. This wrecked the battery so I had to buy a new one.
      Together with the new battery, I bought a Steca Solsum 6.6 F Solar charger (12V 6A) which provides over- and undervoltage protection. It also provides a suitable charging voltage for lead acid batteries.
      0_1472756693275_Steca charger.jpg

      To be able to track the battery level, I attached an INA219 DC current sensor directly to the battery (it is supposed to be connected to the solar panel). It connects to the Seeeduino over iΒ²c and measures current and voltage of the battery.
      0_1472757174831_ina219.jpg
      This allows me to get nice graphs of the energy production and consumption in the system. Beware that due to an error in Domoticz, negative currents are shown as positive in the charts.

      Voltage charts
      0_1472757433275_spanning.png
      0_1472757452564_spanning_maand.png

      Current chart
      0_1472757475515_stroom.jpg

      After some time, I decided to double the amount of solar panels.
      When I connected the four panels in series I saw no difference at all in the charts.
      When however, I connected the 4 panels 2 in series and 2 groups in parallel I found the produced current was doubled. After some investigation I understand that the Steca charger simple cuts the excess voltage of the panels to protect the battery but doesn't convert the energy in an efficient way. What I really need is an MPPT (Maximum Power Point Tracking) charger.
      These however cost a small fortune, so in the name of matrimonial peace keeping, I decided to leave it like it is πŸ™‚

      posted in My Project
      stefaanv
      stefaanv
    • RE: Internet of Poultry - Fully automated chicken shed

      @breimann , door mechanism and end-of-run contacts

      I did a few attempt to make the door arm out of wood, but wasn't happy with any of them. The biggest problem was to connect the arm to the motor. I usually use the below cable connectors to fasten something to a shaft, but the shaft of the motor is 6mm diam while the biggest connector I can find can only take a 5mm shaft.
      0_1472752999390_Suikertjes.jpg
      In the end I bought two steel corner pieces in the closest DIY shop and adapted them with a drill and a grinder.
      In the same DIY shop I found a cheap router which was fastened to a 6mm drill with a small inbus screw, the router is the black piece in the below photos.
      After some attempts to glue to router to the corner piece, I decided to solder them together with plumbing solder. If you attempt this, be carefull not to burn your fingers. I takes a few minutes to cool down.
      0_1472753490616_soldering overview.jpg
      0_1472753501407_soldering close.jpg

      The end result, when mounted in the shed looks like this
      0_1472753916648_Door mechanism indoor.jpg
      0_1472753926388_Door mechanism outside.jpg

      Here is a video of the door in action
      0_1472754055923_Video deurtje.mp4

      In the pictures and the video you can see the end-of-run magnetic switches which I use to detect the open and close position of the door. These are connected to Arduino input pins.

      posted in My Project
      stefaanv
      stefaanv
    • RE: Internet of Poultry - Fully automated chicken shed

      @breimann , all of that will take a few posts to explain. Bear with me.

      The door mechanism took a lot of trial and error. My biggest advise is to estimate the torque needed to open the door before ordering any components.

      Due to lack of a dynamometer, here is how I tackled the problem :

      Attach an elastic band to the door at some position where you know the distance to the hinges (15cm in my case)

      Pulls the elastic band towards you in a right angle to the door until the door starts to move. Measure or estimate how much the elastic band is stretched (in my case, I measured +/-30cm). Be careful the door doesn't smach into your face πŸ™‚

      Disconnect the elastic band from the door and suspend some adjustable weight to it until it is stretched the same amount as before. I used a small bottle, an iron wire and changed the amount of water in the bottle. 0_1472752518609_bottle.jpg 0_1472748734920_bottle.jpg

      Measure the weight
      0_1472752530848_bottle on scale.jpg 0_1472748775095_bottle on scale.jpg

      The torque is distance (to the hinges) x the weight, in my case 15cm x 0.285kg = 4.275 kg.cm

      I selected a Modelcraft RB350600-0A101R Transmissiemotor 12 V 1:600 (25€ at Conrad).
      According to the datasheet, at 3.44kg.cm (closest in the list), the motor should run at 9,46 rpm and consume 0,14A (12V).
      In reality, the motor takes about 3,5s to make half a turn, which amounts to 8,6 rpm and pulls between 150 and 200mA with a startup current of +/- 350mA. Pretty close to what the data sheet says !

      For the actuation of the motor, I use two relays of a Seeeduino relay shield of which I connected the NO to 0V, the NC to 12V and each motor wire to one of the COM. The resulting behavior is
      R1 open, R2 open ==> motor stops
      R1 closed, R2 open ==> motor turns CW
      R1 open, R2 closed ==> motor turns CCW
      R1 closed, R2 closed==> motor stops

      Some more advise,
      Don't try to open the door with a stepper motor. i tried it and I got bad oscillations.
      A servo motor could also work, but you'll have to find one that can deliver the torque.

      posted in My Project
      stefaanv
      stefaanv
    • Selecting a motor

      @breimann , all of that will take a few posts to explain. Bear with me.

      The door mechanism took a lot of trial and error. My biggest advise is to estimate the torque needed to open the door before ordering any components.

      Due to lack of a dynamometer, here is how I tackled the problem :

      1. Attach an elastic band to the door at some position where you know the distance to the hinges (15cm in my case)

      2. Pulls the elastic band towards you in a right angle to the door until the door starts to move. Measure or estimate how much the elastic band is stretched (in my case, I measured +/-30cm). Be careful the door doesn't smach into your face πŸ™‚

      3. Disconnect the elastic band from the door and suspend some adjustable weight to it until it is stretched the same amount as before. I used a small bottle, an iron wire and changed the amount of water in the bottle. 0_1472748734920_bottle.jpg

      4. Measure the weight
        0_1472748775095_bottle on scale.jpg

      5. The torque is distance (to the hinges) x the weight, in my case 15cm x 0.285kg = 4.275 kg.cm

      I selected a Modelcraft RB350600-0A101R Transmissiemotor 12 V 1:600 (25€ at Conrad).
      According to the datasheet, at 3.44kg.cm (closest in the list), the motor should run at 9,46 rpm and consume 0,14A (12V).
      In reality, the motor takes about 3,5s to make half a turn, which amounts to 8,6 rpm and pulls between 150 and 200mA with a startup current of +/- 350mA. Pretty close to what the data sheet says !

      For the actuation of the motor, I use two relays of a Seeeduino relay shield of which I connected the NO to 0V, the NC to 12V and each motor wire to one of the COM. The resulting behavior is
      R1 open, R2 open ==> motor stops
      R1 closed, R2 open ==> motor turns CW
      R1 open, R2 closed ==> motor turns CCW
      R1 closed, R2 closed==> motor stops

      Some more advise,
      Don't try to open the door with a stepper motor. i tried it and I got bad oscillations.
      A servo motor could also work, but you'll have to find one that can deliver the torque.

      posted in My Project
      stefaanv
      stefaanv
    • RE: Meetup in the Netherlands - Saturday July 30th, in Breda!

      Thanks also from my side. Learned a lot of new things during the meeting. It will take some time to try everything out.
      My son caught a lot of PokΓ©mon in Breda (untill the phone battery went flat) and my wife did a lot of shopping, so everybody was happy !

      posted in General Discussion
      stefaanv
      stefaanv
    • RE: Internet of Poultry - Fully automated chicken shed

      @sincze beware, the router solution isn't perfect. Sometimes the connection drop out for no apparent reason. The advantage is that you get full debug info over the serial port. I'm going to have a look at OTA updates for future projects.

      posted in My Project
      stefaanv
      stefaanv
    • RE: Sleep support in Gateway

      @AWI Thought about that, but I can't figure out how instruct to store V_TEST or V_VAR information in Domoticz nodes for sending it to the MySensors node. I've searched the Domoticz forum over and over without success. Can you point me in the right direction ?

      posted in General Discussion
      stefaanv
      stefaanv
    • RE: Internet of Poultry - Fully automated chicken shed

      Yes, we have foxes (and rats) in the neighbourhood. Chicks get eaten if not locked up at night. The fence is only 1m high, but won't keep a fox away from the chickens.
      I thought about RfId, but question is if one reader will detect tags anywhere in the shed.
      Voice recognition is another option to account for all chickens. Maybe when I find the time. Pool automation must be taken care of first πŸ™‚
      Anyway, it works as it is. Just need to set the light level in between chicken bed time and fox lunch time.

      posted in My Project
      stefaanv
      stefaanv
    • RE: Internet of Poultry - Fully automated chicken shed

      @TommySharp, after some observation I set the light limit to 18 [something], I don't trust the light sensor to output Lux accurately. Till now they've always been inside when the door closes. They're social animal by the way, if one goes indoor at dawn, the other one follows within minutes.

      posted in My Project
      stefaanv
      stefaanv
    • RE: Internet of Poultry - Fully automated chicken shed

      @tbowmo Both food and water are "gravitationally supplied". There is a 15liter food and 1l water supply indoor and 12l water supply outdoor. These last for weeks.
      0_1469257021106_Food_water.jpg

      Wifi webcam is connected to Synology NAS camera app for recording. The aim is to enable the camera 5min before and after the closing of the door. Outdoor camera is on the wish list. Camera's can be enabled both automatically and remotely (like the door). Good news is that the chickens are smart enough to move out of harms way when the door closes. I noticed that the chickens go indoor very punctually on the internet provided sun-down, so the lux sensors may not be needed after all.

      Remaining isuues are collecting of eggs and droppings. Both are less urgent and much more difficult to accomplish.

      posted in My Project
      stefaanv
      stefaanv
    • Internet of Poultry - Fully automated chicken shed

      The goal of this project is to automate our chicken shed to such a level that the chickens can survive our summer vacation without outside help.

      0_1469173555598_IoP cover.JPG
      The project is based on Domoticz(rPi) and MySensors (Sparkfun Redboard)
      Sensors in the shed :

      • Temperature + humidity
      • Ambient light sensor
      • Current/voltage on the solar panels and on the motor
      • PIR sensor
      • End-of-run switches
      • Two buttons for local activation of the door

      Actuators :

      • DC motor for opening/closing the door
      • Relais for switching the inside light
      • Relais for switching the webcam

      The board arduino shield for connecting all the wiring
      0_1469174937923_Shield.jpg

      The complete installation
      From left to right : (temporary) router for remote USB connection for uploading sketches, Arduino with shields, DC motor, Solar charging controller.
      ,
      0_1469174994808_Complete installation.jpg

      The shed in the making
      0_1469175138149_Shed in the making.jpg

      The door mechanism & one of the end-of-run sensors
      0_1469175532912_Door machanism.jpg

      Overview photo with solar panels
      0_1469175609860_Overview.jpg

      posted in My Project
      stefaanv
      stefaanv
    • RE: Meetup in the Netherlands - Saturday July 30th, in Breda!

      OK, got the ticket.
      If the BBQ is still on, I'd like to come with 4 people (2 adults, 2 children). Just let me know what's the price per person.
      Looking forward to meet you all.
      Can't bring my sensor, it's a chicken shed. I can bring foto's and demo over the internet.
      My setup : domoticz on rPi3, MySensors Gateway, RfxCom gateway, Domoticz linked to 3 wago PLC's, some Python code, sketches, c# on mono, etc

      posted in General Discussion
      stefaanv
      stefaanv
    • RE: Meetup in the Netherlands - Saturday July 30th, in Breda!

      Count me in for the conference. Will fill out the form later.
      Let me know if I need to bring some real beer πŸ™‚

      Stefaan

      posted in General Discussion
      stefaanv
      stefaanv
    • RE: Sleep support in Gateway

      @hek What is missing in the AtMega328 ? In my case the messages are only spurious door open/close instructions. I expect only a couple of message a day which can be picked up by the sensor node every 10 seconds or so.
      Is it possible in that case ? Can it be done in sketch code using the current library ?

      posted in General Discussion
      stefaanv
      stefaanv
    • RE: Sleep support in Gateway

      Sorry for the typo above.

      I've created a sensor node that could sleep most of the time but needs to receive messages occasionally. I'm eager to reduce the power draw since it is solar/battery powered. The controller is Domoticz.
      Sleep mode doesn't work for incoming messages (to the sensor) because Domoticz doesn't support message delaying.

      My question : is it feasible to create a gateway that buffers messages from the controller to the sensor until the sensor node wakes up ? That way sleep mode can be supported without any changes to the controller software.

      posted in General Discussion
      stefaanv
      stefaanv
    • Sleep support in Gateway

      Hi,
      I've built a sensor node that can sleep for most of the time except it receives a

      posted in General Discussion
      stefaanv
      stefaanv
    • Writing gateways

      I'd like to write two more gateway for MyNodes.net. One for the RFXcom gateway and one to interface with the Wago PLC's that drive my home automation.
      Although there are explanations on the mynodes.net website how to build new nodes, there is no info about how to build gateways.
      Does anyone have information to can get me started ?

      posted in MyNodes.NET
      stefaanv
      stefaanv