Internet of Poultry - Fully automated chicken shed


  • The goal of this project is to automate our chicken shed to such a level that the chickens can survive our summer vacation without outside help.

    0_1469173555598_IoP cover.JPG
    The project is based on Domoticz(rPi) and MySensors (Sparkfun Redboard)
    Sensors in the shed :

    • Temperature + humidity
    • Ambient light sensor
    • Current/voltage on the solar panels and on the motor
    • PIR sensor
    • End-of-run switches
    • Two buttons for local activation of the door

    Actuators :

    • DC motor for opening/closing the door
    • Relais for switching the inside light
    • Relais for switching the webcam

    The board arduino shield for connecting all the wiring
    0_1469174937923_Shield.jpg

    The complete installation
    From left to right : (temporary) router for remote USB connection for uploading sketches, Arduino with shields, DC motor, Solar charging controller.
    ,
    0_1469174994808_Complete installation.jpg

    The shed in the making
    0_1469175138149_Shed in the making.jpg

    The door mechanism & one of the end-of-run sensors
    0_1469175532912_Door machanism.jpg

    Overview photo with solar panels
    0_1469175609860_Overview.jpg


  • Admin

    Awesome! I must show my sister this.. She recently started breeding chickens for the eggs.


  • Hardware Contributor

    Damn... now i have to get chickens 😉


  • Hardware Contributor

    excellent 👍 what a luxury poultry 🙂


  • Hero Member

    @stefaanv Pretty neat! although I would still ask somebody to keep an eye on your feathered friends... 👀


  • Contest Winner

    Awesome ⭐ Thumbs up from me 👍


  • You beat me to it, this is totally on my longer term list to accomplish for quail.


  • Hardware Contributor

    Cococoricooo
    hmm sorry, it was too hard to resist...I'm french 😅


  • Admin

    Cool project..

    Two parts are missing though, what about food and water?

    Is it a wifi enabled Webcam?


  • @tbowmo Both food and water are "gravitationally supplied". There is a 15liter food and 1l water supply indoor and 12l water supply outdoor. These last for weeks.
    0_1469257021106_Food_water.jpg

    Wifi webcam is connected to Synology NAS camera app for recording. The aim is to enable the camera 5min before and after the closing of the door. Outdoor camera is on the wish list. Camera's can be enabled both automatically and remotely (like the door). Good news is that the chickens are smart enough to move out of harms way when the door closes. I noticed that the chickens go indoor very punctually on the internet provided sun-down, so the lux sensors may not be needed after all.

    Remaining isuues are collecting of eggs and droppings. Both are less urgent and much more difficult to accomplish.


  • I've had a similar setup run for over a year. Last week my ln298 broke so the door doesn't open and close anymore. Waiting on spare parts. I have guillotine style door with reed switches on top and bottom.


  • Is it important to know that all the chickens are in the coup before you close the door or are we just assuming they are all inside at a certain time?


  • @TommySharp said:

    Is it important to know that all the chickens are in the coup before you close the door or are we just assuming they are all inside at a certain time?

    I use a light sensor and close the door at <5 lux. They are allways in by then.


  • @TommySharp
    Maybe all the chickens needs to be wearing a RFID tag, and then clsoe door when all counted RFID tags are inside (RFID reader could maybe be close to water/food supply)


  • @TommySharp, after some observation I set the light limit to 18 [something], I don't trust the light sensor to output Lux accurately. Till now they've always been inside when the door closes. They're social animal by the way, if one goes indoor at dawn, the other one follows within minutes.


  • Mod

    @stefaanv said:

    when the door closes

    Possible stupid question from someone with zero chicken knowledge : why do you have to close the door at night?


  • Fox ! He like chicken for diner !


  • Mod

    @Fabien looks to be 1.5m fence around it, which could also keep the foxes out. But again, what do I know 😆


  • @Yveaux said:

    @Fabien looks to be 1.5m fence around it, which could also keep the foxes out. But again, what do I know 😆

    I have fence too ... and fox ... But no more chicken ! 3 eaten in April !


  • Yes, we have foxes (and rats) in the neighbourhood. Chicks get eaten if not locked up at night. The fence is only 1m high, but won't keep a fox away from the chickens.
    I thought about RfId, but question is if one reader will detect tags anywhere in the shed.
    Voice recognition is another option to account for all chickens. Maybe when I find the time. Pool automation must be taken care of first 🙂
    Anyway, it works as it is. Just need to set the light level in between chicken bed time and fox lunch time.


  • @stefaanv

    First off, excellent design. Great job!

    I have had one of these running for a while. I did not want mine to react to light levels because I did not want it to close during a thunderstorm, etc. and lock the chickens out. That being said, I have mine close 20 minutes after sunset and open 20 minutes after sunrise. The first couple of nights some of the chickens were locked out because they came home to late. I had to manually let them in. After a couple of days they learned quickly (despite not being very smart creatures) and they head to the house early before the door closes. After that, my camera alerts me to any movement in the house. I have only had one false alarm in a couple of months.

    I have a pretty strong outdoor pen and I have still had multiple black snakes, one raccoon, and one possum get in. The raccoon ate a chicken and one snake bit one. After installing the door I have not had one injured chicken.

    Mine is pretty low tech. I used a single push button and mysensored a relay board that turns a dc motor with a 3d printed gear that raises/lowers the door. I have had zero problems with it since installed. Thanks Hek!

    The one big thing I learned, Transient Voltage Suppressor. I used a larger dc motor due to the weight of my door and every time the door opened it scrambled the Arduino with electric interference. Took me forever to figure out what the problem was and how to fix it.

    Now if I can just figure out how to mysensor it to let me know when a chicken lays an egg.....


  • MySensors Evangelist

    @stefaanv I had to view the pictures again 😃 it still is a very nice project. And the router was a nice idea for my experiment to remotely upload sketches in the garden instead of picking the whole device up back into the house.. I'll have to look into that a little bit further to figure out how I can use it..


  • @sincze beware, the router solution isn't perfect. Sometimes the connection drop out for no apparent reason. The advantage is that you get full debug info over the serial port. I'm going to have a look at OTA updates for future projects.


  • @stefaanv said:

    OTA updates

    If I could only make time to get this working also! 😄

    Great project!


  • Hi @stefaanv i'm very new to mysensors but am awaiting some parcels to arrive to try my hand at a few things. First on the list is two water tank level sensors, but next will probably be our chook yard automation system. Love this project! It's inspired me to keep dreaming and designing. It would be really helpful to see a few more things in detail like what battery are you using, solar panel, and the door activation system. Also is there another way to do remote upload of sketches?


  • @koen01 this sounds interesting. Any chance you could post a photo of your door system?


  • @breimann , all of that will take a few posts to explain. Bear with me.

    The door mechanism took a lot of trial and error. My biggest advise is to estimate the torque needed to open the door before ordering any components.

    Due to lack of a dynamometer, here is how I tackled the problem :

    Attach an elastic band to the door at some position where you know the distance to the hinges (15cm in my case)

    Pulls the elastic band towards you in a right angle to the door until the door starts to move. Measure or estimate how much the elastic band is stretched (in my case, I measured +/-30cm). Be careful the door doesn't smach into your face 🙂

    Disconnect the elastic band from the door and suspend some adjustable weight to it until it is stretched the same amount as before. I used a small bottle, an iron wire and changed the amount of water in the bottle. 0_1472752518609_bottle.jpg 0_1472748734920_bottle.jpg

    Measure the weight
    0_1472752530848_bottle on scale.jpg 0_1472748775095_bottle on scale.jpg

    The torque is distance (to the hinges) x the weight, in my case 15cm x 0.285kg = 4.275 kg.cm

    I selected a Modelcraft RB350600-0A101R Transmissiemotor 12 V 1:600 (25€ at Conrad).
    According to the datasheet, at 3.44kg.cm (closest in the list), the motor should run at 9,46 rpm and consume 0,14A (12V).
    In reality, the motor takes about 3,5s to make half a turn, which amounts to 8,6 rpm and pulls between 150 and 200mA with a startup current of +/- 350mA. Pretty close to what the data sheet says !

    For the actuation of the motor, I use two relays of a Seeeduino relay shield of which I connected the NO to 0V, the NC to 12V and each motor wire to one of the COM. The resulting behavior is
    R1 open, R2 open ==> motor stops
    R1 closed, R2 open ==> motor turns CW
    R1 open, R2 closed ==> motor turns CCW
    R1 closed, R2 closed==> motor stops

    Some more advise,
    Don't try to open the door with a stepper motor. i tried it and I got bad oscillations.
    A servo motor could also work, but you'll have to find one that can deliver the torque.


  • @breimann , door mechanism and end-of-run contacts

    I did a few attempt to make the door arm out of wood, but wasn't happy with any of them. The biggest problem was to connect the arm to the motor. I usually use the below cable connectors to fasten something to a shaft, but the shaft of the motor is 6mm diam while the biggest connector I can find can only take a 5mm shaft.
    0_1472752999390_Suikertjes.jpg
    In the end I bought two steel corner pieces in the closest DIY shop and adapted them with a drill and a grinder.
    In the same DIY shop I found a cheap router which was fastened to a 6mm drill with a small inbus screw, the router is the black piece in the below photos.
    After some attempts to glue to router to the corner piece, I decided to solder them together with plumbing solder. If you attempt this, be carefull not to burn your fingers. I takes a few minutes to cool down.
    0_1472753490616_soldering overview.jpg
    0_1472753501407_soldering close.jpg

    The end result, when mounted in the shed looks like this
    0_1472753916648_Door mechanism indoor.jpg
    0_1472753926388_Door mechanism outside.jpg

    Here is a video of the door in action
    0_1472754055923_Video deurtje.mp4

    In the pictures and the video you can see the end-of-run magnetic switches which I use to detect the open and close position of the door. These are connected to Arduino input pins.


  • @breimann , Battery and solar panels

    I'm using a Seeeduino instead of an Arduino because it is more flexible. The (measured) power consumption is about 45mA @ 12V. Since I wanted to bridge a 10day holiday period securely (assuming no input from the solar panels), I selected a 10Ah (240h x 45mA = 10800mAh) Sealed Lead Acid battery from dynoeurope.
    0_1472756044098_Batterij.jpg
    For the solar panels, I chose two 1.35 Wp 9V 150mA panels. 2x9V=18V >14.1V which is typically used to charge a 12V lead acid battery.
    0_1472756270084_Solar panel.jpg
    At first, I just connected the 2 panels in series across the battery and the arduino. This turned out to be a really bad idea ! The system stopped working when the battery was depleted to 4.5V. This wrecked the battery so I had to buy a new one.
    Together with the new battery, I bought a Steca Solsum 6.6 F Solar charger (12V 6A) which provides over- and undervoltage protection. It also provides a suitable charging voltage for lead acid batteries.
    0_1472756693275_Steca charger.jpg

    To be able to track the battery level, I attached an INA219 DC current sensor directly to the battery (it is supposed to be connected to the solar panel). It connects to the Seeeduino over i²c and measures current and voltage of the battery.
    0_1472757174831_ina219.jpg
    This allows me to get nice graphs of the energy production and consumption in the system. Beware that due to an error in Domoticz, negative currents are shown as positive in the charts.

    Voltage charts
    0_1472757433275_spanning.png
    0_1472757452564_spanning_maand.png

    Current chart
    0_1472757475515_stroom.jpg

    After some time, I decided to double the amount of solar panels.
    When I connected the four panels in series I saw no difference at all in the charts.
    When however, I connected the 4 panels 2 in series and 2 groups in parallel I found the produced current was doubled. After some investigation I understand that the Steca charger simple cuts the excess voltage of the panels to protect the battery but doesn't convert the energy in an efficient way. What I really need is an MPPT (Maximum Power Point Tracking) charger.
    These however cost a small fortune, so in the name of matrimonial peace keeping, I decided to leave it like it is 🙂


  • @stefaanv
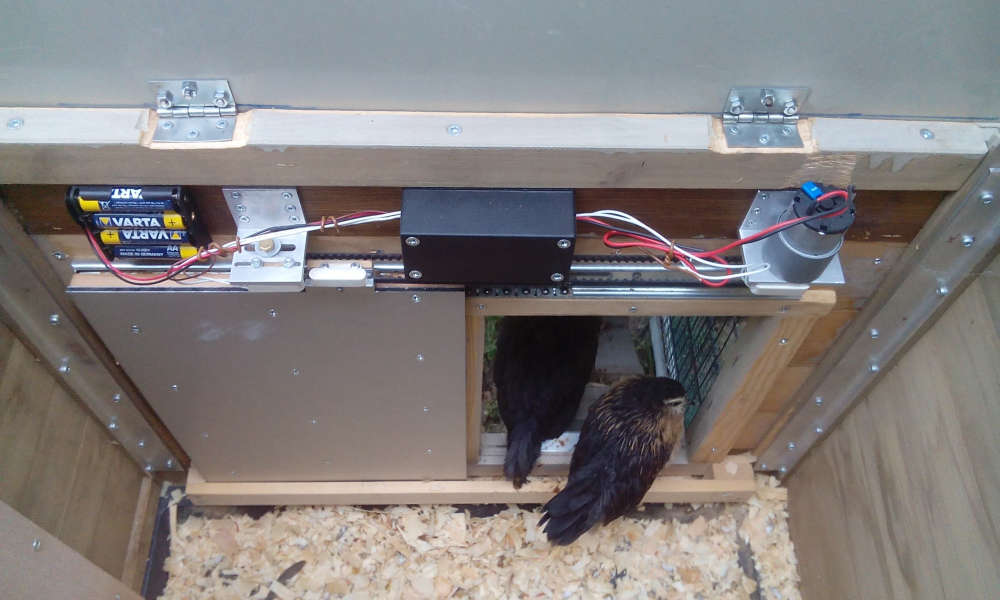
    Door mechanism and end of run contacts
    This is great info!
    A couple questions.

    1. Are you just using standard door hinges x 2 on the door on the outside?
    2. Is that a magnetic latch you have once it closes to stop a chook accidentally (or deliberately?? ;)) pushing against it?
    3. Did you buy the motor with the tube to fit inside it and bracket or did you fashion that yourself?
      Thankyou!


  • @stefaanv
    Solar Panel and Batteries
    I'm all for matrimonial peace keeping!!
    I'm just curious, why did you connect the INA219 DC current sensor directly to the battery and not the solar panel?


  • @breimann
    1/ Yes, 2 standard hinges. There's plenty of different types (big, small, different materials, ...) in DIY shops. One thing to consider is if you want the open or closed type. buy the open type if you want to remove the door, else the closed type. The open type comes in left and right types. Make sure to buy the right ones or your door will fall off the hinges 🙂
    2/ There is a chicken crushing protection in the software : if the "door closed" end-of-run isn't read within 4 seconds after the door started closing, then it will fully open again. The end-of-run switches are primarily to stop the motor when the end position is reached. Unlike with a servo or a stepper motor, with a DC motor you don't know at which position the door is. Also the motor is really strong. If it run too far something will break (I assume the internal gears will break first).
    3/ I bought the holding bracket for the motor together with the motor. I found it to be really expensive and badly designed but you can't make everything yourself. (matrimonial peace keeping, remember 😉 )


  • @breimann
    I figured that if I connect the INA to the solar panels, I only get info about energy generation, not about consumption.
    By connecting it to the battery, I get both info's + the battery voltage which is a good indication for the charging level. What I can't see is the solar voltage and the absolute consumption and generation number (I measure the difference). However, there is physical evidence that it get's dark at night at which time the panels don't generate energy. The consumption is 45mA flat unless the camera or the LED's are switched on. So I can deduce all the information I'm not measuring.
    Ideally you should install 2 or even 3 INA's to measure generation, consumption and battery separately, but I found it was better to spend the money elsewhere.


  • @breimann
    Just for fun, here is one of the evening recordings that is automatically stored on my Synology NAS every day. It provides evidence that the chickens were inside when the door closed. These recordings help me to set the correct ambient light level at which the door closes.
    0_1472800935919_Evening take.mp4
    It took some tuning, but this works really well now. The only times the chicks are not indoor when the door closes is on hot days when the temperature inside is still high in the evening.


  • @breimann
    By the way, in what part of the world in a chicken called a chook ? Austalia according to Google Translate ? Correct ?


  • @stefaanv
    In Danish a "kok" is a male chicken


  • @bjacobse
    OK, in Dutch a "kok" is a chef in a restaurant. However, they typically behave like male chickens, so that is not so far off.


  • @stefaanv
    Yes, google gets it right again... i'm in Australia, or South Australia to be a little more precise. Yep "chooks" is the commonly used word here for chickens.


  • @stefaanv
    Love this recording. I love how you linked the recording to start 5 seconds before the door closes, and how you can see if there are eggs in your laying boxes and if the chooks are roosting!! Love it. Great thinking. What sort of camera are you using?


  • @breimann
    I'm using a cheap indoor dlink camera DCS-933L with night vision. One disadvantage : it can only be powered at 5V so I had to insert a DC/DC converter and it uses a lot of power (up to 200mA). So I only have it powered on about 1 minute every day. Just long enough for the NAS to pick up the signal and take a small clip.

    Great to have someone from the other side of the world interested in my project !!!
    Now I'm really curious, since you walk upside-down compared to us, Do chook in Austalia sleep on top of the roost or do they hang heads-down from the roost ? 🙂


  • @stefaanv
    That's helpful re type of camera.
    To shed light on your question re how chooks sleep on roosts in Australia... yes they do sleep upside down, a bit like a bat... but maybe bats don't sleep hanging upside down where you live?? 😉
    No, gravity unfortunately (fortunately) hasn't taken a holiday here, so if they tried sleeping upside down i'm afraid their blood would all drain to their brains!!


  • @stefaanv said:

    @bjacobse
    OK, in Dutch a "kok" is a chef in a restaurant. However, they typically behave like male chickens, so that is not so far off.

    Yes a kok is also a kitchen chef in DK


  • @breimann
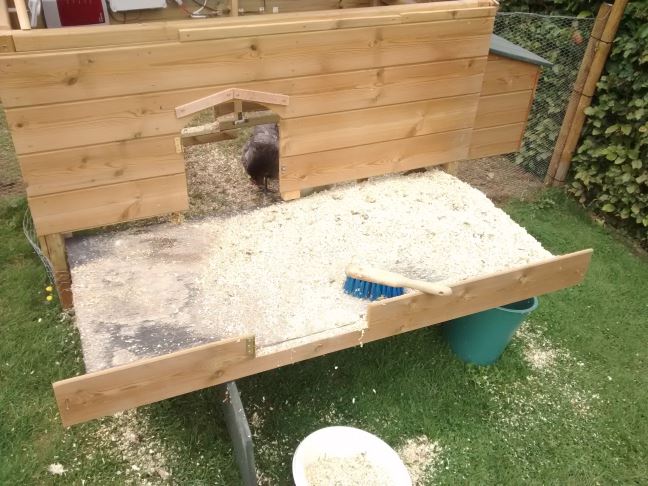
    Here's the pictures of the cleaning. If you make a sliding bottom, do use mechanical sliders (I only have L-profiles) like the ones that are used in kitchen furniture. That way you'll be able to fully extend and your don't have to support the front. Do take care that the whole shed doesn't tip over.
    0_1472822231440_Kuisen 1.jpg

    0_1472822397045_Kuisen 3.jpg

    0_1472822238472_Kuisen 2.jpg


  • @stefaanv Sorry i've been busy fencing and planting trees last few days... this is a great cleaning system... although i'm planning to make a bit bigger coup so not sure how i can incorporate this but it looks fantastic. Great thinking!


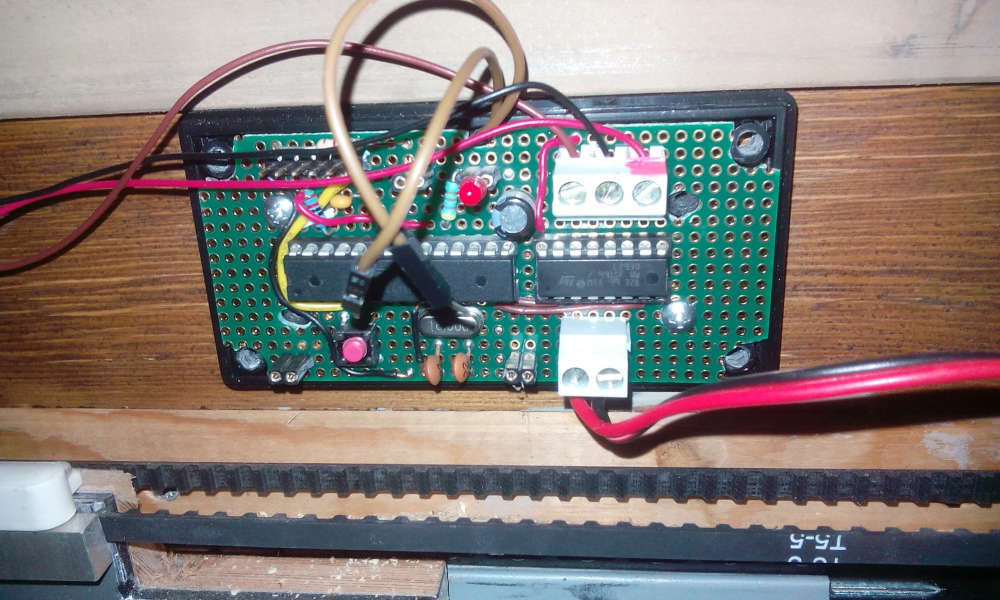
  • May I ask, how do you get debug remotely? I also presume you're using the MYS bootloader?

    Great project!


  • @Mark-Swift
    Nope, that's what the Fritz.box router is for. It has remote USB which I usb for the debugging. It's not ideal (always fails after computer hibernation) but it does the trick.


  • I would love to see your sensor code. I am in the process building an automated door for my coop as well.


  • @Nathan-Overley
    Hi Nathan, it's not nice code, been written too quickly. I have to rewrite it some day. Still, here it is, it may give you idea's. Let me know if you improve it.
    0_1477377889434_Kippenhok_3.ino


  • @stefaanv
    Thank you! I will definitely post my version when I get it done. I really appreciate you posting the code!


  • Hello Stefaan,

    Thanks for sharing your nice project !
    How is it with the automatic door and your MySensors controller after 2 years ?

    Do you improved the code in the meanwhile and do you want to share it again ?

    I made also an automatic (horizontal sliding) door on my coop with a barebone Arduino and a LDR as sensor, but I want the same functionalities like yours, so I ordered today all the extra necessary parts.

    0_1537217224212_IMG_20170624_204139.jpg

    0_1537217174000_IMG_20170626_080402.jpg

    Kind regards and thanks in advance,
    Peter.


Log in to reply
 

Suggested Topics

  • 8
  • 2
  • 90
  • 2
  • 2
  • 29

0
Online

11.2k
Users

11.1k
Topics

112.5k
Posts