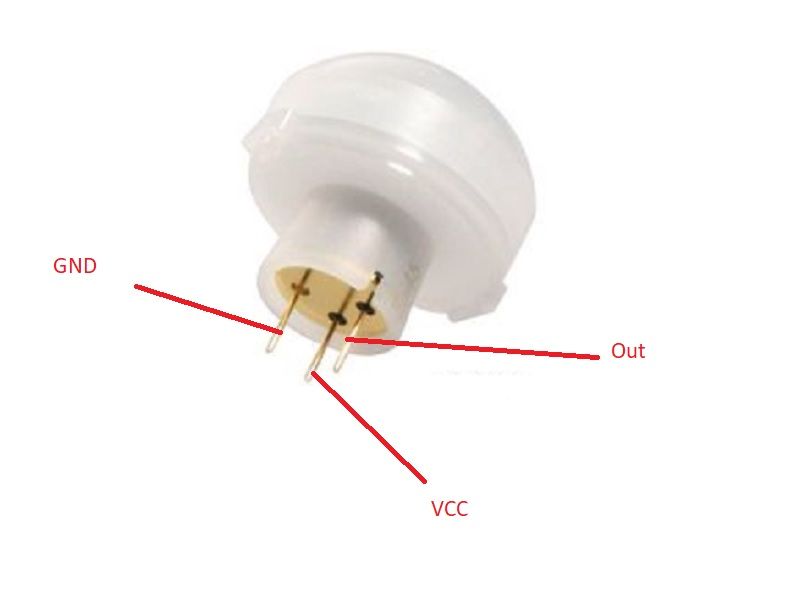
Skip to content

Troubleshooting

Help! Everything just falls apart
2.7k Topics 21.5k Posts
  • NodeMCU Wifi not working

    4
    0 Votes
    4 Posts
    56 Views
    mfalkviddM
    Nice work @netbus. Thanks for reporting back.
  • arduino serial monitor gateway problem

    5
    1 Votes
    5 Posts
    69 Views
    K
    @sundberg84 2020-02-27 00:33:15.512 Status: MySensors: Worker started... 2020-02-27 00:33:16.513 Status: MySensors: Using serial port: /dev/ttyUSB0 Does this mean that I was able to connect? However, I still have no reaction in the "devices" tab, and the status in the hardware "setup"
  • !MCO:PRO:RC=1

    9
    0 Votes
    9 Posts
    221 Views
    R
    Hi, The strange behavior is no longer present and I can't replicate the problem. I suspect there was a general communication problem with the gateway. Anyway, please see the following debug prints. __ __ ____ | \/ |_ _/ ___| ___ _ __ ___ ___ _ __ ___ | |\/| | | | \___ \ / _ \ `_ \/ __|/ _ \| `__/ __| | | | | |_| |___| | __/ | | \__ \ _ | | \__ \ |_| |_|\__, |____/ \___|_| |_|___/\___/|_| |___/ |___/ 2.3.2 16 MCO:BGN:INIT NODE,CP=RNNNA-Q-,FQ=16,REL=255,VER=2.3.2 26 TSM:INIT 28 TSF:WUR:MS=0 34 TSM:INIT:TSP OK 36 TSF:SID:OK,ID=1 38 TSM:FPAR 41 ?TSF:MSG:SEND,1-1-255-255,s=255,c=3,t=7,pt=0,l=0,sg=0,ft=0,st=OK: 247 TSF:MSG:READ,0-0-1,s=255,c=3,t=8,pt=1,l=1,sg=0:0 252 TSF:MSG:FPAR OK,ID=0,D=1 2050 TSM:FPAR:OK 2051 TSM:ID 2052 TSM:ID:OK 2054 TSM:UPL 2057 TSF:MSG:SEND,1-1-0-0,s=255,c=3,t=24,pt=1,l=1,sg=0,ft=0,st=OK:1 2068 TSF:MSG:READ,0-0-1,s=255,c=3,t=25,pt=1,l=1,sg=0:1 2073 TSF:MSG:PONG RECV,HP=1 2075 TSM:UPL:OK 2077 TSM:READY:ID=1,PAR=0,DIS=1 2081 TSF:MSG:SEND,1-1-0-0,s=255,c=3,t=15,pt=6,l=2,sg=0,ft=0,st=OK:0100 2100 TSF:MSG:READ,0-0-1,s=255,c=3,t=15,pt=6,l=2,sg=0:0100 2110 TSF:MSG:SEND,1-1-0-0,s=255,c=0,t=17,pt=0,l=5,sg=0,ft=0,st=OK:2.3.2 2118 TSF:MSG:SEND,1-1-0-0,s=255,c=3,t=6,pt=1,l=1,sg=0,ft=0,st=OK:0 2179 TSF:MSG:READ,0-0-1,s=255,c=3,t=6,pt=0,l=1,sg=0:M 2186 TSF:MSG:SEND,1-1-0-0,s=255,c=3,t=11,pt=0,l=18,sg=0,ft=0,st=OK:Stairs Wall Lights 2198 TSF:MSG:SEND,1-1-0-0,s=255,c=3,t=12,pt=0,l=3,sg=0,ft=0,st=OK:1.2 2209 TSF:MSG:SEND,1-1-0-0,s=0,c=0,t=4,pt=0,l=10,sg=0,ft=0,st=OK:Top_Lights 2318 TSF:MSG:SEND,1-1-0-0,s=1,c=0,t=4,pt=0,l=13,sg=0,ft=0,st=OK:Bottom_Lights 2427 TSF:MSG:SEND,1-1-0-0,s=2,c=0,t=3,pt=0,l=17,sg=0,ft=0,st=OK:Top_Lights_Switch 2537 TSF:MSG:SEND,1-1-0-0,s=3,c=0,t=3,pt=0,l=20,sg=0,ft=0,st=OK:Bottom_Lights_Switch 2648 TSF:MSG:SEND,1-1-0-0,s=4,c=0,t=23,pt=0,l=23,sg=0,ft=0,st=OK:Top_Lights_Switch_Level 2758 TSF:MSG:SEND,1-1-0-0,s=5,c=0,t=23,pt=0,l=25,sg=0,ft=0,st=OK:Bottom_Lights_Switch_Leve 2866 MCO:REG:REQ 2871 TSF:MSG:SEND,1-1-0-0,s=255,c=3,t=26,pt=1,l=1,sg=0,ft=0,st=OK:2 2877 TSF:MSG:READ,0-0-1,s=255,c=3,t=27,pt=1,l=1,sg=0:1 2882 MCO:PIM:NODE REG=1 2884 MCO:BGN:STP Setup Started. 2888 TSF:MSG:SEND,1-1-0-0,s=2,c=1,t=2,pt=1,l=1,sg=0,ft=0,st=OK:0 2995 TSF:MSG:SEND,1-1-0-0,s=3,c=1,t=2,pt=1,l=1,sg=0,ft=0,st=OK:0 Top Switch level: 100 3103 TSF:MSG:SEND,1-1-0-0,s=4,c=1,t=24,pt=1,l=1,sg=0,ft=0,st=OK:100 Bottom Switch level: 100 3211 TSF:MSG:SEND,1-1-0-0,s=5,c=1,t=24,pt=1,l=1,sg=0,ft=0,st=OK:100 3318 TSF:MSG:SEND,1-1-0-0,s=0,c=2,t=3,pt=0,l=0,sg=0,ft=0,st=OK: 3364 TSF:MSG:READ,0-0-1,s=0,c=1,t=3,pt=0,l=1,sg=0:0 V_Dimmer received: 0 Fade to Level: 0:0-->0 3425 TSF:MSG:SEND,1-1-0-0,s=1,c=2,t=3,pt=0,l=0,sg=0,ft=0,st=OK: 3469 TSF:MSG:READ,0-0-1,s=1,c=1,t=3,pt=0,l=1,sg=0:0 V_Dimmer received: 1 Fade to Level: 1:0-->0 Setup Colplete. 3531 MCO:BGN:INIT OK,TSP=1 Switch 1 pressed. 11350 TSF:MSG:SEND,1-1-0-0,s=2,c=1,t=2,pt=1,l=1,sg=0,ft=0,st=OK:1 Fade to Level: 0:0-->100 Sensor Update received: 0 12360 TSF:MSG:SEND,1-1-0-0,s=0,c=1,t=2,pt=1,l=1,sg=0,ft=0,st=OK:1 12466 TSF:MSG:SEND,1-1-0-0,s=0,c=1,t=3,pt=1,l=1,sg=0,ft=0,st=OK:100 Switch 1 pressed. 14713 TSF:MSG:SEND,1-1-0-0,s=2,c=1,t=2,pt=1,l=1,sg=0,ft=0,st=OK:0 Fade to Level: 0:100-->0 Sensor Update received: 0 15726 TSF:MSG:SEND,1-1-0-0,s=0,c=1,t=2,pt=1,l=1,sg=0,ft=0,st=OK:0 15832 TSF:MSG:SEND,1-1-0-0,s=0,c=1,t=3,pt=1,l=1,sg=0,ft=0,st=OK:0 Thanks
  • RPi MQTT Gateway problems...

    3
    0 Votes
    3 Posts
    44 Views
    T
    @mfalkvidd Thanks for the info and the reply. I'm going to start again from scratch and recheck every detail. ill respond again with resolution on completion. Thanks again.
  • VS838 IR receiver led anyone got it working with mys?

    25
    0 Votes
    25 Posts
    227 Views
    skywatchS
    Many thanks @electrik and @Yveaux , some moral support is often pivotal in getting things done! @Yveaux IDE 1.8.12 is now available and working fine on win10 x64 for me :)
  • Openhab thing/item for gas sensor

    2
    0 Votes
    2 Posts
    39 Views
    S
    just a small correction: it's a Raspberry Pi Gateway, but probably this makes no difference
  • Truncated message when arduino sending version info:

    2
    0 Votes
    2 Posts
    53 Views
    mfalkviddM
    Cross-reference: https://github.com/mysensors/MySensors/issues/1389
  • Panasonic PIR sensor

    5
    2
    1 Votes
    5 Posts
    93 Views
    V
    @Yveaux - I did try both at some point, but no joy. Sounds like i fried it before it could see anything.
  • Signing fail - RFM69HW

    5
    0 Votes
    5 Posts
    107 Views
    JerbyJ
    Did you solve the issue? When setup signing & encryption 2 years ago I had to use Mysensors development version to get it working. I also had to remove the analog input on a node because that was to mutch for the promini.
  • NRF52 -> Will not wake after sleep

    9
    1 Votes
    9 Posts
    144 Views
    S
    I have been trying @nagelc code with a lot of debug prints and I think that my device is stuck after MyHwNRF5.cpp inline void hwSleep(void) { CORE_DEBUG(PSTR("In hwSleep, 345\n")); __WFE(); __SEV(); __WFE(); CORE_DEBUG(PSTR("In hwSleep, 351\n")); } int8_t hwSleep(uint32_t ms) { hwSleepPrepare(ms); while (nrf5_rtc_event_triggered == false) { hwSleep(); } CORE_DEBUG(PSTR("In hwSleep, 357\n")); hwSleepEnd(ms); return MY_WAKE_UP_BY_TIMER; } And I will not go to hwSleepEnd 11274 MCO:SLP:MS=5000,SMS=0,I1=255,M1=255,I2=255,M2=255 11280 TSF:TDI:TPD 11281 After transport Disable 11284 Before hwSleep 11286 In hwSleepPrepare, 287 11289 In hwSleepPrepare,300 11291 In hwSleep, 345
  • Problem with ethernet gateway

    ethernet gateway
    10
    0 Votes
    10 Posts
    4k Views
    bocmauB
    Hello. i had a similar problem. I replaced the network switch And then the ping worked
  • Cannot find parent, node does not recieve pong response

    1
    0 Votes
    1 Posts
    25 Views
    No one has replied
  • Battery powered latching relay node

    13
    0 Votes
    13 Posts
    181 Views
    I
    @mtiutiu Thank you for the information! I will give it a try with the bluetooth module. I use Home Assistant as the controller and store the relay state in the EEPROM (according to the relay example) and on top of that I have configured the node to send updates of the state (taken form EEPROM) to home assistant periodically.
  • DS18B20 + multi relay

    5
    0 Votes
    5 Posts
    87 Views
    hakha4H
    Hi I have a similar setup but I'm using MCP23017 for the relays wich only takes two pins and it works perfect. As to your question about presenting sensors to gateway. Code snippet below is one way to do this I think // in my setup ID for tempsensors starts with number of relays plus one uint8_t RELAY_First_Child_ID = 1;//First relay Child-ID uint8_t DS_First_Child_ID = NUMBER_OF_RELAYS + 1; //First Child-ID to be used by Dallas Bus; set this to be higher than number of relays who need EEPROM storage to avoid conflicts // in YOUR setup ID för trmpsensors could be like below uint8_t RELAY_First_Child_ID = 1;//First relay Child-ID uint8_t DS_First_Child_ID =100; // //PRESENT TO GATEWAY void presentation() { // Send the sketch version information to the gateway and Controller sendSketchInfo("Your info", "1.0"); // Register relays to gateway for (int i = 0; i <= NUMBER_OF_RELAYS-1; i++) { present(RELAY_First_Child_ID + i, S_BINARY);// delay(200);//uncomment if all relays not being registered correct }// end for loop //----------------------------------------------------------------------------- // Register temperature sensors to gateway as child devices // Fetch the number of attached temperature sensors // Present all temperature sensors to controller for (int i = 0; i < numberOfDevices; i++) { present(DS_First_Child_ID + i, S_TEMP);// in your case first ID=100 //delay(200);//uncomment if all sensors not being registered correct }// end for loop Hope this might give you an idea how to. If you want I can give you my sketch doing what you want to accomplish but as I said it's based on MCP23017 to drive relays
  • OTA:FWP:UPDATE SKIPPED :(

    2
    1
    0 Votes
    2 Posts
    26 Views
    pihomeP
    just tired with different fuse settings bootloader.low_fuses=0xE2 but no success 2088 TSM:FPAR:OK 2088 TSM:ID 2091 TSM:ID:OK 2093 TSM:UPL 2097 2193 TSF:MSG:READ,0-0-1⸮2209 TSF:MSG:SEND,1-1-0-0,s=255,c=4,t=0,pt=6,l=10,sg=0,ft.Wz-⸮0100 2410 TSF:MSG:READ,0-0-1,s=255,c=3,t=15,pt=6,l=2,sg=0:012428 TSF:MSG:SEND,1-1-0-0,s=255,c=3,t=6,pt=1,l=1,sg=0,ft=0,st=OK:0 >TSF:MSG:READ,0-0-1,s=0,c=4,t=1,pt=6,l=8,sg=0:20000100D00374A3 2674 OTA:FWP:UPDATE 26⸮2791 TSF:MSG:READ,0-0-1,s=255,c=3,t=6,pt=0,⸮⸮⸮Blank Over The Air Node 2811 TSF:MSG:SEND,1-1-0-0,s=255⸮MMi⸮3,t=26,pt=1,l=1,sg=0,ft=0,st=OK:2 3088 MCO:BGN:STP 3090 MCO:BGN:INIT OK,TSP=1 24172 TSF:MSG:READ,0-0-1,s=0,c=4,t=1,pt=6,l=8,sg=0:20000100D00374A3 24178 OTA:FWP:UPDATE
  • W5100 Ethernet Gateway in Release 2.5.0-1

    gateway
    1
    0 Votes
    1 Posts
    30 Views
    No one has replied
  • serial gateway: !TSM:INIT:TSP FAIL

    3
    0 Votes
    3 Posts
    49 Views
    K
    @mfalkvidd Oh, I completely misunderstood then! I thought mysgw would interpret the serial input and then make it accessible to the controller. Thanks för clearing that up, I will give it a shot tomorrow.
  • PIR Sensor Gives False High in 55 Minutes (Can't find a way to solve)

    9
    0 Votes
    9 Posts
    388 Views
    YveauxY
    @Vinod-Amarathunga If this solves your problem then why do you need the transistors & optocoupler? I would expect powering the PIR VIN from the separate 5V supply and tying the GND of the separate supply to the GND of the Arduino would work just as well. Did you try that?
  • rfm69hw on a raspberry pi 4, power issues

    2
    1
    0 Votes
    2 Posts
    41 Views
    K
    So from what I can read here this might not be a power issue after all? This is the sketch I am using for the signal scanner: /* * The MySensors Arduino library handles the wireless radio link and protocol * between your home built sensors/actuators and HA controller of choice. * The sensors forms a self healing radio network with optional repeaters. Each * repeater and gateway builds a routing tables in EEPROM which keeps track of the * network topology allowing messages to be routed to nodes. * * Created by Henrik Ekblad <henrik.ekblad@mysensors.org> * Copyright (C) 2013-2019 Sensnology AB * Full contributor list: https://github.com/mysensors/MySensors/graphs/contributors * * Documentation: http://www.mysensors.org * Support Forum: http://forum.mysensors.org * * This program is free software; you can redistribute it and/or * modify it under the terms of the GNU General Public License * version 2 as published by the Free Software Foundation. * ******************************* * * REVISION HISTORY * Version 1.0 - tekka * * DESCRIPTION * ATC mode settings and signal report functions, on RFM69 and RFM95 nodes * */ // Enable debug prints #define MY_DEBUG #define MY_SIGNAL_REPORT_ENABLED #define MY_NODE_ID 3 // Enable and select radio type attached // RFM69 #define MY_RADIO_RFM69 #define MY_RFM69_NEW_DRIVER // ATC on RFM69 works only with the new driver (not compatible with old=default driver) #define MY_IS_RFM69HW //#define MY_RFM69_ATC_TARGET_RSSI_DBM (-70) // target RSSI -70dBm //#define MY_RFM69_MAX_POWER_LEVEL_DBM (10) // max. TX power 10dBm = 10mW // RFM95 //#define MY_RADIO_RFM95 //#define MY_RFM95_ATC_TARGET_RSSI_DBM (-70) // target RSSI -70dBm //#define MY_RFM95_MAX_POWER_LEVEL_DBM (10) // max. TX power 10dBm = 10mW #include <MySensors.h> // ID of the sensor child #define CHILD_ID_UPLINK_QUALITY (0) #define CHILD_ID_TX_LEVEL (1) #define CHILD_ID_TX_PERCENT (2) #define CHILD_ID_TX_RSSI (3) #define CHILD_ID_RX_RSSI (4) #define CHILD_ID_TX_SNR (5) #define CHILD_ID_RX_SNR (6) // Initialize general message MyMessage msgTxRSSI(CHILD_ID_TX_RSSI, V_CUSTOM); MyMessage msgRxRSSI(CHILD_ID_RX_RSSI, V_CUSTOM); MyMessage msgTxSNR(CHILD_ID_TX_SNR, V_CUSTOM); MyMessage msgRxSNR(CHILD_ID_RX_SNR, V_CUSTOM); MyMessage msgTxLevel(CHILD_ID_TX_LEVEL, V_CUSTOM); MyMessage msgTxPercent(CHILD_ID_TX_PERCENT, V_CUSTOM); MyMessage msgUplinkQuality(CHILD_ID_UPLINK_QUALITY, V_CUSTOM); void setup() { } void presentation() { // Send the sketch version information to the gateway and controller sendSketchInfo("ATC", "1.0"); // Register all sensors to gw (they will be created as child devices) present(CHILD_ID_UPLINK_QUALITY, S_CUSTOM, "UPLINK QUALITY RSSI"); present(CHILD_ID_TX_LEVEL, S_CUSTOM, "TX LEVEL DBM"); present(CHILD_ID_TX_PERCENT, S_CUSTOM, "TX LEVEL PERCENT"); present(CHILD_ID_TX_RSSI, S_CUSTOM, "TX RSSI"); present(CHILD_ID_RX_RSSI, S_CUSTOM, "RX RSSI"); present(CHILD_ID_TX_SNR, S_CUSTOM, "TX SNR"); present(CHILD_ID_RX_SNR, S_CUSTOM, "RX SNR"); } void loop() { // send messages to GW send(msgUplinkQuality.set(transportInternalToRSSI(_transportSM.uplinkQualityRSSI))); send(msgTxLevel.set(transportGetTxPowerLevel())); send(msgTxPercent.set(transportGetTxPowerPercent())); // retrieve RSSI / SNR reports from incoming ACK send(msgTxRSSI.set(transportGetSendingRSSI())); send(msgRxRSSI.set(transportGetReceivingRSSI())); send(msgTxSNR.set(transportGetSendingSNR())); send(msgRxSNR.set(transportGetReceivingSNR())); //to serial Serial.print("transportInternalToRSSI(_transportSM.uplinkQualityRSSI): "); Serial.println(transportInternalToRSSI(_transportSM.uplinkQualityRSSI)); Serial.print("transportGetTxPowerLevel(): "); Serial.println(transportGetTxPowerLevel()); Serial.print("transportGetTxPowerPercent(): "); Serial.println(transportGetTxPowerPercent()); Serial.print("transportGetSendingRSSI(): "); Serial.println(transportGetSendingRSSI()); Serial.print("transportGetReceivingRSSI(): "); Serial.println(transportGetReceivingRSSI()); Serial.print("transportGetSendingSNR(): "); Serial.println(transportGetSendingSNR()); Serial.print("transportGetReceivingSNR(): "); Serial.println(transportGetReceivingSNR()); Serial.println("Waiting"); // wait a bit wait(10000); } And this is how I compiled the gateway: ./configure --my-transport=rfm69 --my-rfm69-frequency=868 --my-gateway=mqtt --my-is-rfm69hw --extra-cxxflags="-DMY_RFM69_RST_PIN=29" --my-controller-ip-address=127.0.0.1 --my-mqtt-publish-topic-prefix=mysensors-out --my-mqtt-subscribe-topic-prefix=mysensors-in --my-mqtt-client-id=mysensorsgateway1 --my-mqtt-user=mysensors --my-mqtt-password=redacted --my-port=1883 Any ideas how I can test mysensors 2.2 with the raspberry pi 4? From what I understand that version of the pi isn't supported until version 2.4 alpha?
  • Works perfectly untill i introduce sleep

    4
    0 Votes
    4 Posts
    70 Views
    skywatchS
    @markjgabb said in Works perfectly untill i introduce sleep: additional note my button is connected between GND and D3 with 470k resistor in the middle This will be an unstable way to detect a change as the input pin is 'floating' unless the button is connected when it then gets grounded via the resistor. What would be better is connect the resistor between the positive power of the arduino and the input pin (this is known as a pull-up resistor) and then add the switch from the input pin to ground. In this configuration the input pin is at all times in a known state, either it is 'high' when the button is not pressed or 'low' when the button is pressed. This will give a clear signal to the arduino.

15

Online

11.7k

Users

11.2k

Topics

113.1k

Posts