💬 Easy/Newbie PCB for MySensors
-
@hiddenuser I don't know why you have a booster in place (unless it is a buck boost) and you need to change the voltage divider resistors if you want to read higher voltages (look at my solar project). In addition I'd put in place a LDO regulator if you want to use a lipo battery since a normal voltage regulator would require a higher Vin than a lipo battery can provide.
@gohan said in 💬 Easy/Newbie PCB for MySensors:
Thanks @gohan for the feedback. Can I have the link to your solar project!
-
@gohan said in 💬 Easy/Newbie PCB for MySensors:
Thanks @gohan for the feedback. Can I have the link to your solar project!
-
Hi Sundberg,
I have read there could be some problem about radio connection if the temperature is ~0C or minus, I have met this issue so I will replace the existing 4.7µ capacitor with a bigger, e.g. ~20µ.
The battery measurement contains a 0.1 uF capacitor, What do you think I do have to replace it with an another bigger one ?
thanksBarna
@barna - i don't know to be honest. As I wrote I had issues last winter but never with that 0.1 cap. I'm running second winter now (have been as low as -8C so far) without issues.
-
Hi Sundberg,
I have read there could be some problem about radio connection if the temperature is ~0C or minus, I have met this issue so I will replace the existing 4.7µ capacitor with a bigger, e.g. ~20µ.
The battery measurement contains a 0.1 uF capacitor, What do you think I do have to replace it with an another bigger one ?
thanksBarna
@barna check out this thread:
https://forum.mysensors.org/topic/186/new-library-to-read-arduino-vcc-supply-level-without-resistors-for-battery-powered-sensor-nodes-that-do-not-use-a-voltage-regulator-but-connect-directly-to-the-batteries
It is a way to monitor battery voltage without the need for the 0.1 uf capacitor and resistor setup on the board. -
Hi Sundberg,
I have read there could be some problem about radio connection if the temperature is ~0C or minus, I have met this issue so I will replace the existing 4.7µ capacitor with a bigger, e.g. ~20µ.
The battery measurement contains a 0.1 uF capacitor, What do you think I do have to replace it with an another bigger one ?
thanksBarna
@barna said in 💬 Easy/Newbie PCB for MySensors:
Hi Sundberg,
I have read there could be some problem about radio connection if the temperature is ~0C or minus, I have met this issue so I will replace the existing 4.7µ capacitor with a bigger, e.g. ~20µ.
The battery measurement contains a 0.1 uF capacitor, What do you think I do have to replace it with an another bigger one ?
thanksBarna
I don't think you need, it's made to stabilize the measured voltage, in the worst case the measured voltage will be a little bit unstable but your node will still run fine.
-
on the subject of batteries i have to say im really impressed with the setup of these boards....
ive got a DHT and lux resistor measuring every 10 minutes, and i cant even remember how long ago i last changed the batteries...i think its about 3-4 months now....nothing special, just aldi batteries (australian cheap shopping chain)last check they are still 65%
@markjgabb Don't know if it's the same chain, but we have aldi stores here in the US.

-
@markjgabb Don't know if it's the same chain, but we have aldi stores here in the US.
-
Hi everybody. Finally got my newb pcb and I soldered everything needed for the pro mini 3.3v. But I ran into problems.
I think it's the cheap chinese pdo mini but I want to ask you guys. Problem id that my node doesn't work. But when I debug my node I plug my pro mini in my computer's usb and then it works.
What I could see is that when it is battery operated I can read a 3.3v value on the vcc pin of the pro mini. When I also connect via usb this value is about 3.5v.
Could it be that my pro mini requires 3.5v.
I did solder the capacitor for the radio and i'm using a 3.3v step up converter also.Thank you
-
@akamap - listen to the guys above, let us know with pictures :) Its the best.
Did you by any chance miss to solder to jumpers?
The best approach is to measure with a multimeter... put the black to GND and measure your way through the circuit from batteries, booster, jumper, pro mini and radio with the red put on each components VCC (or Vout on booster). Then you know where it goes wrong. Try to follow the schematics or the traces in the pcb to figure out how the current flows. -
@akamap - listen to the guys above, let us know with pictures :) Its the best.
Did you by any chance miss to solder to jumpers?
The best approach is to measure with a multimeter... put the black to GND and measure your way through the circuit from batteries, booster, jumper, pro mini and radio with the red put on each components VCC (or Vout on booster). Then you know where it goes wrong. Try to follow the schematics or the traces in the pcb to figure out how the current flows.@sundberg84 That's why I wanted him to send pictures. There are a number of variables that need to be in place depending on the configuration that you are using with this board. Is he using a 3.3 or 5 volt arduino, does he have a regulator, are the correct jumpers in place. Any one of these missing factors can make it not work.
-
EDIT : Seeing the pictures this big, I think I know why and it is my fault. I tried to save energy by desoldering the led on the arduino. I followed a post here on mysensors.org. But I just realized I might have desoldered the wrong thing on this arduino. I'm not sure what I desoldered, but it might be what is causing the problems (I desoldered the tiny thing below the led) I'll put a fresh one to see if this is working.
Thanks
Original response :
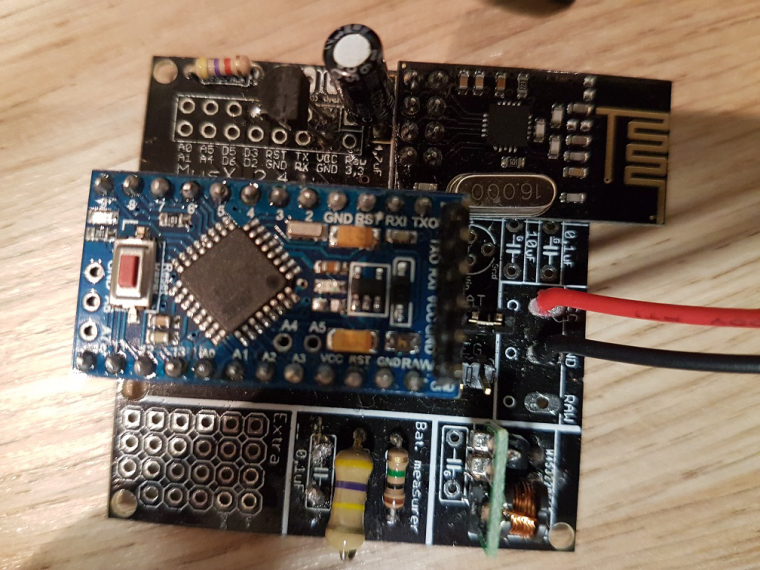
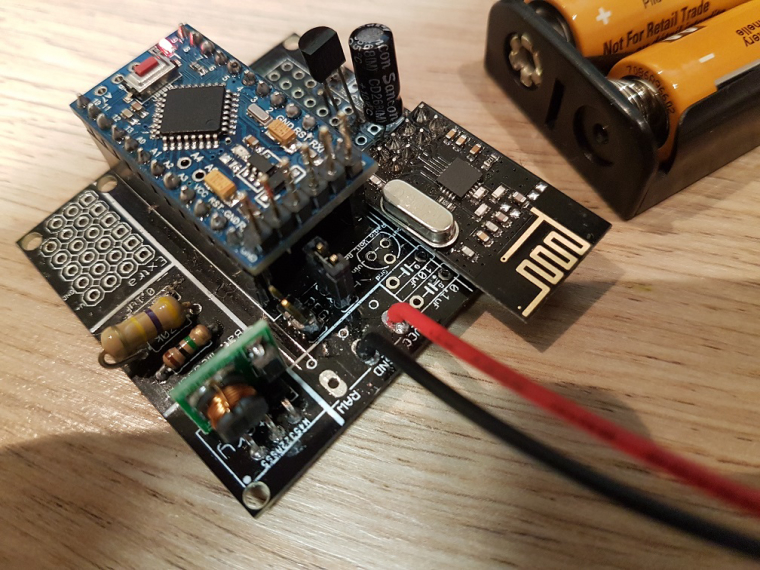
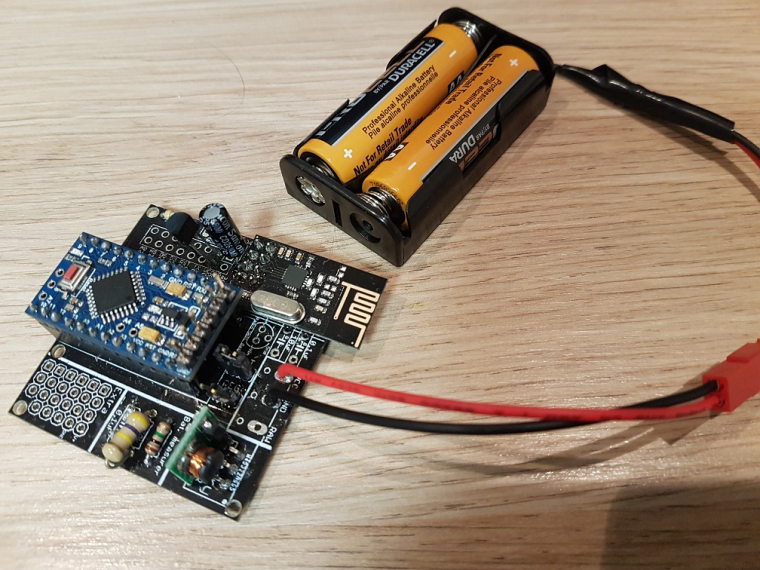
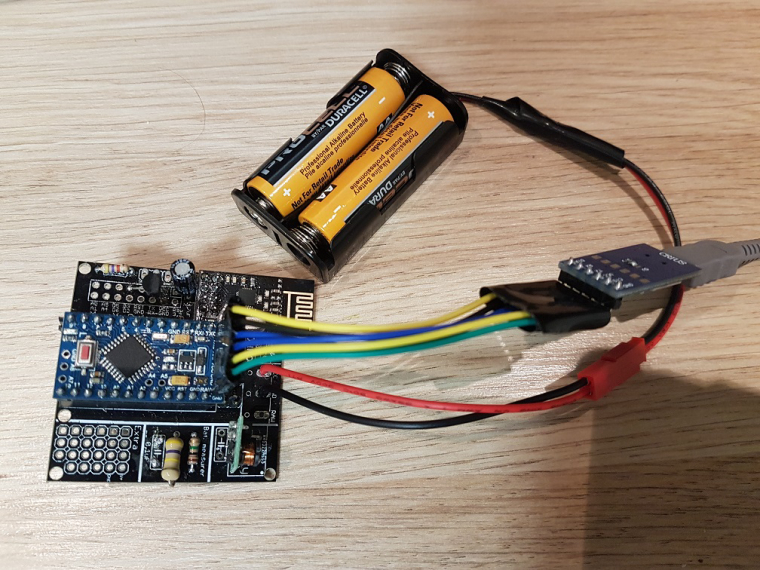
Ok, thank for all the answers and here is more information.
I power it via 2AA battery. I did put a jumper on the battery point. And I am using a pro mini 3.3v (Cheap chinese clone). I am using a step up regulator to step it up to 3.3v for the arduino.
I measured the voltages and they are as follow :
Without USB programmer (Not working) :
Battery : 3.00V
Input step up : 3.00V
Output Step UP : 3.35V
VCC and GND on arduino : 3.34V
VCC and GND on Radio : 3.01VWith the USB programmer pluggued in (Working) :
Battery : 3.00V
Input step up : 3.00V
Output Step UP : 3.47V
VCC and GND on arduino : 3.48V
VCC and GND on Radio : 3.00VAnother information, I did not solder directly the arduino pro mini (you will see on the pictures). I don't know what the are called but I'll call them "extender". I use them so I can unplug the arduino in case I fried the pro mini.
Here are some pictures with and without the usb programmer plugged in :
-
EDIT : Seeing the pictures this big, I think I know why and it is my fault. I tried to save energy by desoldering the led on the arduino. I followed a post here on mysensors.org. But I just realized I might have desoldered the wrong thing on this arduino. I'm not sure what I desoldered, but it might be what is causing the problems (I desoldered the tiny thing below the led) I'll put a fresh one to see if this is working.
Thanks
Original response :
Ok, thank for all the answers and here is more information.
I power it via 2AA battery. I did put a jumper on the battery point. And I am using a pro mini 3.3v (Cheap chinese clone). I am using a step up regulator to step it up to 3.3v for the arduino.
I measured the voltages and they are as follow :
Without USB programmer (Not working) :
Battery : 3.00V
Input step up : 3.00V
Output Step UP : 3.35V
VCC and GND on arduino : 3.34V
VCC and GND on Radio : 3.01VWith the USB programmer pluggued in (Working) :
Battery : 3.00V
Input step up : 3.00V
Output Step UP : 3.47V
VCC and GND on arduino : 3.48V
VCC and GND on Radio : 3.00VAnother information, I did not solder directly the arduino pro mini (you will see on the pictures). I don't know what the are called but I'll call them "extender". I use them so I can unplug the arduino in case I fried the pro mini.
Here are some pictures with and without the usb programmer plugged in :
@akamap thats just the resistor... should not be the problem.
I cant see anything obvious. I have some radios without silkscreen and they work....... like a clone. Not the best but most work ok. Try adding a capacitor on the booster - might be a noisy one... I would recommend to try a 0,1uF ceramic if you have. Otherwise just wack in what you have... not to big i think.If you power it from the booster/bat you cant power it the same time from USB! Disconnect VCC from the ftdi adapter.
Connet RX/TX and GND to begin with. RST if you need to upload. Two power sources makes one to much. -
EDIT : Seeing the pictures this big, I think I know why and it is my fault. I tried to save energy by desoldering the led on the arduino. I followed a post here on mysensors.org. But I just realized I might have desoldered the wrong thing on this arduino. I'm not sure what I desoldered, but it might be what is causing the problems (I desoldered the tiny thing below the led) I'll put a fresh one to see if this is working.
Thanks
Original response :
Ok, thank for all the answers and here is more information.
I power it via 2AA battery. I did put a jumper on the battery point. And I am using a pro mini 3.3v (Cheap chinese clone). I am using a step up regulator to step it up to 3.3v for the arduino.
I measured the voltages and they are as follow :
Without USB programmer (Not working) :
Battery : 3.00V
Input step up : 3.00V
Output Step UP : 3.35V
VCC and GND on arduino : 3.34V
VCC and GND on Radio : 3.01VWith the USB programmer pluggued in (Working) :
Battery : 3.00V
Input step up : 3.00V
Output Step UP : 3.47V
VCC and GND on arduino : 3.48V
VCC and GND on Radio : 3.00VAnother information, I did not solder directly the arduino pro mini (you will see on the pictures). I don't know what the are called but I'll call them "extender". I use them so I can unplug the arduino in case I fried the pro mini.
Here are some pictures with and without the usb programmer plugged in :
-
Thank you everyone. Everythings seems to be working now. I did solder a capacitor on the booster.
But I don't think this was all that was bad. I also find out that when I touched the capacitor for the radio, I was having mixed result. So I soldered the capacitor directly on the radio.
Now, everything works fine. I guess I burned the trace or something was creating a short with this part.
I just need to remove the voltage regulator as suggested by gohan now and I can start testing my battery life.
Thanks again. Great library, great forum but most of all, great community.
-
So its coming up for a new revision of the EasyPCB (both Nrf + RFM edition).
I have had some suggestions from the community so far and some thoughs of myself:- ATSHA204A (signing)
- Change 0,1uF and 10uF capacitor so now 10uF is on the input and 0,1uF on the output
- Line up MysX connector for a more clean placement of daugherboards.
Anyone have any other input before i start the work?
I will not take any suggestions that will make the board heavy or non user-friendly. Still the same goal - only easy to use components, easy to assemble and easy to understand.
Hello! It looks like you're interested in this conversation, but you don't have an account yet.
Getting fed up of having to scroll through the same posts each visit? When you register for an account, you'll always come back to exactly where you were before, and choose to be notified of new replies (either via email, or push notification). You'll also be able to save bookmarks and upvote posts to show your appreciation to other community members.
With your input, this post could be even better 💗
Register Login