RFM69HW temp-humidity node
-
I received a tiny test board today from the fab so I could see how well an smd atmega328p fits on the pads:
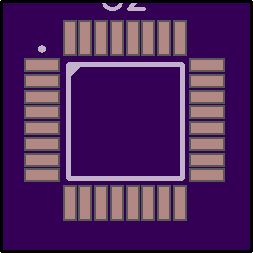
The alignment is right, but I think I can probably narrow them slightly. Is there a rule of thumb for how thin to make them, or conversely, how much spacing to put between them? My only concern is that without enough spacing between them (and I don't have any idea how much spacing is enough), there might be a risk of solder bridging. The more space, the lower the odds of that.
-
Check the datasheet for the atmega328p-au. It has a section on PCB layout.
I would go for same width as the actual pins, and make the pads long enough to have space for some solder (when doing it by hand).
On my stamp size node I also used the smd version and that layout was not difficult to solder when using a fine tip.
-
@GertSanders said:
Check the datasheet for the atmega328p-au. It has a section on PCB layout.
Thanks! I'll give that a look. On my first attempt I just used the default pad layout in the diptrace library for an atmega168 (as it didn't explicitly have one for an atmega328), so I should probably verify that the dimensions are correct.
I would go for same width as the actual pins, and make the pads long enough to have space for some solder (when doing it by hand).
There might even be a case for making them a little extra long, if the board real estate allows. I believe there's a solder technique where you add solder to the pads in advance, and if they're extra long you can kinda push it onto the pins after melting it, provided you've also layered a lot of fresh flux everthing, including the pins.
On my stamp size node I also used the smd version and that layout was not difficult to solder when using a fine tip.
What kind and size of solder tip do you use?
-
@NeverDie
0.8 mm solder by STANNOL (HS10), packs of 100gr
The tip is around 0.8mm wide (narrowest tip I could get for my Weller station, I have an old EC2002)
-
Thanks, I just ordered Hakko 0.2mm (curved) and 0.5mm (straight conical) tips from amazon. Both got good reviews. Hopefully one of them is a good match for the task, but if not, it's good to know that 0.8mm will do the business.
-
I received the board from post #1 in the mail today. I'm planning to mount the atmega328p DIP chip using machine pin female headers. It certainly can do that, but I'm thinking that on the next iteratioin it might be preferable to have the entire machine pin--not just the thinner leader part--go through the PCB, because then the plastic part of the header can be flush with the PCB (as would be the case if more typical female headers were used). Anyone tried doing that? Any reason not to do that?
-
So, to clarify, what I mean by a female machine pin header (also known as a Swiss machine pin header) is this:

Unfortunately, the only dimensioning I've been able to find is this:

which lacks the dimension I want to know, which is diameter of the larger pin body that's just above the 0.51mm diameter part of the leader pin that's meant to be pushed through the through-hole.Purely eyeballing it, it looks like it's maybe, what, twice as wide? Anyone happen to know what that dimension is?
-
I've one of these at home. I could take a measurement, but maybe someone has a better idea.

-
1.35 Millimeters!
-
@TimO
Thanks! That exactly matches what my micrometer says also, so I'll go with that.So now the question is: what diameter hole should I have drilled for that? Is there a rule of thumb? e.g. Would 1.45 be too snug? Too loose?
-
To keep things rolling I just sent in to be fabricated a test board with 1.45mm holes . It cost just 30 cents. If anyone has an idea for a better diameter to try, let me know and I'll send in one of those as well.

-
I assembled the FTDI adapter board yesterday. I should have spaced the pads further apart on the switch (well, at least for the switch I'm using) and also on the through-hole resistors. Anyhow, I only need one, so I don't think I'll be updating it.
-
I assembled the first node from post #1 today, but it didn't work. Upon investigation, I found that one of the required traces was not there! I had generated the trace layout using diptraces auto-router, and it didn't indicate a failure. Most likely I over-constrained the problem by making the PCB board size smaller than I should have. However, if I had known that the auto-routing had failed, I could have relaxed that enough for it to succeed.
-
So, I was able to make the board work by soldering on a single "oops" wire to compensate for the missing trace. I guess I'll be redoing this board so that's not required on future builds. The FTDI adapter board also had an oops that I fixed without much difficulty. Using the adapter board I've verified I can upload new sketches to the node from post #1. The reset button also works as intended. So, the adapter board feasibility is now proven.
-
I took a shot at soldering the smaller board with the much tinier atmega328p, but for now I've concluded that hand soldering such a small chip is simply more work than it's worth. Perhaps with a reflow oven....
I'm still waiting for the interstitial board to arrive.
-
Soldering an atmega328 smt is easy:
https://www.youtube.com/watch?v=UeCZ9AMG3Vo
according to that guy, anyway. Maybe the longer pads makes it so?
-
This has a lot of detail about soldering the atmega328 surface mount:
https://www.youtube.com/watch?v=-yc3zEe0RA0
So, though it's obviously doable, I still wouldn't say it's "easy."
-
I finally had success using the Dave Jones tack and reflow method. The hardest part is just ensuring that the chip is properly aligned after the tack. From that point on, iit goes relatively easy.
-
So, LED is blinking like it should, and I can download sketches to it. I plugged in an si7021 board, and that's working too:
Humidity: 44.42 Temperature: 22.22
Humidity: 44.40 Temperature: 22.22
Humidity: 44.43 Temperature: 22.23
Humidity: 44.42 Temperature: 22.22
Humidity: 44.43 Temperature: 22.21
Humidity: 44.43 Temperature: 22.22
Humidity: 44.44 Temperature: 22.22Looks as though a BME280 board, which has the same pinout as the si7021 board, should work also.

I tried the adafruit library on such a BME280, but it says it can't find the sensor. So, I tried the sparkfun library instead, and it is outputing false information:Temperature: 0.00 degrees C
Temperature: 32.00 degrees F
Pressure: 0.00 Pa
Altitude: 45846.20m
Altitude: 150414.04ft
%RH: 0.00 %Looking at the back of the BME280 board , it looks like it may have a voltage regulator and/or level converter on it (?)..

Since I'm feeding it 3.3v, not 5v, then perhaps that's the problem.The part is 662K, and sure enough, it's a voltage regulator:
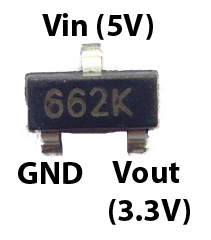
If I remove that and short Vin to the 3v3 lead, maybe it will work....
So, to see if it works at all, I hooked up the BME280 board to an arduino uno at 5v, and... still no joy. Apparently, I received a defective BME280.
 Murphy's Law strikes again. Therefore, I'll exchange it for another one. Meanwhile, I'll use the si7021.
-
Hello, I had a problem with BME280 too. Both Adafruit and Sparkfun use 0x77 as default address, but I have the same breakout board than you and the i2c address is 0x76.
Voltage regulator is not a problem it's a XC6206 and it's drawing close to nothing when you feed it with low voltage, and for battery voltage (3v down to 2V) the drop out voltage should be around 0.1V.You can pass the address of the sensor in the begin method, it defaults to the one defined in the h file which is 0x77
#define BME280_ADDRESS                (0x77)

 bool  begin(uint8_t addr = BME280_ADDRESS);
(I use the sparkfun library at the moment as it's easier to set the running mode of the sensor to switch it to sleep mode after measurement. Else it's using too much power for battery operation)
-
@NeverDie
Nice. Could you please open your design? -> www.openhardware.io
-
@Nca78
Thank you! I changed the I2C address to 0x76, and now I get the correct readings (in this case, using Sparkfun library):Temperature: 22.77 degrees C
Temperature: 73.00 degrees F
Pressure: 99002.00 Pa
Altitude: 202.13m
Altitude: 663.15ft
%RH: 47.00 %Fantastic! It works after all. Thank you again.
-
I designed the miniature board in the earlier post for the temp-RH sensor to hover over the atmega328p.
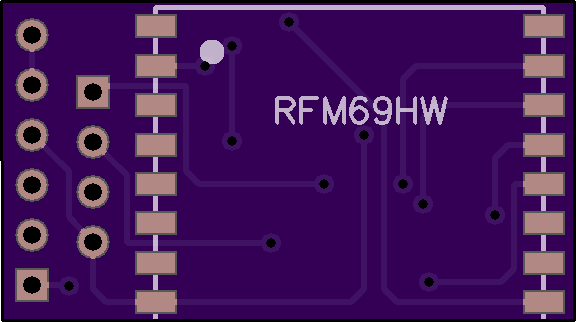
Maybe it doesn't matter all that much, but after assembling one that way, I'm realizing it would be better to have it hover over the radio instead because the radio antenna means that the radio side is more likely to be facing up and the atmega328p is flat enough that it can be sat upon on the bottom with the radio on top without complaint. As it stands, the temp-RH sensor could still be installed on the radio side of the PCB, but it would be facing outward (resulting in a larger footprint) rather than inward, hovering over the radio. Since the point of this node is to be small, the status quo somewhat defeats the purpose. So, I'll likely be revising the PCB layout to make that change. Also, I'll be eliminating those RFM69 pads that don't actually need to be soldered, as that will reduce that soldering/assembly time.
-
Here's the node from post #1 fully assembled, and with a BME280 instead of an si7021:

I'm starting to toy with the idea of having the radio also be a detachable module. The BME280 is the most expensive part on the board, and it's detachable. The atmega328p is detachable. If the radio were also detachable, it might speed up the assembly and test process. Also, if the radio were to go bad for some reason, one could just pop in a new one. Modularizing like that might make the whole thing easier to repair and troubleshoot, because you could always swap in "known good" modules to see if it fixes a particular problem. Anyhow, just an idea I'm kicking around. What do you all think? Make it more modular, or keep as is?
-
And making also the radio a detachable board would save you some board-space, thus reducing the cost again.
-
@GertSanders
Good point. I'd probably want to move the temp-rh sensor to the other side of the board as well so that it would be on the same side as the detachable radio.. In that case, it wouldn't need to sit so high, because it wouldn't need the clearance to get above the atmega328p. So, it would save on thickness that way. Overall thickness might be a wash, and it would be shorter too, so that sounds like a potential win. I think it's worth exploring.Not sure if there are 2mm pitch machine pins (?), but that might help save on thickness, and if so so that might be the best way to mount the RFM69.
I think I'll switch to an SMD LED after all and use the through-hole real estate occupied by the existing through-hole LED for dedicated wires soldered on to connect to batteries. Or perhaps I should consider some other kind of battery connector? It could be powered as is through dupont connectors on the ftdi header, but to me dupont connectors seem a bit loosey-goosey for a permanent battery connection--not sure how corrosion might affect a dupont connection over time.
-
Here's the assembled small Temp-RH node:
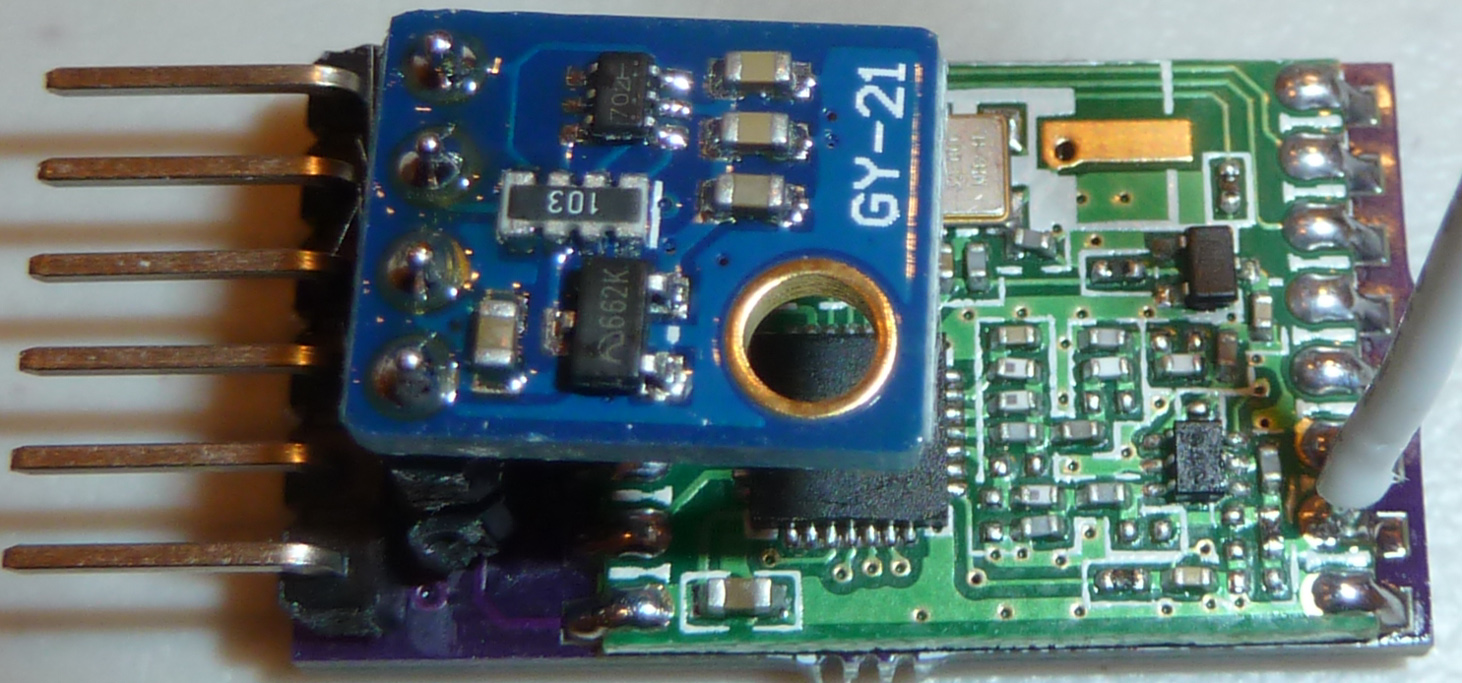
I suddenly realized that if I flipped the si7021 "upside down", then I could install it on the other size of the board from what I had originally intended, all while still using the existing pinout. -I'd prefer to have the actual sensor element facing up, but it works.So, as you can see, the entire thing is barely much bigger than the RFM69HW itself. On the opposite side is the SMD atmega328p-au , an SMD LED, an SMD resistor, and an SMD capacitor. That's it. I can reset the board and upload sketches to it using my FTDI adapter board, as I wrote about earlier in this thread.
-
Here's another board, but this time I simply soldered everything directly to the PCB:

As you would expect, it's a bit thinner than the version where modules plug-in, but not by so much that I think it would make any meaningful difference in most instances.FYI, this particular si7021 comes with a protective cover on it. You can get them either with or without the protective cover, but I think it makes more sense to get it with the cover because it helps mitigate against possible contaminants.
-
I just now tested out the RFM69HW radios, and they all appear to be functioning just fine. I even put one inside a closed refrigerator, since that is one of the applications, and I received a strong signal.
So, as far as I'm concerned, proof of concept is now completed for these two different board designs. It will be a good baseline to compare against as I make optimizations going forward.
-
This photo illustrates one of the original objectives, which was to have a node that's appropriately sized to be powered by two AA cells:
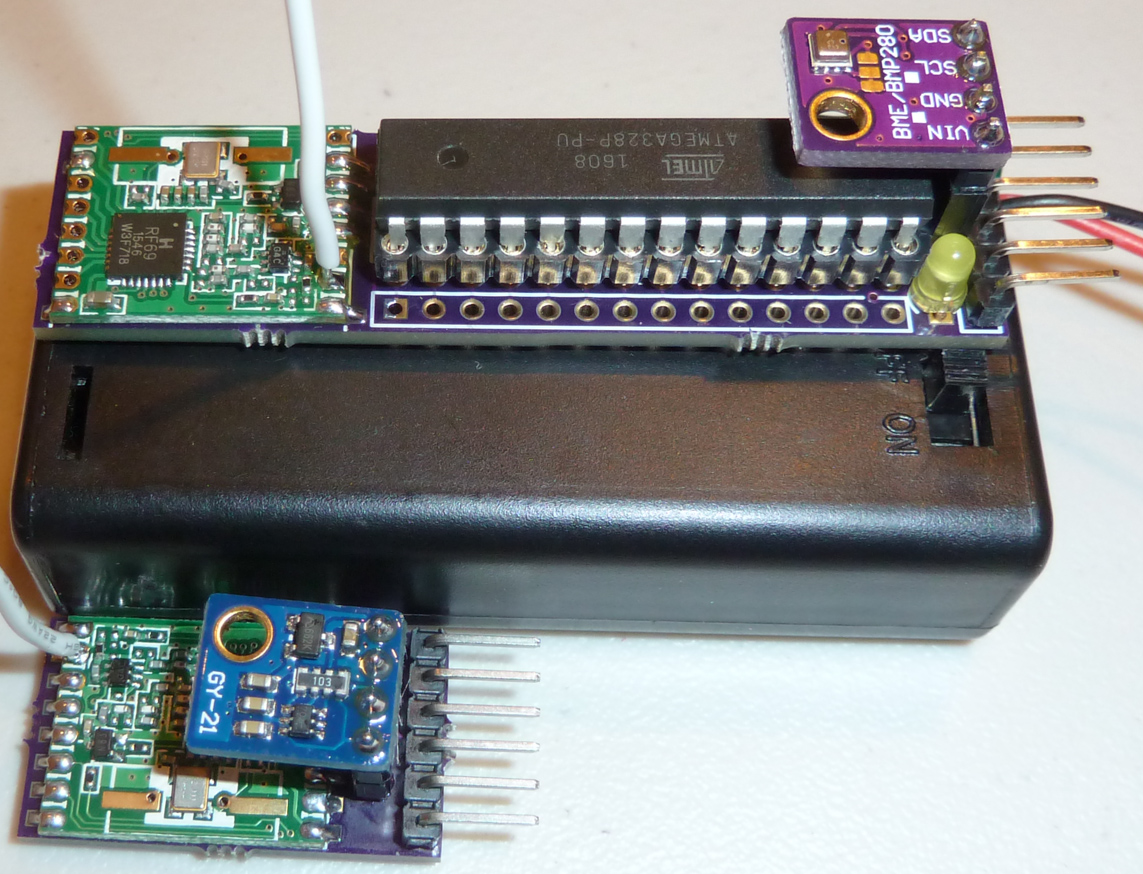
I think either one meets that goal.
-
Nice work !
For the "big" board, as you're constrained by the size of the 2 AA, I would use a pro mini instead of the bare atmega (more flat), and put the sensor on the side of the radio. It would also leave a bit of space for extra sensor (light for example) and maybe atsha for signing ?For the small one I would make another board of similar size with a coin cell holder and a big (100-220µF) ceramic capacitor, and use pins to bring power to the "IC" board and do the spacing at the same time.
As it's a shame to have such a small board and such a huge power supply
-
It seems the collection of small MySensor nodes is growing

Nice work !
-
@Nca78 said:
Nice work !
For the "big" board, as you're constrained by the size of the 2 AA, I would use a pro mini instead of the bare atmega (more flat), and put the sensor on the side of the radio. It would also leave a bit of space for extra sensor (light for example) and maybe atsha for signing ?For the small one I would make another board of similar size with a coin cell holder and a big (100-220µF) ceramic capacitor, and use pins to bring power to the "IC" board and do the spacing at the same time.
As it's a shame to have such a small board and such a huge power supply
Actually, they're really just proof-of-concept boards to confirm that the radio would work OK on such boards. Both nodes may have a fatal design flaw, which is that the sensor breakout boards may be running 24/7 even if the atmega328p is sleeping. Anyone know if the boards (not just the sensor chip) can be slept at <1uA current? If that's not possible, then I'll need to run them from a pin (or possibly some kind of load switch chip if their max current draw is ever greater than 20ma). I guess I'll need to measure it unless someone already has. Have you?
-
@NeverDie I have measured a board based on pro mini with BME280 (put in sleep mode, that's why I use the Sparkfun library) and a BH1750 (also in sleep mode between measurements) and my meter was giving me 17-18µA which is beginning to be too much for a CR battery. But still after running 3 weeks on a chinese CR2032 I see no drop in voltage. BME280 is not so good IMHO for very low power as it's a bit long to make the measurements, and drawing up to a few hundreds of µA while doing so.
I'm also running a board based on pro mini with a SHT21 breakout board (same than yours, with the film as without it will get dirty and lose accuracy quickly). Pro mini + radio alone consume a few µA only (sleep mode of MySensors library) and extra consumption from SHT21 (connected to Vcc) is invisible. I tried to measure with my multimeter the consumption of the SHT21 breakout board alone and it just can't measure anything. Even during measurement my multimeter sees nothing as it's extremely quick.
I did a sketch without sleeps between consecutive sendings (very bad for coin cell), sending every minute (and even if temp/hum don't change it's sending battery voltage), flashing a led after each sending. And with power from 2 cheap chinese LR41 (capacity 25mAh) it's on the way to last 2 months...
-
@Nca78
I just now measured the si7021 and BME280 breakout boards using the Dave Jones Microcurrent device. I did nothing more than power them from a battery pack (2x AA Alkaline batteries) using Vin and GND, but the si7021 measured 8.4uA, and the BME280uA measured 8.1uA. Not bad at all, assuming that represents quiescent current.I suspect the easiest thing will be to power them from a pin on the atmega328p. That way they can be switched off when not in use. When time permits I'll do that and measure the current with a scope trace just to make sure any inrush current doesn't exceed 20ma (which is the max current an atmega328p pin is rated for).
When both the atmega328p and RFM69HW are sleeping just by themselves, the current draw can be as low as 250na (yes, nanoamps) with the right configuration.
-
@NeverDie it's quite common to power them with a pin and never heard about a damage, I don't think you can have inrush current over 20mA. Max starting current for si7021 is 4mA for a maximum duration of 5ms, if we believe the datasheet.
No info about that in the BME280 datasheet but I see very low power consumption in sleep mode (below 1µA) so maybe removing the regulator is not a bad idea...
A problem I have with BME280 also is that sometimes the first measurement (after for example a reset of the node) is off, I'm not sure why, if you have an idea I'm interested But if you have the same problem powering with a pin could be annoying.
For the consumption of the board I cannot tell exactly how low I can go as I don't have a microcurrent device to test but my meter says 2µA or a bit below. With a temperature/humidity measurement you have to use the watchdog timer to wake up regularly so whatever you configure you won't get below 5µA I believe ?
-
@Nca78 said:
@NeverDie
A problem I have with BME280 also is that sometimes the first measurement (after for example a reset of the node) is off, I'm not sure why, if you have an idea I'm interested
Here's my guess: it uses a sample and hold ADC when taking the measurement, and the capacitors aren't fully charged up when it takes the first sample. i.e. it might be similar to the problem in the atmega328p when it comes to measuring its own voltage source.
For the consumption of the board I cannot tell exactly how low I can go as I don't have a microcurrent device to test but my meter says 2µA or a bit below. With a temperature/humidity measurement you have to use the watchdog timer to wake up regularly so whatever you configure you won't get below 5µA I believe ?
There's a trick for doing it using the RFM69HW to act as a wakeup timer, and it costs no extra current to do so. That's a whole topic into itself. Beyond that, you need both BOD and watchdog disabled on the atmega328p in order to get it down to the nanocurrent level while sleeping. In addition, you'll also want to use the internal resonator, not an external resonator or crystal in order to minimize time (and current) wasted during the wakeup phase. Doing that you can reduce the wakeup time for the atmega to <4uSec, which in itself is a huge savings.
So, getting back to throwing out the first sensor reading: the first thing you do after waking up the atmega328p is to initiate the first sensor reading. Then put the atmega back to sleep but wakeup when the first sensor reading is ready. Then simply ignore that sensor reading and initiate the second sensor reading (or however many it takes to get an accurate reading), and sleep the atemega while it's being taken. That's the magic of a <4uSec wakeup time. You can't do anything about the sensor requiring more than one reading in order to get an accurate measurement, but you don't need to waste power on the atmega or the radio while you wait.
-
I just now tried powering the si7021 off of pin 8, but for some reason it isn't working. Same with the BME280. Not sure why. I even tried doing it with a 5v arduino uno, but same result. If I go back to powering it from Vin (either 3v3 or 5v), then everything works again. I also tried powering from pin 4 with the same result. Just powering the breakout board itself doesn't appear to be a problem, but when I hookup SDA and/or SCL, the mcu appears to lock up. Very puzzling. I'm doing this on a breadboard with dupont wires. Maybe there's noise on the wires that hangs it up? Anyhow, at the moment I'm not sure what to make of it.
Looking at the si7021 datasheet, I notice it does contain a heater, and that the heater current can be as high as 94ma. So, if that's enabled by the adafruit library, then that might explain the failure. I'm not sure it's that though.
-
I'm not sure why powering it from a pin is fundamentally different than powering it from the battery, unless the current max is exceeded, which it doesn't appear to be. Tis a mystery.
-
So, I removed the voltage regulator on the si7021 and shorted Vin to Vout on the pads where it used to be. The above anomaly persists.
I then re-ran the current consumption test that I did at earlier, again using the Dave Jones Microcurrent . This time it's showing just 57nA consumed with power to the si7021 breakout board and with no SDA or SCL datalines connected. So, virtually all of the previous current that was measured was being consumed by the voltage regulator, which isn't needed when everything is powered from just two AA batteries.
-
According to the si7021 datasheet, a typical standby current is 60nA, which is very close to what I measured on the si7021 breakout board in the post directly above.
60nA is not significant. Therefore, there is no need to switch the si7021 on and off using either a digital pin or a load switch. It can simply be on all the time, as it is in the current pcb board layout.
-
I changed the orientation of the sensor plug-in so that the sensor element will be facing up on the small board design. I also cleaned up some smaller details and sent the revised design to the fab last night.
-
@NeverDie said:
So now the question is: what diameter hole should I have drilled for that? Is there a rule of thumb? e.g. Would 1.45 be too snug? Too loose?
Answering my own question, standard pin clearance on a thru-hole is apparently anywhere from 0.15mm to 0.8mm: http://electronics.stackexchange.com/questions/110959/how-much-clearance-should-you-include-in-through-hole-component-holes
So, I think I'll go for somewhere in the middle, say 0.25mm added to the pin diameter for the thru-hole diameter that's to be drilled.
A typical header pin is 0.65mm. So, the thru-hole diameter should be 0.65+0.25 = 0.9mm
From a routing perspective, smaller diameter pads are preferable, because they leave more room for routing traces. Pad diameter is going to be hole diameter plus some fixed incremental amount.
-
@NeverDie said:
I changed the orientation of the sensor plug-in so that the sensor element will be facing up on the small board design. I also cleaned up some smaller details and sent the revised design to the fab last night.
As it turns out, there may be a good reason to have the sensor element face down after all: dust is less likely to settle on the cover/sensor-opening if it's facing down rather than up, simply due to gravity.
-
I assembled a node based on the interstitial design, but net net I don't see it as advantageous as compared to the other two, so I'll probably drop that approach. I've come up with a fourth design though and I've sent that to the fab, so presently three different designs are in queue for PCB fabrication.
-
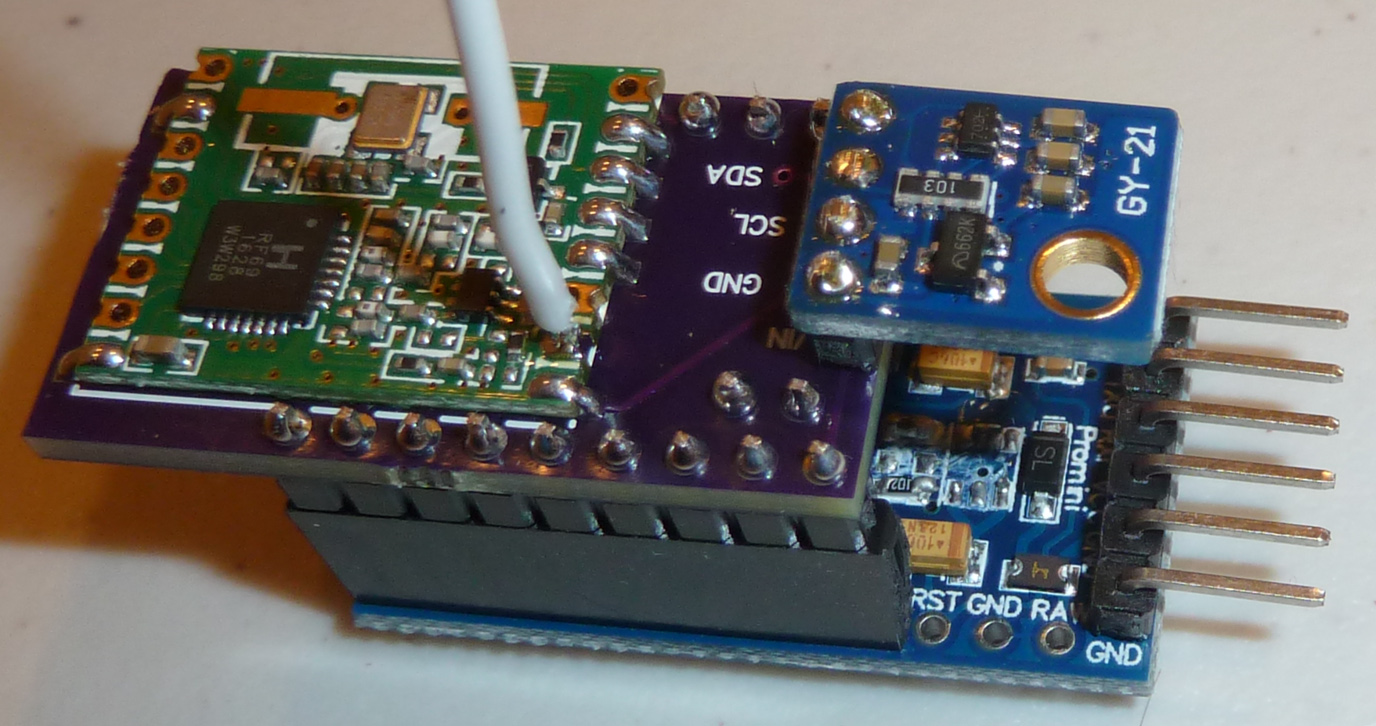
Here's a photo of a TH node based on a Pro Mini with an interstitial board:
-
@NeverDie said:
I'm starting to toy with the idea of having the radio also be a detachable module. The BME280 is the most expensive part on the board, and it's detachable. The atmega328p is detachable. If the radio were also detachable, it might speed up the assembly and test process. Also, if the radio were to go bad for some reason, one could just pop in a new one. Modularizing like that might make the whole thing easier to repair and troubleshoot, because you could always swap in "known good" modules to see if it fixes a particular problem. Anyhow, just an idea I'm kicking around. What do you all think? Make it more modular, or keep as is?
I'm more and more liking the idea of detachable parts, especially as I continue to evolve the designs. That way if I move to a new PCB design, I can job pop the parts off the old PCB and pop them onto the new one without having to desolder things.
-
@NeverDie said:
To keep things rolling I just sent in to be fabricated a test board with 1.45mm holes . It cost just 30 cents. If anyone has an idea for a better diameter to try, let me know and I'll send in one of those as well.

Today I received the test board from the fab and tried it out:
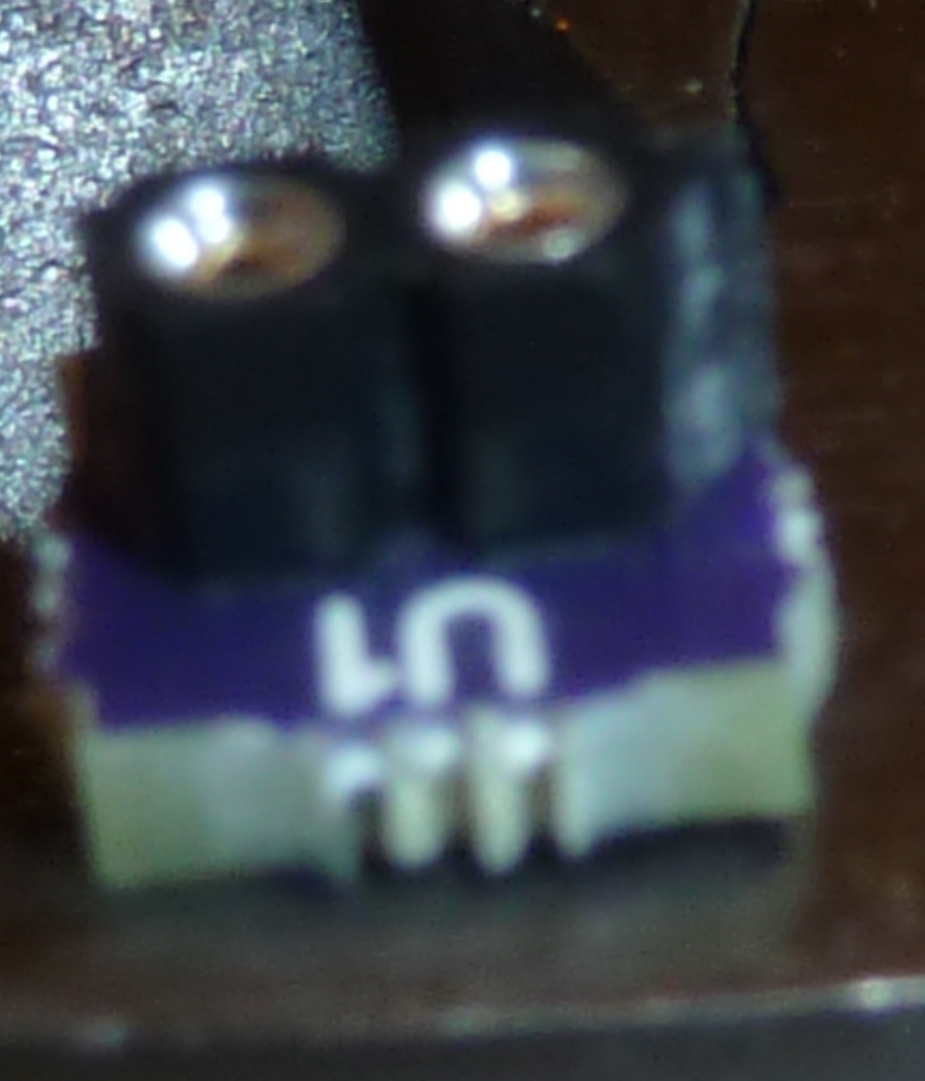
As you can see from the photo (sorry that it's out of focus), it works in the sense that the female machine pin header now sits flush against the board. It's a snug fit though. For a female header that's longer and with more pins in it, I think the holes are going to need greater clearance or it will likely be too tight a fit. Just a wild guess, but I think 1.6mm diameter holes are what I should try next, and with a 14 pin female machine pin header.
-
@NeverDie said:
Here's a photo of a TH node based on a Pro Mini with an interstitial board:
Where can I order this board?
Do you have a location where one could see all the boards you have developed?
-
@korttoma
I'm continuing to evolve them, based in part on the new realization that it's best to start with a particular enclosure in mind and then optimize the board for that particular enclosure.
-
I'd say that so far this is the easiest one to assemble while still being moderately compact:
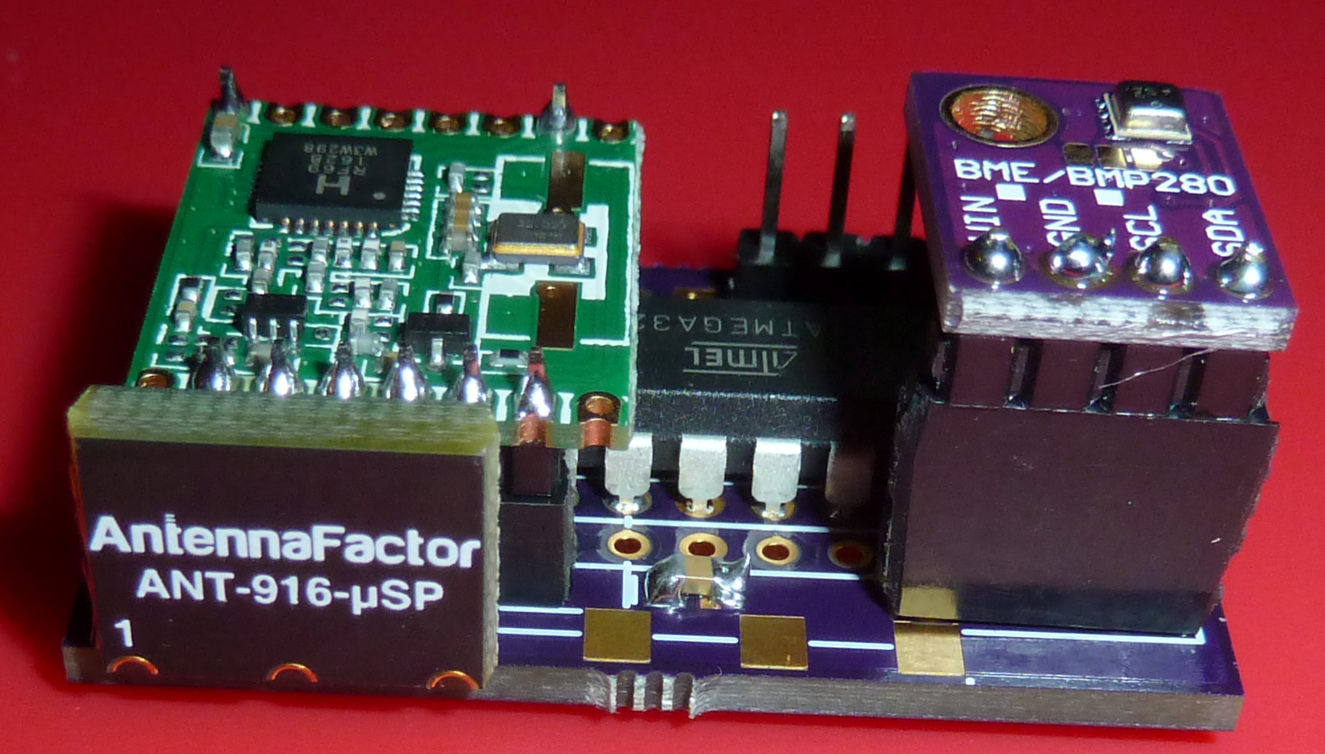
It's also a bit more modular in the sense that the radio and the TH sensor can be plugged in or easily removed. Also nice is that all the atmega328p pins are exposed for easy access.This one is smaller and more specialized:
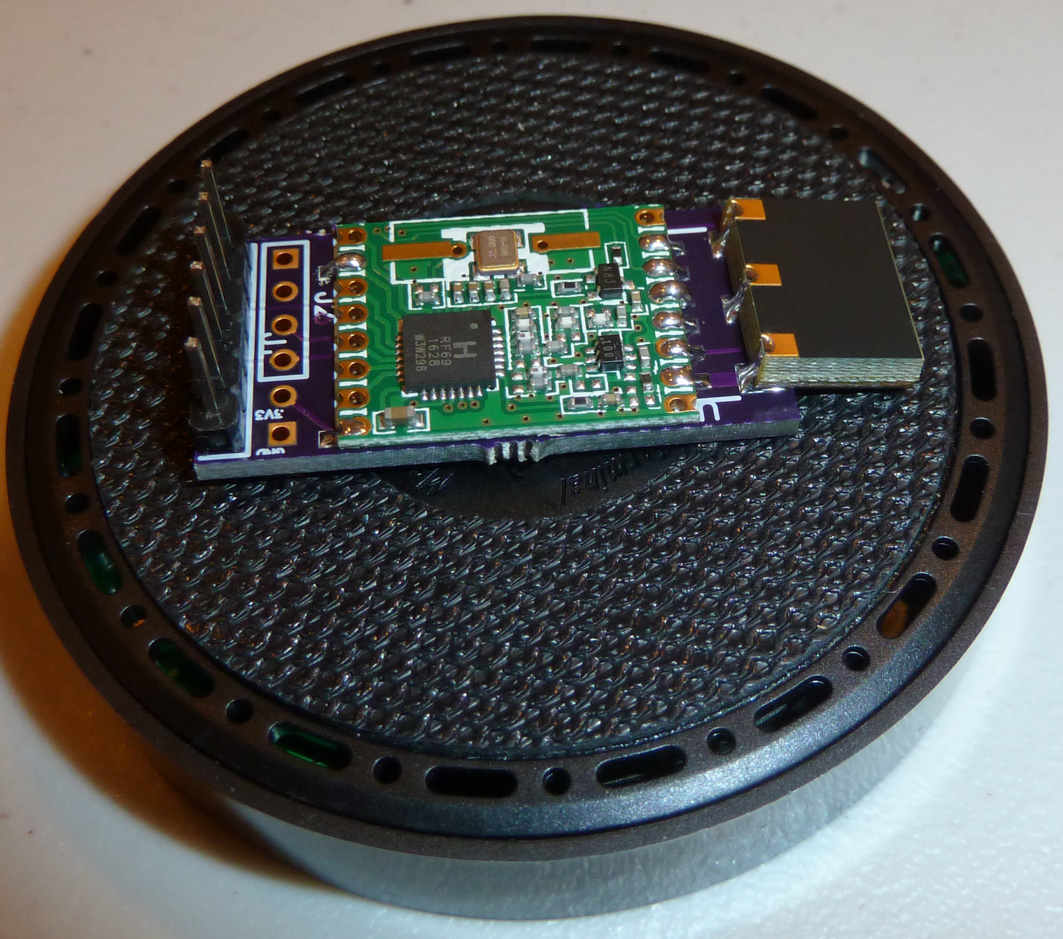
I'm improving both of them though to use machine pins on the TH sensor to reduce the overall height. I've already sent the machine pin smaller version to the fab.
-
@korttoma said:
@NeverDie said:
Here's a photo of a TH node based on a Pro Mini with an interstitial board:
Where can I order this board?
Do you have a location where one could see all the boards you have developed?On the other hand, if you really do want it, I could post it. I'm willing to accommodate Hero members much more than those who are all take and no give.
-
I'm removing the voltage regulator from the BME280, because even though it appears to work fine with it installed even when fed a voltage of 3.3v, at some point it's going to be in the way if being run from even lower voltages. After removing the voltage regulator, I bridge across it using a bit of solid core copper wire and some solder, thusly:
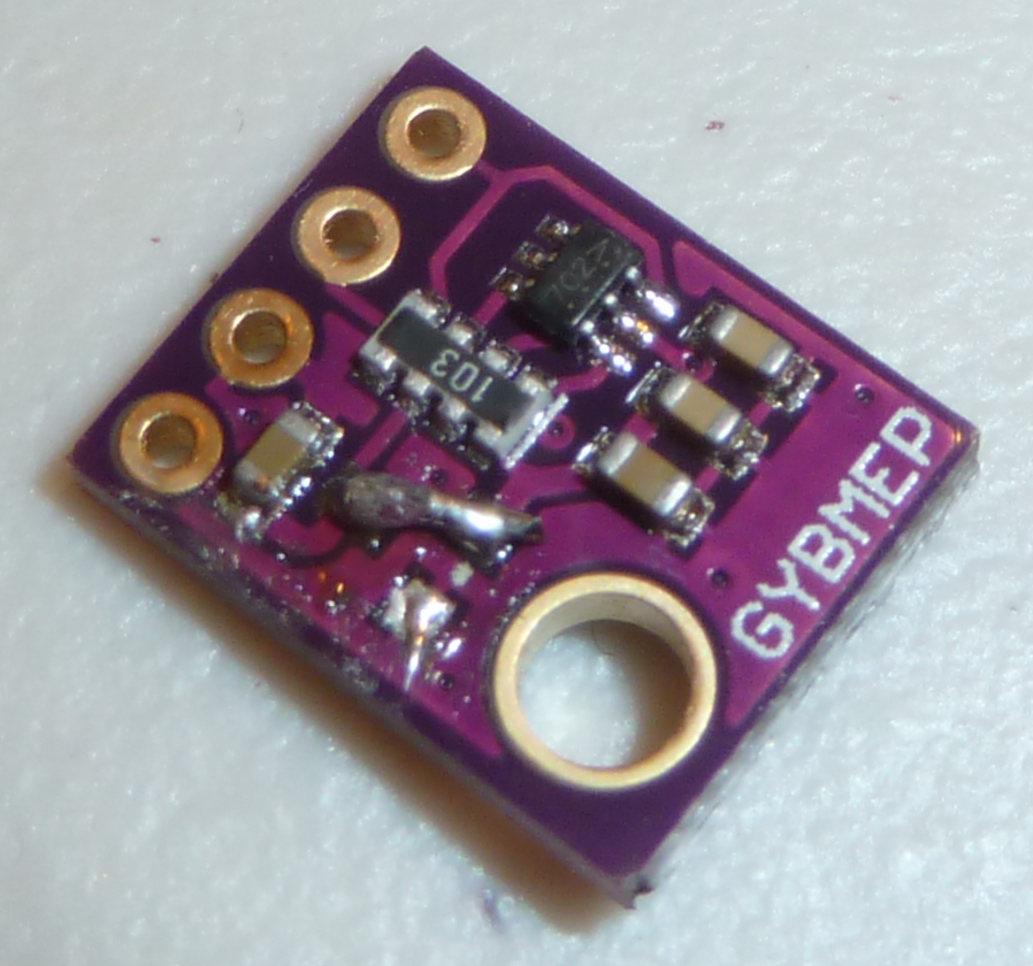
I'm not applying any flux, because I don't want to contaminant the BME280 sensor, either from the flux or from a flux remover afterward.
-
With the BME280 voltage regulator removed, I powered it stand-alone using a 3.3V bench power supply. Using Dave Jones's uCurrent in conjunction with a Fluke 87V multimeter, I measure the standby current at a mere 155 nanoamps. I had planned to power it from pins on the atmega328p and then powering it down between measurements, but at 155na I'm not sure it even matters, provided it's being powered from a battery.
 On the other hand, if the entire mote is being powered from a capacitor that's charged from solar energy that's harvested from only weak ambient indoor light.... I guess in that scenario it might depend on the relative leakage rate of the capacitor that's used for the mote's energy storage as to whether or not it's worth fussing about.
Suggested Topics
-
Welcome
Announcements • • hek