@Yveaux I am so terribly embarrassed! In order to rule out something wrong with the WS5100 I rebuilt the GW using an old Arduino UNO with an Ethernet shield. Still same problem. Then to really make sure I pasted/copied username and password from the cloudmqtt into the sketch. Immediate success! It turned out that I had misread an uppercase I (indigo) for a lower case l (lima). Still the suggestions from the community were good since I could iron out one possible cause after another. Thanks for the support!
B
bgunnarb
@bgunnarb
Posts
-
[SOLVED] Cannot get GwWS5100MQTT to connect to cloudmqtt.com -
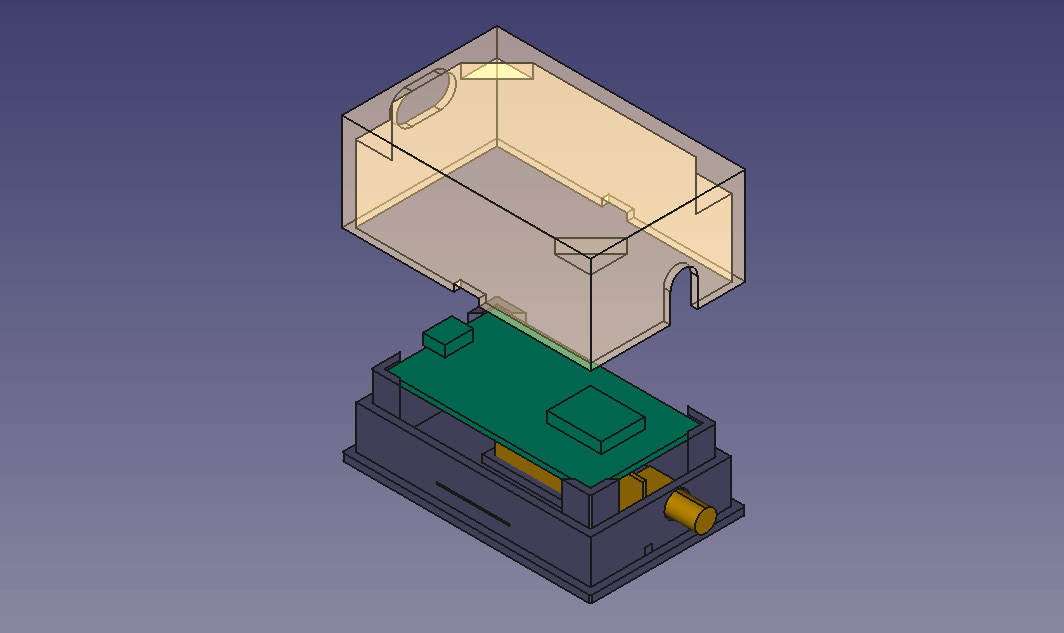
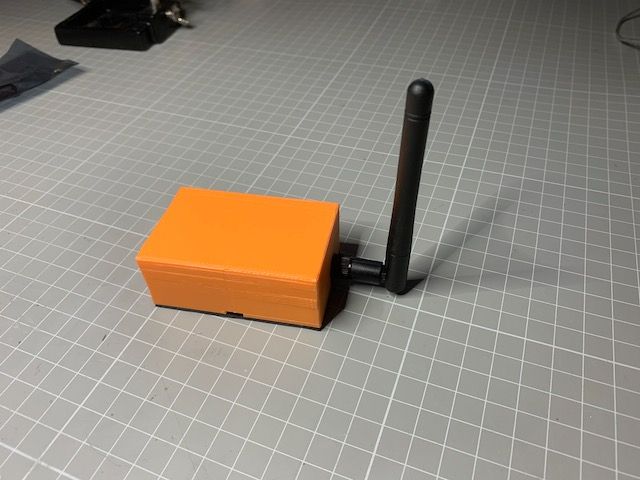
3D printed housing for an MQTT-GWI recently designed a housing for my MQTT-Gateway, based on an ESP8266 module (Node-MCU) and an nRF24L01+PA+LNA. The housing printed great using PLA on my FF Creator Pro. Connections are made using Dupont cables cut in half and soldered directly to the nRF24 where the pins have been removed. I enclose a picture from FreeCad and a link to the stl-files on Github for the base and the cover.
-
Battery life for Motion SensorHi!
Sorry to say, but the Arduino Nano may not be the best choice for battery operation and maybe the Motion Detector also is not the most power economic application. I guess, to start with you have not done any modification to the Nano like removing the power LED? There goes a few milliamps the whole time.The PIR need rather high voltage to be stable and not generate random detects. I run mine on 8V. But the Nano needs only 5V so you burn off a bit of power in the voltage regulator chip, even if the sleep current of the Nano is very low. Of course, the more detections there are, the more power is used during the day.
The Arduino ProMini is a better choice for battery operation. Please see Battery Powering in the left-hand column on the MySensors site. There are a few tricks there to really bring down power consumption. Then again the PIR needs more than 5V so you will have to use a power booster if you use the ProMini 8 MHz version that runs on 3.3 V.
I think sleeping for 600000 mS will only marginally improve battery economy. I went through the same ordeal as you and I run my Motion Detector on a 9 V wall-wart.
For sensors that really work well on battery I would suggest Light, Temperature and Humidity. I have a few of these built around ProMini 8 MHz and they typically run for 9 months or more on 2 x AA reporting every 2 minutes, but if you look at the link above, people achieve much better results. But I'm happy with 9 months.:grinning:
Best of luck and keep experimenting!
-
DHT11 Example Code on ArduinoI think the reason is that you have not set a node ID. At least this is not visible in the sketch.
OpenHab does not hand out node IDs. I have good experience.
You should try setting
#define MY_NODE_ID 1
In the beginning of your sketch where you define Child ID. -
💬 Atmospheric Pressure SensorHi!
I had exactly the same problem until I realised I had compiled for the 8 MHz version of the Arduino Pro Mini instead of the 16 MHz version.
Also, recently building an humidity sensor I realised there are no pull-up resistors on the SDA SDL lines, but that should be built-in if you use a break-out module. -
How to calibrate a gauge sensor@pierrot10
Since I am using almost the same tipping bucket rain gauge, let me try to explain how it works:The top of my funnel measures 109 x 49 mm = 5341 mm2 (square millimeters). For now, let us not worry about the rounded corners of the funnel.
If it rains 1 mm the funnel will collect 5341 mm3 (cubic millimeters) which is 5,341 cubic centimeters equal to 5,34 milliliters. This is difficult to use for calibration so let's try with 10 mm of rain which then equals 53,4 milliliters or 0,53 deciliters of water.So, you pour 53,4 milliliters of water into the funnel, not spilling any and you count the number of bucket tips. In my example, when I do this, the bucket tips 30 times. So if the bucket tips 30 times during a time period, it has rained 10 mm during that time. Or, the other way around: One tip of the bucket = 10/30 = 0,33 mm of rain.
Do not worry about the size of the bucket inside. What matters is how many times the bucket tips for a given amount of water. It is the area of the funnel which is important.
When it rains 1 mm an area of one square meter will receive 1 liter of water but the little funnel will only receive 5,34 milliliters as explained above.Now, if you really want to be accurate, you should take away the area of the rounded corners. But that will be less than 0,5% and there are other sources of inaccuracy.
-
DHT11 Example Code on ArduinoOops! I may have misled you.
The #define MY_NODE_ID 1 has to go into the sketch before you call #include <MySensors.h>as pointed out in the description of the Library API definitions:
"Remember to set configuration defines before including the MySensors.h."
In my sketches I always do all the #define (s) first like below:// Enable debug prints to serial monitor #define MY_DEBUG #define MY_NODE_ID 23 #define BATTERY_SENSE_PIN A0 // Input pin for battery sense #define VMIN 1.0 // (Min input voltage to regulator according to datasheet or guessing. (?) ) #define VMAX 3.22 // (Known or desired voltage of full batteries. If not, set to Vlim.) #define CHILD_ID_HUM 0 #define CHILD_ID_TEMP 1 // Enable and select radio type attached #define MY_RADIO_NRF24 //#define MY_RADIO_RFM69 #include <SPI.h> #include <AM2320.h> #include <Wire.h> #include <MySensors.h> // Rest of code goes here... -
MQTT GW issues with sending MQTT msgDid you try MQTT.fx? I use that SW (free of charge) a lot when troubleshooting MQTT.
Start by checking that MQTT.fx really does connect with the MQTT broker. Then subscribe first to the topic #, which means everything. Then narrow down by subscribing to mygateway1-out/# and so on.
The latest version of MQTT.fx also has a Topics Collector that shows all topics on the broker as they arrive.
-
3D printed housing for an MQTT-GW@evb Done that. Here is the link
-
How to calibrate a gauge sensor@pierrot10
1 mm of rain over 1 square meter is 1 liter of water. Correct!
One liter makes 358 tips so one tip is then 2,7932 milliliters that is correct.
But rainfall mm/hr is 2,7932 * nbr of tips only if the area of the funnel is 1 square meter.Your funnel is only 55 square centimeters so you will only collect 55/10000 of the rain that falls on the whole square meter.
The example you are using at the top of your post does not have the size of the funnel anywhere in the code.
-
Board and hardware failures@ileneken3 and @sundberg84
Hi!
I agree with @sundberg84 , the only time I have had problems, and that is only once, is when I had a very noisy DC/DC booster connected. It took an extra 22uF capacitor at the output of the booster to get the radio to connect to the GW. The booster generated spikes of more than 150 mV peak. I connected the capacitor in the experimental area where Vcc and GND are available. I also switched the capacitor close to the radio to 22uF instead of 4.7 uF. For my next design, I will make sure to connect the radio directly to 2xAA as suggested many times -
Bad downlink radio solved by updating gatewayAh! Sorry, misprint. Now using 2.2.0, not 2.0.0!
-
Motion detector with temperature and barometer functionI have built an intrusion detector that also measures barometer pressure and indoor and outdoor temperatures.
The pressure and indoor temperature is measured by a BMP280 and a number of DS18B20 sensors can be connected to measure the temperature in remote locations.
When movement is detected two red LEDs flash during 20 sec.
Everything is built into a frightening wooden mask, bought in Indonesia. The LEDs poke out through the nostrils.
Here is the sketch:
/**
 * File name: MotionSensor_LED_2_temp_baro_280
 * The MySensors Arduino library handles the wireless radio link and protocol
 * between your home built sensors/actuators and HA controller of choice.
 * The sensors forms a self healing radio network with optional repeaters. Each
 * repeater and gateway builds a routing tables in EEPROM which keeps track of the
 * network topology allowing messages to be routed to nodes.
 *
 * Created by Henrik Ekblad <henrik.ekblad@mysensors.org>
 * Copyright (C) 2013-2015 Sensnology AB
 * Full contributor list: https://github.com/mysensors/Arduino/graphs/contributors
 *
 * Documentation: http://www.mysensors.org
 * Support Forum: http://forum.mysensors.org
 *
 * This program is free software; you can redistribute it and/or
 * modify it under the terms of the GNU General Public License
 * version 2 as published by the Free Software Foundation.
 *
 *******************************
 *
 * REVISION HISTORY
 * Version 1.0 - Henrik Ekblad
 * Version 2.1 - Gunnar Blockmar includes PMB280 temp/baro sensor and DS18B20 temp sensor
 *
 * DESCRIPTION
 * Motion Sensor example using HC-SR501
 * http://www.mysensors.org/build/motion
 *
 * Now with 1 fading LEDs when sensor is triggered
 * Measuring temp and pressure with BMP 280. Local pressure
 * Measuring remote temp via DS18B20
 */

#include <Adafruit_BMP280.h>
#include <Adafruit_Sensor.h>
#include <OneWire.h>
#include <DallasTemperature.h>
#include <SPI.h>

unsigned long SLEEP_TIME = 60000; // Sleep time between reports (in milliseconds)

#define MY_DEBUG
#define DIGITAL_INPUT_SENSOR 3   // The digital input you attached your motion sensor.  (Only 2 and 3 generates interrupt!)
#define INTERRUPT DIGITAL_INPUT_SENSOR-2 // Usually the interrupt = pin -2 (on uno/nano anyway)
#define CHILD_ID_MOT 0   // Id of the motion sensor child
#define CHILD_ID_ITEMP 1  // Id of indoor temperature sensor
#define CHILD_ID_BARO 2  // Id of pressure sensor
#define CHILD_ID_OTEMP 3  // Id of outdoor temperature sensor
#define RED_LED 5    // Pin for LED
#define RED_LED2 6  // Pin for LED2
#define DELAY 40     // Wait for brightness change
int fadeAmount = 5;   // brightness change per step
#define ONE_WIRE_BUS 2 // Pin where dallas sensor is connected
#define MAX_ATTACHED_DS18B20 16
OneWire oneWire(ONE_WIRE_BUS); // Setup a oneWire instance to communicate with any OneWire devices (not just Maxim/Dallas temperature ICs)
DallasTemperature sensors(&oneWire); // Pass the oneWire reference to Dallas Temperature.
int numSensors=0;
bool receivedConfig = false;


const char *weather[] = { "Stabilt", "Bättre", "Sämre", "Ostadigt", "Åska!", "Okänt" };
enum FORECAST
{
  STABLE = 0,     // "Stable Weather Pattern"
  SUNNY = 1,      // "Slowly rising Good Weather", "Clear/Sunny "
  CLOUDY = 2,     // "Slowly falling L-Pressure ", "Cloudy/Rain "
  UNSTABLE = 3,   // "Quickly rising H-Press",     "Not Stable"
  THUNDERSTORM = 4, // "Quickly falling L-Press",    "Thunderstorm"
  UNKNOWN = 5     // "Unknown (More Time needed)
};

Adafruit_BMP280 bmp;      // Digital Pressure Sensor

float lastPressure = -1;
float lastTemp = -1;
int lastForecast = -1;

const int LAST_SAMPLES_COUNT = 5;
float lastPressureSamples[LAST_SAMPLES_COUNT];

// this CONVERSION_FACTOR is used to convert from Pa to kPa in forecast algorithm
// get kPa/h by dividing hPa by 10
#define CONVERSION_FACTOR (1.0/10.0)

int minuteCount = 0;
bool firstRound = true;
// average value is used in forecast algorithm.
float pressureAvg;
// average after 2 hours is used as reference value for the next iteration.
float pressureAvg2;
float dP_dt;


// Enable debug prints to serial monitor
// #define MY_DEBUG

// Enables and select radio type (if attached)
#define MY_RADIO_NRF24
//#define MY_RADIO_RFM69

#define MY_NODE_ID 41

#include <MySensors.h>

// Initialize motion message
MyMessage msgm(CHILD_ID_MOT, V_TRIPPED);
// Initialize temp baro and forecast messages
MyMessage msgit(CHILD_ID_ITEMP, V_TEMP);
MyMessage msgp(CHILD_ID_BARO, V_PRESSURE);
MyMessage forecastMsg(CHILD_ID_BARO, V_FORECAST);
MyMessage msgot(0, V_TEMP);

bool metric = true;
void before()
{
  // Startup up the OneWire library
  sensors.begin();
}


void setup()
{
  pinMode(DIGITAL_INPUT_SENSOR, INPUT);      // sets the motion sensor digital pin as input
  pinMode(RED_LED, OUTPUT);   // sets the pin for the LEDs as output
  pinMode(RED_LED2, OUTPUT);
  analogWrite(RED_LED, 0);    // make sure LEDs are OFF
  analogWrite(RED_LED2, 0);
  bmp.begin();
  if (!bmp.begin())
  {
    Serial.println("Could not find a valid BMP280 sensor, check wiring!");
    while (1) {}
  }
  // requestTemperatures() will not block current thread
  sensors.setWaitForConversion(false);
}

void presentation()
{
  // Send the sketch version information to the gateway and Controller
  sendSketchInfo("M. Sens_LED_2t/b/f 280", "2.2");

  // Fetch the number of attached temperature sensors
  numSensors = sensors.getDeviceCount();

  // Register all sensors to gw (they will be created as child devices)
  present(CHILD_ID_MOT, S_MOTION);
  present(CHILD_ID_ITEMP, S_TEMP);
  present(CHILD_ID_BARO, S_BARO);
  for (int i=0; i<numSensors && i<MAX_ATTACHED_DS18B20; i++) {
     present(i+CHILD_ID_OTEMP, S_TEMP);
  }
}

void loop()
{

  // Read digital motion value
  boolean tripped = digitalRead(DIGITAL_INPUT_SENSOR) == HIGH;


  Serial.println(tripped);
  send(msgm.set(tripped?"1":"0"));  // Send tripped value to gw


  if (tripped) {
   int brightness = 0;   // brightness of LED
   int count = 0;  // number of half cycles to fade LED
   while (count < 12) {    // run 6 full fade cycles
      analogWrite(RED_LED, brightness);
      analogWrite(RED_LED2, brightness);
      brightness = brightness + fadeAmount;
      if (brightness == 0 || brightness == 255) {
        fadeAmount = -fadeAmount;  // change direction of fade
        count ++;
      }
      wait (DELAY);  //wait to see brightness change
    }
    analogWrite(RED_LED, 0);  // turn off LEDs
    analogWrite(RED_LED2, 0);
  }

  int long pressure = bmp.readPressure() / 100;
  float temperature = bmp.readTemperature();
  int forecast = sample(pressure);

  send(msgit.set(temperature, 1));
  send(msgp.set(pressure, 0));
  send(forecastMsg.set(weather[forecast]));

  // Fetch temperatures from Dallas sensors
  sensors.requestTemperatures();

  sleep (750);

  // Read temperatures and send them to controller
  for (int i=0; i<numSensors && i<MAX_ATTACHED_DS18B20; i++) {
  // Fetch and round temperature to one decimal
  float otemperature = static_cast<float>(static_cast<int>((sensors.getTempCByIndex(i)) * 10.)) / 10.;

  // Only send data if no error

  if (otemperature != -127.00 && otemperature != 85.00) {
  // Send in the new temperature
      send(msgot.setSensor(i+CHILD_ID_OTEMP).set(otemperature,1));
  }
}


  // Sleep until interrupt comes in on motion sensor but send update every minute.
  tripped = false;  //reset tripped
  sleep(INTERRUPT,CHANGE, SLEEP_TIME);
}

float getLastPressureSamplesAverage()
{
  float lastPressureSamplesAverage = 0;
  for (int i = 0; i < LAST_SAMPLES_COUNT; i++)
  {
    lastPressureSamplesAverage += lastPressureSamples[i];
  }
  lastPressureSamplesAverage /= LAST_SAMPLES_COUNT;

  return lastPressureSamplesAverage;
}

// Algorithm found here
// http://www.freescale.com/files/sensors/doc/app_note/AN3914.pdf
// Pressure in hPa -->  forecast done by calculating kPa/h
int sample(float pressure)
{
  // Calculate the average of the last n minutes.
  int index = minuteCount % LAST_SAMPLES_COUNT;
  lastPressureSamples[index] = pressure;

  minuteCount++;
  if (minuteCount > 185)
  {
    minuteCount = 6;
  }

  if (minuteCount == 5)
  {
    pressureAvg = getLastPressureSamplesAverage();
  }
  else if (minuteCount == 35)
  {
    float lastPressureAvg = getLastPressureSamplesAverage();
    float change = (lastPressureAvg - pressureAvg) * CONVERSION_FACTOR;
    if (firstRound) // first time initial 3 hour
    {
      dP_dt = change * 2; // note this is for t = 0.5hour
    }
    else
    {
      dP_dt = change / 1.5; // divide by 1.5 as this is the difference in time from 0 value.
    }
  }
  else if (minuteCount == 65)
  {
    float lastPressureAvg = getLastPressureSamplesAverage();
    float change = (lastPressureAvg - pressureAvg) * CONVERSION_FACTOR;
    if (firstRound) //first time initial 3 hour
    {
      dP_dt = change; //note this is for t = 1 hour
    }
    else
    {
      dP_dt = change / 2; //divide by 2 as this is the difference in time from 0 value
    }
  }
  else if (minuteCount == 95)
  {
    float lastPressureAvg = getLastPressureSamplesAverage();
    float change = (lastPressureAvg - pressureAvg) * CONVERSION_FACTOR;
    if (firstRound) // first time initial 3 hour
    {
      dP_dt = change / 1.5; // note this is for t = 1.5 hour
    }
    else
    {
      dP_dt = change / 2.5; // divide by 2.5 as this is the difference in time from 0 value
    }
  }
  else if (minuteCount == 125)
  {
    float lastPressureAvg = getLastPressureSamplesAverage();
    pressureAvg2 = lastPressureAvg; // store for later use.
    float change = (lastPressureAvg - pressureAvg) * CONVERSION_FACTOR;
    if (firstRound) // first time initial 3 hour
    {
      dP_dt = change / 2; // note this is for t = 2 hour
    }
    else
    {
      dP_dt = change / 3; // divide by 3 as this is the difference in time from 0 value
    }
  }
  else if (minuteCount == 155)
  {
    float lastPressureAvg = getLastPressureSamplesAverage();
    float change = (lastPressureAvg - pressureAvg) * CONVERSION_FACTOR;
    if (firstRound) // first time initial 3 hour
    {
      dP_dt = change / 2.5; // note this is for t = 2.5 hour
    }
    else
    {
      dP_dt = change / 3.5; // divide by 3.5 as this is the difference in time from 0 value
    }
  }
  else if (minuteCount == 185)
  {
    float lastPressureAvg = getLastPressureSamplesAverage();
    float change = (lastPressureAvg - pressureAvg) * CONVERSION_FACTOR;
    if (firstRound) // first time initial 3 hour
    {
      dP_dt = change / 3; // note this is for t = 3 hour
    }
    else
    {
      dP_dt = change / 4; // divide by 4 as this is the difference in time from 0 value
    }
    pressureAvg = pressureAvg2; // Equating the pressure at 0 to the pressure at 2 hour after 3 hours have past.
    firstRound = false; // flag to let you know that this is on the past 3 hour mark. Initialized to 0 outside main loop.
  }

  int forecast = UNKNOWN;
  if (minuteCount < 35 && firstRound) //if time is less than 35 min on the first 3 hour interval.
  {
    forecast = UNKNOWN;
  }
  else if (dP_dt < (-0.25))
  {
    forecast = THUNDERSTORM;
  }
  else if (dP_dt > 0.25)
  {
    forecast = UNSTABLE;
  }
  else if ((dP_dt > (-0.25)) && (dP_dt < (-0.05)))
  {
    forecast = CLOUDY;
  }
  else if ((dP_dt > 0.05) && (dP_dt < 0.25))
  {
    forecast = SUNNY;
  }
  else if ((dP_dt >(-0.05)) && (dP_dt < 0.05))
  {
    forecast = STABLE;
  }
  else
  {
    forecast = UNKNOWN;
  }

  // uncomment when debugging
  //Serial.print(F("Forecast at minute "));
  //Serial.print(minuteCount);
  //Serial.print(F(" dP/dt = "));
  //Serial.print(dP_dt);
  //Serial.print(F("kPa/h --> "));
  //Serial.println(weather[forecast]);

  return forecast;
}
and here are a couple of photos, front and back:
 image url)DSC_0669 (1).jpg
 image url)DSC_0668 (1).jpg
 -
GatawayESP8266 - Compile error@eiten Ran into the same error but of course the community is always at hand, ready to help! Great! I'm using MySensors 2.3.2 release version. Downgrading the ESP8266 board library to 2.7.4 as suggested by @OldSurferDude did the trick.
I'm still clinging to MySensors. So simple and inexpensive to use! All sensors and other stuff connects over three MQTT GW in three locations back to my Home Assistant.
PS: Get well soon!Regards, Gunnar
-
Trying to design MySensors PCB / FritzingHi!
I absolutely recommend that you invest the time needed to learn KiCad. Then you get all this stuff with clearances for free. You also get a whole library with footprints for components. KiCad will print originals for making the PCBs if you do that yourself.
You could also send the KiCad .pcb file to e.g. www.oshpark.com in the US. They charge $5 per sq. inch of 2-layer board and you get 3-boards for that price. They normally take one week to do the job and the result is excellent! -
Pro Mini issues@dbemowsk Strange! I have never made a manual reset when programming my Pro Minis.
-
RGB LED strip@maghac I have implemented your 1.8 and I am impressed with the good structure and the performance of your code! Kudos!
-
No merge into master in the last 5 years, should we use development?Well, my network with two handfulls of nodes in three different locations is still live and kicking! I agree that there does not seem to be a lot happening in the community. I'm running 2.4.0- alpha since this gives support for MQTT over TLS. Just managed today to create one more MQTT GW after reading a lot about support for ESP8266. You know, these things you do once per year and have to learn new each time.
MySensors is the cheapest way I have found to create small sensor nodes etc. But now slowly running out of my supply of hardware. Well, time will tell...
-
Arduino with voltage regulatorFiltering the power lines on input and output is generally not a critical issue when it comes to the value of the capacitors unless you plan to produce a large number of boards when cost of components become the issue.
If you are looking for a trouble-free operation it is better to be safe than sorry and to be conservative in the dimensioning. So 10 uF on the output is better than 2.2 since it provides more filtering of low frequency noise. 0.1 uF is better than 470 pF since it provides more filtering of high frequency noise. 10 uF on the input also filter out spikes in the input power, should there be any, so that they do not pass through the regulator. It is good practice to have both a 10 uF and a 0.1 uF capacitor on the output since they have different electrical capabilities to filter low and high frequency noise.
So in essence, the value of filtering capacitors is not that critical most of times. Too little filtering could give you issues with the radio, which is sensitive to noise on the power lines. This is why there always should be a capacitor of at least 4.7 uF close to the radio power input.
-
PIR sensor firing every 20 secondsIn my experience PIR sensor are very sensitive to spikes in the power supply, especially if you run them on voltages close to the lower limit. I feed mine with a separate +8 volt supply. If you run it on the same 5 volt supply as the ESP8266 you are almost guaranteed to get false triggers. The 20 seconds is probably the time after which the PIR resets. This causes a spike on the supply which triggers the PIR again. This happened to me.