Navigation

    • Register
    • Login
    • Search
    • OpenHardware.io
    • Categories
    • Recent
    • Tags
    • Popular
    1. Home
    2. carlierd
    3. Posts
    • Profile
    • Following
    • Followers
    • Topics
    • Posts
    • Best
    • Groups

    Posts made by carlierd

    • RE: Clean looking sensor node

      Very interesting !! Thanks for the idea !

      David.

      posted in Enclosures / 3D Printing
      carlierd
      carlierd
    • RE: ๐Ÿ’ฌ MyMultisensors

      Very good job !

      When will share the schematic ?
      How is responding the PIR ?

      And off course, how is the battery usage ? So many sensors could discharge it faster ...

      David.

      posted in OpenHardware.io
      carlierd
      carlierd
    • RE: Office plant monitor

      @scalz : I missed your reply ! Interesting withe paper !

      @scalz said:

      @Nca78 you can have brownout if the battery is near end of life and nothing has been designed to handle a bit the internal res. but with a fresh a coincell and some capa, you can do some chain tx but that's not the best for the battery life.

      The only case where i had issue with brownout at startup, plus it was a fresh coincell was with a crappy ali coincell batt!! very bad quality! now I'm using only good quality coincell like duracell, varta, maxell.. and that's day and night ๐Ÿ˜‰

      @carlierd If you're interested this doc explains very well the capacitor calc etc... http://www.ti.com.cn/cn/lit/wp/swra349/swra349.pdf

      • capa ideally calculated/estimated (on mine I have 200uF, plus others for sensors, radio is 86uA etc..) and after multiple msg presentation on frsh coincell i don't fall under 2.85 (voltage starts 3.05V) because I can't recover voltage during this period.
        Hopefully a transmit is not 1sec! More something like says 30+ ms (depending if signing is needed, ack, retries.. etc). To not break capa benefits, it's better to sleep between tx during chains..to recover voltage and optimize battery life. Sleeping 200ms can be enough
      • For the capa leakage, it depends of capa. common good quality ceramic have not those leakage (few nano). Sure on this design it's not a ceramic.
      • You're right at runtime 1Mhz consumes less than 8Mhz; mA vs thousands uA. But at 1Mhz everything is slower, comms too (I mean code execution). During deep sleep, there is no difference in power consumption. Oscillator is stopped so mhz does not mean. Note: at 8Mhz you can wake in few uA, at 1Mhz it's slower of course.
      posted in OpenHardware.io
      carlierd
      carlierd
    • RE: Problem with RFM69 on homemade board

      Hello,

      What is the source of the 3,3 ? I got some issues with poor voltage converter. Using an arduino uno board which provides 5 and 3,3V solved my problem.

      David.

      posted in Hardware
      carlierd
      carlierd
    • RE: Slim Node scene controller/ keypad

      Hello,

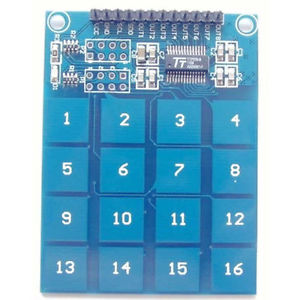
      Some pictures of my scene controller inspired by this post ! I modified the original sketch to have two functions: keyboard for my alarm (from key 1 to 9) and scene controller (from key 10 to 16). Thanks @awi for the idea and the original sketch !
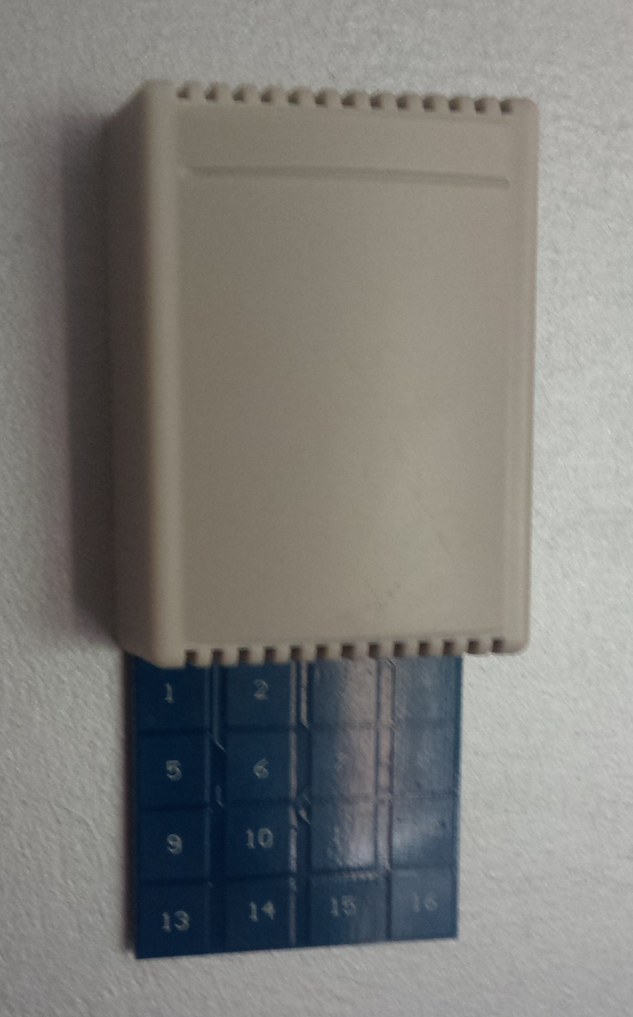
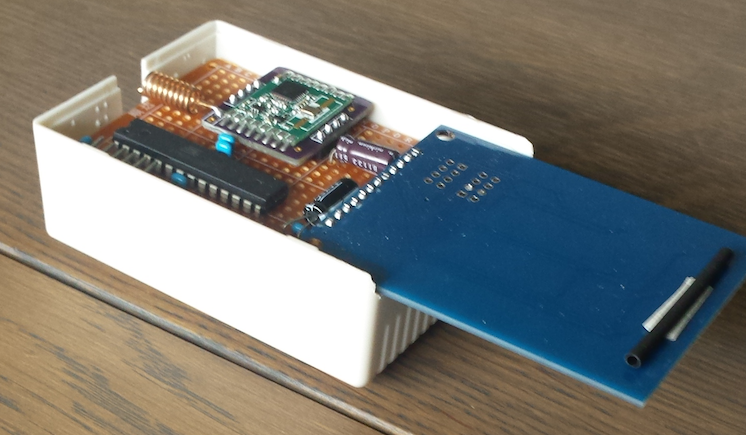
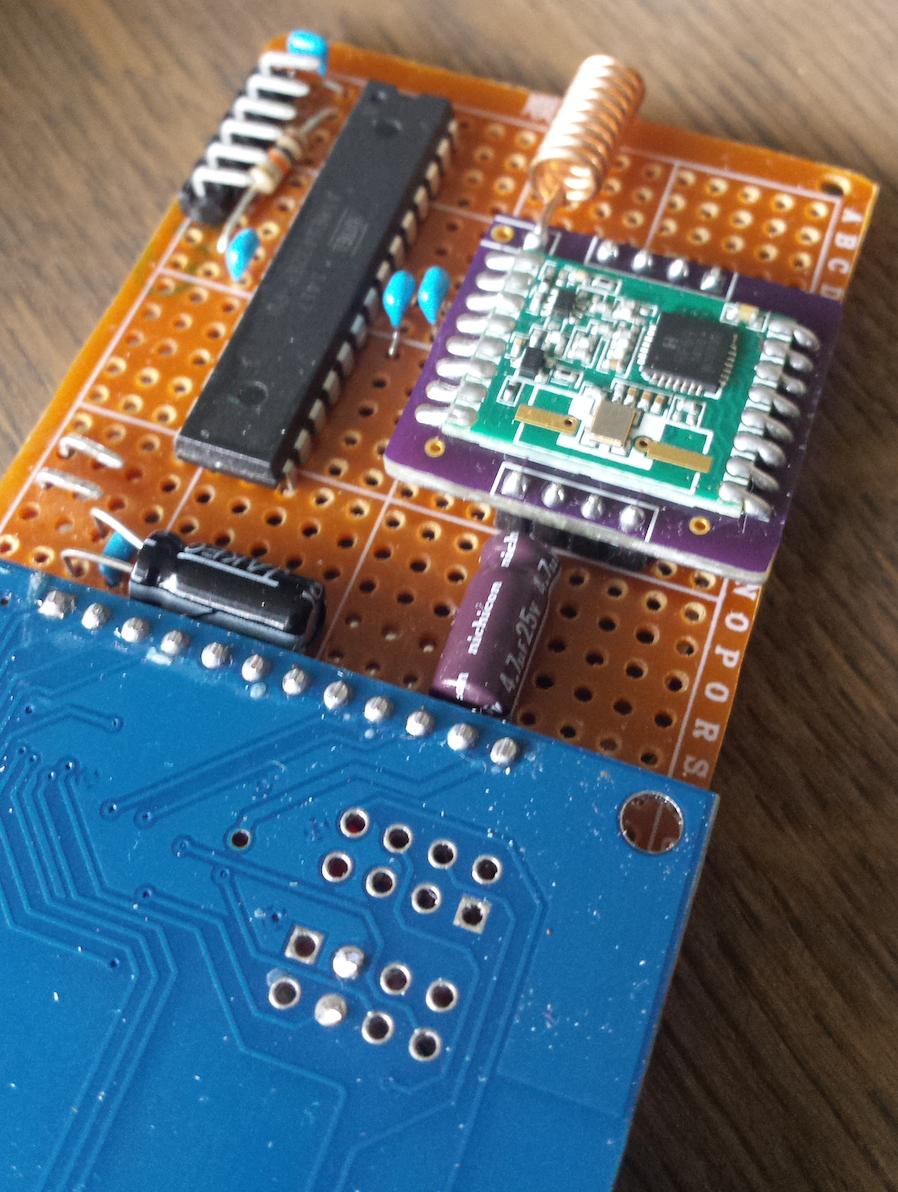
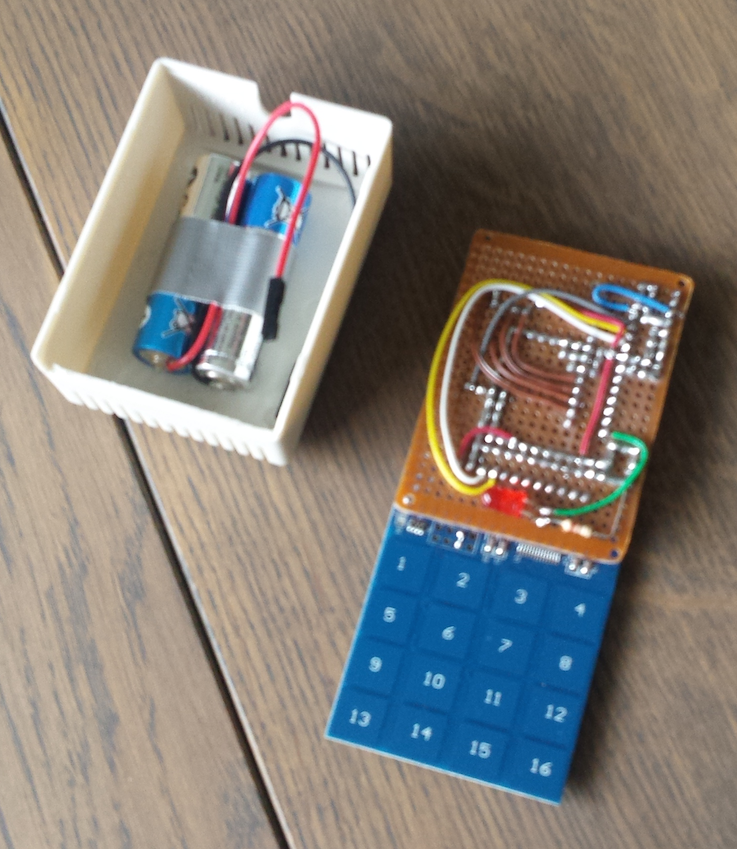
      0_1471010520501_Scene controller 1.png

      0_1471010530511_Scene controller 2.png

      0_1471010539448_Scene controller 3.png

      0_1471010545316_Scene controller 4.png

      David.

      posted in My Project
      carlierd
      carlierd
    • RE: rfm69 and atc

      @Fleischtorte So I am not the only one David waiting for ATC and RSSI ๐Ÿ˜‰

      David.

      posted in Development
      carlierd
      carlierd
    • RE: Office plant monitor

      Interesting !
      I will check in few weeks the result. There is several capacitors to help the stability maybe it could be enough. If it's not the case I will replace the CR2032 by 2 * AAA.

      posted in OpenHardware.io
      carlierd
      carlierd
    • RE: Office plant monitor

      @Nca78 Like @mfalkvidd wrote, the expected life duration is greater than 2 years. But it's just theory. My first node (on 2*AA) was started several weeks ago and the battery level did not change. So I am confident ๐Ÿ˜‰

      I measure the power consumption when working at 1 MHz and there was no difference between 1 or 8 MHz. As I have to decrease the transmission speed at 1 MHz, I got some issues. The main was probably with the signing feature.

      posted in OpenHardware.io
      carlierd
      carlierd
    • RE: ๐Ÿ’ฌ MyMultisensors

      @scalz I will wait. I am curious to see the result on my nodes !

      posted in OpenHardware.io
      carlierd
      carlierd
    • RE: ๐Ÿ’ฌ MyMultisensors

      Hello,

      Very complete board !

      How did you report RSSI ? It is RSSI of the node or the gateway ?

      David.

      posted in OpenHardware.io
      carlierd
      carlierd
    • RE: Office plant monitoring

      Hello,

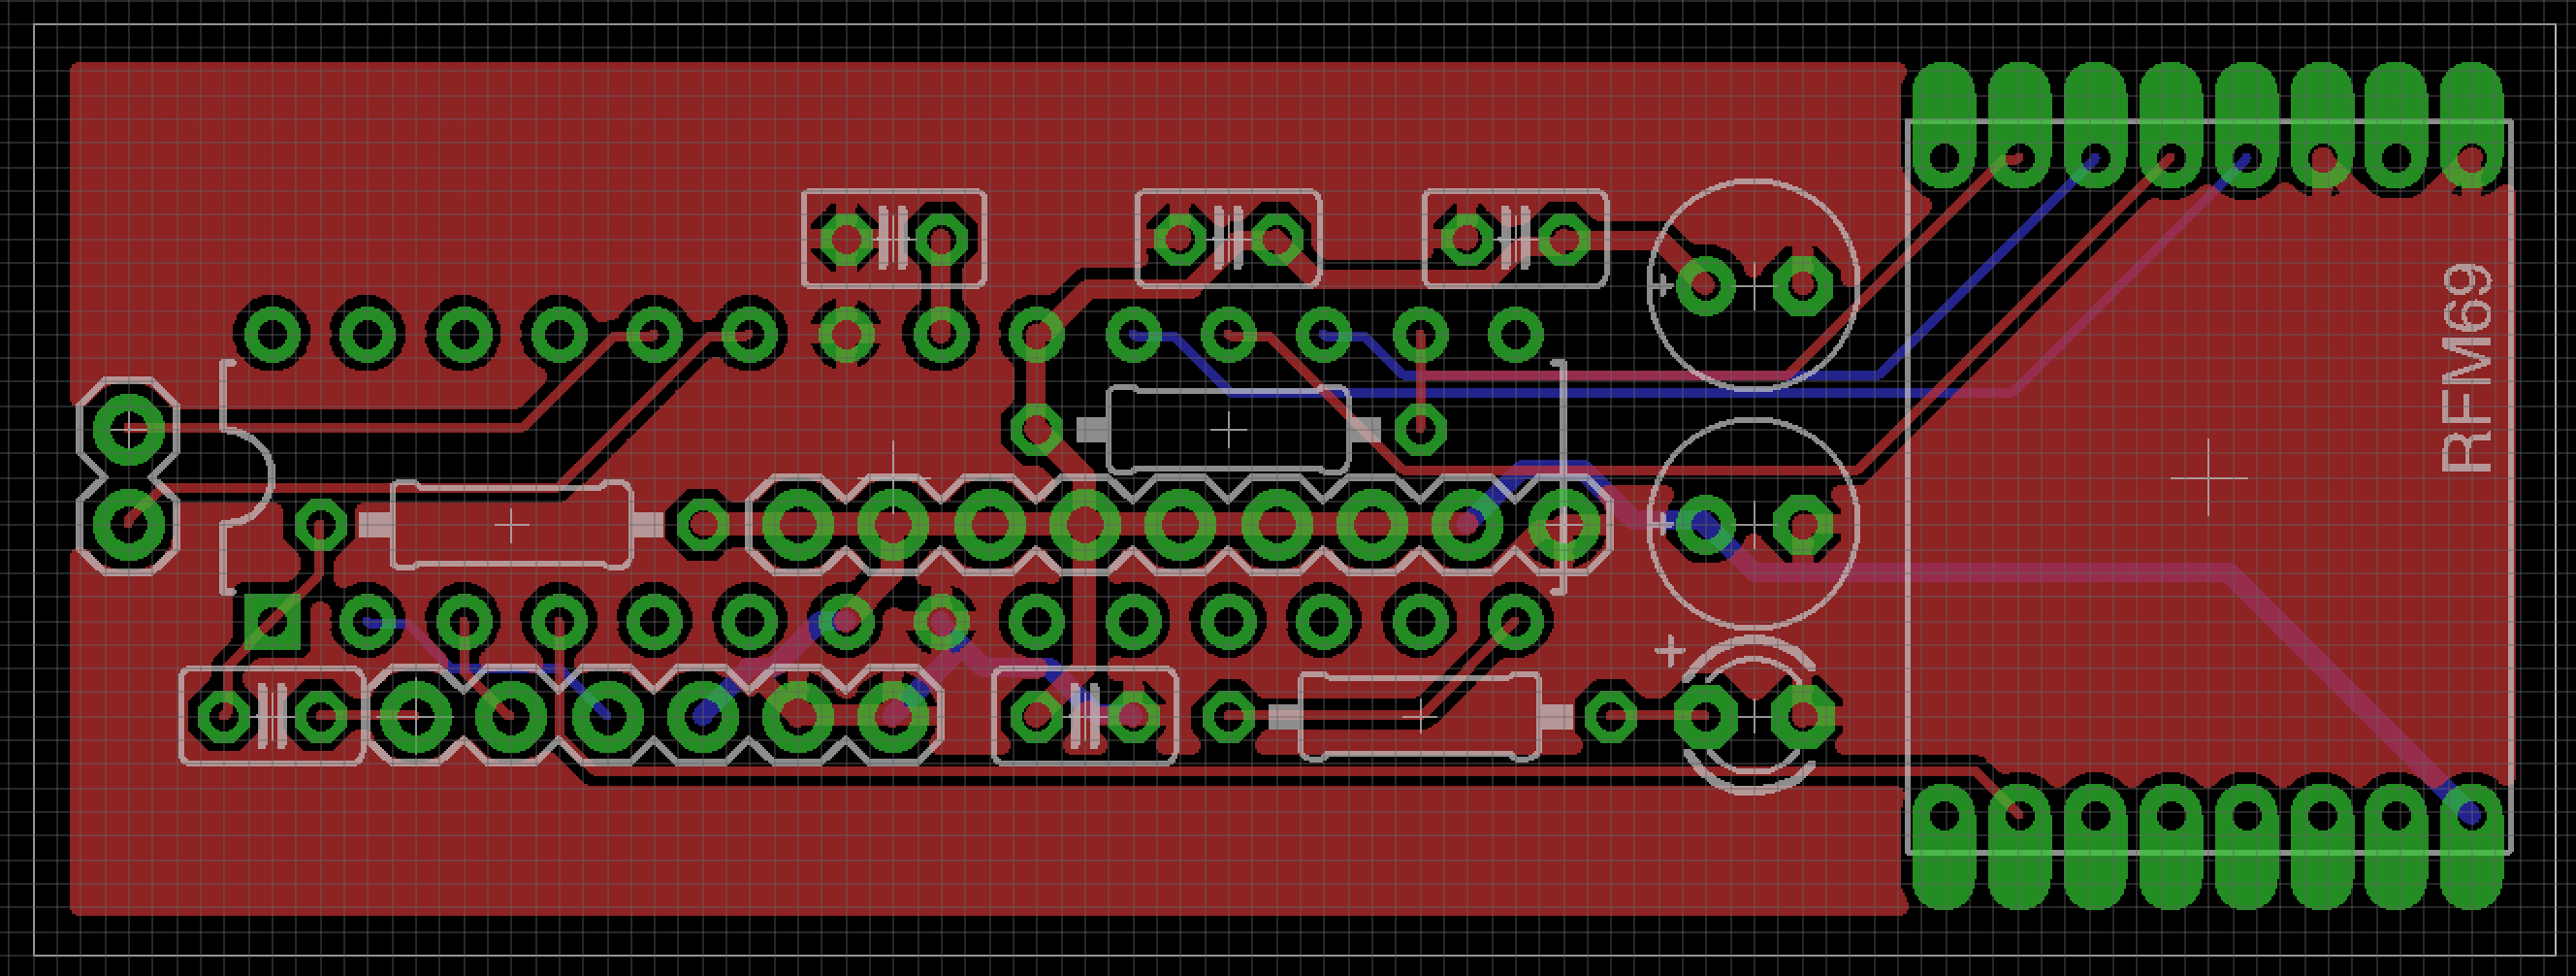
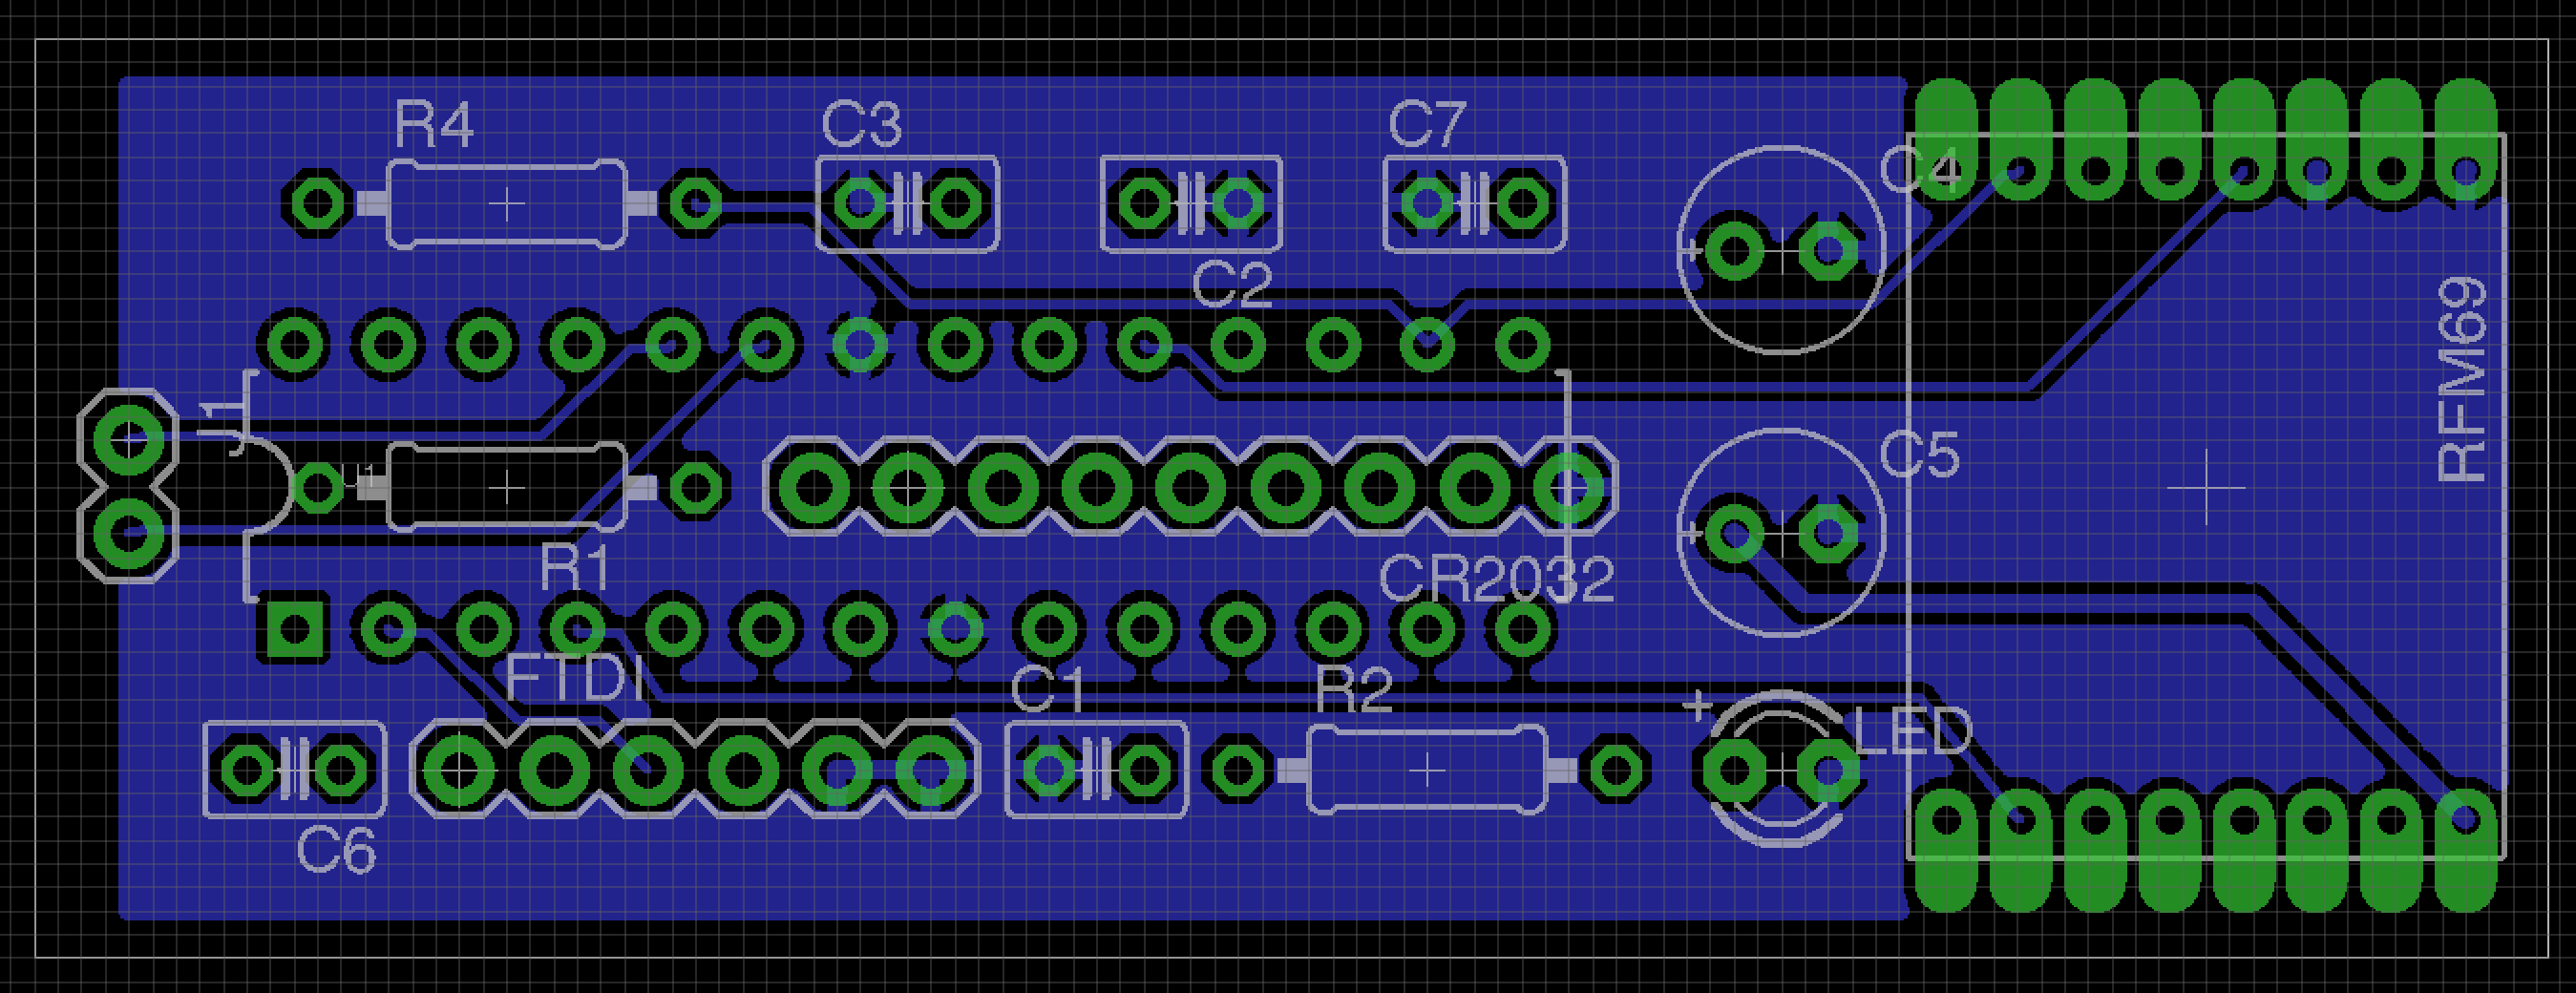
      After several weeks I finally succeed to create a dedicated PCB ! It was started yesterday evening and works fine.

      Some pictures:
      0_1469782265724_Photo 1.jpg
      0_1469782279459_Photo 2.jpg
      0_1469782286758_Photo 3.jpg

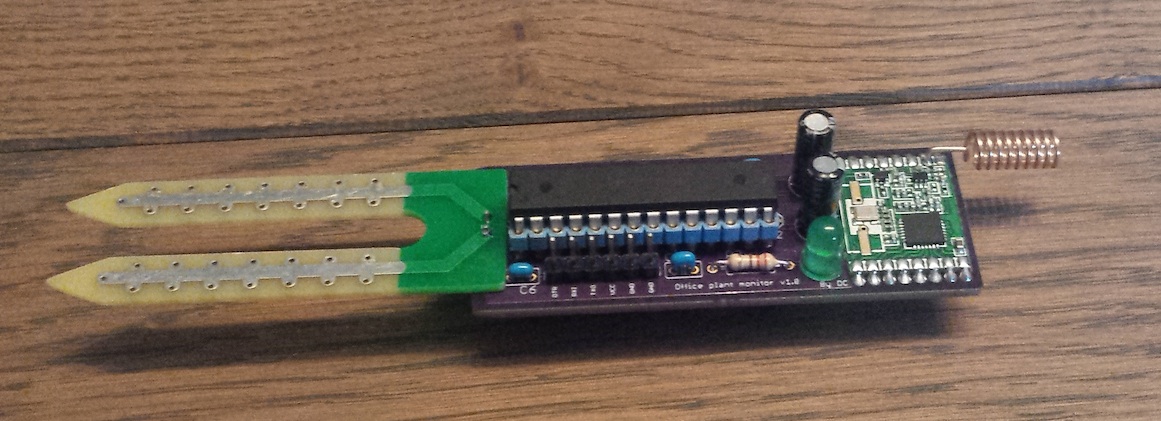
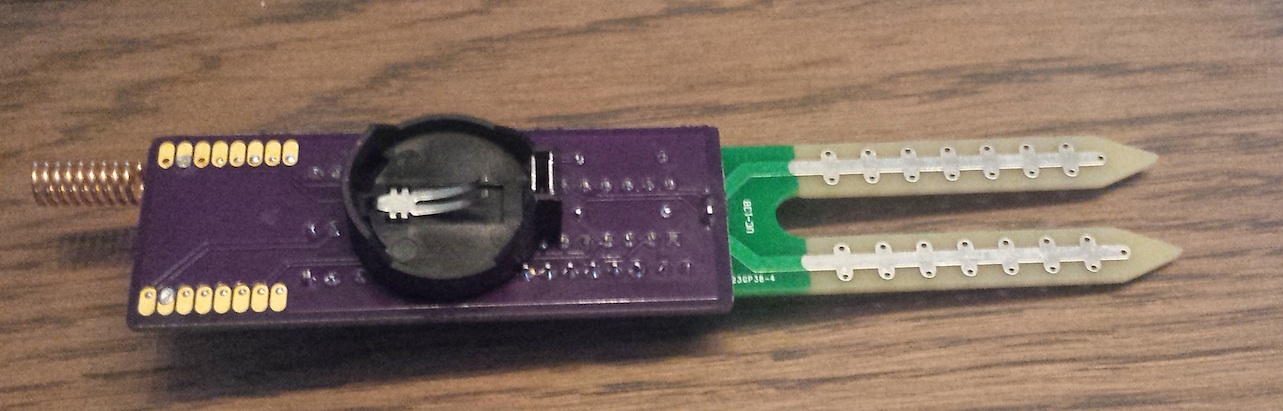
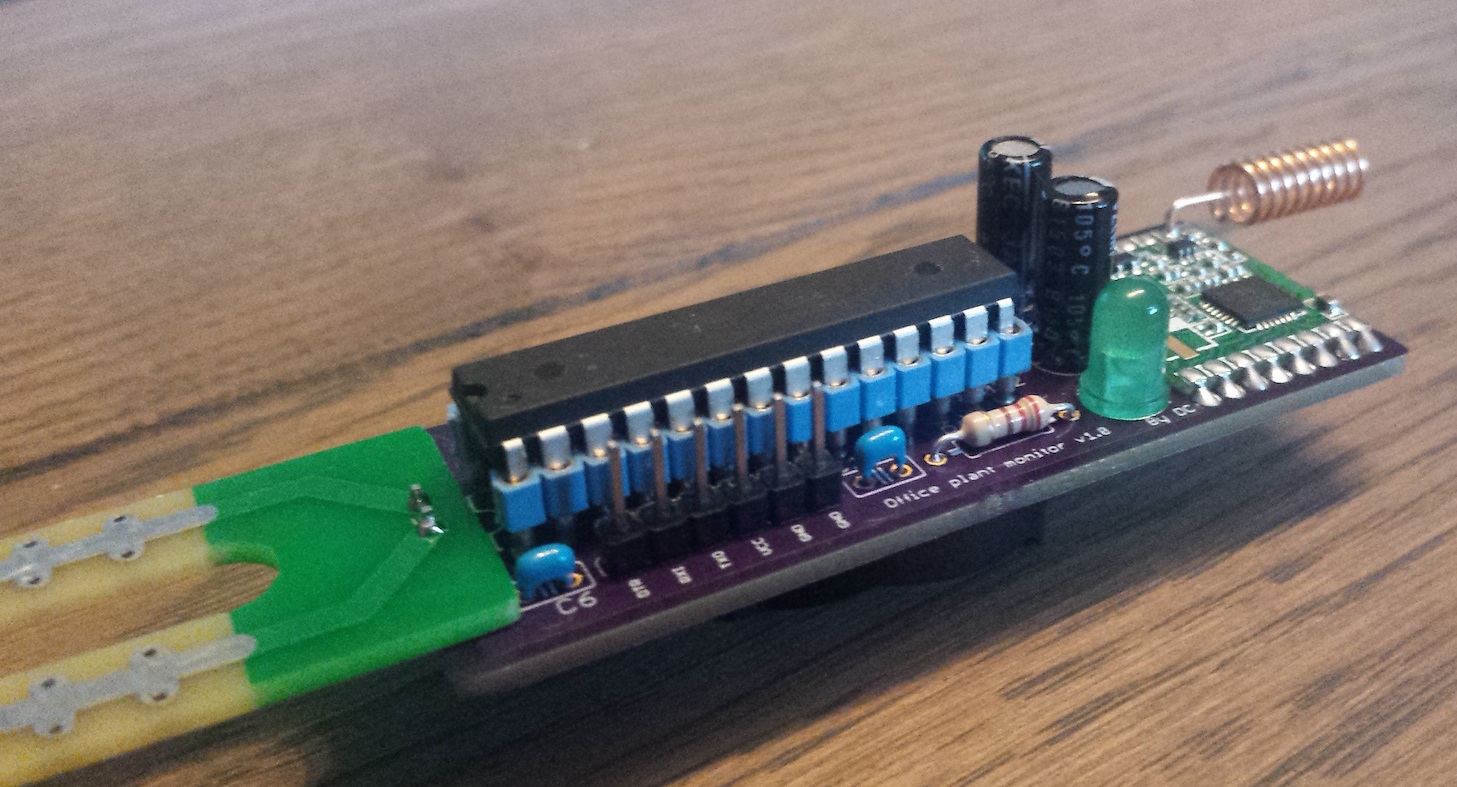
      Measure is reported each two hours. So I expect more than two years on a CR2032 (using @GertSanders firmware).

      I can off course provide any information as PCB.

      Thanks @mfalkvidd for the idea and the code. The project is now WAF ๐Ÿ˜‰

      David.

      posted in My Project
      carlierd
      carlierd
    • RE: 3 in 1 incl battery monitor

      Hello,

      All nodes are still working correctly but I still want to replace DHT22. But nothing done for the moment. Not at top position on my todo list ๐Ÿ˜‰

      David.

      posted in My Project
      carlierd
      carlierd
    • Looking for a box for TTP229 (WAF request)

      Hello,

      As written in the subject I am looking for a box for the TTP229 keyboard:

      0_1462652537304_s-l300.jpg

      @awi made one in this post but it's not WAF enough ...

      Someone found one ? Or a design I can print ?

      Thanks,

      David.

      posted in Hardware
      carlierd
      carlierd
    • RE: Board dimension issue on OSHPark

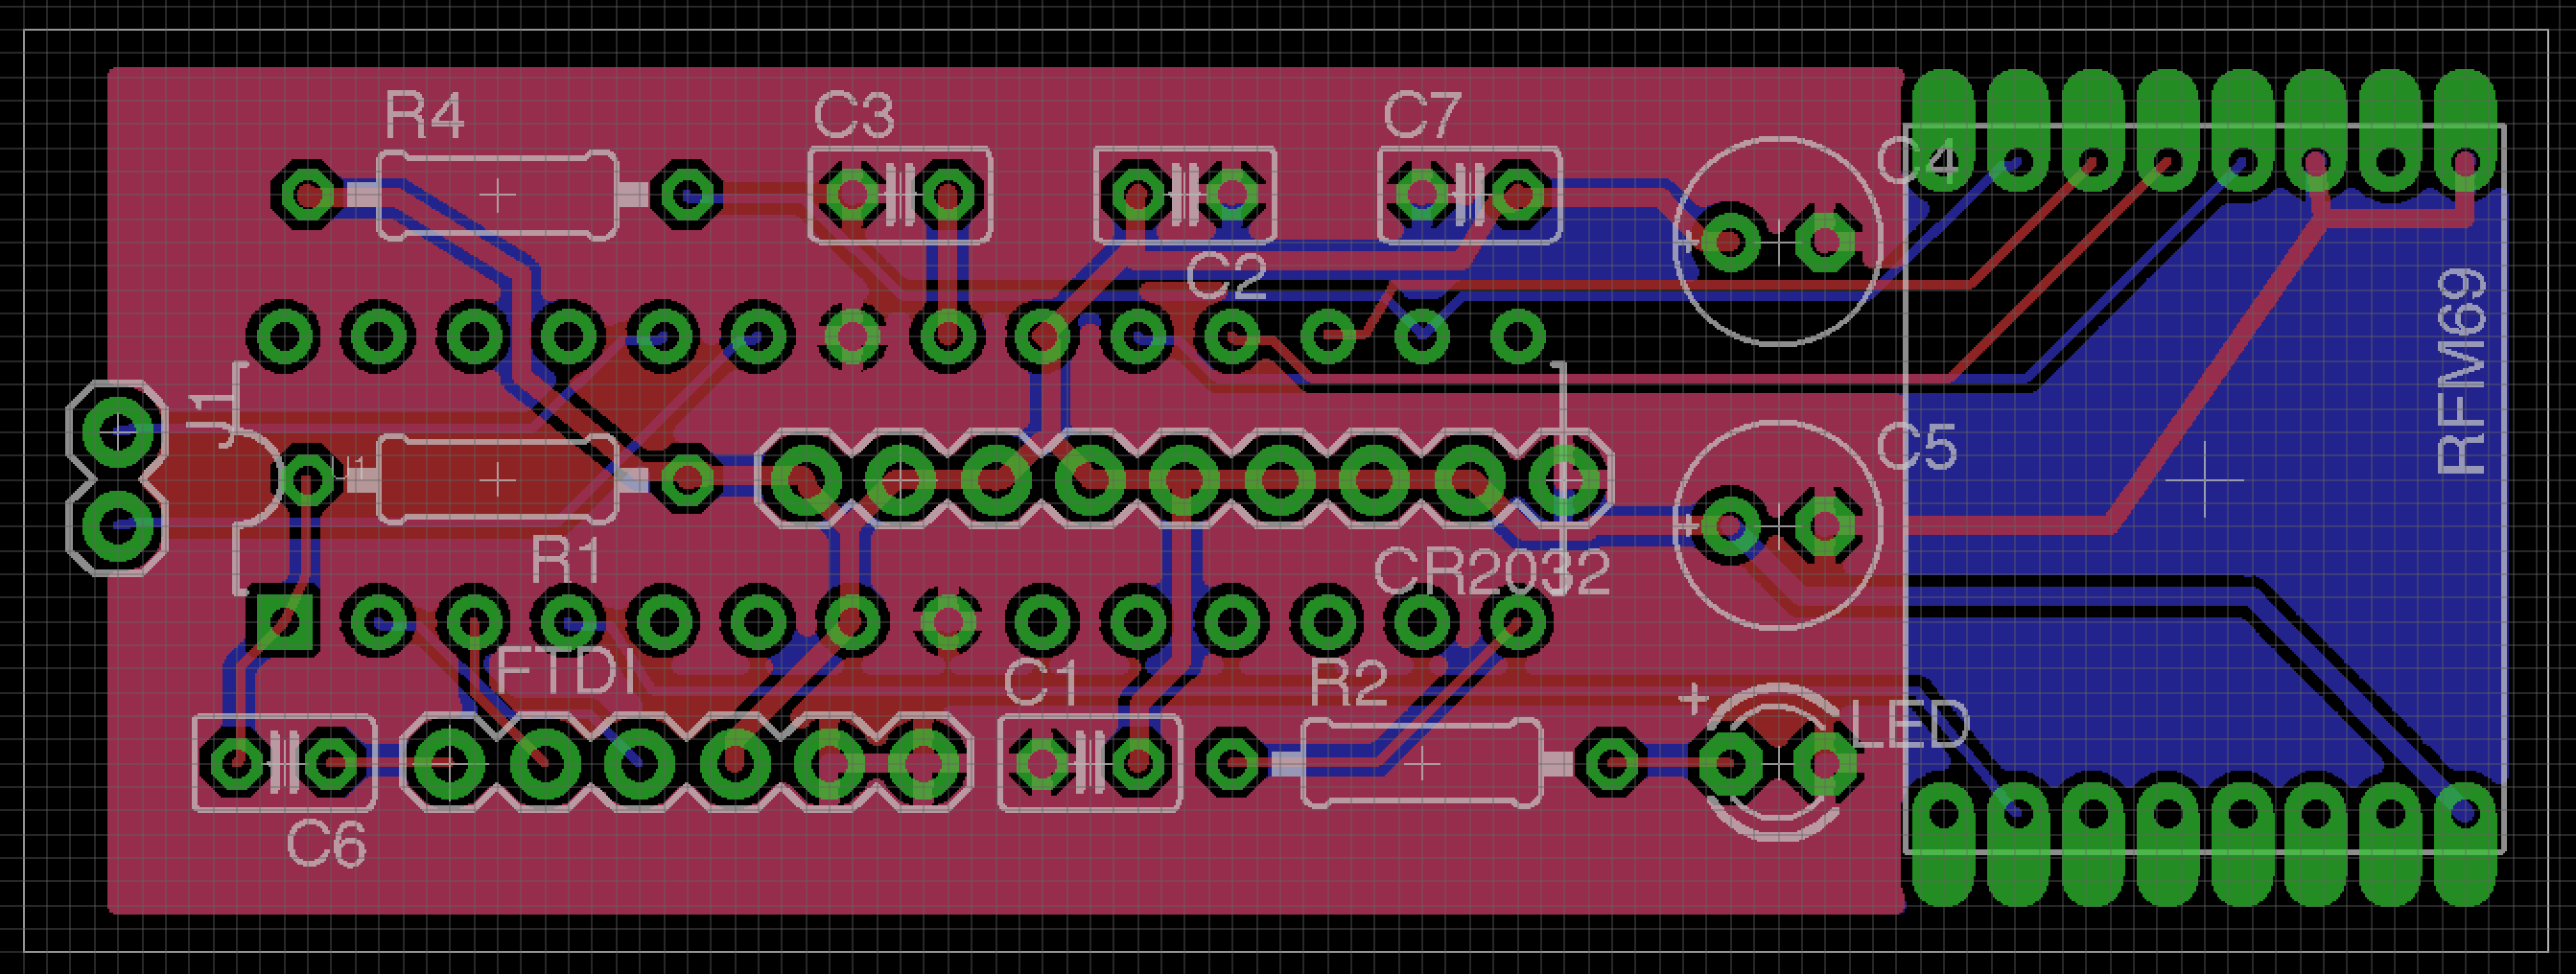
      So easy ! I finally used directly BRD file and not GERBER.
      Thanks for the advice on DRU.

      The strange thing is that I tried with CAM job of OSH Park but the result was the same. But it's working with BRD so let's order my first board ๐Ÿ™‚

      David.

      posted in Hardware
      carlierd
      carlierd
    • RE: Board dimension issue on OSHPark

      Thanks @scalz !!

      But it's the same thing with your modification. Another idea ?

      Thanks.

      David

      posted in Hardware
      carlierd
      carlierd
    • Board dimension issue on OSHPark

      Hello,

      I draw a board in Eagle. Everything seems ok but when uploading gerber files to OSHPark, the board top and bottom sizes are not correct:

      0_1462540684975_2016-05-06 15.16.42.png

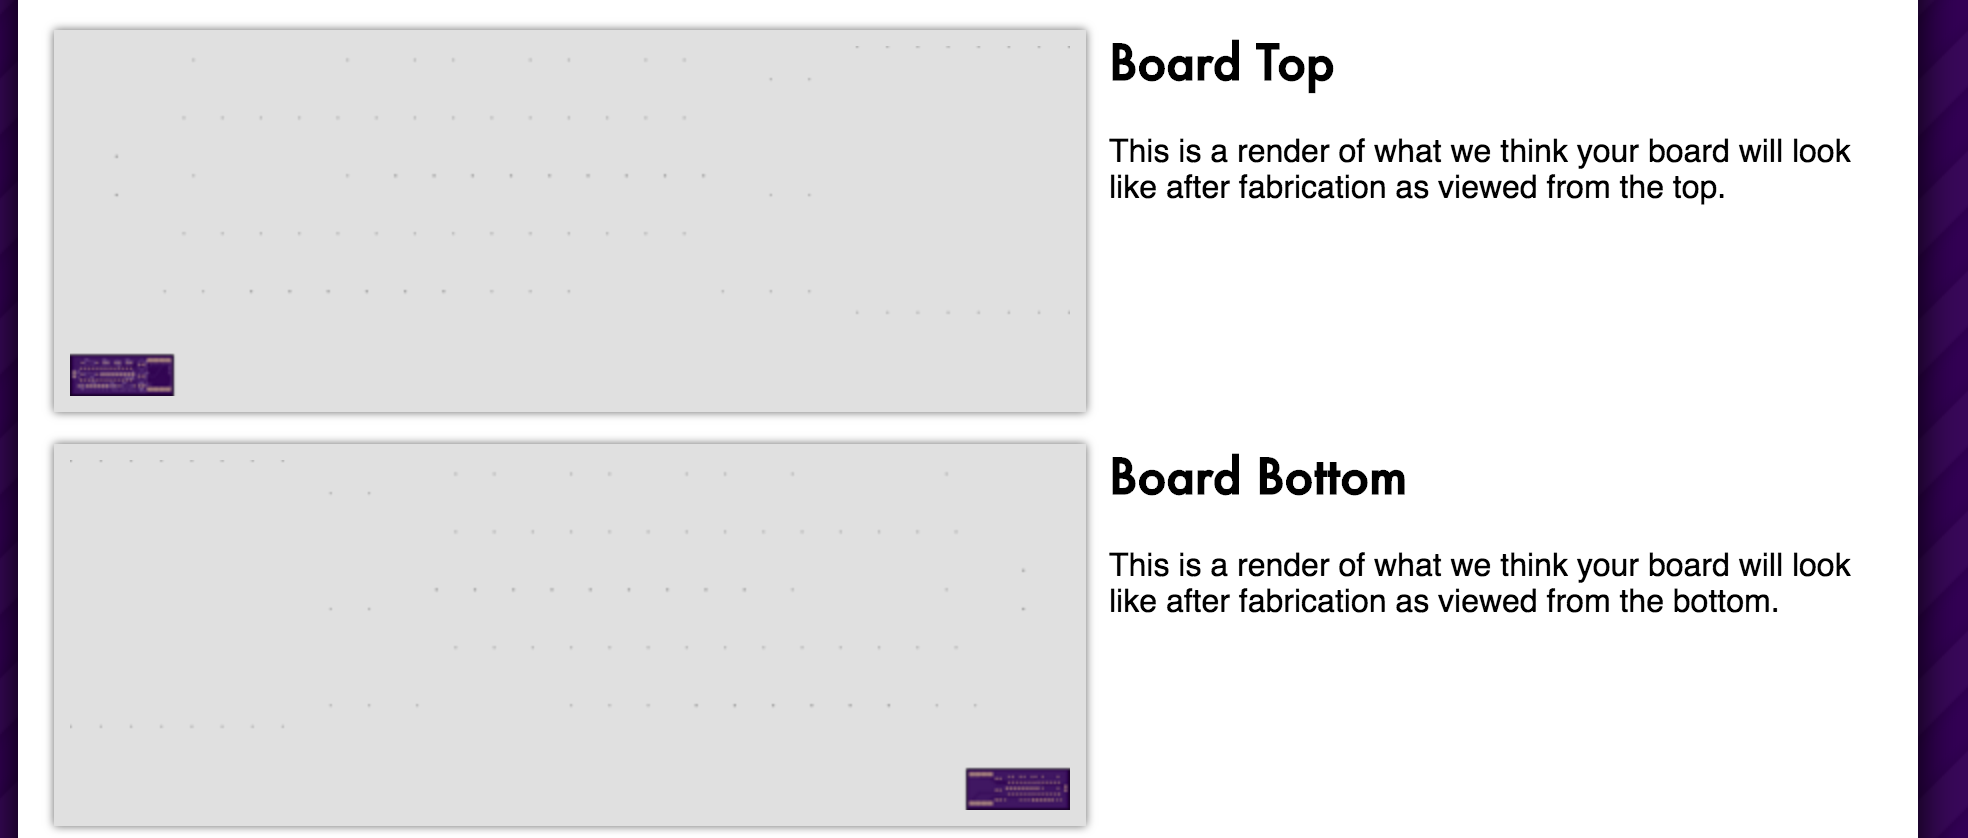
      All other layers sizes are correct:

      0_1462540719978_2016-05-06 15.17.17.png

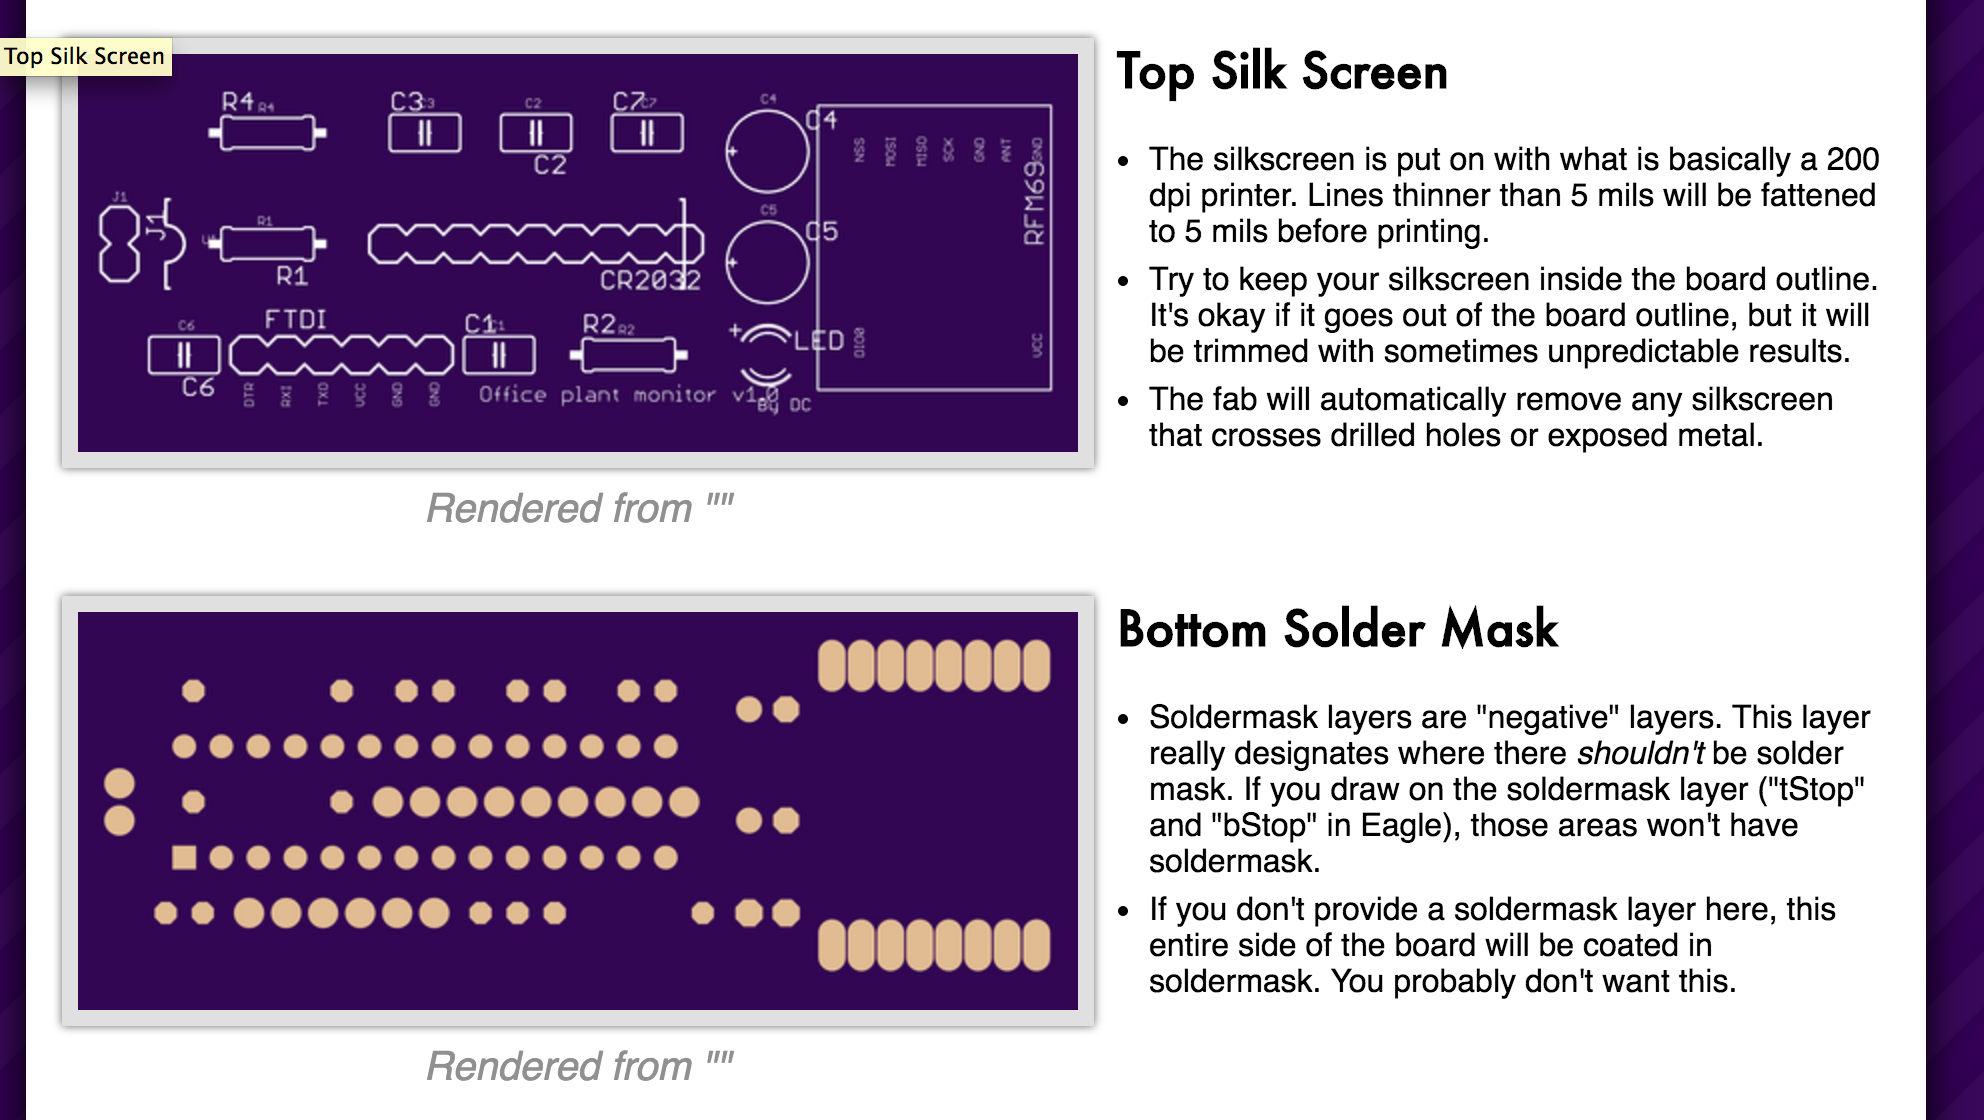
      I verify lot of things and the board is correctly defined on layer 20 (Dimension).

      This is the board if you want to check :
      0_1462540785593_Office plant monitor v1.0.brd

      Thanks !!

      David.

      posted in Hardware
      carlierd
      carlierd
    • RE: Office plan monitor (advice required)

      Hello,

      Last modification:

      0_1462288475312_2016-05-03 17.11.55.png

      0_1462288483516_2016-05-03 17.14.09.png

      I still have your make minor modification on marking and then go to production ๐Ÿ™‚

      David.

      posted in My Project
      carlierd
      carlierd
    • RE: Office plan monitor (advice required)

      @hek : The plant-ground stick is not used. @mfalkvidd did the voltage divider using pull-up. I plan to directly solder the sensor to the pcb.

      @scalz : will upgrade it. I already modified a little by using more space and have a less dense board.

      posted in My Project
      carlierd
      carlierd
    • RE: Office plan monitor (advice required)

      Hello,

      I improved the board:

      0_1462138305893_2016-05-01 23.29.44.png

      @scalz: does it looks good for you ?

      Thanks.

      David.

      posted in My Project
      carlierd
      carlierd
    • RE: Office plan monitor (advice required)

      Thanks for your remarks @m26872 and @scalz !! Will try to implement. Easy for RX-TX twice but not so simple for gnd plane ! I will try for the v2 !

      @scalz : my board routing lessons are very very far (17 years from now) so I forgot them completely. It's why I used the autoroute function.

      David

      posted in My Project
      carlierd
      carlierd
    • RE: Office plant monitoring

      Hello,

      I finally spent some hours on Eagles.

      See the result in this post !

      Do not hesitate to give me advice.

      David.

      posted in My Project
      carlierd
      carlierd
    • Office plan monitor (advice required)

      Hello,

      Thanks to @mfalkvidd I implement my first plant monitor. As it's working perfectly I decided to create a specific design base on the following post.

      The schematic :
      0_1461932293283_2016-04-29 11.10.08.png

      The board (route by eagles):
      0_1461932385715_2016-04-29 10.18.30.png

      I tried to make the smaller board possible.

      Any comment / advice is really recommended ๐Ÿ™‚

      David

      posted in My Project
      carlierd
      carlierd
    • RE: Office plant monitoring

      @scalz : very interesting ! Will you plan to make one ? I am pretty sure that your design could be very very very small ๐Ÿ˜‰

      posted in My Project
      carlierd
      carlierd
    • RE: Office plant monitoring

      Hello,

      Thanks for this useful and simple project !
      My first node is running perfectly since 10 days.
      Next step is to create a PCB and try running on a CR2032 to minimize the size (WAF request ;))

      One question on the uses : when do you set a warning on the result ? When I need to water the flower ?

      0_1461308771999_2016-04-21 17.21.41.png

      My first node is close to 50%, is it time ? Off course it depends on the nature of the flower but I was not able to found the information on Google ...

      David.

      posted in My Project
      carlierd
      carlierd
    • RE: ๐Ÿ’ฌ My simple RFM dongle for Serial GW

      Very nice design !!

      One question, do you sleep ? I know the answer : no !!! ๐Ÿ˜‰

      posted in OpenHardware.io
      carlierd
      carlierd
    • RE: ๐Ÿ’ฌ MyMultisensors

      Merci pour le lien ! Trรจs instructif !

      @scalz said:

      http://www.dorkbotpdx.org/blog/paul/better_spi_bus_design_in_3_steps

      posted in OpenHardware.io
      carlierd
      carlierd
    • RE: ๐Ÿ’ฌ MyMultisensors

      First time I see this resistor ! Will add it in my design. But I need to learn more information on the SPI first.

      David.

      posted in OpenHardware.io
      carlierd
      carlierd
    • RE: Slim Node scene controller/ keypad

      Hello !

      I was inspired by your post and adapt your code to my needs:

      • Scene controller on key 10, 11, 12, 13, 14, 15 and 16 (7 scenes possible)
      • 4 digit code send as VAR_1 if 4 keys between 1 and 9 have been pushed one after one within 2 seconds

      For fun I added a buzzer and a final song is played in case the code is sent.
      No control of the code in the sensor, it will be done in the controller (Jeedom).

      The code if someone is interested:

      /**
       * The MySensors Arduino library handles the wireless radio link and protocol
       * between your home built sensors/actuators and HA controller of choice.
       * The sensors forms a self healing radio network with optional repeaters. Each
       * repeater and gateway builds a routing tables in EEPROM which keeps track of the
       * network topology allowing messages to be routed to nodes.
       *
       * Created by Henrik Ekblad <henrik.ekblad@mysensors.org>
       * Copyright (C) 2013-2015 Sensnology AB
       * Full contributor list: https://github.com/mysensors/Arduino/graphs/contributors
       *
       * Documentation: http://www.mysensors.org
       * Support Forum: http://forum.mysensors.org
       *
       * This program is free software; you can redistribute it and/or
       * modify it under the terms of the GNU General Public License
       * version 2 as published by the Free Software Foundation.
       *
       *
       * Code modified from AWI
       * (http://forum.mysensors.org/topic/3128/slim-node-scene-controller-keypad)
       *
       * Buzzer code from Sparkfun
       * (SparkFun Inventor's Kit / Example sketch 11)
       *
       */
      
      /**************************************************************************************/
      /* Keyboard sensor.                                                                   */
      /*                                                                                    */
      /* Version     : 1.5.10                                                                */
      /* Date        : 17/04/2016                                                           */
      /* Modified by : David Carlier                                                        */
      /**************************************************************************************/
      /*                                ---------------                                     */
      /*                            RST |             |  A5                                 */
      /*                            RX  |             |  A4                                 */
      /*                            TX  |   ARDUINO   |  A3                                 */
      /*     RFM69 (DIO0) --------- D2  |     UNO     |  A2                                 */
      /*     Keyboard SDA --------- D3  |             |  A1                                 */
      /*     Keyboard SCL --------- D4  | ATMEGA 328p |  A0                                 */
      /*              +3v --------- VCC |             | GND --------- GND                   */
      /*              GND --------- GND |  8MHz int.  | REF                                 */
      /*                            OSC |             | VCC --------- +3v                   */
      /*                            OSC |             | D13 --------- RFM69 (SCK)           */
      /*                            D5  |             | D12 --------- RFM69 (MISO)          */
      /*                            D6  |             | D11 --------- RFM69 (MOSI)          */
      /*                            D7  |             | D10 --------- RFM69 (NSS)           */
      /*              LED --------- D8  |             |  D9 --------- Buzzer                */
      /*                                ---------------                                     */
      /*                                                                                    */
      /* +3v = 2*AA                                                                         */
      /*                                                                                    */
      /**************************************************************************************/
      
      #include <SPI.h>
      #include <MySensor.h>
      #include <MyTransportRFM69.h>
      #include <MySigningAtsha204Soft.h>
      
      //Constants for MySensors
      #define SKETCH_NAME           "Keyboard Sensor"
      #define SKETCH_VERSION        "1.5.10"
      #define CHILD_ID_DIGICODE     0
      #define KEYPAD_ID_SCENE       1
      #define CHILD_ID_VOLTAGE      2
      #define SDA_PIN               3
      #define SCL_PIN               4
      #define LED_PIN               8
      #define BUZZER_PIN            9
      #define BUZZ_FREQ_KEY         350
      #define BUZZ_TIME_KEY         100
      #define BUZZ_FREQ_ERROR       75
      #define KEYBOARD_SIZE         16
      #define MAX_SCENE             7
      #define BATTERY_FULL          3143    // 2xAA usually gives 3.143V when full
      #define BATTERY_ZERO          2340    // 2.34V limit for 328p at 8MHz
      
      //Length must equal the total number of notes and spaces
      const byte songLength = 18;
      
      //Notes is an array of text characters corresponding to the notes
      //in your song. A space represents a rest (no tone)
      char notes[] = "cdfda ag cdfdg gf "; // a space represents a rest
      
      //Beats is an array of values for each note and rest.
      //A "1" represents a quarter-note, 2 a half-note, etc.
      //Don't forget that the rests (spaces) need a length as well.
      int beats[] = {1,1,1,1,1,1,4,4,2,1,1,1,1,1,1,4,4,2};
      
      //The tempo is how fast to play the song.
      //To make the song play faster, decrease this value.
      int tempo = 113;
      
      //Misc. variables
      unsigned long WAITING_TIME = 2000; //Waiting time for key pressing
      boolean keyState[KEYBOARD_SIZE];
      
      //Construct MySensors library
      MySigningAtsha204Soft signer;
      MyHwATMega328 hw;
      MyTransportRFM69 transport;
      MySensor node(transport, hw, signer);
      MyMessage msgCode(CHILD_ID_DIGICODE, V_VAR1);
      MyMessage msgSceneOn(KEYPAD_ID_SCENE, V_SCENE_ON);
      MyMessage msgSceneOff(KEYPAD_ID_SCENE, V_SCENE_OFF);
      MyMessage msgVolt(CHILD_ID_VOLTAGE, V_VOLTAGE);
      
      /**************************************************************************************/
      /* Initialization                                                                     */
      /**************************************************************************************/
      void setup()  
        {
        //Get time (for setup duration)
        #ifdef DEBUG
          unsigned long startTime = millis();
        #endif
      
        //Setup buzzer and LED pins
        pinMode(BUZZER_PIN, OUTPUT);
        pinMode(LED_PIN, OUTPUT);
        blinkLedFastly(3);
      
        //Set keyboard pin
        pinMode(SDA_PIN,INPUT);
        pinMode(SCL_PIN, OUTPUT);
        digitalWrite(SCL_PIN, HIGH);
      
        //Start MySensors and send the Sketch Version Information to the Gateway
        node.begin();
        node.sendSketchInfo(SKETCH_NAME, SKETCH_VERSION);
      
        //Register all sensors
        node.present(CHILD_ID_DIGICODE, S_CUSTOM);
        node.present(KEYPAD_ID_SCENE, S_SCENE_CONTROLLER);
        node.present(CHILD_ID_VOLTAGE, S_MULTIMETER);
      
        //Load last Scenestates from EEPROM (7 scenestates available)
        for (int i = 0 ; i < MAX_SCENE; i++)
          {              
          keyState[i] = node.loadState(i);
          #ifdef DEBUG
            Serial.print(" "); Serial.print(keyState[i]);
          #endif
          }
      
        //Setup done !
        blinkLedFastly(3);
      
        //Print setup debug
        #ifdef DEBUG
          int duration = millis() - startTime;
          Serial.println("");
          Serial.print("[Setup duration: "); Serial.print(duration, DEC); Serial.println(" ms]");
        #endif
        }
      
      /**************************************************************************************/
      /* Main loop                                                                          */
      /**************************************************************************************/
      void loop()
        {
        //Sleep, node wakes up on key interrupt
        byte interuptionType = node.sleep(SDA_PIN - 2, FALLING);
      
        //Verify if a key was pressed
        if (interuptionType == 0)
          {
          return;
          }
      
        //Get time (for a complete loop)
        #ifdef DEBUG
          unsigned long startTime = millis();
        #endif
      
        //Get first digit
        byte key = getKeyPressed();
        tone(BUZZER_PIN, BUZZ_FREQ_KEY, BUZZ_TIME_KEY);
      
        //Check validity
        if (key == 0)
          {
      
          Serial.print("bah si !");
          Serial.println(interuptionType);
          
          blinkLedFastlyAndBuzz(3);
          return;
          }
      
        //Inform user that key is valid
        blinkLedFastly(1);
        int digicode = key * 1000;
      
        //Check if key corresponds to a scene touch or a code
        if (key > 9)
          {
          //Update scene state
          node.saveState(key - 10, (boolean)node.loadState(key - 10)?false:true);
      
          //Report data to the gateway
          long voltage = getVoltage();
          node.send(node.loadState(key - 10)?msgSceneOn.set(key - 10):msgSceneOff.set(key - 10));
          node.send(msgVolt.set(voltage / 1000.0, 3));
          int batteryPcnt = round((voltage - BATTERY_ZERO) * 100.0 / (BATTERY_FULL - BATTERY_ZERO));
          if (batteryPcnt > 100) {batteryPcnt = 100;}
          node.sendBatteryLevel(batteryPcnt);
      
          //Print debug
          #ifdef DEBUG
            Serial.print("Scene ");
            Serial.print(key - 10);
            Serial.print(": ");
            Serial.print((boolean)node.loadState(key - 10)?" 1 ":" 0 ");
            Serial.print("   ");
            Serial.print(voltage / 1000.0);
            Serial.print(" v");
            int duration = millis() - startTime;
            Serial.print("   ");
            Serial.print("["); Serial.print(duration, DEC); Serial.println(" ms]");
            Serial.flush();
          #endif
          }
        else
          {
          //Wait for next key pressed or WAITING_TIME without action
          interuptionType = node.sleep(SDA_PIN - 2, FALLING, WAITING_TIME);
      
          //Verify if a key was pressed
          if (interuptionType == 0)
            {
            blinkLedFastlyAndBuzz(3);
            return;
            }
      
          //Get second digit
          key = getKeyPressed();
          tone(BUZZER_PIN, BUZZ_FREQ_KEY, BUZZ_TIME_KEY);
      
          //Check validity
          if (key == 0 || key > 9)
            {
            blinkLedFastlyAndBuzz(3);
            node.sleep(1000);
            return;
            }
      
          //Inform user that key is valid
          blinkLedFastly(1);
          digicode = digicode + key * 100;
      
          //Wait for next key pressed or WAITING_TIME without action
          interuptionType = node.sleep(SDA_PIN - 2, FALLING, WAITING_TIME);
      
          //Verify if a key was pressed
          if (interuptionType == 0)
            {
            blinkLedFastlyAndBuzz(3);
            return;
            }
      
          //Get third digit
          key = getKeyPressed();
          tone(BUZZER_PIN, BUZZ_FREQ_KEY, BUZZ_TIME_KEY);
      
          //Check validity
          if (key == 0 || key > 9)
            {
            blinkLedFastlyAndBuzz(3);
            node.sleep(1000);
            return;
            }
      
          //Inform user that key is valid
          blinkLedFastly(1);
          digicode = digicode + key * 10;
      
          //Wait for next key pressed or WAITING_TIME without action
          interuptionType = node.sleep(SDA_PIN - 2, FALLING, WAITING_TIME);
      
          //Verify if a key was pressed
          if (interuptionType == 0)
            {
            blinkLedFastlyAndBuzz(3);
            return;
            }
      
          //Get fourth digit
          key = getKeyPressed();
          tone(BUZZER_PIN, BUZZ_FREQ_KEY, BUZZ_TIME_KEY);
      
          //Check validity
          if (key == 0 || key > 9)
            {
            blinkLedFastlyAndBuzz(3);
            node.sleep(1000);
            return;
            }
      
          //Inform user that key is valid
          blinkLedFastly(1);
          digicode = digicode + key;
      
          //Report data to the gateway
          long voltage = getVoltage();
          node.send(msgCode.set(digicode));
          node.send(msgVolt.set(voltage / 1000.0, 3));
          int batteryPcnt = round((voltage - BATTERY_ZERO) * 100.0 / (BATTERY_FULL - BATTERY_ZERO));
          if (batteryPcnt > 100) {batteryPcnt = 100;}
          node.sendBatteryLevel(batteryPcnt);
      
          //Print debug
          #ifdef DEBUG
            Serial.print("Complete code: ");
            Serial.print(digicode);
            Serial.print("   ");
            Serial.print(voltage / 1000.0);
            Serial.print(" v");
            int duration = millis() - startTime;
            Serial.print("   ");
            Serial.print("["); Serial.print(duration, DEC); Serial.println(" ms]");
            Serial.flush();
          #endif
      
          //Play final song instead of sleeping
          playFinalSong();
          }
      
        //Wait to avoid false interruption
        node.sleep(1000);
        }
      
      /**************************************************************************************/
      /* Allows to play the final song.                                                     */
      /**************************************************************************************/
      void playFinalSong()
        {
        //Declare local variables
        int i, duration;
      
        // step through the song arrays
        for (i = 0; i < songLength; i++)
          {
          // length of note/rest in ms
          duration = beats[i] * tempo;
      
          // is this a rest? 
          if (notes[i] == ' ')
            {
            delay(duration);            // then pause for a moment
            }
          else                          // otherwise, play the note
            {
            tone(BUZZER_PIN, frequency(notes[i]), duration);
            delay(duration);            // wait for tone to finish
            }
          delay(tempo/10);              // brief pause between notes
          }
        }
      
      /**************************************************************************************/
      /* takes a note character (a-g), and returns the corresponding frequency in Hz        */
      /* for the tone() function.                                                           */
      /**************************************************************************************/
      int frequency(char note) 
        {
        //Declare local variables
        int i;
        const int numNotes = 8;  // number of notes we're storing
      
        // The following arrays hold the note characters and their
        // corresponding frequencies. The last "C" note is uppercase
        // to separate it from the first lowercase "c". If you want to
        // add more notes, you'll need to use unique characters.
      
        // For the "char" (character) type, we put single characters
        // in single quotes.
      
        char names[] = { 'c', 'd', 'e', 'f', 'g', 'a', 'b', 'C' };
        int frequencies[] = {262, 294, 330, 349, 392, 440, 494, 523};
      
        // Now we'll search through the letters in the array, and if
        // we find it, we'll return the frequency for that note.
      
        for (i = 0; i < numNotes; i++)  // Step through the notes
          {
          if (names[i] == note)         // Is this the one?
            {
            return(frequencies[i]);     // Yes! Return the frequency
            }
          }
        return(0);  // We looked through everything and didn't find it,
                    // but we still need to return a value, so return 0.
        }
      
      /**************************************************************************************/
      /* Allows to get the pressed key.                                                     */
      /**************************************************************************************/
      byte getKeyPressed()
        {
        //Get first bit
        digitalWrite(SCL_PIN, LOW);
        delayMicroseconds(100);
        digitalWrite(SCL_PIN, HIGH);
      
        //Read all keys
        for(int i = 0; i < KEYBOARD_SIZE; i++)
          {
          keyState[i] = (digitalRead(SDA_PIN) == LOW);
          digitalWrite(SCL_PIN, LOW);
          delayMicroseconds(100);
          digitalWrite(SCL_PIN, HIGH);
          delayMicroseconds(100);
          }
      
        //Read keyboard table to find the pressed key
        byte keyPressed = -1;
        for(int i = 0 ; i < KEYBOARD_SIZE; i++)
          {
          if (keyState[i])
            {
            keyPressed = i;
            }
          }
      
        //Return the result
        return (keyPressed + 1);
        }
      
      /**************************************************************************************/
      /* Allows to fastly blink the LED.                                                    */
      /**************************************************************************************/
      void blinkLedFastly(byte loop)
        {
        byte delayOn = 150;
        byte delayOff = 150;
        for (int i = 0; i < loop; i++)
          {
          blinkLed(LED_PIN, delayOn);
          delay(delayOff);
          }
        }
      
      /**************************************************************************************/
      /* Allows to fastly blink the LED and to play a sound on the buzzer.                  */
      /**************************************************************************************/
      void blinkLedFastlyAndBuzz(byte loop)
        {
        byte delayOn = 150;
        byte delayOff = 150;
        for (int i = 0; i < loop; i++)
          {
          blinkLed(LED_PIN, delayOn);
          tone(BUZZER_PIN, BUZZ_FREQ_ERROR, delayOff);
          delay(delayOff);
          }
        }
      
      /**************************************************************************************/
      /* Allows to blink a LED.                                                             */
      /**************************************************************************************/
      void blinkLed(byte pinToBlink, int delayInMs)
        {
        digitalWrite(pinToBlink,HIGH);
        delay(delayInMs);
        digitalWrite(pinToBlink,LOW);
        }
      
      /**************************************************************************************/
      /* Allows to get the real Vcc (return value in mV).                                   */
      /* http://provideyourown.com/2012/secret-arduino-voltmeter-measure-battery-voltage/   */
      /**************************************************************************************/
      long getVoltage()
        {
        ADMUX = (0<<REFS1) | (1<<REFS0) | (0<<ADLAR) | (1<<MUX3) | (1<<MUX2) | (1<<MUX1) | (0<<MUX0);
        delay(50);  // Let mux settle a little to get a more stable A/D conversion
        //Start a conversion  
        ADCSRA |= _BV( ADSC );
        //Wait for it to complete
        while (bit_is_set(ADCSRA, ADSC));
      
        //Compute and return the value
        uint8_t low  = ADCL;                  // must read ADCL first - it then locks ADCH
        uint8_t high = ADCH;                  // unlocks both
        long result = (high << 8) | low;
        result = 1125300L / result;           // Calculate Vcc (in mV); 1125300 = 1.1*1023*1000
        return result;                        // Vcc in millivolts
        }
      

      David.

      posted in My Project
      carlierd
      carlierd
    • RE: ๐Ÿ’ฌ MyMultisensors

      @scalz : one question about RFM, why RFM69CW and not HW ? And why the 10k resistor between CS and VCC ?

      David.

      posted in OpenHardware.io
      carlierd
      carlierd
    • RE: [Solved] How disable sleep timer ?

      Hello @m26872 , I set some serial.print in the code and found that i need to add some node.sleep when an incorrect key is pushed. The problem was due to the fact that the interruption pin is still valid when i restart the loop function !
      David.

      posted in Development
      carlierd
      carlierd
    • RE: [Solved] How disable sleep timer ?

      Hello,

      This is the code:

      /**
       * The MySensors Arduino library handles the wireless radio link and protocol
       * between your home built sensors/actuators and HA controller of choice.
       * The sensors forms a self healing radio network with optional repeaters. Each
       * repeater and gateway builds a routing tables in EEPROM which keeps track of the
       * network topology allowing messages to be routed to nodes.
       *
       * Created by Henrik Ekblad <henrik.ekblad@mysensors.org>
       * Copyright (C) 2013-2015 Sensnology AB
       * Full contributor list: https://github.com/mysensors/Arduino/graphs/contributors
       *
       * Documentation: http://www.mysensors.org
       * Support Forum: http://forum.mysensors.org
       *
       * This program is free software; you can redistribute it and/or
       * modify it under the terms of the GNU General Public License
       * version 2 as published by the Free Software Foundation.
       *
       *
       * Code modified from AWI
       * (http://forum.mysensors.org/topic/3128/slim-node-scene-controller-keypad)
       *
       * Buzzer code from Sparkfun
       * (SparkFun Inventor's Kit / Example sketch 11)
       *
       */
      
      /**************************************************************************************/
      /* Keyboard sensor.                                                                   */
      /*                                                                                    */
      /* Version     : 1.4.10                                                                */
      /* Date        : 15/04/2016                                                           */
      /* Modified by : David Carlier                                                        */
      /**************************************************************************************/
      /*                                ---------------                                     */
      /*                            RST |             |  A5                                 */
      /*                            RX  |             |  A4                                 */
      /*                            TX  |   ARDUINO   |  A3                                 */
      /*     RFM69 (DIO0) --------- D2  |     UNO     |  A2                                 */
      /*     Keyboard SDA --------- D3  |             |  A1                                 */
      /*     Keyboard SCL --------- D4  | ATMEGA 328p |  A0                                 */
      /*              +3v --------- VCC |             | GND --------- GND                   */
      /*              GND --------- GND |  8MHz int.  | REF                                 */
      /*                            OSC |             | VCC --------- +3v                   */
      /*                            OSC |             | D13 --------- RFM69 (SCK)           */
      /*                            D5  |             | D12 --------- RFM69 (MISO)          */
      /*                            D6  |             | D11 --------- RFM69 (MOSI)          */
      /*                            D7  |             | D10 --------- RFM69 (NSS)           */
      /*              LED --------- D8  |             |  D9 --------- Buzzer                */
      /*                                ---------------                                     */
      /*                                                                                    */
      /* +3v = 2*AA                                                                         */
      /*                                                                                    */
      /**************************************************************************************/
      
      #include <SPI.h>
      #include <MySensor.h>
      #include <MyTransportRFM69.h>
      #include <MySigningAtsha204Soft.h>
      
      //Constants for MySensors
      #define SKETCH_NAME           "Keyboard Sensor"
      #define SKETCH_VERSION        "1.4.10"
      #define CHILD_ID_DIGICODE     0
      #define KEYPAD_ID_SCENE       1
      #define CHILD_ID_VOLTAGE      2
      #define SDA_PIN               3
      #define SCL_PIN               4
      #define LED_PIN               8
      #define BUZZER_PIN            9
      #define BUZZ_FREQ_KEY         350
      #define BUZZ_TIME_KEY         100
      #define BUZZ_FREQ_ERROR       75
      #define KEYBOARD_SIZE         16
      #define MAX_SCENE             7
      #define BATTERY_FULL          3143    // 2xAA usually gives 3.143V when full
      #define BATTERY_ZERO          2340    // 2.34V limit for 328p at 8MHz
      
      //Length must equal the total number of notes and spaces
      const byte songLength = 18;
      
      //Notes is an array of text characters corresponding to the notes
      //in your song. A space represents a rest (no tone)
      char notes[] = "cdfda ag cdfdg gf "; // a space represents a rest
      
      //Beats is an array of values for each note and rest.
      //A "1" represents a quarter-note, 2 a half-note, etc.
      //Don't forget that the rests (spaces) need a length as well.
      int beats[] = {1,1,1,1,1,1,4,4,2,1,1,1,1,1,1,4,4,2};
      
      //The tempo is how fast to play the song.
      //To make the song play faster, decrease this value.
      int tempo = 113;
      
      //Misc. variables
      unsigned long WAITING_TIME = 2000; //Waiting time for key pressing
      boolean keyState[KEYBOARD_SIZE] ;
      
      //Construct MySensors library
      MySigningAtsha204Soft signer;
      MyHwATMega328 hw;
      MyTransportRFM69 transport;
      MySensor node(transport, hw, signer);
      MyMessage msgCode(CHILD_ID_DIGICODE, V_VAR1);
      MyMessage msgSceneOn(KEYPAD_ID_SCENE, V_SCENE_ON);
      MyMessage msgSceneOff(KEYPAD_ID_SCENE, V_SCENE_OFF);
      MyMessage msgVolt(CHILD_ID_VOLTAGE, V_VOLTAGE);
      
      /**************************************************************************************/
      /* Initialization                                                                     */
      /**************************************************************************************/
      void setup()  
        {
        //Get time (for setup duration)
        #ifdef DEBUG
          unsigned long startTime = millis();
        #endif
      
        //Setup buzzer and LED pins
        pinMode(BUZZER_PIN, OUTPUT);
        pinMode(LED_PIN, OUTPUT);
        blinkLedFastly(3);
      
        //Set keyboard pin
        pinMode(SDA_PIN,INPUT);
        pinMode(SCL_PIN, OUTPUT);
        digitalWrite(SCL_PIN, HIGH);
      
        //Start MySensors and send the Sketch Version Information to the Gateway
        node.begin();
        node.sendSketchInfo(SKETCH_NAME, SKETCH_VERSION);
      
        //Register all sensors
        node.present(CHILD_ID_DIGICODE, S_CUSTOM);
        node.present(KEYPAD_ID_SCENE, S_SCENE_CONTROLLER);
        node.present(CHILD_ID_VOLTAGE, S_MULTIMETER);
      
        //Load last Scenestates from EEPROM (7 scenestates available)
        for (int i = 0 ; i < MAX_SCENE; i++)
          {              
          keyState[i] = node.loadState(i);
          #ifdef DEBUG
            Serial.print(" "); Serial.print(keyState[i]);
          #endif
          }
      
        //Setup done !
        blinkLedFastly(3);
      
        //Print setup debug
        #ifdef DEBUG
          int duration = millis() - startTime;
          Serial.println("");
          Serial.print("[Setup duration: "); Serial.print(duration, DEC); Serial.println(" ms]");
        #endif
        }
      
      /**************************************************************************************/
      /* Main loop                                                                          */
      /**************************************************************************************/
      void loop()
        {
        //Sleep, node wakes up on key interrupt
        byte interuptionType = node.sleep(SDA_PIN - 2, FALLING);
      
        //Verify if a key was pressed
        if (interuptionType == 0)
          {
          return;
          }
      
        //Get time (for a complete loop)
        #ifdef DEBUG
          unsigned long startTime = millis();
        #endif
      
        //Get first digit
        byte key = getKeyPressed();
        tone(BUZZER_PIN, BUZZ_FREQ_KEY, BUZZ_TIME_KEY);
      
        //Check validity
        if (key == 0)
          {
          blinkLedFastlyAndBuzz(3);
          return;
          }
      
        //Inform user that key is valid
        blinkLedFastly(1);
        int digicode = key * 1000;
      
        //Check if key corresponds to a scene touch or a code
        if (key > 9)
          {
          //Update scene state
          node.saveState(key - 10, (boolean)node.loadState(key - 10)?false:true);
      
          //Report data to the gateway
          long voltage = getVoltage();
          node.send(node.loadState(key - 10)?msgSceneOn.set(key - 10):msgSceneOff.set(key - 10));
          node.send(msgVolt.set(voltage / 1000.0, 3));
          int batteryPcnt = round((voltage - BATTERY_ZERO) * 100.0 / (BATTERY_FULL - BATTERY_ZERO));
          if (batteryPcnt > 100) {batteryPcnt = 100;}
          node.sendBatteryLevel(batteryPcnt);
      
          //Print debug
          #ifdef DEBUG
            Serial.print("Scene ");
            Serial.print(key - 10);
            Serial.print(": ");
            Serial.print((boolean)node.loadState(key - 10)?" 1 ":" 0 ");
            Serial.print("   ");
            Serial.print(voltage / 1000.0);
            Serial.print(" v");
            int duration = millis() - startTime;
            Serial.print("   ");
            Serial.print("["); Serial.print(duration, DEC); Serial.println(" ms]");
            Serial.flush();
          #endif
          }
        else
          {
          //Wait for next key pressed or WAITING_TIME without action
          interuptionType = node.sleep(SDA_PIN - 2, FALLING, WAITING_TIME);
      
          //Verify if a key was pressed
          if (interuptionType == 0)
            {
            blinkLedFastlyAndBuzz(3);
            return;
            }
      
          //Get second digit
          key = getKeyPressed();
          tone(BUZZER_PIN, BUZZ_FREQ_KEY, BUZZ_TIME_KEY);
      
          //Check validity
          if (key == 0 || key > 9)
            {
            blinkLedFastlyAndBuzz(3);
            return;
            }
      
          //Inform user that key is valid
          blinkLedFastly(1);
          digicode = digicode + key * 100;
      
          //Wait for next key pressed or WAITING_TIME without action
          interuptionType = node.sleep(SDA_PIN - 2, FALLING, WAITING_TIME);
      
          //Verify if a key was pressed
          if (interuptionType == 0)
            {
            blinkLedFastlyAndBuzz(3);
            return;
            }
      
          //Get third digit
          key = getKeyPressed();
          tone(BUZZER_PIN, BUZZ_FREQ_KEY, BUZZ_TIME_KEY);
      
          //Check validity
          if (key == 0 || key > 9)
            {
            blinkLedFastlyAndBuzz(3);
            return;
            }
      
          //Inform user that key is valid
          blinkLedFastly(1);
          digicode = digicode + key * 10;
      
          //Wait for next key pressed or WAITING_TIME without action
          interuptionType = node.sleep(SDA_PIN - 2, FALLING, WAITING_TIME);
      
          //Verify if a key was pressed
          if (interuptionType == 0)
            {
            blinkLedFastlyAndBuzz(3);
            return;
            }
      
          //Get fourth digit
          key = getKeyPressed();
          tone(BUZZER_PIN, BUZZ_FREQ_KEY, BUZZ_TIME_KEY);
      
          //Check validity
          if (key == 0 || key > 9)
            {
            blinkLedFastlyAndBuzz(3);
            return;
            }
      
          //Inform user that key is valid
          blinkLedFastly(1);
          digicode = digicode + key;
      
          //Report data to the gateway
          long voltage = getVoltage();
          node.send(msgCode.set(digicode));
          node.send(msgVolt.set(voltage / 1000.0, 3));
          int batteryPcnt = round((voltage - BATTERY_ZERO) * 100.0 / (BATTERY_FULL - BATTERY_ZERO));
          if (batteryPcnt > 100) {batteryPcnt = 100;}
          node.sendBatteryLevel(batteryPcnt);
      
          //Print debug
          #ifdef DEBUG
            Serial.print("Complete code: ");
            Serial.print(digicode);
            Serial.print("   ");
            Serial.print(voltage / 1000.0);
            Serial.print(" v");
            int duration = millis() - startTime;
            Serial.print("   ");
            Serial.print("["); Serial.print(duration, DEC); Serial.println(" ms]");
            Serial.flush();
          #endif
      
          //Play final song instead of sleeping
          playFinalSong();
          }
      
      
          //node.sleep(1000);
        }
      
      /**************************************************************************************/
      /* Allows to play the final song.                                                     */
      /**************************************************************************************/
      void playFinalSong()
        {
        //Declare local variables
        int i, duration;
      
        // step through the song arrays
        for (i = 0; i < songLength; i++)
          {
          // length of note/rest in ms
          duration = beats[i] * tempo;
      
          // is this a rest? 
          if (notes[i] == ' ')
            {
            delay(duration);            // then pause for a moment
            }
          else                          // otherwise, play the note
            {
            tone(BUZZER_PIN, frequency(notes[i]), duration);
            delay(duration);            // wait for tone to finish
            }
          delay(tempo/10);              // brief pause between notes
          }
        }
      
      /**************************************************************************************/
      /* takes a note character (a-g), and returns the corresponding frequency in Hz        */
      /* for the tone() function.                                                           */
      /**************************************************************************************/
      int frequency(char note) 
        {
        //Declare local variables
        int i;
        const int numNotes = 8;  // number of notes we're storing
      
        // The following arrays hold the note characters and their
        // corresponding frequencies. The last "C" note is uppercase
        // to separate it from the first lowercase "c". If you want to
        // add more notes, you'll need to use unique characters.
      
        // For the "char" (character) type, we put single characters
        // in single quotes.
      
        char names[] = { 'c', 'd', 'e', 'f', 'g', 'a', 'b', 'C' };
        int frequencies[] = {262, 294, 330, 349, 392, 440, 494, 523};
      
        // Now we'll search through the letters in the array, and if
        // we find it, we'll return the frequency for that note.
      
        for (i = 0; i < numNotes; i++)  // Step through the notes
          {
          if (names[i] == note)         // Is this the one?
            {
            return(frequencies[i]);     // Yes! Return the frequency
            }
          }
        return(0);  // We looked through everything and didn't find it,
                    // but we still need to return a value, so return 0.
        }
      
      /**************************************************************************************/
      /* Allows to get the pressed key.                                                     */
      /**************************************************************************************/
      byte getKeyPressed()
        {
        //Get first bit
        digitalWrite(SCL_PIN, LOW);
        delayMicroseconds(100);
        digitalWrite(SCL_PIN, HIGH);
      
        //Read all keys
        for(int i = 0; i < KEYBOARD_SIZE; i++)
          {
          keyState[i] = (digitalRead(SDA_PIN) == LOW);
          digitalWrite(SCL_PIN, LOW);
          delayMicroseconds(100);
          digitalWrite(SCL_PIN, HIGH);
          delayMicroseconds(100);
          }
      
        //Read keyboard table to find the pressed key
        byte keyPressed = -1;
        for(int i = 0 ; i < KEYBOARD_SIZE; i++)
          {
          if (keyState[i])
            {
            keyPressed = i;
            }
          }
      
        //Return the result
        return (keyPressed + 1);
        }
      
      /**************************************************************************************/
      /* Allows to fastly blink the LED.                                                    */
      /**************************************************************************************/
      void blinkLedFastly(byte loop)
        {
        byte delayOn = 150;
        byte delayOff = 150;
        for (int i = 0; i < loop; i++)
          {
          blinkLed(LED_PIN, delayOn);
          delay(delayOff);
          }
        }
      
      /**************************************************************************************/
      /* Allows to fastly blink the LED and to play a sound on the buzzer.                  */
      /**************************************************************************************/
      void blinkLedFastlyAndBuzz(byte loop)
        {
        byte delayOn = 150;
        byte delayOff = 150;
        for (int i = 0; i < loop; i++)
          {
          blinkLed(LED_PIN, delayOn);
          tone(BUZZER_PIN, BUZZ_FREQ_ERROR, delayOff);
          delay(delayOff);
          }
        }
      
      /**************************************************************************************/
      /* Allows to blink a LED.                                                             */
      /**************************************************************************************/
      void blinkLed(byte pinToBlink, int delayInMs)
        {
        digitalWrite(pinToBlink,HIGH);
        delay(delayInMs);
        digitalWrite(pinToBlink,LOW);
        }
      
      /**************************************************************************************/
      /* Allows to get the real Vcc (return value in mV).                                   */
      /* http://provideyourown.com/2012/secret-arduino-voltmeter-measure-battery-voltage/   */
      /**************************************************************************************/
      long getVoltage()
        {
        ADMUX = (0<<REFS1) | (1<<REFS0) | (0<<ADLAR) | (1<<MUX3) | (1<<MUX2) | (1<<MUX1) | (0<<MUX0);
        delay(50);  // Let mux settle a little to get a more stable A/D conversion
        //Start a conversion  
        ADCSRA |= _BV( ADSC );
        //Wait for it to complete
        while (bit_is_set(ADCSRA, ADSC));
      
        //Compute and return the value
        uint8_t low  = ADCL;                  // must read ADCL first - it then locks ADCH
        uint8_t high = ADCH;                  // unlocks both
        long result = (high << 8) | low;
        result = 1125300L / result;           // Calculate Vcc (in mV); 1125300 = 1.1*1023*1000
        return result;                        // Vcc in millivolts
        }
      

      Not very easy to explain the problem !

      David.

      posted in Development
      carlierd
      carlierd
    • RE: ๐Ÿ’ฌ Stamp size MySensor node

      Very good ! So small !
      I really need to learn how solder SMD part ! More and more design are using small components.

      posted in OpenHardware.io
      carlierd
      carlierd
    • RE: ๐Ÿ’ฌ MyMultisensors

      I am more a jujitsuka but not JJB. But due to the small number of hours in a day (only 24 ๐Ÿ˜‰ ) I spent most of sport time to run ! I started jujitsu too late (34 years), very difficult with people which started at 5 !!

      posted in OpenHardware.io
      carlierd
      carlierd
    • RE: [Solved] How disable sleep timer ?

      Hello. It's what I done, no problem.
      I will try to clarify what happens:

      • User push key 0-9
      • Start sleep with interruption and 2 seconds timer
      • User push key 10 (before timer reach 2 seconds)
      • The software detects it and return (beginning of the loop)
      • At the beginning of the loop there is an interruption to wait a key and it seems that as the 2 seconds timer is finish the sleep is interrupted ...

      David.

      posted in Development
      carlierd
      carlierd
    • RE: ๐Ÿ’ฌ MyMultisensors

      Unfortunately it's not me on the avatar but it's my preferred judo technic ๐Ÿ˜‰

      posted in OpenHardware.io
      carlierd
      carlierd
    • [Solved] How disable sleep timer ?

      Hello,

      I am working on a keyboard project allowing to enter a code on 4 keys and as the keyboard as 16 touch, I will use key 10 to 16 as a scene controller.

      Everything is working correctly except a small thing. I use this sleep function:

      interuptionType = node.sleep(SDA_PIN - 2, FALLING, WAITING_TIME);
      

      The idea is to sleep between two keys of the code:

      • wait for the second key or
      • awake after 2 seconds if no key was pressed to cancelled the code.

      If the second key is greater than 9 I cancelled the code but the sleep of 2 seconds is still actif !

      How I can disable the sleep timer ? Is there a specific function ?

      Thanks for your help.

      David.

      posted in Development
      carlierd
      carlierd
    • RE: ๐Ÿ’ฌ MyMultisensors

      Very beautiful design and, as usual, so interesting !

      posted in OpenHardware.io
      carlierd
      carlierd
    • RE: Slim Node scene controller/ keypad

      @AWI Off course !! Thanks.

      posted in My Project
      carlierd
      carlierd
    • RE: Slim Node scene controller/ keypad

      @AWI
      Led removed and power consumption really low but not stable ! I measure with my uCurrent a consumption between 1.8uA and 2.5. And sometimes some pikes close to 9 or 15 uA. It seems to be every 8 seconds (link to arduino wake-up ?).
      Not a real issue as it's very low.

      I will now work on the package ๐Ÿ™‚

      David.

      posted in My Project
      carlierd
      carlierd
    • RE: Slim Node scene controller/ keypad

      Hello @AWI !

      For an unknown reason I missed your reply. Thanks. I wait the week-end to test it.

      I spent several hours on the net to find a "soft" solution. I think that it's very strange to add a led on this circuit. As the component's consumption is very low, a solution to disable the led in a proper way allows to use it in battery solution.

      David.

      posted in My Project
      carlierd
      carlierd
    • RE: 3 in 1 incl battery monitor

      @the-cosmic-gate
      Hello,
      Motion nodes are still working correctly. The oldest node started the 4 of February is still at 3,29v. My other nodes (temp / humidity / light) are also working correctly but I will replace DHT22 for another sensor.

      David.

      posted in My Project
      carlierd
      carlierd
    • RE: Buy designs on OpenHardware.io

      Very good idea ! Especially for the DIY kit !!

      posted in OpenHardware.io
      carlierd
      carlierd
    • RE: My other PIR multisensor, on coin cell

      Very interesting !!
      Not for me because SMD components are too small but the schematic is very useful !

      How did you do the 3D view ?
      On the coincell you are using 4 capacitors with different values, it's for filtering ? Is it useful with battery ?

      Thanks for sharing !

      David.

      posted in Hardware
      carlierd
      carlierd
    • RE: Slim Node scene controller/ keypad

      @AWI Hello, did you set something (jumper) to reduce the power consumption ? Did you removed the LED on the keyboard ?
      I measured the power consumption at something close to 1.3mA. Really far to your 2.2uA !

      David.

      posted in My Project
      carlierd
      carlierd
    • RE: My 32bits ATSAM node project

      Very good job ! I will be happy when I will able to do 10% of your work ๐Ÿ˜‰

      posted in Hardware
      carlierd
      carlierd
    • RE: Low Power: How much current? [Solved]

      @engy Hello. It's why I am using RFM69 as there is no fake ๐Ÿ™‚

      posted in Hardware
      carlierd
      carlierd
    • RE: Sensebender/Dualoptiboot OTA HowTo in Mysensors

      @scalz

      Nice tutorial.
      I already bought and received your eval board. I ordered it more for ATSHA204A but OTA is interesting.
      Is OTA using eeprom possible with RFM69 ? I imagine that it's the case.
      Thanks.

      David.

      posted in Hardware
      carlierd
      carlierd
    • RE: ๐Ÿ’ฌ Various bootloader files based on Optiboot 6.2

      @GertSanders
      Yes, very impressive ! But finally not a lot of difference with the same node using interruption and sleep.
      The auto-discharge of AA batteries is really important compare to node consumption.

      David.

      posted in OpenHardware.io
      carlierd
      carlierd
    • RE: ๐Ÿ’ฌ Various bootloader files based on Optiboot 6.2

      @GertSanders Hello. I tried the full deep sleep and it's really amazing !

      I used your 8MHz with internal crystal and B0 led, BOD disabled. RFM69 for radio and just a switch via a 10MOhm resistor.
      With the switch open: 280nA
      With the switch close: 580nA

      Measures done with a uCurrent Gold.
      So I am sure now that I found the good bootloader for my application. It's simple to install and I can change easily the BOD !
      Thanks !

      posted in OpenHardware.io
      carlierd
      carlierd
    • RE: ๐Ÿ’ฌ Various bootloader files based on Optiboot 6.2

      @Samuel235 No issue to with the FTDI.
      I just found a small problem due to the Arduino IDE. As I often change board (from UNO to different bootloader) I discover that the menu is sometime not coherent with the real setting. So I found that selecting two or three times board parameters (including port) is the solution to avoid communication issue.

      posted in OpenHardware.io
      carlierd
      carlierd
    • RE: ๐Ÿ’ฌ Various bootloader files based on Optiboot 6.2

      @GertSanders Thanks for explanation. It confirms what I imagine !

      I am using a 10MOhm resistor but not the full deep sleep as I want to periodically send the battery.
      I will try it because 1-2 uA is very low ๐Ÿ˜‰

      posted in OpenHardware.io
      carlierd
      carlierd
    • RE: ๐Ÿ’ฌ Various bootloader files based on Optiboot 6.2

      I am using RFM69. No fake as it's working perfectly at other frequency.

      @GertSanders
      I tried three different configurations:

      • 16 MHz with crystal
      • 8 MHz internal
      • 1 MHz internal (with some st=fail)

      I measured power consumption in sleep mode and found that it's very close to 4uA with all configurations. So why using the 1 MHz ? Do you have better consumption when using 1 MHz ?

      The best configuration for me will be the 8 MHz internal as it avoid to used the crystal.

      David.

      posted in OpenHardware.io
      carlierd
      carlierd
    • RE: [security] Introducing signing support to MySensors

      @Anticimex @tomkxy
      Perhaps the arduino and RFM69 can't run at 1MHz. I have capacitors and I tried with two different power sources. Without signing it's better but still a lot of st=fail. No matter, it was just for testing purpose ๐Ÿ™‚

      posted in Development
      carlierd
      carlierd
    • RE: ๐Ÿ’ฌ Various bootloader files based on Optiboot 6.2

      @GertSanders

      Hello, as I got some issue with the 1MHz bootloader, I tried without the signing feature and I still got st=fail.

      One question for you, perhaps stupid but I need to be sure ๐Ÿ˜‰
      Do you need to set the same serial speed on both node and gateway ?

      David.

      posted in OpenHardware.io
      carlierd
      carlierd
    • RE: [security] Introducing signing support to MySensors

      @Anticimex Hello. Everything is working at 16 or 8MHz so I am pretty sure it's not an issue with the material.
      I will burn the bootloader again and create a new post if it's still not correct. I will also disable signing feature to be sure there is no impact.

      David.

      posted in Development
      carlierd
      carlierd
    • RE: [security] Introducing signing support to MySensors

      @Anticimex

      Hello.

      I am using soft signing.

      find parent
      send: 255-255-255-255 s=255,c=3,t=7,pt=0,l=0,sg=0,st=bc:
      read: 255-255-255 s=255,c=3,t=7,pt=0,l=0,sg=0:
      sensor started, id=255, parent=255, distance=255
      find parent
      send: 255-255-255-255 s=255,c=3,t=7,pt=0,l=0,sg=0,st=bc:
      read: 0-0-255 s=255,c=3,t=8,pt=1,l=1,sg=0:0
      parent=0, d=1
      read: 0-0-255 s=255,c=3,t=8,pt=1,l=1,sg=0:0
      req id
      send: 255-255-0-0 s=255,c=3,t=3,pt=0,l=0,sg=0,st=ok:
      read: 0-0-255 s=255,c=3,t=4,pt=0,l=1,sg=0:9
      send: 9-9-0-0 s=255,c=3,t=15,pt=2,l=2,sg=0,st=fail:1
      read and drop: 9-9-0 s=255,c=3,t=15,pt=2,l=2,sg=0:1
      read: 0-0-9 s=255,c=3,t=15,pt=2,l=2,sg=0:1
      send: 9-9-0-0 s=255,c=3,t=16,pt=0,l=0,sg=0,st=fail:
      nonce tr err
      send: 9-9-0-0 s=255,c=3,t=16,pt=0,l=0,sg=0,st=fail:
      nonce tr err
      read and drop: 9-0-0 s=255,c=3,t=6,pt=1,l=1,sg=0:0
      read: 0-0-9 s=255,c=3,t=17,pt=6,l=25,sg=0:0129D04B64916F5E805EFDF704C34F56B47E547FDDE93805BE
      id=9
      send: 9-9-0-0 s=0,c=0,t=0,pt=0,l=0,sg=0,st=ok:
      send: 9-9-0-0 s=1,c=0,t=30,pt=0,l=0,sg=0,st=fail:
      [Setup duration: 9928 ms]
      send: 9-9-0-0 s=0,c=3,t=16,pt=0,l=0,sg=0,st=fail:
      nonce tr err
      send: 9-9-0-0 s=1,c=3,t=16,pt=0,l=0,sg=0,st=fail:
      nonce tr err
      send: 9-9-0-0 s=255,c=3,t=16,pt=0,l=0,sg=0,st=fail:
      nonce tr err
      Value is 1   Cycle is 1   3.39 v   [753 ms]
      

      Thanks,

      David.

      posted in Development
      carlierd
      carlierd
    • RE: [security] Introducing signing support to MySensors

      Hello,

      I currently testing various bootloader to measure impact on CPU speed on the power consumption.
      I got a lot of nonce error when using 1 MHz configuration.

      Is signing feature possible at 1 MHz ?

      Thanks.

      David.

      posted in Development
      carlierd
      carlierd
    • RE: ๐Ÿ’ฌ Various bootloader files based on Optiboot 6.2

      Hello,

      I tested two bootloaders today:

      • optiboot_atmega328_08M_038400_B0.hex
      • optiboot_atmega328_01M_009600_B0.hex

      But I am pretty sure you already tested them.

      I got some issue with 1MHz bootloader but probably because I am using signing feature.
      I will check the forum to be sure.

      David.

      posted in OpenHardware.io
      carlierd
      carlierd
    • RE: ๐Ÿ’ฌ Various bootloader files based on Optiboot 6.2

      @GertSanders

      So it confirms that your bootloader was correctly burnt in the atmega as the first time I failed to upload a sketch the LED flash three time again and again !
      Thanks !

      David.

      posted in OpenHardware.io
      carlierd
      carlierd
    • RE: ๐Ÿ’ฌ Various bootloader files based on Optiboot 6.2

      @GertSanders One more question on the LED connected on B0.

      When you wrote that the LED lit on arduino reset, it's when the reset button is pushed ? when the arduino start ? or both ?

      David.

      posted in OpenHardware.io
      carlierd
      carlierd
    • RE: ๐Ÿ’ฌ Various bootloader files based on Optiboot 6.2

      I burn the bootloader one more time and now I can upload without any change on configuration.

      Perhaps I made a mistake the first time ๐Ÿ™‚

      I will continue my test.

      David.

      posted in OpenHardware.io
      carlierd
      carlierd
    • RE: ๐Ÿ’ฌ Various bootloader files based on Optiboot 6.2

      @GertSanders
      No doubt that I using your file as I got the same problem as @alexsh1 with the arduino pin file.

      Look at my board choice:

      0_1458392127846_2016-03-19 13.53.48.png

      I find this method very good for deployment but only when it's working ๐Ÿ˜‰

      I check the bootloader with Nick Gammon sketch and it seems good.
      David.

      posted in OpenHardware.io
      carlierd
      carlierd
    • RE: ๐Ÿ’ฌ Various bootloader files based on Optiboot 6.2

      @GertSanders Hello ! I am trying to upload a sketch without success for the moment.

      Burning of the bootloader was done correctly (led on pin 8 lit three times) but impossible to load a sketch.

      For easy deployment I choose to create a new folder to include your bootloaders:

      0_1458389134219_2016-03-19 13.05.30.png

      But it seems that something is missing as upload is not possible:

      Le croquis utilise 1ย 030 octets (3%) de l'espace de stockage de programmes. Le maximum est de 32ย 256 octets.
      Les variables globales utilisent 9 octets (0%) de mรฉmoire dynamique, ce qui laisse 2ย 039 octets pour les variables locales. Le maximum est de 2ย 048 octets.
      /Applications/Arduino.app/Contents/Java/hardware/tools/avr/bin/avrdude -C/Applications/Arduino.app/Contents/Java/hardware/tools/avr/etc/avrdude.conf -v -patmega328p -carduino -P/dev/cu.usbmodem1411 -b38400 -D -Uflash:w:/var/folders/2y/_n7gfzjx5_sgmtyh9t_lp0wc0000gn/T/build8919458311701309495.tmp/Blink.cpp.hex:i 
      
      avrdude: Version 6.0.1, compiled on Apr 14 2015 at 16:30:25
               Copyright (c) 2000-2005 Brian Dean, http://www.bdmicro.com/
               Copyright (c) 2007-2009 Joerg Wunsch
      
               System wide configuration file is "/Applications/Arduino.app/Contents/Java/hardware/tools/avr/etc/avrdude.conf"
               User configuration file is "/Users/carlierd/.avrduderc"
               User configuration file does not exist or is not a regular file, skipping
      
               Using Port                    : /dev/cu.usbmodem1411
               Using Programmer              : arduino
               Overriding Baud Rate          : 38400
      avrdude: ser_open(): can't open device "/dev/cu.usbmodem1411": No such file or directory
      ioctl("TIOCMGET"): Inappropriate ioctl for device
      
      avrdude done.  Thank you.
      
      Problรจme de tรฉlรฉversement vers la carte. Voir http://www.arduino.cc/en/Guide/Troubleshooting#upload pour suggestions.
      

      Any suggestion ?

      David.

      posted in OpenHardware.io
      carlierd
      carlierd
    • RE: My slim 2aa battery node tools

      @GertSanders I tried today and now I can download sketch correctly. One strange thing is that I have to open the serial monitor to have the arduino working after the download ...

      In // I think I have a problem with a bad RFM69 ...

      posted in My Project
      carlierd
      carlierd
    • RE: My slim 2aa battery node tools

      @AWI already done without problem ! I think I got problem with ATMEGA in DIP format ...

      posted in My Project
      carlierd
      carlierd
    • RE: My slim 2aa battery node tools

      @AWI no surprise. It's what I've done except for the capacitor on AREF pin but I'm pretty sure there is no link.
      Thanks.

      Perhaps a problem due to my Mac. I don't know how I can check the connection and isolate the problem.

      David.

      posted in My Project
      carlierd
      carlierd
    • RE: My slim 2aa battery node tools

      @AWI : may you post the schematic diagram of your reset circuit ?
      I got so many connection issue with my FTDI. I of course check internet but nothing is working correctly.

      Thanks !

      David.

      posted in My Project
      carlierd
      carlierd
    • Operational and debug MySensors network

      Hello,

      In order to continue node development I use two MySensors network. One operational and one for dev/debugging.
      My networks are using RFM69 so the difference for both network is only on the variable RFM69_NETWORKID.

      I am not sure (and don't want to test again) but each time my two gateways are switched one (on two computers) the operational network stopped working.

      Is someone doing same thing ? Do you have issue ?

      David.

      posted in General Discussion
      carlierd
      carlierd
    • RE: 3 in 1 incl battery monitor

      @Dylano : My nodes are really new so difficult to say exactly but for the moment the oldest node was started one month ago (04/02) and battery still at 3.32v.

      David.

      posted in My Project
      carlierd
      carlierd
    • RE: ๐Ÿ’ฌ Various bootloader files based on Optiboot 6.2

      @GertSanders Perfect !!!

      posted in OpenHardware.io
      carlierd
      carlierd
    • RE: ๐Ÿ’ฌ Very narrow and minimal switch node

      Very nice !!
      I just started learning Eagles to modify your board for RFM69 compatibility. The road will be long ๐Ÿ˜‰
      Could be good also to add ATSHA204A but in a second time !

      David.

      posted in OpenHardware.io
      carlierd
      carlierd
    • RE: ๐Ÿ’ฌ Various bootloader files based on Optiboot 6.2

      Hello,

      I will try some bootloader so I will be able to give you some fuse settings I have tested to.
      One more question, what B0 means ? I understood it's the pin for the LED ? Why B ? It's not D0 for digital 0 ?

      David.

      posted in OpenHardware.io
      carlierd
      carlierd
    • RE: ๐Ÿ’ฌ Various bootloader files based on Optiboot 6.2

      Hello,

      I will start some test on bootloader impact on battery so the timing is perfect !
      One very useful thing to add in your project could be fuse settings and IDE board files ?

      David.

      posted in OpenHardware.io
      carlierd
      carlierd
    • RE: Removing pro mini led bricked the board

      Yes it is the resistor.
      I don't why it's easier but it is ๐Ÿ˜‰ Probably because heat propagation is better.

      posted in Hardware
      carlierd
      carlierd
    • RE: 3 in 1 incl battery monitor

      The motion can be adapt to run on 3v easily (connect the Vcc to the H pad if available. You can find information on the forum). The DHT could also run on 3v. I have several nodes like that. No problem.
      Can't reply for the step-up because I don't use it.

      David.

      posted in My Project
      carlierd
      carlierd
    • RE: Removing pro mini led bricked the board

      My advice: leave the LED and remove the resistor ! Really easier !

      posted in Hardware
      carlierd
      carlierd
    • RE: Removing pro mini led bricked the board

      Hello,

      I usually desolder the regulator as it's not too difficult but now I did not desolder the LED. I prefer desolder the resistor before the LED. It's really easier !
      At the beginning I was used to desolder the LED and damaged one card ...

      David.

      posted in Hardware
      carlierd
      carlierd
    • RE: 3 in 1 incl battery monitor

      Hello,

      9v means that you are using a voltage regulator which probably consumes a lot of power.
      Why not using AA or AAA battery directly connected to Vcc ?

      David

      posted in My Project
      carlierd
      carlierd
    • RE: Problems with Sensor using RFM69

      It's strange ! Can you post a picture of your sensor and gateway ?

      Have you try with a second nano ? It's not normal to have nothing on the serial monitor when using USB.

      One thing you can do it's to connect a LED to any digital pin and switch it on at the end of the init() function ??

      David.

      posted in Troubleshooting
      carlierd
      carlierd
    • RE: Jeedom application can't see ethernet gateway

      @fredmet8 As mentioned by @minscof you have to check your network configuration. Verify it's ok and then we can look for something else ๐Ÿ™‚
      I never configured IP in the MySensors plugin !

      David.

      posted in Jeedom
      carlierd
      carlierd
    • RE: Problems with Sensor using RFM69

      Hello,

      You have message on the serial monitor ?

      David.

      posted in Troubleshooting
      carlierd
      carlierd
    • RE: 3 in 1 incl battery monitor

      It depends on the activity close to the sensor so not possible to say but some people reach several month without problem.
      In my house it's very fresh so I have not a lot of feedback to give.

      David.

      posted in My Project
      carlierd
      carlierd
    • RE: 3 in 1 incl battery monitor

      The error is because I enable the signing function !
      Remove the following line:

      MySigningAtsha204Soft signer;
      

      And replace

      MySensor node(transport, hw, signer);
      

      by

      MySensor node(transport, hw);
      

      I don't know who had the best sketch.
      I measure internal battery status using the 1.1 reference.

      David.

      posted in My Project
      carlierd
      carlierd
    • RE: 3 in 1 incl battery monitor

      Hello,

      This is the code I use but it's not perfect especially with the battery report.

      The principle is as follow when the sensor start:

      • node in sleep mode with interrupt enable
      • if a move is detected, the detection is reported to the gateway
      • the node then go in sleep mode WITHOUT interrupt for 5 minutes
      • then the node return to sleep mode with interrupt enable

      This is to avoid having many report (and power consumption) to the gateway.

      The code (not perfect ! I have to rework on it but it's ok for the moment):

      /**
       * The MySensors Arduino library handles the wireless radio link and protocol
       * between your home built sensors/actuators and HA controller of choice.
       * The sensors forms a self healing radio network with optional repeaters. Each
       * repeater and gateway builds a routing tables in EEPROM which keeps track of the
       * network topology allowing messages to be routed to nodes.
       *
       * Created by Henrik Ekblad <henrik.ekblad@mysensors.org>
       * Copyright (C) 2013-2015 Sensnology AB
       * Full contributor list: https://github.com/mysensors/Arduino/graphs/contributors
       *
       * Documentation: http://www.mysensors.org
       * Support Forum: http://forum.mysensors.org
       *
       * This program is free software; you can redistribute it and/or
       * modify it under the terms of the GNU General Public License
       * version 2 as published by the Free Software Foundation.
       *
       */
      
      /**************************************************************************************/
      /* Motion sensor.                                                                     */
      /*                                                                                    */
      /* Version     : 1.1.5                                                                */
      /* Date        : 30/01/2016                                                           */
      /* Modified by : David Carlier                                                        */
      /**************************************************************************************/
      /*                                ---------------                                     */
      /*                            RST |             |  A5                                 */
      /*                            RX  |             |  A4                                 */
      /*                            TX  |   ARDUINO   |  A3                                 */
      /*     RFM69 (DIO0) --------- D2  |     UNO     |  A2                                 */
      /*           Motion --------- D3  |             |  A1                                 */
      /*            Power --------- D4  | ATMEGA 328p |  A0                                 */
      /*              +3v --------- VCC |             | GND --------- GND                   */
      /*              GND --------- GND |  8MHz int.  | REF                                 */
      /*                            OSC |             | VCC --------- +3v                   */
      /*                            OSC |             | D13 --------- RFM69 (SCK)           */
      /*                            D5  |             | D12 --------- RFM69 (MISO)          */
      /*                            D6  |             | D11 --------- RFM69 (MOSI)          */
      /*                            D7  |             | D10 --------- RFM69 (NSS)           */
      /*                            D8  |             |  D9                                 */
      /*                                ---------------                                     */
      /*                                                                                    */
      /* +3v = 2*AA                                                                         */
      /*                                                                                    */
      /**************************************************************************************/
      
      #include <SPI.h>
      #include <MySensor.h>
      #include <MyTransportRFM69.h>
      #include <MySigningAtsha204Soft.h>
      
      //Constants
      #define SKETCH_NAME           "Motion Sensor"
      #define SKETCH_VERSION        "1.1.5"
      #define CHILD_ID              0
      #define CHILD_ID_VOLTAGE      1
      #define DIGITAL_INPUT_SENSOR  3
      #define BATTERY_REPORT_CYCLE  4   //Report each hour (4 * 15')
      
      //Misc. variables
      uint8_t switchState = 2;
      unsigned long SLEEP_TIME = 820000; // Sleep time between reads (in milliseconds) (close to 15')
      unsigned long SLEEP_TIME2 = 275000; // Sleep time after int. (in milliseconds) (close to 5')
      uint8_t cycleInProgress = 0;
      uint8_t firstReportDone = 0;
      uint8_t firstReportWithZeroDone = 0;
      
      //Construct MySensors library
      MySigningAtsha204Soft signer;
      MyHwATMega328 hw;
      MyTransportRFM69 transport;
      MySensor node(transport, hw, signer);
      MyMessage msgSwitch(CHILD_ID, V_TRIPPED);
      MyMessage msgVolt(CHILD_ID_VOLTAGE, V_VOLTAGE);
      
      /**************************************************************************************/
      /* Initialization                                                                     */
      /**************************************************************************************/
      void setup()  
        {
        //Get time (for setup duration)
        #ifdef DEBUG
          unsigned long startTime = millis();
        #endif
      
        //Start MySensors and send the Sketch Version Information to the Gateway
        node.begin();
        node.sendSketchInfo(SKETCH_NAME, SKETCH_VERSION);
      
        //Setup the button
        pinMode(DIGITAL_INPUT_SENSOR, INPUT);
      
        //Register all sensors
        node.present(CHILD_ID, S_MOTION);
        node.present(CHILD_ID_VOLTAGE, S_MULTIMETER);
      
        //Print setup debug
        #ifdef DEBUG
          int duration = millis() - startTime;
          Serial.print("[Setup duration: "); Serial.print(duration, DEC); Serial.println(" ms]");
        #endif
        }
      
      /**************************************************************************************/
      /* Main loop                                                                          */
      /**************************************************************************************/
      void loop()
        {
        //Get time (for a complete loop)
        #ifdef DEBUG
          unsigned long startTime = millis();
        #endif
      
        //Read digital motion value
        uint8_t value = digitalRead(DIGITAL_INPUT_SENSOR);
      
        //Get voltage for battery capacity report (add 0.1v to the read value)
        float realVoltage = (getVoltage() / 100.0) + 0.1;
        int batteryPcnt = realVoltage * 100 / 3.0;
        if (batteryPcnt > 100) {batteryPcnt = 100;}
      
        //Check is state change
        if (value != switchState)
          {
          //Report result if not first loop
          if (firstReportDone != 0)
            {
            node.send(msgSwitch.set(value==HIGH ? 1 : 0));
            }
      
          //Store result
          switchState = value;
          }
      
        //Report data to the gateway each hour
        if (cycleInProgress >= BATTERY_REPORT_CYCLE || firstReportDone == 0)
          {
          node.send(msgSwitch.set(value==HIGH ? 1 : 0));
          node.send(msgVolt.set(realVoltage, 2));
          node.sendBatteryLevel(batteryPcnt);
          cycleInProgress = 0;
          firstReportDone = 1;
          }
      
        //Change cycle number
        cycleInProgress++;
      
        //Print debug
        #ifdef DEBUG
          Serial.print("Value is ");
          Serial.print(value, 1);
          Serial.print("   ");
          Serial.print("Cycle is ");
          Serial.print(cycleInProgress, 1);
          Serial.print("   ");
          Serial.print(realVoltage);
          Serial.print(" v");
          int duration = millis() - startTime;
          Serial.print("   ");
          Serial.print("["); Serial.print(duration, DEC); Serial.println(" ms]");
          Serial.flush();
        #endif
      
        //Check if the motion was triggered and if it's not the first report
        if (switchState == 0 && firstReportWithZeroDone == 1)
          {
          //Sleep 5' without interrupt
          node.sleep(SLEEP_TIME2);
          }
      
        //Check if it's the first loop
        if (switchState == 0 && firstReportWithZeroDone == 0)
          {
          firstReportWithZeroDone = 1;
          }
      
        //Sleep until something happens with the sensor
        node.sleep(DIGITAL_INPUT_SENSOR-2, CHANGE, SLEEP_TIME);
        }
      
      /**************************************************************************************/
      /* Allows to get the real Vcc (return value * 100).                                   */
      /**************************************************************************************/
      int getVoltage()
        {
        const long InternalReferenceVoltage = 1056L;
        ADMUX = (0<<REFS1) | (1<<REFS0) | (0<<ADLAR) | (1<<MUX3) | (1<<MUX2) | (1<<MUX1) | (0<<MUX0);
        delay(50);  // Let mux settle a little to get a more stable A/D conversion
        //Start a conversion  
        ADCSRA |= _BV( ADSC );
        //Wait for it to complete
        while (((ADCSRA & (1<<ADSC)) != 0));
        //Scale the value
        int result = (((InternalReferenceVoltage * 1023L) / ADC) + 5L) / 10L;
        return result;
        }
      

      On one sensor I tweak the PIR (remove regulator and diode) but on a second one, I just plug the 3 v to the H pin (see other topic on the forum).

      Working correctly for the moment (one month) but it depends on the presence in the house.

      David.

      posted in My Project
      carlierd
      carlierd
    • RE: Problems with Sensor using RFM69

      @nagelc Dialog with MYSControler is correct so there is probably no issue with 5v.

      posted in Troubleshooting
      carlierd
      carlierd
    • RE: Problems with Sensor using RFM69

      @spacejay I used a 1/2 length antenna (17,23 cm) without any problem on many sensors. I imagine it's a copper wire not flexible ?

      posted in Troubleshooting
      carlierd
      carlierd
    • RE: Jeedom application can't see ethernet gateway

      Hello,

      What is your sketch ? It seems that your sensors have no presentation !
      Example in the setup()function:

      node.present(CHILD_ID, S_MOTION);
        node.present(CHILD_ID_VOLTAGE, S_MULTIMETER);
      

      It's mandatory for jeedom if I'm right.

      David.

      posted in Jeedom
      carlierd
      carlierd
    • RE: Problems with Sensor using RFM69

      What is the frequency of the RFM69 ?
      I used 4,7uF for the capacitor but I am pretty sure that more is not a problem.

      David.

      posted in Troubleshooting
      carlierd
      carlierd
    • RE: Problems with Sensor using RFM69

      Yes you need a gateway and a controller like MYSController.

      posted in Troubleshooting
      carlierd
      carlierd
    • RE: Problems with Sensor using RFM69

      Your gateway is also on nano ? or uno ? You have level adapter ? voltage converter ?

      posted in Troubleshooting
      carlierd
      carlierd
    • RE: Problems with Sensor using RFM69

      Hello,

      Are you using HW version of RFM69 ?

      David

      posted in Troubleshooting
      carlierd
      carlierd
    • RE: Arduino nano + logic level shifter + 3.3v PSU+RFM69HW?

      Hello,

      As mentioned on the MySensors page, NSS, MOSI and SCK are not 5v tolerant so you need to connect them to a level converter. Don't connect MISO to the level converter, it's not necessary and not working for me !

      Hope it helps !

      David.

      posted in General Discussion
      carlierd
      carlierd
    • RE: Slim Node Si7021 sensor example

      @ar91 said:

      @carlierd Are you running your Atmega at 1Mhz, Because I tried to use your sketch and i am getting "Checksum Error".

      No, I am working at 8 MHz (internal). Perhaps your DHT is out of order ? You try with another one ?

      David.

      posted in My Project
      carlierd
      carlierd
    • RE: ๐Ÿ’ฌ Very narrow and minimal switch node

      @GertSanders I will try to modify your design to replace the NRF with a RFM69. Thanks.

      posted in OpenHardware.io
      carlierd
      carlierd
    • RE: ๐Ÿ’ฌ Very narrow and minimal switch node

      Very good job !!

      I saw that you provide a bootloader. What specificities ?

      Other (very selfish) question: next version of your not will be compatible with RFM69HW ?? ๐Ÿ˜‰

      David.

      posted in OpenHardware.io
      carlierd
      carlierd
    • RE: Step by step instructions of how to troubleshoot RFM69 gateway/sensor ?

      @chrille I also use simple sketch to validate hardware without MySensors. It's easier to be sure everything is working correctly. Another reason is that with MySensors there is no RSSI. I found this very useful to verify antenna connection especially with home-made antenna ๐Ÿ™‚

      posted in Troubleshooting
      carlierd
      carlierd
    • RE: Step by step instructions of how to troubleshoot RFM69 gateway/sensor ?

      All my nodes work correctly when powering via 2 AA or via USB adaptor (FTDI).
      I only got issue on the gateway using a uno and a voltage converter.

      On my nodes (arduino pro mini on 3.3v / 8MHz) I used caps of 100uF on the power supply and 4.7uF for the RFM.
      On the gateway I only add the 4.7uF for the RFM.

      David.

      posted in Troubleshooting
      carlierd
      carlierd
    • RE: Step by step instructions of how to troubleshoot RFM69 gateway/sensor ?

      Hello,

      Is there a 3v output on the nano ? I got some issue with my uno and a voltage converter. To solve the issue I removed the voltage converter and used the 3v output on the UNO.
      Hope it helps !

      David.

      posted in Troubleshooting
      carlierd
      carlierd
    • RE: Slim Node Si7021 sensor example

      @ar91 Please find the code I used in 3 different nodes. The good thing with the playground lib is that there is error message if dialog with DHT22 failed.

      /**
       * The MySensors Arduino library handles the wireless radio link and protocol
       * between your home built sensors/actuators and HA controller of choice.
       * The sensors forms a self healing radio network with optional repeaters. Each
       * repeater and gateway builds a routing tables in EEPROM which keeps track of the
       * network topology allowing messages to be routed to nodes.
       *
       * Created by Henrik Ekblad <henrik.ekblad@mysensors.org>
       * Copyright (C) 2013-2015 Sensnology AB
       * Full contributor list: https://github.com/mysensors/Arduino/graphs/contributors
       *
       * Documentation: http://www.mysensors.org
       * Support Forum: http://forum.mysensors.org
       *
       * This program is free software; you can redistribute it and/or
       * modify it under the terms of the GNU General Public License
       * version 2 as published by the Free Software Foundation.
       *
       */
      
      /**************************************************************************************/
      /* Temperature, humidity and luminosity measurements.                                 */
      /*                                                                                    */
      /* Version     : 1.1.6                                                                */
      /* Date        : 10/01/2016                                                           */
      /* Modified by : David Carlier                                                        */
      /**************************************************************************************/
      /*                                ---------------                                     */
      /*                            RST |             |  A5                                 */
      /*                            RX  |             |  A4                                 */
      /*                            TX  |   ARDUINO   |  A3                                 */
      /*     RFM69 (DIO0) --------- D2  |     UNO     |  A2                                 */
      /*            DHT22 --------- D3  |             |  A1                                 */
      /*            Power --------- D4  | ATMEGA 328p |  A0 --------- Light dep. resistor   */
      /*              +3v --------- VCC |             | GND --------- GND                   */
      /*              GND --------- GND |  8MHz int.  | REF                                 */
      /*                            OSC |             | VCC --------- +3v                   */
      /*                            OSC |             | D13 --------- RFM69 (SCK)           */
      /*                            D5  |             | D12 --------- RFM69 (MISO)          */
      /*                            D6  |             | D11 --------- RFM69 (MOSI)          */
      /*                            D7  |             | D10 --------- RFM69 (NSS)           */
      /*                            D8  |             |  D9                                 */
      /*                                ---------------                                     */
      /*                                                                                    */
      /* Power = Vcc for LDR.                                                               */
      /* +3v = 2*AA                                                                         */
      /*                                                                                    */
      /**************************************************************************************/
      
      #include <SPI.h>
      #include <MySensor.h>
      #include <dht.h>
      #include <MyTransportRFM69.h>
      #include <MySigningAtsha204Soft.h>
      
      #define CHILD_ID_HUM 0
      #define CHILD_ID_TEMP 1
      #define CHILD_ID_LIGHT 2
      #define CHILD_ID_VOLTAGE 3
      #define LIGHT_SENSOR_ANALOG_PIN 0
      #define HUMIDITY_SENSOR_DIGITAL_PIN 3
      #define POWER_PIN 4
      //unsigned long SLEEP_TIME = 850000; // Sleep time between reads (in milliseconds) (close to 15')
      unsigned long SLEEP_TIME = 275000; // Sleep time between reads (in milliseconds) (close to 5')
      
      //Construct MySensors library
      MySigningAtsha204Soft signer;
      MyHwATMega328 hw;
      MyTransportRFM69 transport;
      MySensor gw(transport, hw, signer);
      dht DHT;
      MyMessage msgHum(CHILD_ID_HUM, V_HUM);
      MyMessage msgTemp(CHILD_ID_TEMP, V_TEMP);
      MyMessage msgLum(CHILD_ID_LIGHT, V_LEVEL);
      MyMessage msgVolt(CHILD_ID_VOLTAGE, V_VOLTAGE);
      
      /**************************************************************************************/
      /* Initialization                                                                     */
      /**************************************************************************************/
      void setup()
        {
        //Get time (for setup duration)
        #ifdef DEBUG
          unsigned long startTime = millis();
        #endif
      
        //Start MySensors
        gw.begin();
      
        //Send the Sketch Version Information to the Gateway
        gw.sendSketchInfo("GHAS sensor", "1.1.5");
      
        //Register all sensors to gw (they will be created as child devices)
        gw.present(CHILD_ID_HUM, S_HUM);
        gw.present(CHILD_ID_TEMP, S_TEMP);
        gw.present(CHILD_ID_LIGHT, S_LIGHT_LEVEL);
        gw.present(CHILD_ID_VOLTAGE, S_MULTIMETER);
      
        //Delay for DHT22
        delay(1500);
      
        //Print setup debug
        #ifdef DEBUG
          int duration = millis() - startTime;
          Serial.print("[Setup duration: "); Serial.print(duration, DEC); Serial.println(" ms]");
        #endif
        }
      
      /**************************************************************************************/
      /* Main loop                                                                          */
      /**************************************************************************************/
      void loop()
        {
        //Get time (for a complete loop)
        #ifdef DEBUG
          unsigned long startTime = millis();
        #endif
      
        //Power on
        powerOnPeripherals();
      
        //Get DHT22 data
        int dht22Result = DHT.read22(HUMIDITY_SENSOR_DIGITAL_PIN);
        switch (dht22Result)
          {
          case DHTLIB_OK:  
                      //Serial.println("OK,\t");
                      break;
          case DHTLIB_ERROR_CHECKSUM:
                      #ifdef DEBUG
                        Serial.println("Checksum error,\t");
                      #endif
                      break;
          case DHTLIB_ERROR_TIMEOUT:
                      #ifdef DEBUG
                        Serial.println("Time out error,\t");
                      #endif
                      break;
          case DHTLIB_ERROR_CONNECT:
                      #ifdef DEBUG
                        Serial.println("Connect error,\t");
                      #endif
                      break;
          case DHTLIB_ERROR_ACK_L:
                      #ifdef DEBUG
                        Serial.println("Ack Low error,\t");
                      #endif
                      break;
          case DHTLIB_ERROR_ACK_H:
                      #ifdef DEBUG
                        Serial.println("Ack High error,\t");
                      #endif
                      break;
          default:
                      #ifdef DEBUG
                        Serial.println("Unknown error,\t");
                      #endif
                      break;
          }
      
        //Get temperature and humidity
        float temperature = 0;
        float humidity = 0;
        if (dht22Result == DHTLIB_OK)
          {
          temperature = DHT.temperature;
          humidity = DHT.humidity;
          }
      
        //Get power before luminosity to use real voltage
        float realVoltage = getVoltage() / 100.0;
        int batteryPcnt = realVoltage * 100 / 3.0;
        if (batteryPcnt > 100) {batteryPcnt = 100;}
        int lux = computeIlluminance(realVoltage);
      
        //Power off
        powerOffPeripherals();
      
        //Send data to gateway
        gw.send(msgHum.set(humidity, 1));
        gw.send(msgTemp.set(temperature, 1));
        gw.send(msgLum.set(lux));
        gw.send(msgVolt.set(realVoltage, 2));
        gw.sendBatteryLevel(batteryPcnt);
      
        //Print debug
        #ifdef DEBUG
          Serial.print(temperature, 1);
          Serial.print(" degC");
          Serial.print("   ");
          Serial.print(humidity, 1);
          Serial.print(" %");
          Serial.print("   ");
          Serial.print(lux);
          Serial.print(" lx");
          Serial.print("   ");
          Serial.print(realVoltage);
          Serial.print(" v");
          int duration = millis() - startTime;
          Serial.print("   ");
          Serial.print("["); Serial.print(duration, DEC); Serial.println(" ms]");
          Serial.flush();
        #endif
      
        //Sleep
        gw.sleep(SLEEP_TIME);
        }
      
      /**************************************************************************************/
      /* Allows to compute illuminance (in LUX) from LIGHT_SENSOR_ANALOG_PIN.               */
      /**************************************************************************************/
      int computeIlluminance(float realVoltage)
        {
        //Get luminosity
        int luminosity = analogRead(LIGHT_SENSOR_ANALOG_PIN);
        //Calculating the voltage in the input of the ADC
        double voltage = realVoltage * ((double)luminosity / 1024.0);
        //Calculating the resistance of the photoresistor in the voltage divider
        double resistance = (10.0 * realVoltage) / voltage - 10.0;
        //Calculating the intensity of light in lux and return it
        int illuminance = 255.84 * pow(resistance, -10/9);
        return illuminance;
        }
      
      /**************************************************************************************/
      /* Allows to get the real Vcc (return value * 100).                                   */
      /**************************************************************************************/
      int getVoltage()
        {
        const long InternalReferenceVoltage = 1056L;
        ADMUX = (0<<REFS1) | (1<<REFS0) | (0<<ADLAR) | (1<<MUX3) | (1<<MUX2) | (1<<MUX1) | (0<<MUX0);
        delay(50);  // Let mux settle a little to get a more stable A/D conversion
        //Start a conversion  
        ADCSRA |= _BV( ADSC );
        //Wait for it to complete
        while (((ADCSRA & (1<<ADSC)) != 0));
        //Scale the value
        int result = (((InternalReferenceVoltage * 1023L) / ADC) + 5L) / 10L;
        return result;
        }
      
      /**************************************************************************************/
      /* Allows to power ON peripherals.                                                    */
      /**************************************************************************************/
      void powerOnPeripherals()
        {
        //Power-up
        pinMode (POWER_PIN, OUTPUT);
        digitalWrite (POWER_PIN, HIGH);
        delay(1);
        }
      
      /**************************************************************************************/
      /* Allows to power OFF peripherals.                                                   */
      /**************************************************************************************/
      void powerOffPeripherals()
        {
        //Power off
        digitalWrite (HUMIDITY_SENSOR_DIGITAL_PIN, LOW);
        digitalWrite (POWER_PIN, LOW);
        pinMode (HUMIDITY_SENSOR_DIGITAL_PIN, INPUT);
        pinMode (POWER_PIN, INPUT);
        }
      

      Hope it helps !

      David.

      posted in My Project
      carlierd
      carlierd
    • RE: Slim Node Si7021 sensor example

      @ar91 Hello. I am using the arduino playground lib. No issue with it ! I can post a sketch if necessary.

      David.

      posted in My Project
      carlierd
      carlierd