Navigation

    • Register
    • Login
    • OpenHardware.io
    • Categories
    • Recent
    • Tags
    • Popular
    1. Home
    2. dakipro
    3. Posts
    • Profile
    • Following
    • Followers
    • Topics
    • Posts
    • Best
    • Groups

    Posts made by dakipro

    • RE: πŸ’¬ OpenHAB

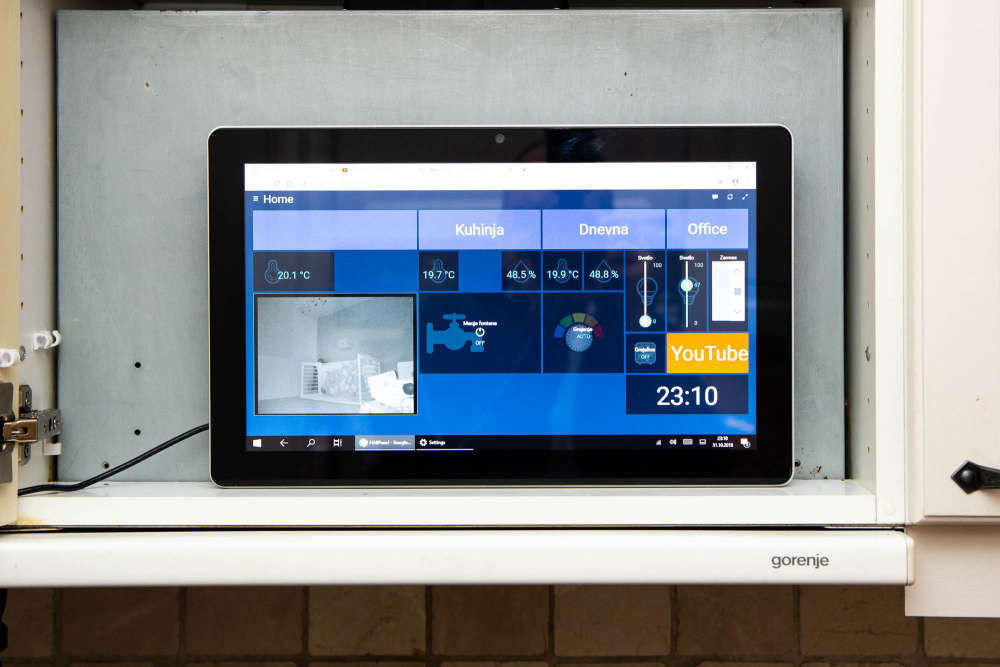
      Some time passed by but I just wanted to thank you @guillermo-schimmel , I've finally managed to connect sensors properly (at least one of them).

      I had to do some changes based on official documentation, so what I did is I just installed mqtt binding from paperUI, and then added one mysensors.things file with fallowing


      Bridge mqtt:broker:mosqbroker "Work Broker" [ host="192.168.1.ip", port="1883", secure=false, username="myuser", password="mypassword", clientID="OPENHAB", startupCheckEnabled=false  ]
      
      Thing mqtt:topic:mosqbroker:ChargingStation_Switch4h_raw_thing "Charging station button" (mqtt:broker:mosqbroker) @ "Home" {
          Channels:
              Type string : ChargingStation_Switch4h_raw_button "Charging station 4h button" [ stateTopic="mygateway1-out/31/4/1/0/16"]
      }


      and then in my items file I had this

      
      String ChargingStation_Switch4h_raw_converted       "ChargingStation Switch4h"           { channel="mqtt:topic:mosqbroker:ChargingStation_Switch4h_raw_thing:ChargingStation_Switch4h_raw_button"}


      and I get the value of the item properly (note I have string for testing, number might be more appropriate here, but that will be fixed another day)

      posted in Announcements
      dakipro
      dakipro
    • RE: πŸ’¬ EFEKTA Temp&Hum sensor(ver. nRF52 )+E-Ink display

      hey @berkseo these look amazing, any estimate when they might be available again as assembled unit?
      Any estimate on how long the battery lasts, with lats say update every 15min?
      Could these be updated OTA somehow (or directly perhaps)?
      I would like to have option to change layout, or perhaps add some other values to it maybe.
      They look amazing, I would like several of these in each room for various things displayed

      posted in OpenHardware.io
      dakipro
      dakipro
    • RE: πŸ’¬ Easy/Newbie PCB for MySensors

      @apl2017 care to share? πŸ™‚

      posted in OpenHardware.io
      dakipro
      dakipro
    • RE: πŸ’¬ OpenHAB

      @guillermo-schimmel said in πŸ’¬ OpenHAB:

      The 1.b. route: MQTT using new MQTT 2.x binding
      The 1.b route. It also works fine, you define the broker via Paper UI and/or files, and you then define every channel by hand, the easier way is via PaperUI.
      This is awful.

      It looks that I was using 1.a, as this is how I already have items defined from before, f.eks.
      Number Temp_03 "Temperatura [%.1f Β°C]" {mqtt="<[mosquito:mygateway1-out/3/1/1/0/0:state:default]"}

      but I do agree, this is a bit... time consuming to figure out which value should be sent when.

      To migrate from this to 1.b, I would have to define every channel in the things file?
      I am not a fan of PaperUi , and would like to have a official bindings when possible. It is always annoying to update openhab, and I would like to keep it as less complicated as possible.

      Do you have an example (or give some tips) on how to go with 1.b route, either via PaperUi, or things file? What do I write there for one, f.eks. temperature-humidity sensor?

      I like having good control over each node, so defining each channel should be fine for me, I am just struggling to get started, then I can copy-paste from there πŸ™‚

      Thanks!

      posted in Announcements
      dakipro
      dakipro
    • RE: πŸ’¬ OpenHAB

      thanks @Guillermo-Schimmel , what I have so far is
      MQTT Binding from paperUi
      MQTT Broker - added from paperUI where I input my ip adress
      Then I should add channels from PaperUi as well?
      If I try that, only option I have is Publish Trigger. There should I put topic i guess?
      Or should I just add Things as you described and something new appears?

      I can wait for tutorial if that is easier for you, I have just a few non-vital devices in mysensors.
      Thanks again!

      posted in Announcements
      dakipro
      dakipro
    • RE: πŸ’¬ OpenHAB

      hi @Guillermo-Schimmel thanks for the info, I searched for a while but didn't understod what to do with channels. Do you have an example or perhaps a list of the channels that should be added, and what the values are?
      Thanks!

      posted in Announcements
      dakipro
      dakipro
    • RE: What did you build today (Pictures) ?

      @nca78 I used white decorative self adhesive wallpaper, so not sure which plastic you are planing to use, but you can easily test that before mounting I think. If you go for paper/foil, put some one-peace plastic in front of the displays as they (mine) are not perfectly soldered in line, so they are noticeable sa foil will glue to them. Not a big deal for me, but would love "the perfection". But yeah, plastic or some harder material would work awesome I think.

      All in all, not difficult project and a very high wow-factor/time-spent value (and waf)

      posted in General Discussion
      dakipro
      dakipro
    • RE: What did you build today (Pictures) ?

      My wife said "I do not want to see "those things""...
      Challenge accepted!

      0_1544224086865_TV LED display 1 - 20181207_171500.jpg

      1_1544224086867_TV LED display 2 - 20181207_183612.jpg

      0_1544224266422_MVI_5770.00_00_03_13.Still001.jpg

      (see the gif in action here https://ibb.co/BCbS2Dc )

      posted in General Discussion
      dakipro
      dakipro
    • RE: πŸ’¬ Easy/Newbie PCB for MySensors

      Ooops, my bad then 😞 I was pretty sure I checked readme.md file, but apparently I got confused.
      Thanks a million!

      posted in OpenHardware.io
      dakipro
      dakipro
    • RE: πŸ’¬ Easy/Newbie PCB for MySensors

      Thanks @hek it is certainly helpful. However the most powerful information is actually in the description page, about how to use the board, how to wire it up for different use cases etc. I suppose a previous version of the information tab is not available?
      If it could be archived (maybe even linked somewhere) it would be really helpful!

      posted in OpenHardware.io
      dakipro
      dakipro
    • RE: πŸ’¬ Easy/Newbie PCB for MySensors

      Thank you @hek , I think this might be useful feature
      I however do not see any data in there, is it something for project owner to allow?
      I tried both as guest and as logged inn, I do see the rows, but no data in fields, screenshot:

      0_1542407389061_Screenshot 2018-11-16 23.28.04.png

      @sundberg84 nothing special about now, I figured it out based on older projects. But since I still have about dosen of boards, I will probably need documentation few years from now, so was just hoping to have it somewhere easily available πŸ™‚ Like a downloaded pdf or something

      posted in OpenHardware.io
      dakipro
      dakipro
    • RE: πŸ’¬ Easy/Newbie PCB for MySensors

      Hey @sundberg84 I just saw the new rev.10, congratulations on the upgrade!
      I still have a bunch of rev 9, do you happen to have images/manual for previous version somewhere? link or a pdf?
      Thanks!

      posted in OpenHardware.io
      dakipro
      dakipro
    • RE: What did you build today (Pictures) ?

      Saw that all other kids cool kids have one, so I installed one kitchen-pc as well.
      It is Flytech K757 15'' POS terminal, windows 10 pro, touch screen, 300gb (soon to be ssd) 8gb ο»Ώram dual coο»Ώre 2,2ghz. Purchased from local "ebay" for around 140 eur.

      0_1541025507479_Kitchen PC 1 - IMG_5680.jpg

      Now I can make that awesome dinner, once in a full moon, without having to carry and unlock my phone all the time...

      posted in General Discussion
      dakipro
      dakipro
    • RE: Longer text in V_TEXT, any workarounds?

      If anyone is trying the same, I did it as @mfalkvidd recommended, with several child IDs
      Then I basically reset the message if data comes on on first childId, and only append it if data comes on any other sensor, something like

      if (message.sensor == messageCHILD1){
        strcpy(newMessage, "       ");                 // we put some spaces in front
        strcat(newMessage, message.getString());    
      }else{
        if(curMessage!=""){
          // append existing message to newMessage
           strcpy(newMessage, curMessage);   
         }
        //append rest
        strcat(newMessage, message.getString());
      }


      Note: the code also works with just two sensors, first for reset, and second that only appends data, but I decided to go with four child IDs, in case there is something I am not seeing at the moment.

      Thanks everyone for ideas

      posted in Development
      dakipro
      dakipro
    • RE: Longer text in V_TEXT, any workarounds?

      Thanks! Btw, does anyone have a example of resending of missed messages from OpenHab via Mqtt?
      Or retrieving any data at all, I just never managed to get any data from openhab from the node. F.eks., asking what is the time and such thing, do I need to have a rule for each "question" and then reply in response, or as a new call or what?

      posted in Development
      dakipro
      dakipro
    • Longer text in V_TEXT, any workarounds?

      Hi,
      I am building a LED matrix display for displaying some messages from controller. I searched and found some discussion few years ago about its limitation and possible workarounds in sending few messages from gateway and the nodes. Was there any progress on this, or has anyone come with some workaround?
      I am using openhab and node-red over mqtt if that helps.
      I was considering making small custom logic in node-red that would split the messages and send them with few seconds delay, and then on the node to combine them in a single text, something like:
      Message1: |CS| This is some 24 message th
      Message2: at is being split over multipl
      Message3: e messages

      So if node gets message starting with "|CS|" it will delete message from the screen, if not it will just append the message to it

      But what if some message gets lost? Or any better suggestions?

      posted in Development
      dakipro
      dakipro
    • RE: MajorDoMo experience

      Thanks, I tried running it on old laptop, but it was difficult for non-russian speaker to figure things out. And I remember that the app was constantly using around 30% of CPU which kept the fan running all the time (because php was running in infinitive loop).
      I switched to domoticz on raspberry, but have now settled on openhab and am very happy with it.

      None of them used more then 1-2% cpu on same laptop, and both are very stable (also easy to find documentation for english-speaking user).

      posted in MajorDoMo
      dakipro
      dakipro
    • RE: What did you build today (Pictures) ?

      Built case for soldering tools, to easily move them out of the way.

      0_1525033392218_Soldering tools holder 2 - IMG_2292_1024.jpg

      0_1525033398349_Soldering tools holder 1 - IMG_2260_1024.jpg

      Not really, bought it on banggood and asked wife to assemble it (she likes those type of projects, especially if the office might look a tiny bit cleaner) https://www.banggood.com/DIY-Self-assemble-RC-Model-Tools-Case-Screwdriver-Box-Gripper-Package-Plier-Stand-Retro-Style-p-1257252.html?cur_warehouse=CN

      Laser cut plywood(or something), looks quite nice I think. I will order few more when they appear in stock.

      posted in General Discussion
      dakipro
      dakipro
    • RE: Recommendation for motorized roller blinds solution (actual motor, like somfy, rollertrol, ebay...)

      thanks @parachutesj , I was thinking of something similar as well, sounds much simpler then my initial thought to have several sensors in a line to determine position of the shade in the room... I also like your temperature sensor solution, as that is actually what we would mostly like to react to, especially on the winter.
      I have quickly found one solution on the internet, using luminosity sensor http://www.instructables.com/id/A-solar-tracking-automatic-motorized-window-blind-/

      I must also deal with "manual override" but I have seen some design patterns for it already, using the "dead switches" / proxy items. And a door that should prevent blinds to go down if doors are open. Should be possible to program in node-red.

      And according to my wife, I must fix it all very soon πŸ™‚

      Thanks again, will look more into it.

      posted in Hardware
      dakipro
      dakipro
    • RE: What did you build today (Pictures) ?

      @nca78 said in What did you build today (Pictures) ?:

      "22" board
      Looks great, can we get more info about it/link?

      posted in General Discussion
      dakipro
      dakipro
    • RE: Recommendation for motorized roller blinds solution (actual motor, like somfy, rollertrol, ebay...)

      It is a Smart Color Button - Philio, got it as a package with the motor itself, from m.nu

      https://www.m.nu/rullgardin/motorisera-rullgardin-1-motor-z-wave-24v?nosto=productcategory-nosto-3

      It is wireless, gyroscope based "button" that works directly with motor itself. They say battery lasts for 6months, but it is usb rechargeable, so not a biggie. It reports battery level to the controller so that is a plus.
      As far as WAF goes, it is wireless and looks nice so that is a plus, but to use it it is a bit, well.. different to operate as it is just held by magnet on the holder/wall and has no rotation limitats, so it is not 100% intuitive for first time use as you just turn it and then nothing happens, then you have to wait almost 2s for it to settle and send new position to the shades, and one cannot change direction (at least I didn't find how) so "left" might be counter intuitive as if shades are open or closed, so it is a bit fiddly to operate. Also it has a tolerance rotation, meaning that fine adjustments for the shades are a bit hit and miss, so...
      But I am hoping that blinds will mostly work automatically so that would not matter that much. And I didn't find some much better remote dimmer-like controllers for the blinds, so.. it will work for now. Easy to replace I think

      posted in Hardware
      dakipro
      dakipro
    • RE: Recommendation for motorized roller blinds solution (actual motor, like somfy, rollertrol, ebay...)

      At the end I purchased and installed z-wave roller blinds from Swedish company m.nu .

      So far so good, and if all is great, I will order three more motors (and two knobs/switches) for living room and terrace doors (which should also automatically keep the shades open if doors er open, to prevent damage).

      Made a basic node-red flow that uses xiaomi lux sensor to get them down, but ultimate goal is to have them understand when the light is very bright and when it is "cozy", perhaps even knowing to get the blinds just low enough. Found one good explanation on the internet, will check it out (perhaps use multiple lux sensors strategically placed around the room to determine sun position and strength). Any tips and tricks?

      (gif of the action, cannot upload gif to the forum https://media.giphy.com/media/5aY6vSwVn1hsdYC6nd/giphy.gif gif is twice the speed)

      posted in Hardware
      dakipro
      dakipro
    • RE: What did you build today (Pictures) ?

      Installed z-wave roller blinds (discussed on this topic) from Swedish company m.nu .

      If all is great, I will order three more motors (and two knobs/switches) for living room and terrace doors (which should also automatically keep the shades open if doors er open, to prevent damage).

      Made a basic node-red flow that uses xiaomi lux sensor to get them down, but ultimate goal is to have them understand when the light is very bright and when it is "cozy", perhaps even knowing to get the blinds just low enough. Found one good explanation on the internet, will check it out (perhaps use multiple lux sensors strategically placed around the room to determine sun position and strength). Any tips and tricks?

      (gif of the action, cannot upload gif to the forum https://media.giphy.com/media/5aY6vSwVn1hsdYC6nd/giphy.gif )

      posted in General Discussion
      dakipro
      dakipro
    • RE: What did you build today (Pictures) ?

      @sundberg84 these run great on 1.8v BOD with some bootloader I found on the web (linked in the last post here ).

      I use uno to flash the bootloader (tried with some IVRs but never got it to work, so just dedicated one uno prototyping hat for flashing) and then upload the sketch with IDE.

      They are reporting battery from 2v to 3v (0-100%), and previous linked node is now reporting 51% of battery after 6 months, with sensor check every 2min and hearth beat every 4h.

      posted in General Discussion
      dakipro
      dakipro
    • RE: What did you build today (Pictures) ?

      My friend had a leakage from the water heater, luckily he was around (and renting) so not much damage was made, so inspired by the incident I made another water leakage sensor for water heater (reusing the code from my previous "ribbon cable sensor" )

      0_1522788478283_Water leak - water heater-1_1024.jpg

      1_1522788478283_Water leak - water heater-2_1024.jpg

      Then I have an "alarm" flow in node-red (via openhab) which blinks all lights in the house, sends notification to mobile phones with high priority etc. Which brings me a lot of joy when all works fine (and annoys my wife, as usual)...

      They are so easy to made that I might as well make a few of them just for convenience and "feeling rich with sensors" if you guys know what I mean πŸ™‚

      posted in General Discussion
      dakipro
      dakipro
    • RE: Water leakage sensor using thin ribbon cable (testing reliability)

      Then I have an "alarm" flow in node-red (via openhab) which blinks all lights in the house, sends notification to mobile phones with high priority etc. Which brings me a lot of joy when all works fine (and annoys my wife, as usual)...

      posted in My Project
      dakipro
      dakipro
    • RE: Water leakage sensor using thin ribbon cable (testing reliability)

      @NeverDie good tip about tinning, and alu tape. I haven't seen them thought, only copper tape (perhaps I wasn't even looking). I will order some just to have it around if I get extra inspiration.

      Rain sensor is what it says on the store page https://www.mysensors.org/store/water
      1_1522787948453_Water leak - water heater-1_1024.jpg

      0_1522787948453_Water leak - water heater-2_1024.jpg

      posted in My Project
      dakipro
      dakipro
    • RE: Water leakage sensor using thin ribbon cable (testing reliability)

      @NeverDie to be honest I haven't measured anything scientifically as the copper tape is glued to the floor, and it is a bit difficult to test where it is positioned right now, but as mentioned, it is still reacting to the water on it, but I am just having some value over which I send 1 to the controller, so... even if it affects some reading, it is well in the tolerance.
      Only thing I noticed is that there is a bit of tape sticking in front of the appliance, and when we vacuum and mop, i think that we are gradually removing pieces of the tape it self. Which is not that critical for me as that part that was sticking out was basically a measurement error (me being clumsy). Even if I have to replace the tape after a year or so, it is still fine for me as alternative would be sensor with much smaller footprint, thus potentially even missing detecting water if it leaks behind/near the sensor. I've seen a lot of z-wave and also xiaomi sensors that have three pins as sensors, and that is fine but they require quite a lot of water to be triggered. I would rather get notification with first drops of water.

      I have just finished building another one using same sketch and logic, but this time using the usual "Rain Detection Sensor" sensor as this one actually needs to cover only a small area just bellow the valve.
      And I plan to build a few more, just for convenience and "feeling rich with sensors" if you guys know what I mean πŸ™‚

      posted in My Project
      dakipro
      dakipro
    • RE: Water leakage sensor using thin ribbon cable (testing reliability)

      Just wanted to report that node is still running as expected. Now after six months battery is reporting 51%, which is as expected (1 year on set of AAs checking every 2 minutes).
      And it has saved us from buying new flor several times (last time today) by detecting water under the dryer (which will most likely be replaced as it is either broken or stupid as hell, doesn't always detect if filter is full and just spills water on the flor).
      So ribbon cable is working fine as water leakage sensor, and batteries hold good enough πŸ™‚

      posted in My Project
      dakipro
      dakipro
    • RE: What did you build today (Pictures) ?

      @neverdie i think i have the larger ones, but with 3-4$ pricetag one can easily order both and use what works best (or even combine them for more flexibility). I originally planned on using only 4 pipes, but then I figured why not put them all, they will just lie around anyway. Now I have two clamps orientated horizontally and two vertically for easier mounting.

      Battery bank is I winner I think, it is very very practical and holds several hours.
      Even if it goes flat during the project, it is just to plug everything into the wall charger, as one would have to do anyway.

      posted in General Discussion
      dakipro
      dakipro
    • RE: What did you build today (Pictures) ?

      Thanks. About the cnc pipes, just check if they are US or EU threads, as I was initially planning to fasten them with nuts, but couldn't find any US type in scandinavia. So I had to improvise with A LOT washers and heavy screws as seen in the picture. For the base I used old laptop cooling holder (whatever the name is).
      And it works surprisingly well for what I use it, I was expecting it to have a bouncing effect, but it is not that much noticeable.
      Way better then that ebay crappy holder with big magnifying mirror that is just so flimsy and annoying.
      I was planing to dedicate one hose as a solder feeder, but never bothered with it.

      Light is a touch-to-adjust type, very very practical , something like this
      https://www.ebay.com/itm/5X-6-LED-Night-Light-Soshine-USB-Power-1W-5V-Touch-Dimmer-Warm-White-Light-B2L8/282772437504?epid=721587756&hash=item41d68cfa00:g:gZQAAOSw1cNaMlr5

      I also have a switch for a fan on the side, and a volt stepup as the fan works on 12V (9 or 10 is my setting).

      I have glued the magnets on the right on the last photo, they are then actually on the left of the silicone mat where the "compartments" are

      posted in General Discussion
      dakipro
      dakipro
    • RE: What did you build today (Pictures) ?

      not built today, but someone mentioned fumes extractor, so this is what I built for soldering, light and fume extractor are powered by a small usb rechargeable powerbank. Fan has a active carbon filter behind it and works great for small to medium-ish projects I work on

      0_1520939158367_Third-Eighth hand soldering help-1 - IMG_0023_1024.jpg

      1_1520939158367_Third-Eighth hand soldering help-3 - IMG_0039_1024.jpg

      2_1520939158367_Third-Eighth hand soldering help-4 - IMG_0045_1024.jpg

      posted in General Discussion
      dakipro
      dakipro
    • RE: Recommendation for motorized roller blinds solution (actual motor, like somfy, rollertrol, ebay...)

      Thank everyone, I forgot to check the topic (I was thinking email notification would arrive, but got nothing.).
      It looks like most popular/easiest way is to go with using end stop and calculating the position as @Nca78 mentioned above, and this is what I have found that is closest to the commercial solution I am considering.
      https://www.m.nu/rullgardin/motorisera-rullgardin-1-motor-z-wave-24v

      It is a website in Swedish, but basically they have a 24v DC motor and a z-wave Flush shutter from Qubino (as well as adapter for ikea blinds f.eks.). It costs a bit over 180e per window (without the blinds).
      To go with mysensors I guess it would be around 35e for motor from ebay and electronic parts (and printing or making adapters). I guess 60e + time spent on it?
      I would not think much if it is just one window, but I need it for five, so if I can save ~100e for window, there might be some math in the mysensors/diy approach .

      But then there is the WAF where a nice remote would be a must, f.eks. https://www.m.nu/fjarrkontroller/smart-color-button-philio
      which rises the cost in both approaches, but then again these blinds would just have to work, every time.

      In theory, the most difficult part is to make a motor controller that would control the blinds just like mentioned Qubino controller does (which I think I can make, with help from community if needed).
      But then a nice remote would be needed as well, most likely mysensorified one so that it can talk directly to the blinds, thus still controlling the blinds even if gateway or controller er offline. Remote doesn't have to be that beautiful, but since it would be the only visible component, it is very much desirable. (it can be semi-hidden as well, or a nice casing could be used and converted to mysensors, not that huge deal, two buttons in the worst case)

      Because of all this I am highly considering commercial approach, but it would be really cool to have this project realized in diy, to demonstrate how some serious money could be saved (and to save me some money as well πŸ™‚ where some portion would be of course donated to the mysensors again πŸ˜‰ )

      posted in Hardware
      dakipro
      dakipro
    • RE: Recommendation for motorized roller blinds solution (actual motor, like somfy, rollertrol, ebay...)

      @gohan after some more research I agree, I did see on some motors button for reset-setting end points, so I assumed that they might have more logic in them. But it looks like that built-in end point control is for the 433mhz models only, as they send/receive plain on/off/myLocation messages, and the motor must figure out where to go on its own.

      I was a bit confused as I have found f.eks. this project https://www.openhardware.io/view/22/Roller-Shutter-Node that only supports motor with three wires. All motors I have found are two wires.

      I guess that with modifications a two wire motor can be used as well, by of reversing the polarity and counting the time to determine start/stop and percentage? (eventually using physical switches for calibration and to determine where the start/stop are)

      posted in Hardware
      dakipro
      dakipro
    • Recommendation for motorized roller blinds solution (actual motor, like somfy, rollertrol, ebay...)

      Hi,
      I would like to have motorized blinds that can report current state and can be controlled from several sources (manually via button, remotely via mqtt etc) and also be "percentage" controllable, meaning shut only 30% or so.
      I can fix pretty much all with mysensors, but motor itself is a tricky part, I would like it to be robust and "properly" done (easiest is with commercial products).

      I leave in Norway, Europe and I have not yet ordered any motor, still checking out options. I saw recommendations about Somfy motors (I also like that they can run on batteries). But from what I have understood the motor needs to have 3 wires (neutral and up and down) for arduino to determine current percentage? or is it?
      They are also natively 433mhz, and I have rfLink for 433 comunication but again there is issue of keep state synchronized with multiple inputs (physical remote, mqtt, etc...)

      I was considering something from ebay as well, but again, two vs three wires for mysensors, can that work somehow?

      f.eks. https://www.ebay.com/itm/DC-24V-30RPM-DIY-Electric-Roller-Blind-Shade-Tubular-Motor-Holder-Kit/253225599792

      Open to suggestions about any solution, if it helps I have rflink for 433 communication, I do have z-wave, xiaomi controllers if some of these can do it easier.

      Would like hear what people would recommend for blinds?

      posted in Hardware
      dakipro
      dakipro
    • RE: πŸ’¬ Easy/Newbie PCB for MySensors

      @Mr_sensor It happened to me once that capacitor was just shortening the circuit, it was a smd, but when I removed it and tested it it was constantly making shortage, thus the circuit was never working and luckily my power supply had a low enough protection.
      I examined cap very closely, all looked fine, but internally it was not working fine.

      Since most of us (well, me at least) are buying cheap components I made it a habit now to always measure every passive component before installation, partly eliminates one variable

      posted in OpenHardware.io
      dakipro
      dakipro
    • RE: Watchdog to notify when sensor offline using Node Red

      Very simple solution, but I just put up a single flow (called watchdog of course) that subscribes to "hart beat" and value topics of items I am watching (in my case via openhab, but principle is the same for vanilla mqtt) and then have a "timeout node" for each item. Timeout node triggers if no message comes in in a predefined period (per item, some send data every few minutes, some every few hours) But each arduino node has defined hart-beat interval

      In my case all timeouts go to a function that formats a message in format "<itemname> not seen in <timeframe>" and that is logged and sent to an email once a day. But you can as well put it into a dashboard as Yveaux showed.

      I also like use of subflows whenever possible, but in my case all is happening on one flow and in two nodes, one that connects to mqtt hearbeat and one node that triggers if no data comes in (sorry I forgot the name, but it is a default node-red node)

      posted in General Discussion
      dakipro
      dakipro
    • RE: SCT-013-030 Energy Meter

      After some research I realized that this cannot work with two wires as they cancel each other.
      After some googling I have found this https://moderndevice.com/product/a1324-hall-effect-sensor/ in description they mention that it can do what I want, to detect if appliance is on or off even if two wires are in close proximity. They mention that you could detect 100W, although I am planning to monitor if stove is on or off, which is I assume more then 100w.
      They also have more precise "boosted" version that is more precise https://moderndevice.com/product/current-sensor/ but I think I do not need it for now.

      posted in My Project
      dakipro
      dakipro
    • RE: SCT-013-030 Energy Meter

      Ok so it will not work around both wires?
      You can not clamp it around extension cable and measure "something"?

      I basically just want to detect if stove is on or off, i was hoping to see at least a blip or anything really, can leave without actual numbers..

      posted in My Project
      dakipro
      dakipro
    • RE: SCT-013-030 Energy Meter

      Thank for sharing the code and schematics, I cannot get it to run however, I always get 0 value whatever I do. Anyone has a suggestion about how to test this sensor the easiest way?

      I have sct 013 030 sensor, and I connected it using the schematics provided here, I tried even the most basic examples I could find using EmonLib, I tried some basic examples using analog read and what not, but nothing seemed to work properly, I would always get either 0 or some fixed value.
      I am connecting "first" and "last" conneciton on 3.5mm jack, but I also tried all combinations, and nothing seems to make a diffference.
      I am using two resistors of 20Kohm as splitters, I am getting 2.43v between both side of them (using nano on 5V).
      I am wrapping the module around the cable of the water cooker for example, which is 1.5KW, but values never change at all. It is either 0 or some max value (46A f.eks.) either with or without the load.
      I was trying both nano and pro mini, same thing happens. Checked the circuit and connection between components several times.
      This is the simplest code I found on the internet (not even mysensorized)

      void setup() {
      	
      	Serial.begin(9600);
      	analogReference(INTERNAL);
      	//analogReference(INTERNAL1V1); //solo Arduino Mega
      }
      
      void loop() {
      	
      	float Irms=get_corriente(); //Corriente eficaz (A)
      	float P=Irms*220.0; // P=IV (Watts)
      
      	Serial.print("Irms: ");
      	Serial.print(Irms,3);
      	Serial.print("A, Potencia: ");
      	Serial.print(P,3);
      	Serial.println("W");
      	//delay(100);
      }
      
      float get_corriente()
      {
      	float voltajeSensor;
      	float corriente=0;
      	float Sumatoria=0;
      	long tiempo=millis();
      	int N=0;
      	while(millis()-tiempo<500)//DuraciΓ³n 0.5 segundos(Aprox. 30 ciclos de 60Hz)
      	{
      		voltajeSensor = analogRead(A0) * (1.1 / 1023.0);////voltaje del sensor
      		corriente=voltajeSensor*30.0; //corriente=VoltajeSensor*(30A/1V)
      		Sumatoria=Sumatoria+sq(corriente);//Sumatoria de Cuadrados
      		N=N+1;
      		delay(1);
      	}
      	Sumatoria=Sumatoria*2;//Para compensar los cuadrados de los semiciclos negativos.
      	corriente=sqrt((Sumatoria)/N); //ecuaciΓ³n del RMS
      	return(corriente);
      }
      

      Could it be that here in Norway we use two "phases" in the house? (or I could be wrong here either).

      What is the most easy "idiot" proof way of testing this and getting some values? What could I be doing wrong?
      Should I just order another sensor, can this "simple" sensor even be wrong?

      Any clues, anyone?

      posted in My Project
      dakipro
      dakipro
    • RE: πŸ’¬ FOTA (Wireless Programming)

      @gohan yes, but can it FOTA? πŸ™‚
      Never saw pro mini with mega chips btw (or didn't know the difference), do you have any links maybe?

      posted in Announcements
      dakipro
      dakipro
    • RE: πŸ’¬ FOTA (Wireless Programming)

      @gohan never saw your reply sorry.
      I am assuming I need more then two interrupts as I would like to have several buttons and sensors to the node. I am building a "information" node from an old lamp that will have a pir, lcd, temp, rgb led. Also a proximity and few others like microphone from the secret knock example, air quality, buzzer.
      I guess I could get away with checking on sensor/buttons state on each cycle since it is not a battery powered sensor, but I assume I will need more memory anyway for all the libs.

      (I know that perhaps the raspberry is better for this task, but... would like to push arduino and myself a bit more πŸ™‚ )

      posted in Announcements
      dakipro
      dakipro
    • RE: πŸ’¬ NModule Temperature, Humidity, Light, Door sensor shield

      No idea to be honest... It is the same node that was working fine, then something killed the battery (in the same timeframe when it was touched), then I removed light sensor MAX44009 and it worked fine with new battery, but then again similar thing happened just recently.

      It sounds reasonable that it could be that radio gets stuck when being touched and then never connects again. Node was actually moved closer to the gateway, so I don't think it is the range issue.

      The code is the one you provided (somewhere), I just modified few lines about interval if I remember correctly (I changed it to 5min i think).

      Just reporting if someone else experiences the similar behavior

      posted in OpenHardware.io
      dakipro
      dakipro
    • RE: πŸ’¬ NModule Temperature, Humidity, Light, Door sensor shield

      It happened again, my wife moved the sensor (which was, you guessed it, without enclosure) and it stopped working due to empty battery. And of course, to make debugging more difficult, this happened with similar 2-3 months period since it happened last time. Since you have some nodes whose battery lasts more then a few months, it has to be something mechanical that happens and shortens the battery, or that another combination of circumstances empties the battery and that the node doesn't manage to report correct voltage/capacity.

      Doesn't have to mean anything significant, except the "motivation" for people to make a housing for the nodes πŸ™‚

      posted in OpenHardware.io
      dakipro
      dakipro
    • RE: Recommendation for various connectors (for probes, sensors, power etc)

      Thanks, I quite like the first suggestion as it keeps all "in the standard" since I have a bunch of dupont cables already. I will definitely order one kit for cable-to-cable connections. Thanks for the video.

      The second suggestion you mentioned actually arrived today, I totally forgot that I have even ordered it. It looks useful for on-pcb connectors, as the male part can be soldered directly to a pcb. Looks promising for cable-to-pcb connections.

      Would love to hear more suggestions as well

      posted in Hardware
      dakipro
      dakipro
    • Recommendation for various connectors (for probes, sensors, power etc)

      Hi,
      almost every my project need some sort of connector that could be detached from the board. For power I usually use a variation of these type wires with connectors https://www.ebay.com/itm/10Set-2Pin-Male-Female-Connector-Cable-Wire-Terminal-Connect-for-LED-Light-DIY/202155561960? or I use the variation of these standard power jacks that are already on some power adapters https://www.ebay.com/itm/3-5mm-x-1-35mm-Right-Angle-DC-Power-Cable-Male-Plug-Connector-Adapter-Plastic/301039573320? .
      These are great as there are variants of these that can easily be fixed on the case itself, making the box easy to detach from power and other connectors. I also use 3.5mm audio cable as it has more then 2 pins.
      But almost all sensors need more then two pins, most need 3 but some lcd might need 5, 7 or what not.
      For those I would sometimes be creative and use male-female dupont cable, cut it in half and glue the male pins together (the black plastic at the end, same for female ones). That way I would have them color coded and not be confused what went where.

      But is there a better solution? What do you recommend as a flexible/universal and reliable connector?
      If possible not very bulky as it might be sited inside the projects enclosure. What do you guys use?

      posted in Hardware
      dakipro
      dakipro
    • RE: Is ARM the future of MySensors?

      @yveaux said in Is ARM the future of MySensors?:

      @dakipro said in Is ARM the future of MySensors?:

      If nrf24 working on same/similar frequency as wifi

      The frequency band of nrf24 is wider than used by wifi. If you select a frequency just outside the wifi band it should help in reducing interference.

      Thanks, that is what I thought. Btw, I am using default channel for mysensors (79 or whatnot), is that "just outside" enough?
      I never had (connection) problems with mysensors, so I never researched fine-tuning options.

      Can some android wifi analyzer help with the showing what is best to use, is there some guide available regarding nrf24? (should we write a guide? πŸ™‚ )

      posted in General Discussion
      dakipro
      dakipro
    • RE: Is ARM the future of MySensors?

      @nca78 said in Is ARM the future of MySensors?:

      there are 350 appartments in my building alone and my nrf24 network runs well

      If nrf24 working on same/similar frequency as wifi, is it not being disturbed by other wifi networks? (I guess that in 350 apartments there are a minimum of 350 wifi networks).
      I never quite understood how exactly nrf24 and wifi go along.

      posted in General Discussion
      dakipro
      dakipro
    • RE: Whole house power monitoring.

      @gohan said in Whole house power monitoring.:

      Why would want energy harvesting on an energy meter that

      I live in building where meter is in a common locker, thus no plugs nor power supplies.

      posted in Hardware
      dakipro
      dakipro
    • RE: Whole house power monitoring.

      quick google search gave me this https://electronics.stackexchange.com/questions/189425/leach-circuit-to-power-microcontroller

      posted in Hardware
      dakipro
      dakipro
    • RE: Whole house power monitoring.

      Interested in the topic as well.
      Also, would it be possible get the power for arduino from the clamp itself, wirelessly? πŸ˜„
      or you must have separate power source for arduino (I know this later is the case, but... you never know what smart people here can come up with)

      posted in Hardware
      dakipro
      dakipro
    • RE: πŸ’¬ FOTA (Wireless Programming)

      as a node, I want to build one ambitious notification node with a bunch of functionality, Due to number of interrupts i would like to have (and total sensors as well) it would have to be a mega board.

      It would be physically located in other part of the house, so wireless programming would be awesome if possible πŸ™‚

      posted in Announcements
      dakipro
      dakipro
    • RE: πŸ’¬ FOTA (Wireless Programming)

      Is it possible to use this bootloader with arduino Mega boards (mega 2560)?
      What should be set in boards.txt then?

      posted in Announcements
      dakipro
      dakipro
    • RE: openHAB 2.2 binding MQTT support

      That is great, I've been a bit inactive with mysensors (moving and family and things) but it should be now possible to ask gateway to present all nodes (ask nodes to present themselves) and add them as things/items?
      I personally prefer to have items configured in the files, but having them autodetected via mqtt and added trough paperUi is definitely an awesome feature, completes the integration via plugin and its functionality.

      I've played yesterday with MyController https://www.mysensors.org/controller/mycontroller and I've seen that it has support for all those things over mqtt (get items info, auto add them). It can also do FOTA over mqtt, something no other controller is capable of doing today (not even famous MySController that originally introduces FOTA). I am sure you can find some inspiration in MyController code about how it is done, when the time comes πŸ™‚

      My plan was to use MyController only for maintenance and remote update of nodes, but unfortunately I wasn't able to set it up to work, got a bunch of exceptions when I tried to add nodes to it. I will try previous version, but if this would be supported in openhab, that would benefit both platforms, a LOT πŸ™‚

      posted in OpenHAB
      dakipro
      dakipro
    • RE: openHAB 2.2 binding MQTT support

      This is great, it will certainly simplify usage of mySensors over mqtt. I remember that it took me 4-5 hours to set everything up. (I did learn a lot about mqtt and openhab, but still).
      It is still early to mention it, but... if you can somehow get FOTA to work over mqtt from openhab (even if it is via console or whatever), than you are the rock star! πŸ™‚

      posted in OpenHAB
      dakipro
      dakipro
    • RE: πŸ’¬ Easy/Newbie PCB for MySensors

      hey, has anyone maybe made a fritzing drawing/component of the board?
      I know, I'm lazy as f but.. since the board is that easy, documenting with it could be easy as well πŸ™‚

      posted in OpenHardware.io
      dakipro
      dakipro
    • RE: What did you build today (Pictures) ?

      @sincze said in What did you build today (Pictures) ?:

      her favourite radio channel at her prefer

      @sincze hi, could you elaborate a bit more the TV messages, do you have any link with more info? Was that the LG tv with Mqtt that was mentioned on the forum?(or I mixed forums)

      posted in General Discussion
      dakipro
      dakipro
    • RE: Experiences with arduino Mega in a small package(Mega2560-CORE)? Alternative arduino with more memory?

      At these prices, I ordered a couple of them, just because all the cool kids have them πŸ™‚

      I was thinking, that (on top of all already ambitious functionality) it would be nice to have a Firmware over the air functionality wouldn't it, as I am certainly going to need to debug and fix the code... So in the end I might split the functionality in two/three pro minis, or if I manage to make Mega do FOTA (didn't find much info about someone doing it already).
      But then there is maybe issue with proximity of the radios in the box which is an old round lamp, radius 10ish cm. I guess I will have to wait for the boards to see how will it all fit together...

      posted in Hardware
      dakipro
      dakipro
    • RE: Wall mounted 'mood light' v2

      If someone still needs it, I managed to control it via mqtt (node-red). I am about to integrate it into the openhab, it might be easier to start that but I wanted to have good control over it (and understand mqtt a bit better).
      In sketch I had to change

      } else if (message.type == V_DIMMER) { // if DIMMER type, adjust brightness
      

      to V_PERCENTAGE for latest api/mqtt

      and I am still struggling a bit to turn all LEDs off completely. Only way I could achieve this was to set color to black (000000). code as it is always leaves my LEDs to 1% or something. But that might be due to node-red implementation, as I do not have response from node-red on "questions" from the node (at some point in code node will ask controller about some values (color if I remember correctly), but I just send the color and brightness manually via injectors). I guess this can be fixed on the controller side, and most likely works with openhab implementation.

      Here are the triggers in node-red

      0_1511731871029_Screenshot 2017-11-26 22.30.28.png

      Here is the node-red code

      [{"id":"8f6785a0.874838","type":"debug","z":"8cfe95c3.331248","name":"","active":true,"console":"false","complete":"false","x":1210,"y":180,"wires":[]},{"id":"a300f395.f6e59","type":"mqtt out","z":"8cfe95c3.331248","name":"","topic":"mygateway1-in/50/5/0/0/3","qos":"","retain":"","broker":"9daccc99.b6c71","x":490,"y":680,"wires":[]},{"id":"45adf375.e59b6c","type":"inject","z":"8cfe95c3.331248","name":"9 - pOff","topic":"","payload":"9","payloadType":"str","repeat":"","crontab":"","once":false,"x":170,"y":640,"wires":[["a300f395.f6e59"]]},{"id":"859588e.a1bec78","type":"mqtt out","z":"8cfe95c3.331248","name":"","topic":"mygateway1-in/50/1/0/0/40","qos":"","retain":"","broker":"9daccc99.b6c71","x":560,"y":180,"wires":[]},{"id":"39b0ef0e.94ef","type":"inject","z":"8cfe95c3.331248","name":"","topic":"","payload":"22FF22","payloadType":"str","repeat":"","crontab":"","once":false,"x":210,"y":160,"wires":[["859588e.a1bec78"]]},{"id":"9dabd8f3.6033b8","type":"inject","z":"8cfe95c3.331248","name":"Alarm pattern","topic":"","payload":"1","payloadType":"str","repeat":"","crontab":"","once":false,"x":250,"y":40,"wires":[["3a117d06.451d12"]]},{"id":"3a117d06.451d12","type":"mqtt out","z":"8cfe95c3.331248","name":"","topic":"mygateway1-in/50/4/1/0/2","qos":"","retain":"","broker":"9daccc99.b6c71","x":560,"y":40,"wires":[]},{"id":"e3c2d218.e92dc","type":"mqtt out","z":"8cfe95c3.331248","name":"","topic":"mygateway1-in/50/4/1/0/2","qos":"","retain":"","broker":"9daccc99.b6c71","x":550,"y":80,"wires":[]},{"id":"5325f52d.2549fc","type":"inject","z":"8cfe95c3.331248","name":"Alarm OFF","topic":"","payload":"0","payloadType":"str","repeat":"","crontab":"","once":false,"x":230,"y":80,"wires":[["e3c2d218.e92dc"]]},{"id":"f9bc44c0.c1f2d8","type":"mqtt in","z":"8cfe95c3.331248","name":"Magic Ball #50","topic":"mygateway1-out/50/#","qos":"2","broker":"9daccc99.b6c71","x":920,"y":180,"wires":[["8f6785a0.874838"]]},{"id":"6a07f043.d5e8a","type":"comment","z":"8cfe95c3.331248","name":"node-id / child-sensor-id / command / ack / type / payload","info":"","x":1030,"y":60,"wires":[]},{"id":"f71ad6cd.2044a8","type":"inject","z":"8cfe95c3.331248","name":"","topic":"","payload":"2222EE","payloadType":"str","repeat":"","crontab":"","once":false,"x":210,"y":200,"wires":[["859588e.a1bec78"]]},{"id":"44e58ecb.748fb","type":"inject","z":"8cfe95c3.331248","name":"","topic":"","payload":"991122","payloadType":"str","repeat":"","crontab":"","once":false,"x":210,"y":240,"wires":[["859588e.a1bec78"]]},{"id":"a91be428.b74eb8","type":"comment","z":"8cfe95c3.331248","name":"Set color manually","info":"","x":170,"y":120,"wires":[]},{"id":"90b541d2.c2abf","type":"mqtt out","z":"8cfe95c3.331248","name":"","topic":"mygateway1-in/50/1/0/0/3","qos":"","retain":"","broker":"9daccc99.b6c71","x":550,"y":340,"wires":[]},{"id":"91fe4122.027e3","type":"inject","z":"8cfe95c3.331248","name":"","topic":"","payload":"80","payloadType":"str","repeat":"","crontab":"","once":false,"x":190,"y":320,"wires":[["90b541d2.c2abf"]]},{"id":"47bc1da0.380374","type":"inject","z":"8cfe95c3.331248","name":"","topic":"","payload":"20","payloadType":"str","repeat":"","crontab":"","once":false,"x":190,"y":360,"wires":[["90b541d2.c2abf"]]},{"id":"baa820db.90109","type":"inject","z":"8cfe95c3.331248","name":"","topic":"","payload":"2","payloadType":"str","repeat":"","crontab":"","once":false,"x":190,"y":400,"wires":[["90b541d2.c2abf"]]},{"id":"709b3196.8abe","type":"comment","z":"8cfe95c3.331248","name":"Set brightnes manually","info":"","x":180,"y":280,"wires":[]},{"id":"1cf7aba7.c34224","type":"mqtt out","z":"8cfe95c3.331248","name":"","topic":"mygateway1-in/50/1/0/0/2","qos":"","retain":"","broker":"9daccc99.b6c71","x":550,"y":480,"wires":[]},{"id":"4263529d.67e44c","type":"inject","z":"8cfe95c3.331248","name":"","topic":"","payload":"1","payloadType":"str","repeat":"","crontab":"","once":false,"x":190,"y":480,"wires":[["1cf7aba7.c34224"]]},{"id":"2528b5c4.d1bc6a","type":"inject","z":"8cfe95c3.331248","name":"","topic":"","payload":"0","payloadType":"str","repeat":"","crontab":"","once":false,"x":190,"y":520,"wires":[["1cf7aba7.c34224"]]},{"id":"e2707070.7e9dc","type":"comment","z":"8cfe95c3.331248","name":"Toggle last brightnes (not needed?)","info":"","x":200,"y":440,"wires":[]},{"id":"3b8f804c.e92f7","type":"inject","z":"8cfe95c3.331248","name":"18 - pOn","topic":"","payload":"18","payloadType":"str","repeat":"","crontab":"","once":false,"x":180,"y":680,"wires":[["a300f395.f6e59"]]},{"id":"d9d700e9.90d03","type":"inject","z":"8cfe95c3.331248","name":"27 - pFire","topic":"","payload":"27","payloadType":"str","repeat":"","crontab":"","once":false,"x":180,"y":760,"wires":[["a300f395.f6e59"]]},{"id":"b2cd2709.3706e8","type":"inject","z":"8cfe95c3.331248","name":"0 - pSolid","topic":"","payload":"0","payloadType":"str","repeat":"","crontab":"","once":false,"x":180,"y":600,"wires":[["a300f395.f6e59"]]},{"id":"a3c976d.8dbe488","type":"comment","z":"8cfe95c3.331248","name":"Patterns: pSolid, pOff, pOn, pAlarm, pFire, pFire2, pCandle, pCircle, pSinelon, pRainbow","info":"","x":660,"y":640,"wires":[]},{"id":"667c092c.9b9298","type":"inject","z":"8cfe95c3.331248","name":"36 - pFire2","topic":"","payload":"36","payloadType":"str","repeat":"","crontab":"","once":false,"x":180,"y":800,"wires":[["a300f395.f6e59"]]},{"id":"ca6823c6.a674","type":"inject","z":"8cfe95c3.331248","name":"25 - pAlarm","topic":"","payload":"25","payloadType":"str","repeat":"","crontab":"","once":false,"x":190,"y":720,"wires":[["a300f395.f6e59"]]},{"id":"75c152f3.3c287c","type":"inject","z":"8cfe95c3.331248","name":"45 - pCandle","topic":"","payload":"45","payloadType":"str","repeat":"","crontab":"","once":false,"x":190,"y":840,"wires":[["a300f395.f6e59"]]},{"id":"6da316d0.eebd68","type":"inject","z":"8cfe95c3.331248","name":"53 - pCircle","topic":"","payload":"53","payloadType":"str","repeat":"","crontab":"","once":false,"x":190,"y":880,"wires":[["a300f395.f6e59"]]},{"id":"2c15c208.c1db0e","type":"inject","z":"8cfe95c3.331248","name":"62 - pSinelon (blocks all!)","topic":"","payload":"62","payloadType":"str","repeat":"","crontab":"","once":false,"x":230,"y":920,"wires":[["a300f395.f6e59"]]},{"id":"431aad05.60f7e4","type":"inject","z":"8cfe95c3.331248","name":"","topic":"","payload":"66 - rainbow","payloadType":"str","repeat":"","crontab":"","once":false,"x":190,"y":960,"wires":[["a300f395.f6e59"]]},{"id":"b1b44b6e.1492a8","type":"comment","z":"8cfe95c3.331248","name":"Set pattern","info":"","x":100,"y":560,"wires":[]},{"id":"70d088e7.889c98","type":"inject","z":"8cfe95c3.331248","name":"0 - doesn't work, use color black","topic":"","payload":"0","payloadType":"str","repeat":"","crontab":"","once":false,"x":390,"y":400,"wires":[["90b541d2.c2abf"]]},{"id":"d5d24b03.2a6288","type":"inject","z":"8cfe95c3.331248","name":"000000 - black turns led off","topic":"","payload":"000000","payloadType":"str","repeat":"","crontab":"","once":false,"x":430,"y":240,"wires":[["859588e.a1bec78"]]},{"id":"9daccc99.b6c71","type":"mqtt-broker","z":"","broker":"localhost","port":"1883","clientid":"","usetls":false,"compatmode":false,"keepalive":"60","cleansession":true,"willTopic":"","willQos":"0","willPayload":"","birthTopic":"","birthQos":"0","birthPayload":""}]
      
      posted in My Project
      dakipro
      dakipro
    • RE: Experiences with arduino Mega in a small package(Mega2560-CORE)? Alternative arduino with more memory?

      Ok now I see that I never knew that arduino zero (m0?) exists at all 😞 That one might be the right choice for me, but I didn't find much resources online about people using and recommending them.

      I didn't knew that SAMD21 is same/similar to ATSAM (or is it?). Honestly, I am still lost πŸ™‚

      The one you @Nca78 linked might be exactly what I need, (if) it has more then 2-4 interrupt pins, and 10-15ish digital pins, and I think this one does have all of that.
      I am currently setting a goal on connecting a lcd (or oled) , some buzzer, LED ring, microphone for secret knocker project, some usual "simple" sensors like motion, proximity, lux, temperature, air quality.
      It is ambitious but I hope I will learn a lot about sensors and programming by gradually adding complexity and sensors.

      I appreciate suggestions, perhaps some of mentioned boards might find its way into the store, to help others with same question. The reason I really enjoy mysensors community and project (besides useful things around the house) is possibility to gradually learn new things, by fallowing the experience of others. Having the "store" is also very helpful as one doesn't have to wonder (much) what to purchase and what is compatible and how will it work, whilst still giving a lot of room for "I made this on my own" feeling πŸ™‚

      posted in Hardware
      dakipro
      dakipro
    • RE: Experiences with arduino Mega in a small package(Mega2560-CORE)? Alternative arduino with more memory?

      Can you @Nca78 link to one "recommended"?
      You mentioned they are similar price, but all i have found are 25e+ which is worth it I guess, but... its is 5 arduino megas πŸ™‚

      posted in Hardware
      dakipro
      dakipro
    • RE: Experiences with arduino Mega in a small package(Mega2560-CORE)? Alternative arduino with more memory?

      Thanks, I have ordered standard Mega hoping it will just fit. I will need more then 2 interrupt pins and would like to drive a display, and some leds and microphone and what not. Notice the "would like" as I am sure I will reach the point where it will be pointless to continue with my ambition, but hey... its a hobby πŸ™‚

      @reinhold Thanks for the tip about the shield, I didn't know one exists, that will help prototyping a LOT easier πŸ™‚

      posted in Hardware
      dakipro
      dakipro
    • RE: Experiences with arduino Mega in a small package(Mega2560-CORE)? Alternative arduino with more memory?

      I've been looking now about it, it looks like a "drop in" replacement for a arduino with a radio?
      Have you @gohan worked with it, if so how was your experience?

      I am a bit unsure if it is used widely enough or would I be one of the pioneers (actually unsure if I have enough experience/will to be one). If it is a fully (or mostly) compatible with arduino/mysensors/examples and sketches then it would be awesome.

      I have very optimistic project ahead of me and I am certain I will have a lot of challenges with the project itself without introducing more variables then needed.

      Is it just to order f.eks. this one https://www.ebay.com/itm/NRF52832-Development-Board-Wireless-Bluetooth-Transceiver-Module/332127356835 ?
      and use programator?
      Do you happen to have some tutorial about how to get started, what other things are needed beside the module itself?

      Looks very interesting, I like most that radio is already on board, avoiding the need to connect it to arduino (the most tedious part of my sensors)

      posted in Hardware
      dakipro
      dakipro
    • Experiences with arduino Mega in a small package(Mega2560-CORE)? Alternative arduino with more memory?

      Hi, I am building one ambitious multi-sensor/light/display with a bunch of functionality and I will most likely need a mega board due to bigger memory. I have found these on ebay https://www.ebay.com/itm/Mega2560-CORE-mini-2560-ATMega2560-Arduino-Compatible-free-shipping/221502571388?
      or this with usb
      https://www.ebay.com/itm/New-Small-Meduino-Mega2560-R3-Pro-Mini-ATMEGA16U2-Arduino-Mega2560-Compatible/162593120251?

      I see ok reviews on the ebay, but has anyone here worked maybe with something like this?
      Or would you recommend some other Arduino that has more memory then pro mini, and is relatively compact.
      Size is not critical, but regular Mega does not fit in my project at the moment

      posted in Hardware
      dakipro
      dakipro
    • RE: πŸ’¬ NModule Temperature, Humidity, Light, Door sensor shield

      Good news, node works as expected after I removed the light sensor and changed the battery.

      After removing MAX44009 light sensor and testing again, i realized that I was connecting both plus and minus to the same pin 😒 that is why power supply was showing shortage 😞

      Unfortunately, I am not very skilled at desoldering so light sensor is not usable anymore. I cannot tell if that sensor was actually the problem or not (most likely not).

      But it looks like the battery has just depleted. After I took it out of the node, it was showing 1.3v then I tested with power supply (connecting it wrong) and that is why I assumed I have fried something. I changed the battery and module is working fine now. Strange is that it was reporting 100% battery level all the time, and while assembling I was changing voltage on the power supply down to 2.4V and it was reporting 40% as expected.
      So... it is not impossible that something depleted the battery the day I touched the sensor, logs show exact time it stopped working (when I touched it).

      But I will consider it as a false alarm for now, and time will tell... I hope πŸ™‚
      Thanks everyone for assistance!

      posted in OpenHardware.io
      dakipro
      dakipro
    • RE: πŸ’¬ NModule Temperature, Humidity, Light, Door sensor shield

      I just managed to fry the only working module I've build so far (life got some other plans for my spare time).
      I just took it in a hand to show it to a friend, and logs show no activity since. The battery was 99%, and now it is 1V. I tried powering it from the power supply, but the voltage drops from 3V to 0.1V, indicating that something is shorting it out. Resistance between gnd and vcc is not 0, so it is not direct connection between them, but I guess static did its thing and some component died, leaving entire module non-functioning 😞
      So... when you build one, make sure you put it in the case and do not touch it with bare hands
      (I remember holding it on the edges to avoid touching the circuits, but I still managed to fry it)

      posted in OpenHardware.io
      dakipro
      dakipro
    • RE: RGB Controller Addressable led strip

      @matthewdllh hi, did you have any luck with the strips? I am considering those as well. Can you share the link from where you purchased them? Maybe some more info about the project if you got any success with it?
      Thanks!

      posted in Hardware
      dakipro
      dakipro
    • Optimisation for button cells (CR2032 and the likes)

      Hi,
      I started using nModule, https://forum.mysensors.org/topic/6902/nmodule-temperature-humidity-light-door-sensor-shield/
      very small node running on (among others) CR2032 button cell battery. @Nca78 has provided some "seed" sketch that is optimized for CR batteries and it works very good, so I was thinking if such optimizations could be implemented in the NodeManager itself for button cell batteries?
      Here is the mentioned sketch https://www.openhardware.io/view/398/NModule-Temperature-Humidity-Light-Door-sensor-shield#tabs-source
      I am not an expert, but by looking at the sketch, main optimizations are done relatively simple, f.eks. short 400ms sleeping between each data sending, short sleep after presentation, and I guess a few other relevant things (maybe voltage reporting could/should be set differently).

      I was considering opening feature request on github, but I was hoping that people who have more experience with button cells would come with more suggestions about what is important so that the nodeManager could be THE plugin for rapid development of battery-powered sensors.
      Having this delay between sends (if not already supported) would be a great start. Maybe having a method or a setting in the power management specifically for button cell batteries?

      posted in NodeManager
      dakipro
      dakipro
    • RE: πŸ’¬ NModule Temperature, Humidity, Light, Door sensor shield

      Ok, that certainly throws a new light on the matter 😞
      Thanks for the info, I will throw all ultrafire I have at home (before I get what their name suggests) and buy some from a trusted brand.
      Cheers!

      posted in OpenHardware.io
      dakipro
      dakipro
    • RE: πŸ’¬ NModule Temperature, Humidity, Light, Door sensor shield

      Hey, do you have any experience with rechargable CR123, regarding the "capacity/voltage loss curve" or what the name is?
      Meaning if rechargeable cr123 would hold enough voltage over time, as the lithium(?) ones doe?
      I found these for a nice price, I have positive experience with Ultrafire http://www.dx.com/p/ultrafire-3-6v-880mah-lc-16340-protected-cr123a-battery-2-pack-3273

      posted in OpenHardware.io
      dakipro
      dakipro
    • RE: πŸ’¬ Dollhouse

      Awesome project, I wish I made something like this.
      (I actually wanted to make something like this when I was in school)
      Very clean and nice presentation and realization, with a lot of attention to details. All is very realistic, I can imagine that it took quite some time making it.
      Thanks for sharing the details!

      posted in Announcements
      dakipro
      dakipro
    • RE: πŸ’¬ NModule Temperature, Humidity, Light, Door sensor shield

      I see. How about using CR123 battery for such a "all-in-one" sensor, I see it has 5-6 times capacity of CR2032.
      Would it be able to drive such sensor for a year perhaps (i know it is impossible to say, but just speculating)?
      Or two AAAs?

      posted in OpenHardware.io
      dakipro
      dakipro
    • RE: πŸ’¬ NModule Temperature, Humidity, Light, Door sensor shield

      As mentioned on the nModule thread, I finally managed to get it to work.
      And as usual, I have a few questions @Nca78 πŸ™‚

      From your photos of the module, you have a door sensor separate from the light/temperature, is that only "strategical" choice, or is it some technical limitation?
      Meaning, would it be possible to have all of them on one sensor, as TempHumLighDoor sensor?

      And I might be pushing it now, but... would it be possible to add a motion sensor on top of that? Can you connect two sensors on same interrupt pin? (both interrupts are occupied by the no-nc door sensor, thus leaving no interrupt for motion sensor) or is there some fancy trick that would allow both of them to be "interruptable"?

      posted in OpenHardware.io
      dakipro
      dakipro
    • RE: πŸ’¬ NModule

      It is great to hear that OTA update is coming soon @Nca78 looking forward to the tutorial πŸ™‚

      posted in OpenHardware.io
      dakipro
      dakipro
    • RE: πŸ’¬ NModule

      IT WORKS!! Life is worth living again...
      I've assembled now fourth module and it works, only different thing I did is that I have soldered the radio and power jumpers before connecting the module together. It could be that without jumpers essential component of all electronics (white smoke) gets out of the radio, not sure what happened. But it works!

      I was struggling a bit to figure out all components needed and all the steps, it might be helpful to have a "short guide", this is for my own reference of what I did in order to get CR2032 module for using with TempHumDoor shield:

      Components needed [nModule]: pro mini, radio, nmodule board, 1 capacitor for radio larger then 4.7uf (I har only 10uf, I have ordered 47uf for future modules).

      Assembling process

      • Burn 1mhz bootloader on pro mini
      • solder two jumpers for jpower and jrdio
      • solder the radio to the board
      • Control that there is no connection between the radio pins, resistance is at least above 200Kohm (don't skip this part thinking it cannot happen to you, it will happen)
      • Solder >4.7uf (f.eks. 10ud) smd.
      • Solder all legs to arduino (except last two RXI and TX0, you will see them missing when you align nModule)
      • Take off the plastic from the legs, before you solder it to the radio (do this BEFORE you solder it to the board)
      • Solder arduino to nModule board
      • Since the capacitor is very small, just check if there is no short between plus and minus (vcc and gnd) pins, as somehow I managed to short them on one module, it turned out that one of the caps was shorting it, probably by overhitting or something.

      Upload mockMySensors sketch and check that node works properly (spare yourself a trouble, no point continuing further if this doesn't work) By this point you should have node looking like (better then) this:

      0_1506632551397_THD nModule 3 - IMG_0730_1024.jpg

      TempHumidityLightDoor shield components: SMD SI7021 for temperature and humidity and a MAX44009 for light, two capacitors larger then 100uf (I used two of 100uf, waiting for 220 to come). And the work so far.

      You basically solder these three/four components and the battery holder as described on the shield here https://www.openhardware.io/view/398/NModule-Temperature-Humidity-Light-Door-sensor-shield
      I didn't yet solder LEDs, but they are accessible after assembling the module.
      Then it looks like this:

      0_1506633186422_THD nModule 4 - IMG_0725_1024.jpg

      0_1506633204869_THD nModule 1 - IMG_0720_1024.jpg

      Now that nModule #1 is completed, you continue with other modules

      0_1506633280285_THD nModule 2 - IMG_0722_1024.jpg

      posted in OpenHardware.io
      dakipro
      dakipro
    • RE: πŸ’¬ Soil Moisture Sensor

      Here is the water leakage sensor I was mentioning few posts above, using thin ribbon cable as a sensor.
      https://forum.mysensors.org/topic/7736/water-leakage-sensor-using-thin-ribbon-cable-testing-reliability
      Time will tell if it is usable at all before it corrodes completely.
      Thanks @RobKuipers for the code, works like a charm!

      posted in Announcements
      dakipro
      dakipro
    • Water leakage sensor using thin ribbon cable (testing reliability)

      Here is a quick'n'dirty sensor I made using 2m long thin ribbon cable from ebay/aliexpress ($2-3) as a leakage sensor to monitor thumble dryer. Sometimes baby would take out the rubber on the doors, or I would not connect the condenser properly after cleaning and it would leak quite a lot of water on the floor.

      Almost invisible under the appliance

      0_1506373053923_Water leakage sensor 1 - IMG_0713_1024.jpg

      0_1506373074866_Water leakage sensor 2 - IMG_0715_1024.jpg

      0_1506373131763_Water leakage sensor 3 - IMG_0380_1024.jpg

      Used the Easy/Newbie pcb as the base, i really get bored of soldering the radio. Also used the little magnets as battery contacts, then the batteries do fit into the small box.
      For the sensor/contact itself I "polished" out the insulation on the ribbon using dremel polishing bit every feww centimeters (it is very easy to damage the copper line, so if you plan to reproduce this one, test with few bits). It looks ugly as hell but it is under the dryer so... functionality beats aesthetics here by far.
      I connected every second line with one contact, and every second with second contact, which gave me a sensor that would detect smallest drop of water (probably not needed but... playing around).

      0_1506373748875_Water leakage sensor 5 - IMG_0369_1024.jpg

      0_1506373421203_Water leakage sensor 4 - IMG_0375_1024.jpg

      This is the code I am using, quickly modified the code that @RobKuipers shared (thanks again!) here https://forum.mysensors.org/topic/4827/soil-moisture-sensor/13

      I just removed some not needed code and played around with sensitivity. It is checking for value every two minutes and sensitivity value around 50 works fine for me (if case before sending the moisture around line 149).
      I also flashed 1mhz bootloader with BOD lowered to 1.8v, so it runs a bit longer on batteries without power stepup module

      Here is the code that runs it

      /*
       Name:		MYS_MoistureSensor.ino
       Created:	5/25/2017 1:04:35 PM
       Author:	Rob
      
       Soil moisture measuring by using stainless steel rods (or any other conductor).
       Probably the simplest project ever, since only a MySensors-node and some wire is needed to set things up.
       
       The sketch alternates current during measuring to prevent corrosion of the rods due to electrolyses.
       Odd readings may occur when starting (eg. increasing soil moisture for no apparent reason), please just allow the electrodes to settle down in the soil.
       No extra hardware needed. 
       
       I use an Arduino Mini 3V3, powered on two AA cells. It is suggested you set the fuses for a lower Brown Out Detection (BOD). But anything goes.
      
       Just tie D4 and A0 together to one rod, and D5 and A1 to another rod. This is sensor one.
       For the second sensor tie D6 and A2 together to one rod, and D7 and A3 to another rod.
       Connect a pushbutton between GND and D3 if you need a button that makes the node report immediately (can be omitted)
      
       Measurement are taken every minute and send to the gateway if different from the previous reading.
       In case of no changes, the node reports itself every four hours.
       The output is between 0 (dry) and 100 (wet).
      
       Can also be used as a depth moisture sensor with three sensor zones; in that case use one (common) long rod and three smaller sensors along
       the height of the rod and configure the sketch accordingly.
      	 sensors[0] = { 4, A0, 5, A1, -1, false };
      	 sensors[1] = { 4, A0, 6, A2, -1, false };
      	 sensors[2] = { 4, A0, 7, A3, -1, false };
      
      */
      
      #include "Header.h"
      
      // Enable debug Serial.prints to serial monitor
      #define MY_DEBUG 
      
      #if defined MY_DEBUG
      #define Sprintln(a) (Serial.println(a))
      #define Sprint(a) (Serial.print(a))
      #else 
      #define Sprintln(a)
      #define Sprint(a)
      #endif
      
      // Enable and select radio type attached
      #define MY_RADIO_NRF24
      
      // Use PA_LOW for RF24+PA (Power Amplifier)
      //#define MY_RF24_PA_LEVEL RF24_PA_LOW
      //#define MY_RF24_PA_LEVEL RF24_PA_MAX
      
      #define MY_NODE_ID 42
      
      #include <MySensors.h>
      
      #define ACK 0        // = false
      #define CHILD_ID 1
      #define REPORTNOWSWITCH_PIN 3    // Arduino Digital I/O pin for button/reed switch (must be an interrupt pin!)
      
      #define NUM_MOISTURE_SENSORS 1
      #define CHILD_ID_TEMPERATURE (CHILD_ID+NUM_MOISTURE_SENSORS+1)
      
      #define SENSOR1_ROD1_DIGITAL 4
      #define SENSOR1_ROD1_ANALOG A0
      #define SENSOR1_ROD2_DIGITAL 5
      #define SENSOR1_ROD2_ANALOG A1
      
      
      #define SLEEP_IN_MS 120000		// every minute a new measurement
      #define EVERY_15_MINUTES (3600000/4/SLEEP_IN_MS)
      #define EVERY_4_HOURS (3600000*4/SLEEP_IN_MS) 
      #define NUM_READS (int)5		// Number of sensor reads for filtering
      
      int countLoops;
      int8_t interruptedBy = -1;
      int oldBatLevel;
      float oldTemperature;
      
      int output_value;
      
      /// Included in Header.h:
      //typedef struct {
      //	int digital_input_a;
      //	int analog_input_a;
      //	int digital_input_b;
      //	int analog_input_b;
      //	int level;
      //	bool connected;
      //} sensorWiring;
      
      sensorWiring sensors[NUM_MOISTURE_SENSORS];
      
      MyMessage msgMoistureSensor(CHILD_ID, V_TRIPPED);
      //MyMessage msgChipTemp(CHILD_ID_TEMPERATURE, V_TEMP);
      
      
      void before()
      {
      	// All buttons as input-pullup as per ATMEGA recommendation to use less power (and more safety) 
      	// (http://electronics.stackexchange.com/questions/43460/how-should-unused-i-o-pins-be-configured-on-atmega328p-for-lowest-power-consumpt)
      	for (int i = 1; i <= 8; i++)
      	{
      		pinMode(i, INPUT_PULLUP);
      	}
      
      	// Now explicity set pins as needed
      
      	// Setup report-now switch, activate internal pull-up
      	//pinMode(REPORTNOWSWITCH_PIN, INPUT_PULLUP);
      
      	// Initialize sensor variables
      
      	// Connect Digital pin 4 to Analog input A0 and a metal rod
      	// Connect Digital pin 5 to Analog input A1 and another metal rod.
      	sensors[0] = { SENSOR1_ROD1_DIGITAL, SENSOR1_ROD1_ANALOG, SENSOR1_ROD2_DIGITAL, SENSOR1_ROD2_ANALOG, -1, false };
      
      
      	for  (int i = 0; i<NUM_MOISTURE_SENSORS; i++)
      		sensors[i].connected = testSensorConnections(sensors[i]);
      }
      
      void setup()
      {
      
      }
      
      
      void presentation() {
      	sendSketchInfo("Water Leak Sensor no42", "1.1", ACK);
      
      	for (int i = 0; i < NUM_MOISTURE_SENSORS; i++)
      	{
      		if (sensors[i].connected) present(CHILD_ID+i, S_WATER_LEAK , ACK);
      	}
      	//present(CHILD_ID_TEMPERATURE, S_TEMP);
      }
      
      void loop()
      {
      	
      
      	for (int i = 0; i < NUM_MOISTURE_SENSORS; i++)
      	{
      		if (sensors[i].connected)
      		{
      			output_value = measure(sensors[i]);
      			
      			Sprint(F("output_value is "));
      			Sprintln(output_value);
      			if ((sensors[i].level != output_value) && output_value > 50)
      			{
      				sensors[i].level = output_value;
      				send(msgMoistureSensor.setSensor(CHILD_ID+i).set(1), ACK);
      			}
      		}
      	}
      
      	// Every fifteen minutes; poll temperature
      	if (countLoops%EVERY_15_MINUTES==0) 
      	{
      
      		int batLevel = getBatteryLevel();
      		if ((oldBatLevel != batLevel)) // ...but only when changed, or when button is pressed; 
      		{
      			sendBatteryLevel(batLevel, ACK);
      			oldBatLevel = batLevel;
      		}
      	}
      
      	// So you know I'm alive
      	if (countLoops == EVERY_4_HOURS)
      	{
      		sendHeartbeat(ACK);
      		countLoops = 0;
      	}
      
      	countLoops++;
      
      	interruptedBy = sleep(SLEEP_IN_MS);
      }
      
      // Connect Digital pin 'digital_input_a' to Analog input 'analog_input_a' and a metal rod,
      // do the same for b
      long measure(sensorWiring sensor)
      {
      	long total = 0;
      	int reading_a = 0;
      	int reading_b = 0;
      
      	for (int i = 0; i<NUM_READS; i++) {
      		// Left to right
      		reading_a = measureOneDirection(sensor.digital_input_a, sensor.digital_input_b, sensor.analog_input_a);
      		// Right to left
      		reading_b = measureOneDirection(sensor.digital_input_b, sensor.digital_input_a, sensor.analog_input_b);
      
      		total += reading_a + reading_b;
      	}
      	return map(total / (2 * NUM_READS), 1023, 0, 0, 100);
      }
      
      long measureOneDirection(int digital_input_1, int digital_input_2, int analog_input_1)
      {
      	pinMode(digital_input_2, OUTPUT);
      	digitalWrite(digital_input_2, LOW);
      	pinMode(digital_input_1, INPUT_PULLUP);
      	delayMicroseconds(100);
      	long reading = analogRead(analog_input_1);
      	//delayMicroseconds(25);
      	pinMode(digital_input_1, INPUT);     // High impedance                 
      	pinMode(digital_input_2, INPUT);     // High impedance                 
      	delay(1);
      
      	Sprint(F("measureOneDirection - Reading "));
      	Sprintln(reading);
      
      	return reading;
      }
      
      // test the connections of both rods of a sensor
      boolean testSensorConnections(sensorWiring moistureSensor)
      {
      	return (testSensorConnection(moistureSensor.digital_input_a, moistureSensor.analog_input_a) && testSensorConnection(moistureSensor.digital_input_b, moistureSensor.analog_input_b));
      }
      
      //  test if digital pin is connected to correct analog pin
      boolean testSensorConnection(int digital_input, int analog_input)
      {
      	pinMode(digital_input, OUTPUT);
      	digitalWrite(digital_input, HIGH);                        
      	delayMicroseconds(100);
      	long reading_1 = analogRead(analog_input);   
      	digitalWrite(digital_input, LOW);                      
      	delayMicroseconds(100);
      	long reading_2 = analogRead(analog_input);   
      	pinMode(digital_input, INPUT);     // High impedance                 
      	delay(1);
      
      	Sprint(F("testSensorConnection - Reading1 "));
      	Sprintln(reading_1);
      	Sprint(F("testSensorConnection - Reading2 "));
      	Sprintln(reading_2);
      
      	bool correct = ((reading_1 == 1023) && (reading_2 == 0));
      	return correct;
      }
      
      
      long readMUX(uint8_t aControl) 
      {
      	long result;
      
      	ADMUX = aControl;
      	delay(20); // Wait for Vref to settle
      	noInterrupts();
      	// start the conversion
      	ADCSRA |= _BV(ADSC) | _BV(ADIE);
      	set_sleep_mode(SLEEP_MODE_ADC);    // sleep during sample
      	interrupts();
      	sleep_mode();
      	// reading should be done, but better make sure
      	// maybe the timer interrupt fired 
      	while (bit_is_set(ADCSRA, ADSC));
      	// Reading register "ADCW" takes care of how to read ADCL and ADCH.
      	result = ADCW;
      
      	return result;
      
      }
      
      
      // Battery measure
      int getBatteryLevel()
      {
      	int results = (readVcc() - 2000) / 10;
      
      	if (results > 100)
      		results = 100;
      	if (results < 0)
      		results = 0;
      	return results;
      } // end of getBandgap
      
      // when ADC completed, take an interrupt 
      EMPTY_INTERRUPT(ADC_vect);
      
      long readVcc() {
      	long result;
      	// Read 1.1V reference against AVcc
      	result = readMUX(_BV(REFS0) | _BV(MUX3) | _BV(MUX2) | _BV(MUX1));
      
      	result = 1126400L / result; // Back-calculate AVcc in mV (1024 steps times 1100 mV (1.1V) = 1126400L)
      
      	return result;
      }
      
      
      // Utter nonsense, but needed for attaching an interrupt to...
      void debounce() {
      }


      Now the only question is: How long will copper wire detect the water before corroding? I understand that the code has polarity change to avoid electrolytic effect, but still moisture from the air will certainly corrode exposed wires. If it holds a year that would be ok, everything above that would be great πŸ™‚
      If it doesn't work long enough, then I will just buy some more robust sensor and replace the ribbon strip with it.

      posted in My Project
      dakipro
      dakipro
    • RE: πŸ’¬ NModule

      checked between the pins, no radio pins are touching each other. Those hairs er most likely from the cat, got them cleaned after the photo.
      I will try to make one more module in a few days and test.

      But to confirm, for the simplest module I need >4.7uF cap, pro mini and the radio, two jumpers (jpower and jrdio) and some mock sketch, and it should all work?
      Have I missed some other jumper or resistor or some other component maybe?

      posted in OpenHardware.io
      dakipro
      dakipro
    • RE: πŸ’¬ NModule

      I put the radio cap back (4.7uf the largest I have in smd), but still same error 😞

      posted in OpenHardware.io
      dakipro
      dakipro
    • RE: πŸ’¬ NModule

      Must I have a radio cap?
      I connected the jumpers now quickly for a test (missed the part that I need them), but still same error

      49 TSF:WUR:MS=0
      81 !TSM:INIT:TSP FAIL
      98 TSM:FAIL:CNT=1
      114 TSM:FAIL:PDT
      10158 TSM:FAIL:RE-INIT
      10174 TSM:INIT
      10207 !TSM:INIT:TSP FAIL
      10240 TSM:FAIL:CNT=2
      10256 TSM:FAIL:PDT

      Here is the photo of the board (a bit blurry, I can take it again if it helps)
      0_1506263553498_IMG_0702-800.jpg

      I am missing the radio cap as I was testing lest night without them, but I can solder them in a few hours and test again if you think it will help.

      I connect power to the vcc pin of the "connection pins" right?

      Radio is the one linked in the BOM from aliexpress

      posted in OpenHardware.io
      dakipro
      dakipro
    • RE: πŸ’¬ NModule

      Hey @Nca78 I received the boards and components (yay!)
      But... I connected three modules, and none of them works 😞
      They all have transport (radio?) fail like

      32 TSM:INIT
      49 TSF:WUR:MS=0
      81 !TSM:INIT:TSP FAIL
      98 TSM:FAIL:CNT=1
      114 TSM:FAIL:PDT

      I tried connecting radios from two different batches, I tried connecting only the radio and arduino, I tried powering it from separate powersupply and only debug via serial. I tried provided sketch and also tried dummy sketch from the examples. I tried using the CR battery, node works fine except that the radio doesn't start communicating.
      I do measure 3V on the radio pins. I tried with and without radio cap.

      I am using chinese silicon mat to solder components on, I read somewhere that you use something similar *(not that I am spying on you πŸ™‚ ) but could it be that I am frying all the radios with static electricity?
      I have used the mat before and it works fine with regular radios, nothing fried so far, but there is something preventing nodes from working 😞

      Do you have any suggestions on how I can debug them and see what seems to be the problem?

      posted in OpenHardware.io
      dakipro
      dakipro
    • RE: πŸ’¬ Soil Moisture Sensor

      Thanks @RobKuipers , it compiles fine now. I will work on finetuning the code, just to confirm, you attach one wire to the both D4 and A0, and second to D5 and A1 ?

      I will test with a variation of this ribbon wire https://ae01.alicdn.com/kf/HTB1admbHVXXXXcfXVXXq6xXFXXXb/NEW-font-b-laptop-b-font-Switch-touchpad-font-b-cable-b-font-1-0mm-pitch.jpg
      Just to expose the wire every few cm with a dremel/polisher, and stick the wire to the floor under the appliance somehow (double tape).

      (for start I will put it under dryer actually, because baby sometimes removes the rubber sealing and it starts leaking)

      But I am now being concerned about the corrosion, as it is very thin wire... If it doesn't work long, I will replace it with something more robust and corrosion resistant.

      posted in Announcements
      dakipro
      dakipro
    • RE: πŸ’¬ Soil Moisture Sensor

      Hey @RobKuipers I am trying to reuse your sketch as a water leakage sensor, but I got stopped at the Header.h file. Can you please share its content?

      I am also considering using two pieces of wire (on a ribbon strip though, just to peal isolation at strategic places).
      I will use it on battery and I was thinking on measuring every minute or so, and send a heartbeat every half hour/hour with battery status.
      Do you have any other tips about converting the sketch to water leak?
      Thanks for the sketch btw!

      posted in Announcements
      dakipro
      dakipro
    • RE: Metal in walls prevents radio communication. Alternatives?

      thanks, I will try it soon when I grab some time/motivation.
      Photos above are from google, here is the actual box in the common hallway

      0_1504637971934_20170905_204828.jpg

      And it is common box for two apartments, so no drilling possible, batteries only πŸ™‚

      posted in Troubleshooting
      dakipro
      dakipro
    • RE: Metal in walls prevents radio communication. Alternatives?

      If I understand you @Sushukka correctly, you have a esp that connects on wifi in completely metal enclosure, and it connects to your wifi?
      That might give some hope that I can do the same, perhaps with a repeater that can be located ~2m from the box, bein separated by 1-2 walls. I tried directly connecting to the main node, but it didn't work.
      I understood that Nrf24l01+ uses same frequency (or does it?) as wifi so it should work as well.

      I will take a photo of the electrical box, but it is basically like this one
      alt text
      and it is built into the wall in a hallway, sort of like this (ignore these numbers, I just googled for a photo)
      alt text
      (but I can live with rechargeable batteries[hell yeah I can live without the pulse meter, but "I need one" πŸ™‚ ])

      posted in Troubleshooting
      dakipro
      dakipro
    • RE: πŸ’¬ NModule Temperature, Humidity, Light, Door sensor shield

      Thanks, I wrote something similar "inline" just to get the node out.
      I also noticed that reed switch is not mentioned in the code (or I missed it). Not that it is difficult to implement, but maybe you have some more improvements πŸ™‚

      To be honest, I wasn't expecting any source code for the node so I really appreciate that you shared it, and also made it very clear and easy to use. I also like optimizations related to the CR battery, so thank you for that

      posted in OpenHardware.io
      dakipro
      dakipro
    • RE: πŸ’¬ NModule Temperature, Humidity, Light, Door sensor shield

      hi, I was just playing around with the code while I wait for the boards, and I noticed the use of
      ArduinoSystemStatus library, as mentioned in the code

      #include <SystemStatus.h>   // Get it here:  https://github.com/cano64/ArduinoSystemStatus
      

      But the library on github does not have a getVCCPercent() method as used in the code on line 262

      currentBatteryPercent = SystemStatus().getVCCPercent(BATTERY_VCC_MIN, BATTERY_VCC_MAX);
      

      Do you remember where did you download SystemStatus from, I couldn't find anything on google nor github.
      The code does not compile with library from the link above (as method is missing). I guess it is not difficult to replace it, but perhaps it is worth mentioning.

      posted in OpenHardware.io
      dakipro
      dakipro
    • RE: πŸ’¬ NodeManager

      How to add i2c sensor?
      I see that there is a git issue asking about si7021 which I would also like to use as well, but has someone perhaps connected it already by creating a custom sensor?
      How difficult would it be?
      Thanks!

      posted in OpenHardware.io
      dakipro
      dakipro
    • RE: IKEA Varv lamp and MySensors

      Nice solution.
      Also that is a very compact (tested and safe) 220V ac -> 19V DC converter inside... hm...

      posted in My Project
      dakipro
      dakipro
    • RE: Metal in walls prevents radio communication. Alternatives?

      yeah that poweline was the one of the ideas (variation on the particle injector from above)..
      I will ask electrician next time he comes if he can install one powerplug inside the powermeter box.
      If he can do that, then I could use it to send data trough the cable to the inside of the appartment, and take it from there.
      I can see daily usage on the power company portal, was hoping to get something more of a real-time-ish

      posted in Troubleshooting
      dakipro
      dakipro
    • RE: Metal in walls prevents radio communication. Alternatives?

      What do you mean by powerline adapter?
      All the main switches/fuses and the meter are in the same stupid metal box. Cables come "magically" into the apartment. Thing is that they belong to the "building", and I can only touch things in the apartment (i cannot install 220v socket inside the box f.eks.). All (almost, except for one) the cables come trough the walls and are not accessible

      I could make several non-contact (with the clamp) monitors and attach them around huge appliances, but... that is a plan d (and I do not have plan b or c)

      posted in Troubleshooting
      dakipro
      dakipro
    • RE: Metal in walls prevents radio communication. Alternatives?

      Then I might "steel" thread a bit πŸ™‚

      I want to monitor/count pulses from a power meter. But the thing is that we live in the building and the power meter it is in a "common" metal box (one more meter in it). I can place a device inside and write on it that it is a monitor, but the problem is that meter is inside the completely metal box, with only two wholes, both filled with main power cables. So no holes, no option to get the antenna sticking out of the door, no option to plug it in the power even, it has to run on the battery.

      From my understanding, that box is a dead hole when it comes to external communication. Or? Use the box somehow as an antenna? Telepathy perhaps? πŸ™‚

      One "ironman" idea is to clamp around one of the main cables inside the box, to somehow send the signal from "around the cable by injecting microwave signal nano particles" and then from inside the apartment which is 4-5m detect injected signal and send it to the gateway.
      But when I make that last thing, then I might as well make the ironman suite...

      posted in Troubleshooting
      dakipro
      dakipro
    • RE: Why I quit using MySensors for actuators

      I understand the principle, number of sent packets should match number of received ones per node πŸ™‚
      I thought it was perhaps already implemented on node/gateway level. I guess one could always send Text or some custom label and handle it in controller, but having it integrated in gateway itself would be awesome πŸ™‚

      posted in General Discussion
      dakipro
      dakipro
    • RE: Why I quit using MySensors for actuators

      @NeverDie said in Why I quit using MySensors for actuators:

      numbering your packets and having the gateway keep track of how many aren't received

      Hi, could you elaborate this a bit more, maybe with some link/example about how to number the packages, and how to keep track of them on the gateway?
      I am also very interested in this statistics, as a way to improve long term reliability.

      posted in General Discussion
      dakipro
      dakipro
    • RE: πŸ’¬ NModule Temperature, Humidity, Light, Door sensor shield

      Ahh... its been a few years since I ordered a pcb last time, forgot all the details πŸ™‚
      Thank you, it works like you described it, I am now looking forward to making the modules πŸ™‚

      btw, I found out that local library has a 3d printer I could use, so I am hoping to make a few different/similar cases for the modules.
      I am also considering the motion sensor together with light/temp/door... But I will start "simpler" for now, also waiting for your progress report on the nModule motion shield for the best sensor to pick

      Thanks again

      posted in OpenHardware.io
      dakipro
      dakipro
    • RE: πŸ’¬ NModule Temperature, Humidity, Light, Door sensor shield

      @Nca78 can you please check the "drill holes" file in the source for this shield, I was testing pcbs.io and it complained about "Gerber Normalization Failed For Layer: Drill Holes". (all works fine for the main nModule)

      On oshpark I get "I can't find a board outline file." (I get this error on oshpark for all the boards/layouts)

      posted in OpenHardware.io
      dakipro
      dakipro
    • RE: πŸ’¬ NModule Temperature, Humidity, Light, Door sensor shield

      Well I can do it the easy way as you are describing it πŸ™‚

      Half the battery time is significant then. I now opened one of the "simple" reeds that have their own enclosure, and it is possible to remove 2 pin reed and replace it with 3pin one (just dig out hot glue). Thin white wire from nmodule to the reed should not be noticeable in the frame.

      0_1503068394663_IMG_9115-Edit1-800.jpg

      Red is the reed switch, and yes I can put the module on the corner of the doors and have it hidden since most of the doors are open entire day. But in a few years when we redecorate I am planning to get 5V-12V in all the rooms, it will approximately come on the green circle, then I can hide entire nmodule inside the wall, and just have a thin wire to the reed sensor. (I will probably even put reed inside the frame of the doors and put wire inside the wall, but I need a proof of concept for now πŸ™‚ )

      posted in OpenHardware.io
      dakipro
      dakipro
    • RE: πŸ’¬ NModule Temperature, Humidity, Light, Door sensor shield

      I am probably annoying you with the questions, but I do hope they will benefit the board and the modules πŸ™‚
      One more about magnetic reed switches, you are recommending the ones that are registering both open and closed, due to battery consumption. And it makes sense to use them, but I would like to use them outside the module casing, and it is difficult to find them with their own casing, like the "normally closed" ones (case only improves waf, but still important... πŸ™‚ ).
      Does it make significant difference for doors that open-close 5-10 times a day, is it worth the hassle to go for 3 pin ones and somehow improvise on the casing, or is it easier to just buy more batteries πŸ™‚

      posted in OpenHardware.io
      dakipro
      dakipro
    • RE: πŸ’¬ NModule Temperature, Humidity, Light, Door sensor shield

      Awesome!

      Just a question, the CR2032 battery would be "sandwiched" between the nmodule and the shields?

      Also, if the shield is not used, then the battery would be on the same side where the radio is (based on photos), but are you then using the "power" part of the board as the shield? Or wiring it manually? Or does the "power" part acts as another "power shield"?
      Would be great if you could elaborate this part, maybe on the nmodule itself, about how to assemble it together with the cr2032 battery (or maybe I missed something 😞 )

      p.s. you can update the shields description in the table with shields on the main module https://www.openhardware.io/view/364/NModule#tabs-instructions

      posted in OpenHardware.io
      dakipro
      dakipro
    • RE: πŸ’¬ NModule Temperature, Humidity, Light, Door sensor shield

      Great, I think this case should fit nicely. http://www.ebay.com/itm/5PCS-Small-Desk-top-Plastic-Enclosure-Box-Case-White-51x36x20mm-CASE-025-A1-5/192269740428
      Internally it is 43 x 28(30) x 16 . Almost perfect for us without much choice (read: without 3d printer) πŸ™‚

      posted in OpenHardware.io
      dakipro
      dakipro