Navigation

    • Register
    • Login
    • OpenHardware.io
    • Categories
    • Recent
    • Tags
    • Popular
    1. Home
    2. Suresh Mali
    3. Posts
    • Profile
    • Following
    • Followers
    • Topics
    • Posts
    • Best
    • Groups

    Posts made by Suresh Mali

    • RE: Node unable to get ID from gateway. [2.2.0]

      @mfalkvidd I have hit a dead end. The issue described in the thread is stii not resolved. Any advice on what can help figure out the issue would be helpful.

      Thanks

      posted in Troubleshooting
      Suresh Mali
      Suresh Mali
    • RE: Node unable to get ID from gateway. [2.2.0]

      Any Moderator or Admin here who can help me, please.

      posted in Troubleshooting
      Suresh Mali
      Suresh Mali
    • RE: Node unable to get ID from gateway. [2.2.0]

      @rejoe2 I am using 2.2.0 on both gateway and node. Using NRF24L01+ with Caps . Strangely one of my node running on 2.1.0 is able to communicate with the gateway. Let's hope Mods have some answers. Appreciate your efforts and time.
      Thanks

      posted in Troubleshooting
      Suresh Mali
      Suresh Mali
    • RE: Node unable to get ID from gateway. [2.2.0]

      @rejoe2 I have already tried 2 different RF modules, the known good ones. So RF can be ruled out. I am running it with Domoticz, usually I don't have to change any setting, on presentation the node is shown in Domoticz and I just add it to my UI. Also tried the option Allow discovery for 5 mins in Domoticz that did not work either. So kind of lost here as to what's happening.

      posted in Troubleshooting
      Suresh Mali
      Suresh Mali
    • RE: Node unable to get ID from gateway. [2.2.0]

      @rejoe2 I tried as suggested. Cleared EEPROM using the sketch from MySensors example folder, tried auto ID assignment and also predefined ID. None seems to work.

      This is the log when no ID is assigned.

      16 MCO:BGN:INIT NODE,CP=RNNNA---,VER=2.2.0
      25 TSM:INIT
      26 TSF:WUR:MS=0
      33 TSM:INIT:TSP OK
      35 TSM:FPAR
      37 TSF:MSG:SEND,255-255-255-255,s=255,c=3,t=7,pt=0,l=0,sg=0,ft=0,st=OK:
      2046 !TSM:FPAR:NO REPLY
      2049 TSM:FPAR
      2051 TSF:MSG:SEND,255-255-255-255,s=255,c=3,t=7,pt=0,l=0,sg=0,ft=0,st=OK:
      4059 !TSM:FPAR:NO REPLY
      4061 TSM:FPAR
      4063 TSF:MSG:SEND,255-255-255-255,s=255,c=3,t=7,pt=0,l=0,sg=0,ft=0,st=OK:
      

      Log when Node is assigned ID:

      16 MCO:BGN:INIT NODE,CP=RNNNA---,VER=2.2.0
      25 TSM:INIT
      26 TSF:WUR:MS=0
      33 TSM:INIT:TSP OK
      35 TSM:INIT:STATID=254
      37 TSF:SID:OK,ID=254
      39 TSM:FPAR
      75 TSF:MSG:SEND,254-254-255-255,s=255,c=3,t=7,pt=0,l=0,sg=0,ft=0,st=OK:
      2083 !TSM:FPAR:NO REPLY
      2085 TSM:FPAR
      2121 TSF:MSG:SEND,254-254-255-255,s=255,c=3,t=7,pt=0,l=0,sg=0,ft=0,st=OK:
      4129 !TSM:FPAR:NO REPLY
      4131 TSM:FPAR
      4167 TSF:MSG:SEND,254-254-255-255,s=255,c=3,t=7,pt=0,l=0,sg=0,ft=0,st=OK:
      6175 !TSM:FPAR:NO REPLY
      6177 TSM:FPAR
      6213 TSF:MSG:SEND,254-254-255-255,s=255,c=3,t=7,pt=0,l=0,sg=0,ft=0,st=OK:
      8221 !TSM:FPAR:FAIL
      8222 TSM:FAIL:CNT=1
      8224 TSM:FAIL:DIS
      8226 TSF:TDI:TSL
      

      Please advice if there anything that could help me understand the issue and fix it.
      Thanks alot.

      posted in Troubleshooting
      Suresh Mali
      Suresh Mali
    • RE: Node unable to get ID from gateway. [2.2.0]

      @rejoe2 Will try that. I did tried assigning ID manually, but that did not work.

      posted in Troubleshooting
      Suresh Mali
      Suresh Mali
    • RE: Node unable to get ID from gateway. [2.2.0]

      @rejoe2 oh, I am sorry. I use the sketch from EEPROM Lib in Arduino. Not from MySensors. I am doing it right?

      posted in Troubleshooting
      Suresh Mali
      Suresh Mali
    • RE: Node unable to get ID from gateway. [2.2.0]

      @rejoe2 I have used the Mockmysensor example sketch from Mysensors.

      posted in Troubleshooting
      Suresh Mali
      Suresh Mali
    • Node unable to get ID from gateway. [2.2.0]

      I updated the gateway to 2.2.0. I have one sensor on 2.1.1 which able to communicate fine with my gateway. I tried testing a node on 2.2.0. I flash the MockMySensor sketch, but its not able to get a node ID from gateway. I also cleared EEPROM and replashed , tied to assign ID to node but did not help. The ID:4 we see in the gateway log is my node running on 2.1.1. Need help in understanding what could be the issue/fix. Thanks
      Logs from Node:

      6 MCO:BGN:INIT NODE,CP=RNNNA---,VER=2.2.0
      25 TSM:INIT
      26 TSF:WUR:MS=0
      33 TSM:INIT:TSP OK
      35 !TSF:SID:FAIL,ID=0
      37 TSM:FAIL:CNT=1
      38 TSM:FAIL:DIS
      40 TSF:TDI:TSL
      10042 TSM:FAIL:RE-INIT
      10044 TSM:INIT
      10051 TSM:INIT:TSP OK
      10053 !TSF:SID:FAIL,ID=0
      10055 TSM:FAIL:CNT=2
      10057 TSM:FAIL:DIS
      10059 TSF:TDI:TSL
      

      Logs from Gateway:

      Mar  6 15:51:47 myhome mysgw: GWT:RFC:C=0,MSG=0;0;3;0;18;PING
      Mar  6 15:51:57 myhome mysgw: GWT:RFC:C=0,MSG=0;0;3;0;18;PING
      Mar  6 15:52:06 myhome mysgw: TSF:MSG:READ,4-4-255,s=255,c=3,t=7,pt=0,l=0,sg=0:
      Mar  6 15:52:06 myhome mysgw: TSF:MSG:BC
      Mar  6 15:52:06 myhome mysgw: TSF:MSG:FPAR REQ,ID=4
      Mar  6 15:52:06 myhome mysgw: TSF:PNG:SEND,TO=0
      Mar  6 15:52:06 myhome mysgw: TSF:CKU:OK
      Mar  6 15:52:06 myhome mysgw: TSF:MSG:GWL OK
      Mar  6 15:52:06 myhome mysgw: TSF:MSG:SEND,0-0-4-4,s=255,c=3,t=8,pt=1,l=1,sg=0,ft=0,st=OK:0
      Mar  6 15:52:07 myhome mysgw: GWT:RFC:C=0,MSG=0;0;3;0;18;PING
      Mar  6 15:52:10 myhome mysgw: TSF:MSG:READ,4-4-0,s=255,c=3,t=24,pt=1,l=1,sg=0:1
      Mar  6 15:52:10 myhome mysgw: TSF:MSG:PINGED,ID=4,HP=1
      Mar  6 15:52:10 myhome mysgw: !TSF:MSG:SEND,0-0-4-4,s=255,c=3,t=25,pt=1,l=1,sg=0,ft=0,st=NACK:1
      
      posted in Troubleshooting
      Suresh Mali
      Suresh Mali
    • RE: [Resolved] accept: Bad file descriptor

      Thanks @mfalkvidd and @gohan . That helped.

      posted in Troubleshooting
      Suresh Mali
      Suresh Mali
    • [Resolved] accept: Bad file descriptor

      I build a Gateway on Rpi. Post build it was working fine. I reboot and it stops working. Unable to interpret what this means. Please help. I did go through the forum but not able to solve it. I am using the latest 2.2.0 release. I ruled out hardware and radio issues as one of my node was able to communicate and send messages.

      Any help would be appreciated.
      Thanks

      pi@myhome:~/MySensors $ sudo ./bin/mysgw -d
      mysgw: Starting gateway...
      mysgw: Protocol version - 2.2.0
      mysgw: MCO:BGN:INIT GW,CP=RNNGL---,VER=2.2.0
      mysgw: TSF:LRT:OK
      mysgw: TSM:INIT
      mysgw: TSF:WUR:MS=0
      mysgw: TSM:INIT:TSP OK
      mysgw: TSM:INIT:GW MODE
      mysgw: TSM:READY:ID=0,PAR=0,DIS=0
      mysgw: MCO:REG:NOT NEEDED
      mysgw: bind: Address already in use
      mysgw: Failed to bind!
      mysgw: MCO:BGN:STP
      mysgw: MCO:BGN:INIT OK,TSP=1
      mysgw: accept: Bad file descriptor
      mysgw: accept: Bad file descriptor
      mysgw: accept: Bad file descriptor
      mysgw: accept: Bad file descriptor
      mysgw: accept: Bad file descriptor
      posted in Troubleshooting
      Suresh Mali
      Suresh Mali
    • RE: Curtain Control Node.

      @jacikaas Ok.

      //Remove this line from loop function
      stepper1.run(); 
      
      //Change this line
      stepper1.moveTo(CURTAIN_CLOSED);
      //to
      stepper1.runToPosition(CURTAIN_CLOSED);
      

      I hope this works. Also make similar changes in block which closes curtains.
      Refernce article: https://www.pjrc.com/teensy/td_libs_AccelStepper.html

      posted in My Project
      Suresh Mali
      Suresh Mali
    • RE: Curtain Control Node.

      @jacikaas said in Curtain Control Node.:

      void receive(const MyMessage &message)
      {
      // if message = V_UP start moving until closed
      if (message.type==V_UP) {
      digitalWrite(powerPin, HIGH);
      if (stepper1.distanceToGo() == 0){
      if (stepper1.currentPosition() == CURTAIN_OPEN){
      stepper1.moveTo(CURTAIN_CLOSED);
      // Store state in eeprom
      saveState(message.sensor, message.getBool());
      request(CHILD_ID, V_UP, 0); // request new values from controller
      }
      }
      }
      if (message.type==V_DOWN) {
      digitalWrite(powerPin, HIGH);
      stepper1.moveTo(CURTAIN_OPEN);
      // Store state in eeprom
      saveState(message.sensor, message.getBool());
      request(CHILD_ID, V_DOWN, 0); // request new values from controller
      }
      if (message.type==V_STOP) {
      digitalWrite(powerPin, HIGH);
      stepper1.setCurrentPosition(0);
      // Store state in eeprom
      saveState(message.sensor, message.getBool());
      request(CHILD_ID, V_STOP, 0); // request new values from controller
      }
      // delay(CURTAIN_CLOSED);
      // digitalWrite(powerPin, LOW);
      }

      You can enable and disable outputs and try. In the following function:

      void receive(const MyMessage &message)
      
      //add the following at the begining of the function
      stepper1.enableOutputs ()
      //and add the following at the end in the same function.
      stepper1.disableOutputs ()
      

      I hope this helps haven't tried it myself.

      posted in My Project
      Suresh Mali
      Suresh Mali
    • RE: Curtain Control Node

      @TON-RIJNAARD You need to select the board based on the bootloader you have flashed. Complile the code in Arduino and try burning the hex file using a programmer (USBasp, AVRISP, etc..) if are facing issues with Arduino.

      posted in OpenHardware.io
      Suresh Mali
      Suresh Mali
    • RE: Transformer-less power supply

      @Tmaster Thanks for bringing this up. I was able to find LNK family ICs where I'll be able to source at cheaper price. I have ordered some LNK306 to test them. Cost me 80Rs/$1 and some cents. Will test once I receive them and post the results.

      posted in My Project
      Suresh Mali
      Suresh Mali
    • RE: Transformer-less power supply

      @rvendrame My current design uses Hi Link 5V PSU, however I am looking at lowering the cost and this was one of the options.

      I also reverse engineered some cheap 5v phone chargers, its an SMPS based design using single transistor. Are safe as there is isolation.

      This might be my next option to look into. The problem is with the transformer. How do I get the transformer to my specification. Do I wind them myself? will have to look into it.

      posted in My Project
      Suresh Mali
      Suresh Mali
    • RE: Transformer-less power supply

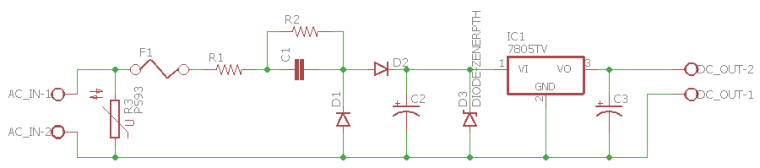
      @Suresh-Mali I modified the above schematic, just to add some protection and regulation.
      0_1507188250336_AC_DC_Transformerless.png

      posted in My Project
      Suresh Mali
      Suresh Mali
    • RE: Transformer-less power supply

      @Toyman That helps. Thanks.

      posted in My Project
      Suresh Mali
      Suresh Mali
    • RE: Transformer-less power supply

      @sundberg84 Thanks for your valuable information.

      posted in My Project
      Suresh Mali
      Suresh Mali
    • RE: Transformer-less power supply

      @gohan Overvoltage and short I guess can be solved if I use an MOV and Fuse.

      posted in My Project
      Suresh Mali
      Suresh Mali
    • RE: Transformer-less power supply

      If nobody is going to touch it once installed, would there be any safety issues?

      posted in My Project
      Suresh Mali
      Suresh Mali
    • Transformer-less power supply

      Hi,
      Can I use a Capacitor-Resistor voltage dropper circuit without isolation to power up my Node like the one in below image.

      alt text

      I understand the node would not be mains isolated and would be a risk if touched. Apart from this are there any other risks or performance issues that I should be concerned of before I dive into constructing this circuit. I will add a LDO regulator at the output to get a regulated supply.

      Please share your thoughts and views. Thanks

      posted in My Project
      Suresh Mali
      Suresh Mali
    • RE: Curtain Control Node

      @TON-RIJNAARD There is a ICSP header to program MCU. I dont use RFM69 so you'll have to modify the Sch file. NS pin connects to D10. More info here : https://www.mysensors.org/build/connect_radio shows on how to connect RFM69.

      posted in OpenHardware.io
      Suresh Mali
      Suresh Mali
    • RE: Curtain Control Node

      @TON-RIJNAARD
      SparkFun-DigitalIC.lbr This lib has the ATSHA204.

      https://www.diymodules.org/eagle-show-object?type=usr&id=1937&part=microchip.lbr&device=25* here you can download the EEPROM lib

      posted in OpenHardware.io
      Suresh Mali
      Suresh Mali
    • RE: Curtain Control Node

      @TON-RIJNAARD I'll get back with libs for these parts. I am not in town and all files are on my desktop. Will send you once m back

      posted in OpenHardware.io
      Suresh Mali
      Suresh Mali
    • RE: SCT-013-030 Energy Meter

      Hi @patrick-schaerer ,
      I got my setup running and was trying your code.

      I was testing this code on my AC unit which has 1600W max consumption. When I first ran it always reported a value of around 270W even when the AC unit was off from mains and in running condition it reported around 750W with compressor on and around 250W with compressor off.
      I adjusted the value on line

      emon1.current(ANALOG_INPUT_SENSOR, 30);             // Current: input pin, calibration
      

      Tried values from 10 to 111(default as per emon lib) to calibrate it to report 0 in off condition. finally at 10 it reported zero but now when the AC is on it reports 270W max.

      Could you please help me figure out where the problem could be. Thanks

      posted in My Project
      Suresh Mali
      Suresh Mali
    • RE: Android App - Client ethernet gateway

      @checkup I was trying this app and accidentally put in wrong IP address. The froze and had to end app. I have submitted the log report.

      posted in My Project
      Suresh Mali
      Suresh Mali
    • RE: No ID assigned by gateway.

      After filding around a lot with the MySensor2.0 lib and spending my whole weekend, when I could not get things going I finally switched back to MySensors1.5.4. After that I made quick progress and my node was on network. Here is the link below of a working Dimmer node.

      MySensors AC 220v Dimmer with Domoticz – 01:42
      β€” S Kumar

      posted in My Project
      Suresh Mali
      Suresh Mali
    • RE: No ID assigned by gateway.

      I tried debugging with MYSController. It seems the node and gateway are not communicating. The Gateway receives the messages but does not assigns ID to node. I tried assigning static ID to both Node and Gateway, but its fails.
      What started as Dimmer module not working has turned to no communication between nodes on 2.0lib.
      I'll probably wait until the MySensors 2.0 lib is stable and there is proper documentation. For now rolling back to 1.5lib seems the best choice I have got.

      The forum is there to help but it has mix of 1.5 and 2.0 lib its like hunting in a haystack for documentation and support. Please find a way to separate the 2.0 and below 2.0 lib. Thanks

      posted in My Project
      Suresh Mali
      Suresh Mali
    • RE: No ID assigned by gateway.

      I am still unable to figure out why the node is not getting registered on gateway.
      The Serial output of Gateway

      0;255;3;0;9;Starting gateway (RNNGA-, 2.0.0)
      0;255;3;0;9;TSM:INIT
      0;255;3;0;9;TSM:RADIO:OK
      0;255;3;0;9;TSM:GW MODE
      0;255;3;0;9;TSM:READY
      0;255;3;0;14;Gateway startup complete.
      0;255;0;0;18;2.0.0
      0;255;3;0;9;No registration required
      0;255;3;0;9;Init complete, id=0, parent=0, distance=0, registration=1
      0;255;3;0;9;TSP:MSG:READ 0-0-255 s=255,c=3,t=7,pt=0,l=0,sg=0:
      0;255;3;0;9;TSP:MSG:BC
      0;255;3;0;9;TSP:MSG:READ 0-0-255 s=255,c=3,t=7,pt=0,l=0,sg=0:
      0;255;3;0;9;TSP:MSG:BC
      0;255;3;0;9;TSP:MSG:READ 0-0-255 s=255,c=3,t=7,pt=0,l=0,sg=0:
      0;255;3;0;9;TSP:MSG:BC
      

      The serial Output of Node:

      Starting sensor (RNNNA-, 2.0.0)
      TSM:INIT
      TSM:RADIO:OK
      !TSP:ASSIGNID:FAIL (ID=0)
      !TSM:FAILURE
      TSM:PDT
      TSM:FPAR
      TSP:MSG:SEND 0-0-255-255 s=255,c=3,t=7,pt=0,l=0,sg=0,ft=0,st=bc:
      TSM:FPAR
      TSP:MSG:SEND 0-0-255-255 s=255,c=3,t=7,pt=0,l=0,sg=0,ft=0,st=bc:
      TSM:FPAR
      TSP:MSG:SEND 0-0-255-255 s=255,c=3,t=7,pt=0,l=0,sg=0,ft=0,st=bc:
      TSM:FPAR
      TSP:MSG:SEND 0-0-255-255 s=255,c=3,t=7,pt=0,l=0,sg=0,ft=0,st=bc:
      !TSM:FPAR:FAIL
      !TSM:FAILURE
      TSM:PDT
      

      What could be the failure here. Itried clearing the EEPROM on both Gateway and Node, changed power supply on Node, but nothing is working.
      I know Gateway is fine because I had another node and it sends data and it shows up on Gateway.
      Somebody please help. Thanks

      posted in My Project
      Suresh Mali
      Suresh Mali
    • No ID assigned by gateway.

      Hi Folks,

      I am building a dimmer, I am unable to understand some of the abbreviations used in the 2.0Lib. The serial output is as below.

      TSP:MSG:SEND 2-2-255-255 s=255,c=3,t=7,pt=0,l=0,sg=0,ft=0,st=bc:
      Starting sensor (RNNNA-, 2.0.0)
      TSM:INIT
      TSM:RADIO:OK
      TSP:ASSIGNID:OK (ID=2)
      TSM:FPAR
      TSP:MSG:SEND 2-2-255-255 s=255,c=3,t=7,pt=0,l=0,sg=0,ft=0,st=bc:
      TSM:FPAR
      TSP:MSG:SEND 2-2-255-255 s=255,c=3,t=7,pt=0,l=0,sg=0,ft=0,st=bc:
      TSM:FPAR
      TSP:MSG:SEND 2-2-255-255 s=255,c=3,t=7,pt=0,l=0,sg=0,ft=0,st=bc:
      TSM:FPAR
      TSP:MSG:SEND 2-2-255-255 s=255,c=3,t=7,pt=0,l=0,sg=0,ft=0,st=bc:
      !TSM:FPAR:FAIL
      !TSM:FAILURE
      

      Could somebody please help me understand the terms used like TSP, TSM, FPAR.

      My code is as below, I am unable to register the node in Domoticz. Could somebody be kind enough to help me and point out if anything is wrong here.

      // Enable debug prints
      #define MY_DEBUG
      
      // Enable and select radio type attached
      #define MY_RADIO_NRF24
      //#define MY_RADIO_RFM69
      
      #include <SPI.h>
      #include <MySensors.h>  
      #include <Dimmer.h>
      
      #define CHILD_ID_FAN 1
      #define FAN_CONTROL_PIN 7 //pin to control the fan/light
      #define EPROM_LIGHT_STATE 1
      #define EPROM_DIMMER_LEVEL 2
      
      #define LIGHT_OFF 0
      #define LIGHT_ON 1
      
      Dimmer dimmer(FAN_CONTROL_PIN, DIMMER_RAMP,2,50);
      
      #define SN "Fan Speed Controller"
      #define SV "1.0"
      
      int LastLightState=LIGHT_OFF;
      int LastDimValue=100;
      
      MyMessage lightMsg(CHILD_ID_FAN, V_STATUS);
      MyMessage dimmerMsg(CHILD_ID_FAN, V_PERCENTAGE);
      
      void setup()  
      { 
        //Retreive our last light state from the eprom
        int LightState=loadState(EPROM_LIGHT_STATE); 
        if (LightState<=1) {
          LastLightState=LightState;
          int DimValue=loadState(EPROM_DIMMER_LEVEL); 
          if ((DimValue>0)&&(DimValue<=100)) {
            //There should be no Dim value of 0, this would mean LIGHT_OFF
            LastDimValue=DimValue;
          }
        }
      
        dimmer.begin();
        
        //Here you actualy switch on/off the light with the last known dim level
        SetCurrentState2Hardware();
        
        Serial.println( "Node ready to receive messages..." );  
      }
      
      void presentation() {
        // Send the Sketch Version Information to the Gateway
        sendSketchInfo(SN, SV);
      
        present(CHILD_ID_FAN, S_DIMMER );
      }
      
      void loop()      
      {
      }
      
      void receive(const MyMessage &message)
      {
        if (message.type == V_STATUS) {
          Serial.println( "V_LIGHT command received..." );
          
          int lstate= atoi( message.data );
          if ((lstate<0)||(lstate>1)) {
            Serial.println( "V_LIGHT data invalid (should be 0/1)" );
            return;
          }
          LastLightState=lstate;
          saveState(EPROM_LIGHT_STATE, LastLightState);
          
          if ((LastLightState==LIGHT_ON)&&(LastDimValue==0)) {
             //In the case that the Light State = On, but the dimmer value is zero,
             //then something (probably the controller) did something wrong,
             //for the Dim value to 100%
            LastDimValue=100;
            saveState(EPROM_DIMMER_LEVEL, LastDimValue);
          }
          
          //When receiving a V_LIGHT command we switch the light between OFF and the last received dimmer value
          //This means if you previously set the lights dimmer value to 50%, and turn the light ON
          //it will do so at 50%
        }
        else if (message.type == V_PERCENTAGE) {
          Serial.println( "V_DIMMER command received..." );  
          int dimvalue= atoi( message.data );
          if ((dimvalue<0)||(dimvalue>100)) {
            Serial.println( "V_DIMMER data invalid (should be 0..100)" );
            return;
          }
          if (dimvalue==0) {
            LastLightState=LIGHT_OFF;
          }
          else {
            LastLightState=LIGHT_ON;
            LastDimValue=dimvalue;
            saveState(EPROM_DIMMER_LEVEL, LastDimValue);
          }
        }
        else {
          Serial.println( "Invalid command received..." );  
          return;
        }
      
        //Here you set the actual light state/level
        SetCurrentState2Hardware();
      }
      
      void SetCurrentState2Hardware()
      {
        if (LastLightState==LIGHT_OFF) {
           Serial.println( "Light state: OFF" );
           dimmer.off();
        }
        else {
           Serial.print( "Light state: ON, Level: " );
           Serial.println( LastDimValue );
           dimmer.set(LastDimValue);
        }
      
        //Send current state to the controller
        SendCurrentState2Controller();
      }
      
      void SendCurrentState2Controller()
      {
        if ((LastLightState==LIGHT_OFF)||(LastDimValue==0)) {
          send(dimmerMsg.set(0));
        }
        else {
          send(dimmerMsg.set(LastDimValue));
        }
      }
      
      posted in My Project
      Suresh Mali
      Suresh Mali
    • RE: Water tank instant volume

      Hi,
      I had a similar setup, the Ultrasonic sensor did not last long. I used to measure the water level in overhead tank. Within a month the transducers were all rusted and the ultrasonic sensor died. I had to take everything out. I am looking for some waterproof sensors like the ones used in car park assist.

      In case you have a better solution, please do share.

      posted in Domoticz
      Suresh Mali
      Suresh Mali
    • RE: Curtain Control Node

      @jemish You can look for on Aliexpress.

      posted in OpenHardware.io
      Suresh Mali
      Suresh Mali
    • RE: Curtain Control Node

      @bisschopsr The design files are available on openhardware.io

      posted in OpenHardware.io
      Suresh Mali
      Suresh Mali
    • RE: I am not able to stop the blinds motor once the first command is sent.

      @oscarc The routine below i see some problem.

      void checkHWInnputs()
        {
       debouncer.update();
         debouncer1.update();
        int value = debouncer.read();
       int value1 = debouncer1.read();
       
        
         if (value == LOW) {
      
       Serial.println("Detected stop button push. Stopping");
           cover(1);
        }
      
         {
         if (value1 == LOW)
        Serial.println("Detected stop button push. Stopping");
            cover(0);
          
          }
      

      Once you detect the button state, you are calling

      cover(0);
      

      If you look at the cover routine, the parameters are used in case statement.
      0=Open
      1=Close
      2=Idle.
      My suggestion would be to change cover(0)/cover(1) to cover(2) which would stop the motor.

      posted in Troubleshooting
      Suresh Mali
      Suresh Mali
    • RE: I am not able to stop the blinds motor once the first command is sent.

      @oscarc You can add debouncer.

        debouncer.attach(BUTTON_PIN);
        debouncer.interval(5);
      

      Refer the binary switch sensor sketch here http://www.mysensors.org/build/binary

      posted in Troubleshooting
      Suresh Mali
      Suresh Mali
    • RE: Curtain Control Node.

      @patchmaster I used the relay sketch and modified it to my needs. Sorry but I dont have any sketch for ULN2003. 😞

      posted in My Project
      Suresh Mali
      Suresh Mali
    • RE: Curtain Control Node.

      @barduino Seems like the IDE. Open any example MySensors Sketch. Delete the contents from sketch and copy paste from my sketch. I guess that should work.

      Are you able to compile any other sketch in Arduino?

      posted in My Project
      Suresh Mali
      Suresh Mali
    • RE: Curtain Control Node.

      I have published my project with all the files.
      https://www.openhardware.io/view/45/Curtain-Control-Node

      posted in My Project
      Suresh Mali
      Suresh Mali
    • RE: Curtain Control Node.

      @franzelare Great. Good Luck with the build.

      I'll be posting my HW design and Code as part of Contest on openhardware.io

      posted in My Project
      Suresh Mali
      Suresh Mali
    • RE: Curtain Control Node.

      @barduino I tried downloading the code, it works. Anyways I am pasting the code below.

      For end stops I have not yet decided. I had some Ideas of using Hall effect sensor on both ends and a small piece of magnet in the string to detect ends or Maybe use stop switches. Not sure but will have to try both and see which works the best.

      I am yet to clean the code I have some debugging serial prints in code which will remove once finalized.

      #include <SPI.h>
      #include <MySensor.h>
      
      
      int motor_forward = 5;
      int motor_reverse = 6;
      
      int LDRinput = 1;     //analog pin to which LDR is connected, here we set it to 0 so it means A0
      int LDRValue = 0;      //thatοΏ½s a variable to store LDR values
      int light_sensitivity = 500;    //This is the approx value of light surrounding your LDR
      
      int stopSwLeft = 4;
      int stopSwRight = 3;
      int stopSwNow = 2;
      
      int CHILD_CURTAIN_ID =1;
      int lastState;
      MySensor gw;
      MyMessage msg_S_COVER_U(CHILD_CURTAIN_ID, V_UP);
      MyMessage msg_S_COVER_D(CHILD_CURTAIN_ID, V_DOWN);
      MyMessage msg_S_COVER_S(CHILD_CURTAIN_ID, V_STOP);
      //MyMessage msg(CHILD_CURTAIN_ID,V_UP);
      // the setup routine runs once when you press reset:
      void setup()
      {
      	Serial.begin(115200);
      	// initialize the digital pin as an output for L239D.
      	pinMode(motor_forward, OUTPUT);
      	pinMode(motor_reverse, OUTPUT);
      	
      	// initialize the digital pin as an output for Stop Switches.
      	pinMode(stopSwLeft, INPUT_PULLUP);
      	pinMode(stopSwRight, INPUT_PULLUP);
      	pinMode(stopSwNow, INPUT_PULLUP);
      	
      	gw.begin(incomingMessage, AUTO, true);
      	// Send the sketch version information to the gateway and Controller
      	gw.sendSketchInfo("Window_Curtain", "1.0");
      	gw.present(CHILD_CURTAIN_ID, S_COVER);
      	
      }
      
      void loop(){
      	
      	gw.process();
      	
      	}
      void cover(int coverVal){
      
      	//int coverVal = gw.loadState(CHILD_CURTAIN_ID);
      
      	Serial.print("Cover is : ");
      	lastState = coverVal;
      	switch (coverVal) {
      	case 0:
      		Serial.println("Opening");
      			while (lastState == coverVal)
      			{
      				m_left();
      				gw.process();
      				checkHWInnputs();
      				coverVal = gw.loadState(CHILD_CURTAIN_ID);
      			}
      			gw.send(msg_S_COVER_U.set(V_UP));
      		break;
      	case 1:
      		Serial.println("Closing");
      			while (lastState == coverVal)
      			{
      				m_right();
      				gw.process();
      				checkHWInnputs();
      				coverVal = gw.loadState(CHILD_CURTAIN_ID);
      			}
      			gw.send(msg_S_COVER_D.set(V_DOWN));
      		break;
      	case 2:
      		Serial.println("Idle");
      			while (lastState == coverVal)
      				{
      					m_stop();
      					gw.process();
      					checkHWInnputs();
      					coverVal = gw.loadState(CHILD_CURTAIN_ID);
      				}
      			gw.send(msg_S_COVER_S.set(V_STOP));
      			break;
      	}
      	return;
      
      }
      void incomingMessage(const MyMessage &message) {
      	// We only expect one type of message from controller. But we better check anyway.
      	Serial.println("recieved incomming message");
      	switch (message.type) {
      	case V_UP:
      		gw.saveState(CHILD_CURTAIN_ID, 0);
      		Serial.print("Incoming change for ID_S_COVER:");
      		Serial.print(message.sensor);
      		Serial.print(", New status: ");
      		Serial.println("V_UP");
      		cover(gw.loadState(CHILD_CURTAIN_ID));
      		Serial.print("Done cover procedure");
      		//m_right();
      		break;
      
      	case V_DOWN:
      		gw.saveState(CHILD_CURTAIN_ID, 1);
      		Serial.print("Incoming change for ID_S_COVER:");
      		Serial.print(message.sensor);
      		Serial.print(", New status: ");
      		Serial.println("V_DOWN");
      		cover(gw.loadState(CHILD_CURTAIN_ID));
      		Serial.print("Done cover procedure");
      		//m_left();
      		break;
      
      	case V_STOP:
      		gw.saveState(CHILD_CURTAIN_ID, 2);
      		Serial.print("Incoming change for ID_S_COVER:");
      		Serial.print(message.sensor);
      		Serial.print(", New status: ");
      		Serial.println("V_STOP");
      		cover(gw.loadState(CHILD_CURTAIN_ID));
      		Serial.print("Done cover procedure");
      		//m_stop();
      		break;
      	}
      	Serial.print("exiting incoming message");
      	return;
      	
      }
      // the loop routine runs over and over again forever:
      void m_right() {
      	digitalWrite(motor_forward, HIGH); //terminal D1 will be HIGH
      	digitalWrite(motor_reverse, LOW); //terminal D2 will be LOW
      	Serial.print("Set For:High and Rev: Low");
      	exit;
      }
      
      void m_left() {
      	digitalWrite(motor_forward, LOW); //terminal D1 will be LOW
      	digitalWrite(motor_reverse, HIGH); //terminal D2 will be HIGH
      	Serial.print("Set For:Low and Rev: High");
      	exit;
      }
      
      void m_stop() {
      	digitalWrite(motor_forward, LOW); //terminal D1 will be LOW
      	digitalWrite(motor_reverse, LOW); //terminal D2 will be HIGH
      	Serial.print("Set For:Low and Rev: Low");
      	exit;
      }
      
      void checkHWInnputs()
      	{
      		if (digitalRead(stopSwNow) == LOW)
      		{
      			Serial.println("Detected stop button push. Stopping");
      			cover(2);
      			Serial.println("Saved stop state to EEPROM");
      		}
      		if (digitalRead(stopSwLeft) == LOW)
      		{
      			Serial.println("Detected stop button push. Stopping");
      			cover(1);
      			Serial.println("Saved stop state to EEPROM");
      		}
      		if (digitalRead(stopSwRight) == LOW)
      		{
      			Serial.println("Detected stop button push. Stopping");
      			cover(0);
      			Serial.println("Saved stop state to EEPROM");
      		}
      	}
      
      
      posted in My Project
      Suresh Mali
      Suresh Mali
    • RE: Curtain Control Node.

      @AWI Thanks. Why dont you increase the pulley size (larger pulley) that will increase the speed.

      I found driving stepper motor to be bit more complicated than driving a DC motor. I picked the Geared motor basis the calculation using this calculator.

      Since without rails pulling the curtains on a metal pipe needed more torque. Thus I chose 100 RPM to be a suitable fit.

      Will share the Schematics and PCB layout files soon. I have already added the sketch for reference. Since I was testing I did not put the circuit in any housing. But will give some shape soon.

      Also will be adding 3 buttons for Manual Control.

      posted in My Project
      Suresh Mali
      Suresh Mali
    • RE: Curtain Control Node.

      Its a Geared DC Motor with Voltage Rating of 6-12V and 100 RPM. I am using a L239 to control the motor.
      alt text

      posted in My Project
      Suresh Mali
      Suresh Mali
    • Curtain Control Node.

      My First version of curtain control Node is ready, installed and tested. Some work is pending, which I'll complete on my weekend.
      Edit: Code for the Node:Curtain Node
      Curtain Control Node.

      Please share your feedback so that I can improvise.

      posted in My Project
      Suresh Mali
      Suresh Mali
    • RE: Bootloader and fuses for Pro Mini 3.3V using Arduino UNO as ISP

      @mfalkvidd AVRDudess works with AVRISP mkii as well. Have you tried to detect the Pro Mini chip using AVRDudess+AVRISPMkii. Are you able to detect the chip using Mkii in AVRDudess?

      posted in Troubleshooting
      Suresh Mali
      Suresh Mali
    • RE: Bootloader and fuses for Pro Mini 3.3V using Arduino UNO as ISP

      @mfalkvidd Do you have an USBasp? It works great burning bootloaders. You will be able to recover the fuse as long as you have not set the fuse to disable SPI. If SPI is disabled then the only way to recover is using High Voltage Programmer.

      posted in Troubleshooting
      Suresh Mali
      Suresh Mali
    • RE: Bootloader and fuses for Pro Mini 3.3V using Arduino UNO as ISP

      @mfalkvidd If the ATMEGA is detected then all you have to do is input the Fuse Bits and program. It should work. Just select the bootloader hex file in Flash. Check Set fuses and hit program.

      posted in Troubleshooting
      Suresh Mali
      Suresh Mali
    • RE: Bootloader and fuses for Pro Mini 3.3V using Arduino UNO as ISP

      @mfalkvidd As long as you have not disabled SPI fuse you should be able to recover. Try AVRDUDESS with slow speed. Also on USBasp there is a jumper for slow sck speed. That helped me recover/reprogram fuse to Blank ATMEGA328p as well.

      posted in Troubleshooting
      Suresh Mali
      Suresh Mali
    • RE: Bootloader and fuses for Pro Mini 3.3V using Arduino UNO as ISP

      I have been through the same scenario. My savior was USBasp and AVRDUDESS

      Select programmer and click detect. If the device signature is found you will be able to set the fuse bits. Get the fuse bits from boards.txt in Arduino folder. I prefer using AVRDUDESS rather than Arduino to burn bootloaders. Its very convenient and easy to use.

      Download here http://blog.zakkemble.co.uk/avrdudess-a-gui-for-avrdude/

      0_1456984342210_Capture.PNG

      posted in Troubleshooting
      Suresh Mali
      Suresh Mali
    • RE: I am not able to stop the blinds motor once the first command is sent.

      Here is the sketch for Curtain Node.
      WindowCurtainShield.ino

      I have managed to solve a lot of problems, but some still exist.
      Works great with Domoticz..manual Buttons are still WIP.
      Some pictures for my first version of Node.
      I have left EEPROM and ATSHA204 unpopulated. Will learn more about it and then add.
      I will be using Dual Optiboot to support OTA.

      0_1456723308133_IMG_20160229_103922.jpg
      0_1456723353041_IMG_20160229_103930.jpg
      0_1456723391691_IMG_20160229_104552.jpg

      posted in Troubleshooting
      Suresh Mali
      Suresh Mali
    • Sensor for water quality.

      Hi,

      I have a problem with water supply. Sometimes the water has very bad odor and cannot be used. The only way to check is smell the water. Now when the water supply is on and filling overhead tanks, at beginning the water smells OK, but you don't know when bad water will start flowing. For now we do random checks every now and then to ensure, but sometimes we miss and it gets pumped up contaminating the entire tank. The only way is to drain the tank and refill.

      Is there a sensor that can be used to check the water quality. I read some blogs suggesting use of IR and photo diode and reading the values of photo diode. This could be helpful when there is dirt in water but not smell. Please let me know if any one has any idea how this can be achieved.

      Thanks for reading.

      posted in Hardware
      Suresh Mali
      Suresh Mali
    • RE: Home made OTA and Authentication breakout board.

      @scalz Thanks for clarifying. Anyways, I will still be able to use the EEPROM. Will keep it for future when you have the modified code for i2c protocol. For now I'll have to order ATSHA204A-STUCZ package.

      posted in Hardware
      Suresh Mali
      Suresh Mali
    • Home made OTA and Authentication breakout board.

      Using the reference from https://www.openhardware.io/view/18/OTA-and-Authentication-Evaluation-Board
      I modified the design a bit to accommodate ATShA-204A-SSHDA package.

      Is there something I need to change in the code to use 8 pin ATSHA204.

      1_1454834437061_IMG_20160207_140552.jpg 0_1454834437053_IMG_20160207_095401.jpg

      posted in Hardware
      Suresh Mali
      Suresh Mali
    • RE: Pressure Sensor Node send fails.

      @ericvdb I tried with MYSController. Set Assign ID to Auto, also tried settings up static ID, but does not seem to work.

      posted in Troubleshooting
      Suresh Mali
      Suresh Mali
    • RE: Pressure Sensor Node send fails.

      I have also tried other sketch on same node and they work fine.

      posted in Troubleshooting
      Suresh Mali
      Suresh Mali
    • RE: Over the air (OTA) bootloading update tutorial?

      Hey Guys, I managed to find a EEPROM chip from Bangalore, India. Its 25LC512, priced at Rs.65(~$1). I hope it works. I should get it next 2days. It has the same footprint as one used in SenseBenderMicro. Will try once I have them and update.

      posted in General Discussion
      Suresh Mali
      Suresh Mali
    • RE: Over the air (OTA) bootloading update tutorial?

      @scalz Oh yes, soldering is not an issue. I have rework station and I am proficient with soldering Through Hole and SMD components.
      Its about getting the EEPROMs.

      Buying from Ali would be my last resort. I am hunting for this chip in other parts of India. I should have an answer by day end, If I dont get them then I'll order from Ali. Waiting is the worst part of ordering from Ali. I had Order ATSHA204 on 12th Dec and still waiting.😞

      posted in General Discussion
      Suresh Mali
      Suresh Mali
    • RE: Over the air (OTA) bootloading update tutorial?

      @scalz , ThanksπŸ˜ƒ
      I am not a Device Programmer, I am counting on some one to hack and make it possible. Hope somebody puts in efforts that will help everybody like me.

      posted in General Discussion
      Suresh Mali
      Suresh Mali
    • RE: Over the air (OTA) bootloading update tutorial?

      @ahmedadelhosni Hey, I found this article. Seems like the guy has used i2c for remote flash. I was not able to extactly understand whats going on, maybe you can help.
      http://www.rotwang.co.uk/projects/bootloader.html

      posted in General Discussion
      Suresh Mali
      Suresh Mali
    • RE: Over the air (OTA) bootloading update tutorial?

      @ahmedadelhosni Great, do let us know once you have something.

      posted in General Discussion
      Suresh Mali
      Suresh Mali
    • RE: Over the air (OTA) bootloading update tutorial?

      @scalz Thanks buddy πŸ‘ . Probably I would have to keep hunting for SPI EEPROMs iguess.πŸ˜“

      posted in General Discussion
      Suresh Mali
      Suresh Mali
    • RE: Over the air (OTA) bootloading update tutorial?

      Request, if some one help me with this question. Thanks

      posted in General Discussion
      Suresh Mali
      Suresh Mali
    • RE: I am not able to stop the blinds motor once the first command is sent.

      @mfalkvidd Thanks for your suggestion. It works great.

      posted in Troubleshooting
      Suresh Mali
      Suresh Mali
    • Pressure Sensor Node send fails.

      I have been trying to build a sensor node for Temp+Baro, and have been unsuccessful since last week. The message fails
      Below is the output from Serial Monitor

      req id
      send: 255-255-1-0 s=255,c=3,t=3,pt=0,l=0,sg=0,st=fail:
      sensor started, id=255, parent=1, distance=2
      req id
      send: 255-255-1-0 s=255,c=3,t=3,pt=0,l=0,sg=0,st=fail:
      req id
      send: 255-255-1-0 s=255,c=3,t=3,pt=0,l=0,sg=0,st=fail:
      req id
      send: 255-255-1-0 s=255,c=3,t=3,pt=0,l=0,sg=0,st=fail:
      req id
      send: 255-255-1-0 s=255,c=3,t=3,pt=0,l=0,sg=0,st=fail:
      Temperature = 18.10 *C
      Pressure = 1074.38 hPa
      Forecast = unknown
      req id
      send: 255-255-1-0 s=255,c=3,t=3,pt=0,l=0,sg=0,st=fail:
      req id
      send: 255-255-1-0 s=255,c=3,t=3,pt=0,l=0,sg=0,st=fail:
      req id
      send: 255-255-1-0 s=255,c=3,t=3,pt=0,l=0,sg=0,st=fail:
      Temperature = 17.90 *C
      Pressure = 1074.37 hPa
      Forecast = unknown
      req id
      send: 255-255-1-0 s=255,c=3,t=3,pt=0,l=0,sg=0,st=fail:
      req id
      send: 255-255-1-0 s=255,c=3,t=3,pt=0,l=0,sg=0,st=fail:
      Temperature = 17.80 *C
      Pressure = 1074.46 hPa
      Forecast = unknown
      req id
      send: 255-255-1-0 s=255,c=3,t=3,pt=0,l=0,sg=0,st=fail:
      req id
      send: 255-255-1-0 s=255,c=3,t=3,pt=0,l=0,sg=0,st=fail:
      

      I have researched the forum a lot and tried the below, but no success.

      • Added 10uF caps to both Node and Gateway. Also tried with 100uF caps.
      • Cleared EEPROM.
      • Changed Bootloader.
      • Changed NRF Radio
      • Tried different power source

      I have one more node with Relay and its working fine. So i guess the problem should be with the node. The node is a custom built board with Optiboot. I worked fine a couple of times and now I wont work.
      1_1453856608688_IMG_20160127_0617541-(2).jpg 0_1453856608687_IMG_20160127_061731-(2).jpg
      0_1453856713307_Water_Control.png
      Log file for MYSController when I had the MYSBootloader and tried updating FW using OTA. 0_1453856213616_MySensors_20160127-053410.log

      I am unable to figure out the problem and seek assistance from the experienced gurus out there.

      Appreciate and help I can get.

      posted in Troubleshooting
      Suresh Mali
      Suresh Mali
    • RE: Over the air (OTA) bootloading update tutorial?

      Can I use i2c EEPROM for OTA bootloading with DualOptiboot or it has to be Serial SPI. I was not able to find any documentation on it. I brought a breakout board and it seems to be i2c, and i2c chips are easily available where I live.

      http://www.aliexpress.com/item-img/AT24C256-Serial-EEPROM-I2C-Interface-EEPROM-Data-Storage-Module-PIC-NEW/32471353868.html?spm=2114.10010108.100005.10.sd3Dld

      posted in General Discussion
      Suresh Mali
      Suresh Mali
    • RE: I am not able to stop the blinds motor once the first command is sent.

      Appreciate your response. Will try gw.process in while loop. I am yet to add the code for endpoint of curtain. I will be using reed switch to detect end and start.

      posted in Troubleshooting
      Suresh Mali
      Suresh Mali
    • Unable to sign up for openhardware.io using Google Account

      Unable to sign up for openhardware.io using Google Account. Below error:

      Connect
      500 ValidationError: User validation failed

         at MongooseError.ValidationError (/home/oh/openhardware/node_modules/mongoose/lib/error/validation.js:23:11)
         at model.Document.invalidate (/home/oh/openhardware/node_modules/mongoose/lib/document.js:1283:32)
         at /home/oh/openhardware/node_modules/mongoose/lib/document.js:1158:16
         at validate (/home/oh/openhardware/node_modules/mongoose/lib/schematype.js:662:7)
         at /home/oh/openhardware/node_modules/mongoose/lib/schematype.js:693:9
         at Array.forEach (native)
         at SchemaNumber.SchemaType.doValidate (/home/oh/openhardware/node_modules/mongoose/lib/schematype.js:667:19)
         at /home/oh/openhardware/node_modules/mongoose/lib/document.js:1156:9
         at nextTickCallbackWith0Args (node.js:433:9)
         at process._tickCallback (node.js:362:13)
      posted in Bug Reports
      Suresh Mali
      Suresh Mali
    • I am not able to stop the blinds motor once the first command is sent.

      I trying to build mysensor node for window curtains. I am not very good with programming. Can somebody please help me and point out what am I doing wrong. My code is as below

      #include <SPI.h>
      #include <MySensor.h>
      
      
      int motor_forward = 5;
      int motor_reverse = 6;
      
      int LDRinput = 1;     //analog pin to which LDR is connected, here we set it to 0 so it means A0
      int LDRValue = 0;      //thatοΏ½s a variable to store LDR values
      int light_sensitivity = 500;    //This is the approx value of light surrounding your LDR
      
      int stopSwLeft = 7;
      int stopSwRight = 8;
      int stopSwNow = 2;
      
      int CHILD_CURTAIN_ID =1;
      int lastState;
      MySensor gw;
      MyMessage msg_S_COVER_U(CHILD_CURTAIN_ID, V_UP);
      MyMessage msg_S_COVER_D(CHILD_CURTAIN_ID, V_DOWN);
      MyMessage msg_S_COVER_S(CHILD_CURTAIN_ID, V_STOP);
      //MyMessage msg(CHILD_CURTAIN_ID,V_UP);
      // the setup routine runs once when you press reset:
      void setup()
      {
      	Serial.begin(115200);
      	// initialize the digital pin as an output for L239D.
      	pinMode(motor_forward, OUTPUT);
      	pinMode(motor_reverse, OUTPUT);
      	
      	// initialize the digital pin as an output for Stop Switches.
      	pinMode(stopSwLeft, INPUT);
      	pinMode(stopSwRight, INPUT);
      	pinMode(stopSwNow, INPUT);
      	
      	gw.begin(incomingMessage, AUTO, true);
      	// Send the sketch version information to the gateway and Controller
      	gw.sendSketchInfo("Window_Curtain", "1.0");
      	gw.present(CHILD_CURTAIN_ID, S_COVER);
      	
      }
      
      void loop(){
      	Serial.print("I am in loop begin");
      	gw.process();
      	Serial.print("GW.process done.");
      	//cover();
      
      	}
      void cover(int coverVal){
      
      	//int coverVal = gw.loadState(CHILD_CURTAIN_ID);
      
      	Serial.print("Cover is : ");
      	lastState = coverVal;
      	switch (coverVal) {
      	case 0:
      		Serial.println("Opening");
      			while (lastState == coverVal)
      			{
      				m_left();
      				coverVal = gw.loadState(CHILD_CURTAIN_ID);
      			}
      			gw.send(msg_S_COVER_U.set(V_UP));
      		break;
      	case 1:
      		Serial.println("Closing");
      			while (lastState == coverVal)
      			{
      				m_right();
      				coverVal = gw.loadState(CHILD_CURTAIN_ID);
      			}
      			gw.send(msg_S_COVER_D.set(V_DOWN));
      		break;
      	default:
      		Serial.println("Idle");
      			while (lastState == coverVal)
      				{
      					m_stop();
      					coverVal = gw.loadState(CHILD_CURTAIN_ID);
      				}
      			gw.send(msg_S_COVER_S.set(V_STOP));
      	}
      
      }
      void incomingMessage(const MyMessage &message) {
      	// We only expect one type of message from controller. But we better check anyway.
      	Serial.println("recieved incomming message");
      	switch (message.type) {
      	case V_UP:
      		gw.saveState(CHILD_CURTAIN_ID, 0);
      		Serial.print("Incoming change for ID_S_COVER:");
      		Serial.print(message.sensor);
      		Serial.print(", New status: ");
      		Serial.println("V_UP");
      		cover(gw.loadState(CHILD_CURTAIN_ID));
      		Serial.print("Done cover procedure");
      		//m_right();
      		break;
      
      	case V_DOWN:
      		gw.saveState(CHILD_CURTAIN_ID, 1);
      		Serial.print("Incoming change for ID_S_COVER:");
      		Serial.print(message.sensor);
      		Serial.print(", New status: ");
      		Serial.println("V_DOWN");
      		cover(gw.loadState(CHILD_CURTAIN_ID));
      		Serial.print("Done cover procedure");
      		//m_left();
      		break;
      
      	case V_STOP:
      		gw.saveState(CHILD_CURTAIN_ID, 2);
      		Serial.print("Incoming change for ID_S_COVER:");
      		Serial.print(message.sensor);
      		Serial.print(", New status: ");
      		Serial.println("V_STOP");
      		cover(gw.loadState(CHILD_CURTAIN_ID));
      		Serial.print("Done cover procedure");
      		//m_stop();
      		break;
      	}
      	Serial.print("exiting incoming message");
      }
      // the loop routine runs over and over again forever:
      void m_right() {
      	digitalWrite(motor_forward, HIGH); //terminal D1 will be HIGH
      	digitalWrite(motor_reverse, LOW); //terminal D2 will be LOW
      	Serial.print("Set For:High and Rev: Low");
      	return;
      }
      
      void m_left() {
      	digitalWrite(motor_forward, LOW); //terminal D1 will be LOW
      	digitalWrite(motor_reverse, HIGH); //terminal D2 will be HIGH
      	Serial.print("Set For:Low and Rev: High");
      	return;
      }
      
      void m_stop() {
      	digitalWrite(motor_forward, LOW); //terminal D1 will be LOW
      	digitalWrite(motor_reverse, LOW); //terminal D2 will be HIGH
      	Serial.print("Set For:Low and Rev: Low");
      	return;
      }
      
      
      //---------------------------------------------------------------------------------------------
      //void senselight()
      //{
      //	LDRValue = analogRead(LDRinput);      //reads the ldrοΏ½s value through LDR
      //	Serial.println(LDRValue);       //prints the LDR values to serial monitor
      //	delay(50);        //This is the speed by which LDR sends value to arduino
      //	
      //	if (LDRValue < light_sensitivity)
      //	{
      //		digitalWrite(13, HIGH);
      //	}
      //	else
      //	{
      //		digitalWrite(13, LOW);
      //	}
      //}
      

      I am using Domoticz as controller. Whats happening is once I press Open, the motor keeps spinning in one direction and on sending command to stop it does not stop. BTW I have L293D to control the motor.

      Appreciate any help I can get.

      posted in Troubleshooting
      Suresh Mali
      Suresh Mali
    • RE: Help with Raspberry Install.

      I don't understand your question. If you are talking about the version 1.8.0 showed for java, then yes its Oracle Java.. When you start that's the message you get. You can check with your browser by opening the site, it works fine when I get that message.

      What seems to be the problem here.

      posted in MyController.org
      Suresh Mali
      Suresh Mali
    • RE: Battery Sensor with stepup and on/off transistor

      @n3ro Gr8, makes sense.πŸ‘

      posted in Hardware
      Suresh Mali
      Suresh Mali
    • RE: Battery Sensor with stepup and on/off transistor

      @n3ro Why would you need a step up for DHT, I am running DHT11 on 3.3v and it work fine.

      posted in Hardware
      Suresh Mali
      Suresh Mali
    • RE: Releases

      On using I had a couple of questions.

      • How do I configure more than 1 type of gateway. I have a node which runs using ESP8266 and has DHT11 to read Temp+Hum. Its loaded with EasyESP. Its send data through MQTT. And at the same time Raspi is configured with serial gateway using NRF24L01.

      • Add edit option for Timers.

      posted in MyController.org
      Suresh Mali
      Suresh Mali
    • RE: Releases

      @jkandasa Thanks, Got it working after updating Java 8JDK, which installed JRE1.8

      Is there a page that I can request for features or changes, like There is no section which shows me information about the type of gateway configured and if its working or not.

      posted in MyController.org
      Suresh Mali
      Suresh Mali
    • RE: Releases

      Hi jkandasa,

      Amazing job on the MyController. I am trying to install on raspi. Post installation and setting up java, when tried to start. It does not start, below isw the log file.

      Exception in thread "main" java.lang.UnsupportedClassVersionError: org/mycontroller/standalone/StartApp : Unsupported major.minor version 52.0
      	at java.lang.ClassLoader.defineClass1(Native Method)
      	at java.lang.ClassLoader.defineClass(ClassLoader.java:792)
      	at java.security.SecureClassLoader.defineClass(SecureClassLoader.java:142)
      	at java.net.URLClassLoader.defineClass(URLClassLoader.java:449)
      	at java.net.URLClassLoader.access$100(URLClassLoader.java:71)
      	at java.net.URLClassLoader$1.run(URLClassLoader.java:361)
      	at java.net.URLClassLoader$1.run(URLClassLoader.java:355)
      	at java.security.AccessController.doPrivileged(Native Method)
      	at java.net.URLClassLoader.findClass(URLClassLoader.java:354)
      	at java.lang.ClassLoader.loadClass(ClassLoader.java:424)
      	at sun.misc.Launcher$AppClassLoader.loadClass(Launcher.java:308)
      	at java.lang.ClassLoader.loadClass(ClassLoader.java:357)
      	at sun.launcher.LauncherHelper.checkAndLoadMain(LauncherHelper.java:482)
      

      Please help. Thanks.

      posted in MyController.org
      Suresh Mali
      Suresh Mali
    • RE: Newbie question about network security

      In Domoticz if you look under settings, there is an button Add Device which works like pairing. There is also a check box to not allow any new device unless you click Add.

      posted in Domoticz
      Suresh Mali
      Suresh Mali
    • Ultrasonic Sensor+1 Relay node does not work

      Hi,

      I am trying to build a node with Ultrasonic sensor and 1 relay. I used the sample code and tried to build one. I am facing issues. The Domoticz will detect the ultrasonic sensor using the provided example code but when I merge them it gives error and does not detect. My sketch is as below:

      #include <SPI.h>
      #include <MySensor.h>  
      #include <NewPing.h>
      
      #define CHILD_ID_DISTANCE 1
      #define CHILD_ID_RELAY 10
      #define TRIGGER_PIN  6  // Arduino pin tied to trigger pin on the ultrasonic sensor.
      #define ECHO_PIN     5  // Arduino pin tied to echo pin on the ultrasonic sensor.
      #define MAX_DISTANCE 300 // Maximum distance we want to ping for (in centimeters). Maximum sensor distance is rated at 400-500cm.
      #define RELAY_1  3  // Arduino Digital I/O pin number for first relay (second on pin+1 etc)
      #define RELAY_ON 1  // GPIO value to write to turn on attached relay
      #define RELAY_OFF 0 // GPIO value to write to turn off attached relay
      
      MySensor gw;
      NewPing sonar(TRIGGER_PIN, ECHO_PIN, MAX_DISTANCE); // NewPing setup of pins and maximum distance.
      MyMessage msg(CHILD_ID_DISTANCE, V_DISTANCE);
      int lastDist;
      boolean metric = true; 
      
      void setup()  
      { 
        gw.begin(incomingMessage, AUTO,false);
      
        // Send the sketch version information to the gateway and Controller
        gw.sendSketchInfo("Distance Sensor", "1.0");
      
        // Register all sensors to gw (they will be created as child devices)
          gw.present(CHILD_ID_DISTANCE, S_DISTANCE);
          boolean metric = gw.getConfig().isMetric;
        
          gw.sendSketchInfo("Relay", "1.0");
          // Register all sensors to gw (they will be created as child devices)
          gw.present(CHILD_ID_RELAY, S_LIGHT);
          // Then set relay pins in output mode
          pinMode(RELAY_1, OUTPUT);   
          // Set relay to last known state (using eeprom storage) 
          digitalWrite(RELAY_1, gw.loadState(CHILD_ID_RELAY)?RELAY_ON:RELAY_OFF);
        
      }
      
      void loop()      
      {     
      	gw.process();
      
      	int dist = metric?sonar.ping_cm():sonar.ping_in();
      	Serial.print("Ping: ");
      	Serial.print(dist); // Convert ping time to distance in cm and print result (0 = outside set distance range)
      	Serial.println(metric?" cm":" in");
      
      	  if (dist != lastDist) {
      		  gw.send(msg.set(dist));
      		  lastDist = dist;
      	  }
      
        //gw.sleep(SLEEP_TIME);
      	
      }
      
      void incomingMessage(const MyMessage &message) {
        // We only expect one type of message from controller. But we better check anyway.
        if (message.type==V_LIGHT) {
           // Change relay state
           digitalWrite(RELAY_1, message.getBool()?RELAY_ON:RELAY_OFF);
           // Store state in eeprom
           gw.saveState(message.sensor, message.getBool());
           // Write some debug info
           Serial.print("Incoming change for sensor:");
           Serial.print(message.sensor);
           Serial.print(", New status: ");
           Serial.println(message.getBool());
         } 
      }
      

      I am unable to figure out why it is not working.

      The log file from Domoticz shows the below:

      2015-05-26 07:05:52.585 MySensors: Using serial port: /dev/ttyUSB0
      2015-05-26 07:05:57.410 Error: MySensors: Unhandled sensor (sub-type=13), please report with log!
      2015-05-26 07:05:57.429 Error: MySensors: Unhandled sensor (sub-type=13), please report with log!
      2015-05-26 07:05:57.440 Error: MySensors: Unhandled sensor (sub-type=13), please report with log!
      

      and it keeps on going.
      Below is the output when Node is connected to serial port.

      Ping: 11 cm
      send: 5-5-0-0 s=1,c=1,t=13,pt=2,l=2,st=ok:11
      read: 5-1-0 s=10,c=0,t=3,pt=0,l=5:1.4.1
      Ping: 9 cm
      send: 5-5-0-0 s=1,c=1,t=13,pt=2,l=2,st=ok:9
      read: 5-1-0 s=10,c=0,t=3,pt=0,l=5:1.4.1
      Ping: 9 cm
      Ping: 11 cm
      send: 5-5-0-0 s=1,c=1,t=13,pt=2,l=2,st=ok:11
      read: 5-1-0 s=10,c=0,t=3,pt=0,l=5:1.4.1
      

      I am using Raspberry pi as gateway with Arduino Uno. Arduino Mini Pro as node.
      Please help me figure out what could be the issue. Any help is really appreciated. Thanks.!πŸ˜ƒ

      posted in Domoticz
      Suresh Mali
      Suresh Mali