My final setup to get MySensors and OpenHab communicating via MQTT
-
Hi,
Thanks for the help.I keep getting these messages on the COM port for the MQTT Gateway. What does it mean and what should I do to proceed? Thx.
0;255;3;0;9;MCO:BGN:INIT GW,CP=RNNGA--,VER=2.0.1-beta
0;255;3;0;9;TSM:INIT
0;255;3;0;9;!TSM:INIT:TSP FAIL
0;255;3;0;9;TSM:FAILURE
0;255;3;0;9;TSM:FAILURE:PDT
0;255;3;0;9;TSM:FAILURE:RE-INIT
0;255;3;0;9;TSM:INIT
0;255;3;0;9;!TSM:INIT:TSP FAIL
0;255;3;0;9;TSM:FAILURE
0;255;3;0;9;TSM:FAILURE:PDT
0;255;3;0;9;TSM:FAILURE:RE-INIT -
Update on this. It seems to be working after I found I did not modify the MyConfig.h being used.
After uncommenting #define MY_SOFTSPI
I got below.0;255;3;0;9;MCO:BGN:INIT GW,CP=RNNGA--,VER=2.0.1-beta
0;255;3;0;9;TSM:INIT
0;255;3;0;9;TSM:INIT:TSP OK
0;255;3;0;9;TSM:INIT:GW MODE
0;255;3;0;9;TSM:READY
IP: 192.168.1.108
0;255;3;0;9;MCO:REG:NOT NEEDED
0;255;3;0;9;MCO:BGN:STP
0;255;3;0;9;MCO:BGN:INIT OK,ID=0,PAR=0,DIS=0,REG=1
IP: 192.168.1.108
0;255;3;0;9;Attempting MQTT connection...
0;255;3;0;9;MQTT connected
0;255;3;0;9;Sending message on topic: mygateway1-out/0/255/0/0/18
0;255;3;0;9;TSF:SANCHK:OK
IP: 192.168.1.108
0;255;3;0;9;Attempting MQTT connection...
0;255;3;0;9;MQTT connected
0;255;3;0;9;Sending message on topic: mygateway1-out/0/255/0/0/18 -
@zuolan Good that you found the problem. Don't forget to comment out define MY_SOFTSPI again
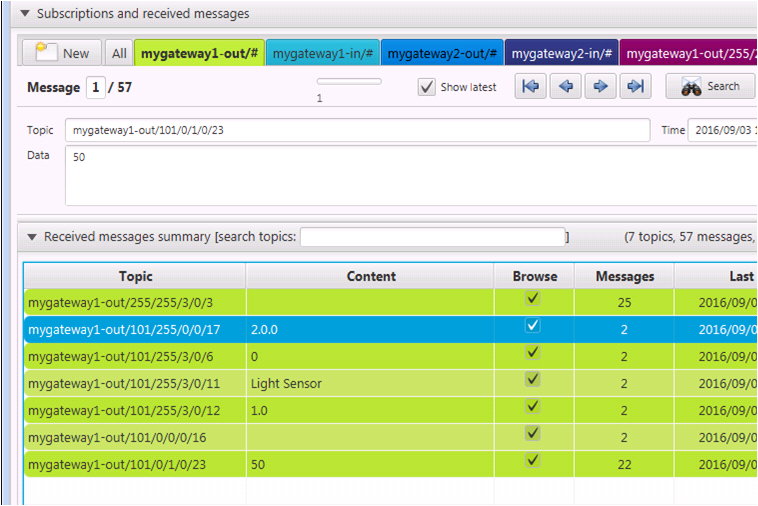
@Martin-Tellblom Something is still not right. I looked at the MQTT messages using
mosquito_sub -v -t 'mygateway1-out/#'
I got below:
mygateway1-out/0/255/0/0/18 2.0.1-beta
...
mygateway1-out/255/255/3/0/3 (null)
...
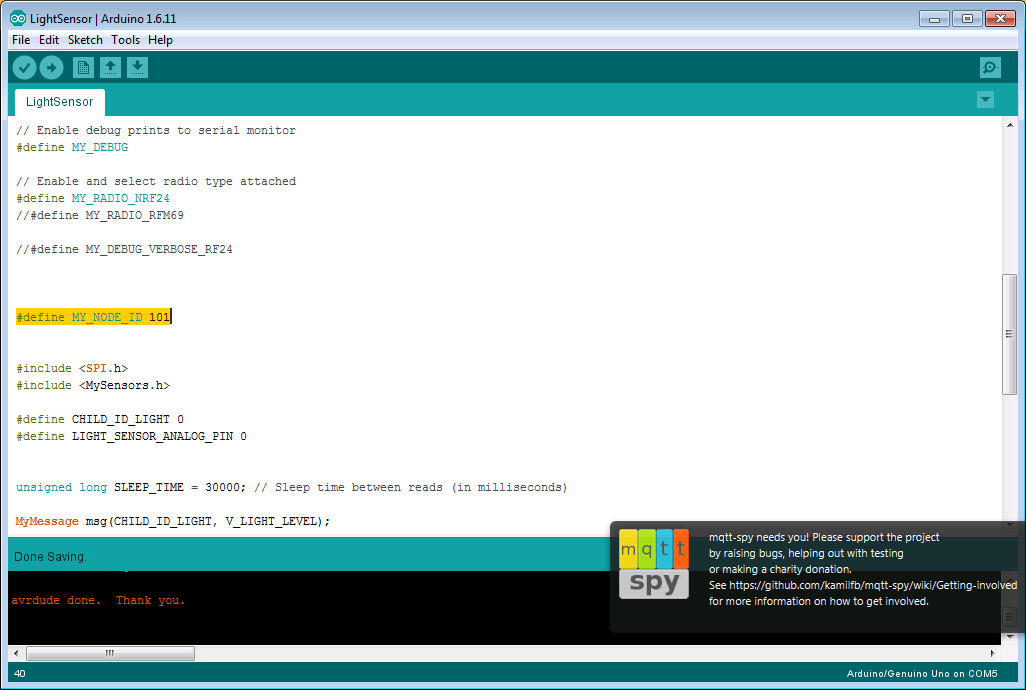
It seems the (null)is where the message body should have been. So the payload is missing.The sensor node is the 'LightSensor' sketch taking an analog data
// Enable debug prints to serial monitor
#define MY_DEBUG// Enable and select radio type attached
#define MY_RADIO_NRF24
//#define MY_RADIO_RFM69#include <SPI.h>
#include <MySensors.h>#define CHILD_ID_LIGHT 0
#define LIGHT_SENSOR_ANALOG_PIN 0unsigned long SLEEP_TIME = 30000; // Sleep time between reads (in milliseconds)
MyMessage msg(CHILD_ID_LIGHT, V_LIGHT_LEVEL);
int lastLightLevel;void presentation() {
// Send the sketch version information to the gateway and Controller
sendSketchInfo("Light Sensor", "1.0",true);// Register all sensors to gateway (they will be created as child devices)
present(CHILD_ID_LIGHT, S_LIGHT_LEVEL);
}void loop()
{
int lightLevel = (1023-analogRead(LIGHT_SENSOR_ANALOG_PIN))/10.23;Serial.println(lightLevel);
if (lightLevel != lastLightLevel) {
send(msg.set(lightLevel));
lastLightLevel = lightLevel;
}
sleep(SLEEP_TIME);
}Why the sensor node is not returning the voltage reading?
What am I doing wrong?Thanks,
-
@Martin-Tellblom Something is still not right. I looked at the MQTT messages using
mosquito_sub -v -t 'mygateway1-out/#'
I got below:
mygateway1-out/0/255/0/0/18 2.0.1-beta
...
mygateway1-out/255/255/3/0/3 (null)
...
It seems the (null)is where the message body should have been. So the payload is missing.The sensor node is the 'LightSensor' sketch taking an analog data
// Enable debug prints to serial monitor
#define MY_DEBUG// Enable and select radio type attached
#define MY_RADIO_NRF24
//#define MY_RADIO_RFM69#include <SPI.h>
#include <MySensors.h>#define CHILD_ID_LIGHT 0
#define LIGHT_SENSOR_ANALOG_PIN 0unsigned long SLEEP_TIME = 30000; // Sleep time between reads (in milliseconds)
MyMessage msg(CHILD_ID_LIGHT, V_LIGHT_LEVEL);
int lastLightLevel;void presentation() {
// Send the sketch version information to the gateway and Controller
sendSketchInfo("Light Sensor", "1.0",true);// Register all sensors to gateway (they will be created as child devices)
present(CHILD_ID_LIGHT, S_LIGHT_LEVEL);
}void loop()
{
int lightLevel = (1023-analogRead(LIGHT_SENSOR_ANALOG_PIN))/10.23;Serial.println(lightLevel);
if (lightLevel != lastLightLevel) {
send(msg.set(lightLevel));
lastLightLevel = lightLevel;
}
sleep(SLEEP_TIME);
}Why the sensor node is not returning the voltage reading?
What am I doing wrong?Thanks,
@zuolan
Hi , mygateway1-out is used when sending commands to MySensors devices. In my setup I have renamed it like this:// Set this nodes subscripe and publish topic prefix #define MY_MQTT_PUBLISH_TOPIC_PREFIX "MySensors" //Changed from "MySensors-in" #define MY_MQTT_SUBSCRIBE_TOPIC_PREFIX "MySensors-out"You should subscribe to the topic that the Gateway is Publishing (i.e MySensors-in)
MySensors MQTT Client Gateway, Openhab, Dashing, Razberry, 1-wire
-
@zuolan
Hi , mygateway1-out is used when sending commands to MySensors devices. In my setup I have renamed it like this:// Set this nodes subscripe and publish topic prefix #define MY_MQTT_PUBLISH_TOPIC_PREFIX "MySensors" //Changed from "MySensors-in" #define MY_MQTT_SUBSCRIBE_TOPIC_PREFIX "MySensors-out"You should subscribe to the topic that the Gateway is Publishing (i.e MySensors-in)
@Martin-Tellblom
OK. I will. Can you post an example of messages you are getting so I have a rough idea?Many thanks.
-
@Martin-Tellblom
OK. I will. Can you post an example of messages you are getting so I have a rough idea?Many thanks.
@zuolan
This is how my Light sensor present itself and submitting data:MySensors/100/255/0/0/17 2.0.0 MySensors/100/255/3/0/6 0 MySensors/100/255/3/0/6 Light Sensor MySensors/100/255/3/0/12 1.0 MySensors/100/100/0/0/16 null MySensors/100/100/1/0/23 7 <--This is the actual light valueSo in my case to monitor the light value in openhab I use this address: MySensors/100/100/1/0/23
MySensors MQTT Client Gateway, Openhab, Dashing, Razberry, 1-wire
-
@zuolan
This is how my Light sensor present itself and submitting data:MySensors/100/255/0/0/17 2.0.0 MySensors/100/255/3/0/6 0 MySensors/100/255/3/0/6 Light Sensor MySensors/100/255/3/0/12 1.0 MySensors/100/100/0/0/16 null MySensors/100/100/1/0/23 7 <--This is the actual light valueSo in my case to monitor the light value in openhab I use this address: MySensors/100/100/1/0/23
@Martin-Tellblom
OK. I am not getting any from 'mygateway1-in/#'. Let me check.Just to be clear, in the above sketch
sendSketchInfo("Light Sensor", "1.0",true);
send(msg.set(lightLevel));
should have caused messages in 'mygateway1-in/#'?
Thanks,
-
@Martin-Tellblom
OK. I am not getting any from 'mygateway1-in/#'. Let me check.Just to be clear, in the above sketch
sendSketchInfo("Light Sensor", "1.0",true);
send(msg.set(lightLevel));
should have caused messages in 'mygateway1-in/#'?
Thanks,
@zuolan
Hi.That's correct, whats shown is the presentation and the last row the LightValue, MySensors/100/100/1/0/23
First of all I don't think there is any problem at all in your sensor sketch, the only thing I have changed in my is that I have changed is that I added this row:
#define MY_NODE_ID 100What I think the problem is that you are subscribing the wrong topic:
As I mentioned before my MQTT settings are:
// Set this nodes subscripe and publish topic prefix
#define MY_MQTT_PUBLISH_TOPIC_PREFIX "MySensors"
#define MY_MQTT_SUBSCRIBE_TOPIC_PREFIX "MySensors-out"
Observerve that the MQTT topics is case sensative ie MySensors is NOT the same as mysensors.
I use MQTT-SPY (java based listener) to look at the messages and here you can look at every message sent when subscribing to # (And there is a BIG differense if you publish to MySensors or /MySensors). I suggest that you use MQTT-SPY and subscribe to both /# and # and that should catch all messages that comes to your broker (exept system messages)
Here you can se the differense between using the correct upper and lowercase and not. The first picture subribes to MySensors/#

And this one subscribes to mysensors/#

MySensors MQTT Client Gateway, Openhab, Dashing, Razberry, 1-wire
-
@zuolan
Hi.That's correct, whats shown is the presentation and the last row the LightValue, MySensors/100/100/1/0/23
First of all I don't think there is any problem at all in your sensor sketch, the only thing I have changed in my is that I have changed is that I added this row:
#define MY_NODE_ID 100What I think the problem is that you are subscribing the wrong topic:
As I mentioned before my MQTT settings are:
// Set this nodes subscripe and publish topic prefix
#define MY_MQTT_PUBLISH_TOPIC_PREFIX "MySensors"
#define MY_MQTT_SUBSCRIBE_TOPIC_PREFIX "MySensors-out"
Observerve that the MQTT topics is case sensative ie MySensors is NOT the same as mysensors.
I use MQTT-SPY (java based listener) to look at the messages and here you can look at every message sent when subscribing to # (And there is a BIG differense if you publish to MySensors or /MySensors). I suggest that you use MQTT-SPY and subscribe to both /# and # and that should catch all messages that comes to your broker (exept system messages)
Here you can se the differense between using the correct upper and lowercase and not. The first picture subribes to MySensors/#
And this one subscribes to mysensors/#
@Martin-Tellblom
Thanks again.I installed mqttspy and changed #define MY_NODE_ID 100.
I subscribe to the following topics:
mygateway1-in
/#I'm still not getting any messages in mygateway1-in.
Especially not this one: "MySensors/100/255/3/0/6 Light Sensor" that you are getting.
All the messages I can see still in mygateway1-out/255/255/3/0/3 topic.
So I think data from my Light Sensor node is not getting through.Your thoughts? And how to debug this?
On the COM port of the Light Sensor I got below. Do you see any indication showing it is sending data to mqtt? What about the !TSM:FALILURE?
!TSM:CHKID:FAIL (ID=255)
!TSM:FAILURE
TSM:PDT
TSM:INIT
TSM:RADIO:OK
TSM:FPAR
TSP:MSG:SEND 255-255-255-255 s=255,c=3,t=7,pt=0,l=0,sg=0,ft=0,st=bc:
TSP:MSG:READ 0-0-255 s=255,c=3,t=8,pt=1,l=1,sg=0:0
TSP:MSG:FPAR RES (ID=0, dist=0)
TSP:MSG:PAR OK (ID=0, dist=1)
TSM:FPAR:OK
TSM:ID
TSP:MSG:SEND 255-255-0-0 s=255,c=3,t=3,pt=0,l=0,sg=0,ft=0,st=ok:
TSM:ID
TSP:MSG:SEND 255-255-0-0 s=255,c=3,t=3,pt=0,l=0,sg=0,ft=0,st=ok:
TSM:ID
TSP:MSG:SEND 255-255-0-0 s=255,c=3,t=3,pt=0,l=0,sg=0,ft=0,st=ok:
TSM:ID
TSP:MSG:SEND 255-255-0-0 s=255,c=3,t=3,pt=0,l=0,sg=0,ft=0,st=ok:
!TSM:CHKID:FAIL (ID=255)
!TSM:FAILURE
TSM:PDT
TSM:INIT
TSM:RADIO:OK
TSM:FPAR -
@zuolan
Hi.That's correct, whats shown is the presentation and the last row the LightValue, MySensors/100/100/1/0/23
First of all I don't think there is any problem at all in your sensor sketch, the only thing I have changed in my is that I have changed is that I added this row:
#define MY_NODE_ID 100What I think the problem is that you are subscribing the wrong topic:
As I mentioned before my MQTT settings are:
// Set this nodes subscripe and publish topic prefix
#define MY_MQTT_PUBLISH_TOPIC_PREFIX "MySensors"
#define MY_MQTT_SUBSCRIBE_TOPIC_PREFIX "MySensors-out"
Observerve that the MQTT topics is case sensative ie MySensors is NOT the same as mysensors.
I use MQTT-SPY (java based listener) to look at the messages and here you can look at every message sent when subscribing to # (And there is a BIG differense if you publish to MySensors or /MySensors). I suggest that you use MQTT-SPY and subscribe to both /# and # and that should catch all messages that comes to your broker (exept system messages)
Here you can se the differense between using the correct upper and lowercase and not. The first picture subribes to MySensors/#
And this one subscribes to mysensors/#
I actually have the problem below solved. Since I already finished writing, so I am leaving this here for other people.
More information on this.
Although the Light Sensor data is not getting through, the Light Sensor node does cause all these MQTT messages to be sent.
Before I turn on the Light Sensor node, there is no MQTT message on the mqttspy and on the GatewayW5100MQTTClient COM port it is very quiet and I got this:
After I turn on the Light Sensor node the MQTT messages started comming and on the GatewayW5100MQTTClient COM port:
0;255;3;0;9;Starting gateway (RNNGA-, 2.0.0)
0;255;3;0;9;TSM:INIT
0;255;3;0;9;TSM:RADIO:OK
0;255;3;0;9;TSM:GW MODE
0;255;3;0;9;TSM:READY
IP: 192.168.1.108
0;255;3;0;9;No registration required
0;255;3;0;9;Init complete, id=0, parent=0, distance=0, registration=1
IP: 192.168.1.108
0;255;3;0;9;Attempting MQTT connection...
0;255;3;0;9;MQTT connected
0;255;3;0;9;TSP:SANCHK:OK
0;255;3;0;9;TSP:SANCHK:OK
0;255;3;0;9;TSP:SANCHK:OK
0;255;3;0;9;TSP:SANCHK:OK<<Light Sensor Turned on>>
0;255;3;0;9;TSP:MSG:READ 255-255-255 s=255,c=3,t=7,pt=0,l=0,sg=0:
0;255;3;0;9;TSP:MSG:BC
0;255;3;0;9;TSP:MSG:FPAR REQ (sender=255)
0;255;3;0;9;TSP:CHKUPL:OK
0;255;3;0;9;TSP:MSG:GWL OK
0;255;3;0;9;TSP:MSG:SEND 0-0-255-255 s=255,c=3,t=8,pt=1,l=1,sg=0,ft=0,st=bc:0
0;255;3;0;9;TSP:MSG:READ 255-255-255 s=255,c=3,t=7,pt=0,l=0,sg=0:
0;255;3;0;9;TSP:MSG:BC
0;255;3;0;9;TSP:MSG:FPAR REQ (sender=255)
0;255;3;0;9;TSP:CHKUPL:OK (FLDCTRL)
0;255;3;0;9;TSP:MSG:GWL OK
0;255;3;0;9;TSP:MSG:SEND 0-0-255-255 s=255,c=3,t=8,pt=1,l=1,sg=0,ft=0,st=bc:0
0;255;3;0;9;TSP:MSG:READ 255-255-0 s=255,c=3,t=3,pt=0,l=0,sg=0:
0;255;3;0;9;Sending message on topic: mygateway1-out/255/255/3/0/3
0;255;3;0;9;TSP:MSG:READ 255-255-0 s=255,c=3,t=3,pt=0,l=0,sg=0:
0;255;3;0;9;Sending message on topic: mygateway1-out/255/255/3/0/3
0;255;3;0;9;TSP:MSG:READ 255-255-0 s=255,c=3,t=3,pt=0,l=0,sg=0:
0;255;3;0;9;Sending message on topic: mygateway1-out/255/255/3/0/3
0;255;3;0;9;TSP:MSG:READ 255-255-0 s=255,c=3,t=3,pt=0,l=0,sg=0:
0;255;3;0;9;Sending message on topic: mygateway1-out/255/255/3/0/3
0;255;3;0;9;TSP:MSG:READ 255-255-255 s=255,c=3,t=7,pt=0,l=0,sg=0:
0;255;3;0;9;TSP:MSG:BC
0;255;3;0;9;TSP:MSG:FPAR REQ (sender=255)
0;255;3;0;9;TSP:CHKUPL:OK
0;255;3;0;9;TSP:MSG:GWL OK
0;255;3;0;9;TSP:MSG:SEND 0-0-255-255 s=255,c=3,t=8,pt=1,l=1,sg=0,ft=0,st=bc:0
0;255;3;0;9;TSP:MSG:READ 255-255-0 s=255,c=3,t=3,pt=0,l=0,sg=0:
0;255;3;0;9;Sending message on topic: mygateway1-out/255/255/3/0/3
0;255;3;0;9;TSP:MSG:READ 255-255-0 s=255,c=3,t=3,pt=0,l=0,sg=0:
0;255;3;0;9;Sending message on topic: mygateway1-out/255/255/3/0/3
0;255;3;0;9;TSP:MSG:READ 255-255-0 s=255,c=3,t=3,pt=0,l=0,sg=0:
0;255;3;0;9;Sending message on topic: mygateway1-out/255/255/3/0/3
0;255;3;0;9;TSP:MSG:READ 255-255-0 s=255,c=3,t=3,pt=0,l=0,sg=0:
.......So question is why the messages from Light Sensor do not get through (or I am still not capturing them) while causing messages being sent on mygateway1-out/255/255/3/0/3?
See next post.
-
@zuolan
Hi.That's correct, whats shown is the presentation and the last row the LightValue, MySensors/100/100/1/0/23
First of all I don't think there is any problem at all in your sensor sketch, the only thing I have changed in my is that I have changed is that I added this row:
#define MY_NODE_ID 100What I think the problem is that you are subscribing the wrong topic:
As I mentioned before my MQTT settings are:
// Set this nodes subscripe and publish topic prefix
#define MY_MQTT_PUBLISH_TOPIC_PREFIX "MySensors"
#define MY_MQTT_SUBSCRIBE_TOPIC_PREFIX "MySensors-out"
Observerve that the MQTT topics is case sensative ie MySensors is NOT the same as mysensors.
I use MQTT-SPY (java based listener) to look at the messages and here you can look at every message sent when subscribing to # (And there is a BIG differense if you publish to MySensors or /MySensors). I suggest that you use MQTT-SPY and subscribe to both /# and # and that should catch all messages that comes to your broker (exept system messages)
Here you can se the differense between using the correct upper and lowercase and not. The first picture subribes to MySensors/#
And this one subscribes to mysensors/#
@Martin-Tellblom
Your advice of changing the MY_NODE_ID made the difference. I foolishly left it in the MyConfig.h file so it is conflicting with the gateway.
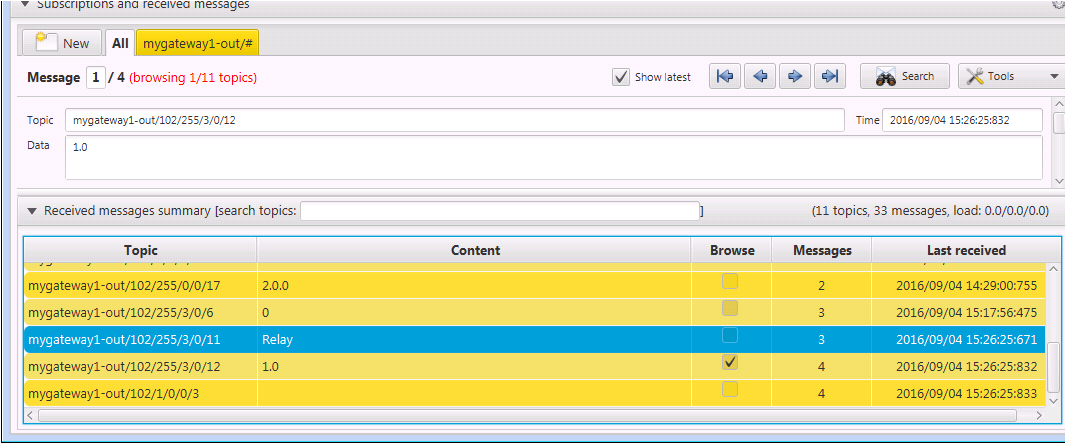
So on mqttspy I now get this!!!!!!!!!!!!!!!!!!!!!!!!!!!
Thanks so much for helping me.
-
On the topic of editing header files, I found (maybe this is obvious for other people) many including the #define MY_SOFTSPI should be done in the sketch (before the corresponding header file is included?). In this way you don't have to worry about changing it back or conflict.
-
Thats good that you found the problem.
-
Thanks.
I now try to get MQTT to talk to openhab by following the RelayActuator example. I only have the openhab demo running.
I am not sure I have enough information in the above instruction to comple the mqtt.items file. For the following MQTT topics setup of mine,
I will try the following for the first line:
String Garage_Door "Garage Door [%s]" (gGarage, Windows) {mqtt="<[broker:mygateway1-out/102/1/1/0/2:state:MAP(1closed0open.map)]"}For the second line I am really stuck about how the do the "/2/2/0/0/2/"part:
Switch MQTTTestSwitch "MQTT Test Switch" (gBasement) {mqtt=">[broker:mygateway1-in/2/2/0/0/2:command:ON:1],>[broker:mygateway1-in/2/2/0/0/2:command:OFF:0]"}How should one figure out?
OK. To answer my own question the information is clearly here:
https://www.mysensors.org/download/serial_api_20#sensor-typesI will be reading up.
-
@Meshx86 said:
s distribution, i can't get openhab to distribute Address to the nodes when connecting, the MQTT Gateway sketch of my sensors doesn't do that right ?
Any tips that would be great
Set a static node id using
#define MY_NODE_ID 2020 in this case is the node id.
MySensors MQTT Client Gateway, Openhab, Dashing, Razberry, 1-wire
-
@Meshx86 said:
s distribution, i can't get openhab to distribute Address to the nodes when connecting, the MQTT Gateway sketch of my sensors doesn't do that right ?
Any tips that would be great
Set a static node id using
#define MY_NODE_ID 2020 in this case is the node id.
@Martin-Tellblom cheers
-
I wanted a solid platform to connect MySensors to OpenHab. I struggled getting messages to come back from OpenHab to MySensor with both the serial gateway and the MQTTGateway on 1.5.4. Finally I abandoned that approach and went to MySensors 2.0 MQTTClientGateway > Mosquito > OpenHab and it all works beautifully. I am posting my final setup so that maybe it will help others trying to accomplish the same thing. If I have omitted anything critical please reply and I will try to update this.
Controller
- Raspberry Pi (Jessie)
- Openhab 1.8
- make sure you org.openhab.binding.mqtt-1.8.1.jar in your addons directory
- 192.168.1.101
MQTT Broker
- Mosquito on same Raspberry Pi as OpenHab
- followed steps to install here https://mosquitto.org/2013/01/mosquitto-debian-repository/
- 192.168.1.101 running on port 1883 this needs to be set in both OpenHab.cfg and in GatewayW5100MQTTClient sketch (see below)
MQTT Client Gateway
- Genuine Arduino
- Gikfun Ethernet Shield W5100
- Addicore nRF24L01
- MySensors 2.0 https://github.com/mysensors/Arduino/archive/master.zip
- GatewayW5100MQTTClient from examples folder in zip
MySensors RelayActuator
- Arduino Nano clone
- Addicore nRF24L01
MQTT Client on my iPhone
- This is so useful for getting the messaging correct (both from OpenHab and Sensor)
- MQTT Inspector 1.0 is the one i used
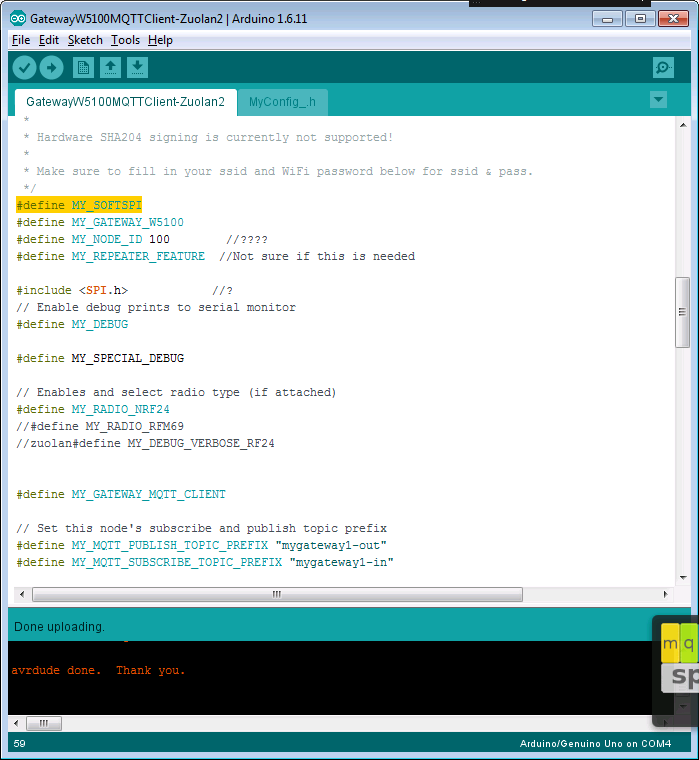
GatewayW5100MQTTClient sketch I didn't change these lines but you need to note them. They form an important part of the message structure that your openhab items will need to subscribe to
// Set this nodes subscripe and publish topic prefix
#define MY_MQTT_PUBLISH_TOPIC_PREFIX "mygateway1-out"
#define MY_MQTT_SUBSCRIBE_TOPIC_PREFIX "mygateway1-in"
It is important to change the lines below so that the MySensors MQTT Client device is on your network and can communicate correctly. Use the same subnet as your other devices. You can get gateway information using ipconfig on windows..
// Enable MY_IP_ADDRESS here if you want a static ip address (no DHCP)
#define MY_IP_ADDRESS 192,168,1,87

// If using static ip you need to define Gateway and Subnet address as well
#define MY_IP_GATEWAY_ADDRESS 192,168,1,1
#define MY_IP_SUBNET_ADDRESS 255,255,255,0
Change these lines to point to your Mosquito MQTT Broker
// MQTT broker ip address or url. Define one or the other.
//#define MY_CONTROLLER_URL_ADDRESS "m20.cloudmqtt.com"
#define MY_CONTROLLER_IP_ADDRESS 192, 168, 1, 101

// The MQTT broker port to to open
#define MY_PORT 1883
openhab.cfg I probably should have called the broker mosquitto instead of mysensor but just note that this is the alias openhab will use to talk to the broker and can be anything you choose
# URL to the MQTT broker, e.g. tcp://localhost:1883 or ssl://localhost:8883
mqtt:mysensor.url=tcp://192.168.1.101:1883

# Optional. Client id (max 23 chars) to use when connecting to the broker.
# If not provided a default one is generated.
mqtt:mysensor.clientId=openhab
1closed0open.map this is in opt/openhab/configurations/transform
1=closed
0=open
mqtt.items
before each message is a symbol. < means openhab is subscribing to this topic. As such topics need to be prefixed with the values in your gateway. If you left the default use mygateway1-out prefix. I am not including the code I use to publish to the Garage Door item. > means openhab is publishing to this item. The default prefix here is mygateway1-in. Now the good news here is once everything gets connected and starts sending messages, you can use a MQTT client to watch for specifc messages by subscribing to both mygateway1-out/# and mygateway1-in/#. This is how i dialed in the values you see in my mqtt.items file.String Garage_Door "Garage Door [%s]" (gGarage, Windows) {mqtt="<[mysensor:mygateway1-out/101/3/1/0/16:state:MAP(1closed0open.map)]"} Switch MQTTTestSwitch "MQTT Test Switch" (gBasement) {mqtt=">[mysensor:mygateway1-in/2/2/0/0/2:command:ON:1],>[mysensor:mygateway1-in/2/2/0/0/2:command:OFF:0]"}Modified RelayActuator Sketch from MySensors 2.0 examples
/**
 * The MySensors Arduino library handles the wireless radio link and protocol
 * between your home built sensors/actuators and HA controller of choice.
 * The sensors forms a self healing radio network with optional repeaters. Each
 * repeater and gateway builds a routing tables in EEPROM which keeps track of the
 * network topology allowing messages to be routed to nodes.
 *
 * Created by Henrik Ekblad <henrik.ekblad@mysensors.org>
 * Copyright (C) 2013-2015 Sensnology AB
 * Full contributor list: https://github.com/mysensors/Arduino/graphs/contributors
 *
 * Documentation: http://www.mysensors.org
 * Support Forum: http://forum.mysensors.org
 *
 * This program is free software; you can redistribute it and/or
 * modify it under the terms of the GNU General Public License
 * version 2 as published by the Free Software Foundation.
 *
 *******************************
 *
 * REVISION HISTORY
 * Version 1.0 - Henrik Ekblad
 *
 * DESCRIPTION
 * Example sketch showing how to control physical relays.
 * This example will remember relay state after power failure.
 * http://www.mysensors.org/build/relay
 */

// Enable debug prints to serial monitor
#define MY_DEBUG

// Enable and select radio type attached
#define MY_RADIO_NRF24
//#define MY_RADIO_RFM69

// Enable repeater functionality for this node
// #define MY_REPEATER_FEATURE

#include <SPI.h>
#include <MySensors.h>

#define RELAY_1  3  // Arduino Digital I/O pin number for first relay (second on pin+1 etc)
#define NUMBER_OF_RELAYS 1 // Total number of attached relays
#define RELAY_ON 1  // GPIO value to write to turn on attached relay
#define RELAY_OFF 0 // GPIO value to write to turn off attached relay
#define LED_PIN 6

void before() {

}

void setup() {
    // Then set relay pins in output mode
    pinMode(LED_PIN, OUTPUT);
    // Set relay to last known state (using eeprom storage)
    digitalWrite(LED_PIN, LOW);
}

void presentation()
{
  // Send the sketch version information to the gateway and Controller
  sendSketchInfo("Relay", "1.0");

    // Register all sensors to gw (they will be created as child devices)
    present(2, S_LIGHT);

}


void loop()
{

}

void receive(const MyMessage &message) {
  Serial.print("V_LIGHT=");
  Serial.print(V_LIGHT);
  Serial.print("got message of type ");
  Serial.println(message.type);
  // We only expect one type of message from controller. But we better check anyway.
  if (message.type==V_LIGHT) {
     // Change relay state
     digitalWrite(LED_PIN, message.getBool()?RELAY_ON:RELAY_OFF);
     // Store state in eeprom
     saveState(message.sensor, message.getBool());
     // Write some debug info
     Serial.print("Incoming change for sensor:");
     Serial.print(message.sensor);
     Serial.print(", New status: ");
     Serial.println(message.getBool());
   }
}
One other thing to note is that the type of item can affect how it reacts to values. For example, originally my Garage Door item was of type contact and i kept getting messages in my openhab.log that said it could not set state because new value was NULL. I switched it to string and it worked.
@Eric-Buhring I found that changing the line in the my sensors program that sends the message as below allowed me to use a Contact rather than a Switch
if (value != sentValue2) {
		// Value has changed from last transmission, send the updated value
		send(msg2.set(value==HIGH?"OPEN":"CLOSED"));
		sentValue2 = value;

	}

Hello! It looks like you're interested in this conversation, but you don't have an account yet.
Getting fed up of having to scroll through the same posts each visit? When you register for an account, you'll always come back to exactly where you were before, and choose to be notified of new replies (either via email, or push notification). You'll also be able to save bookmarks and upvote posts to show your appreciation to other community members.
With your input, this post could be even better 💗
Register Login