Is it possible to run more than one pin to an interrupt for sleep/wake purposes?


  • Hi,

    I have a 4x4 keypad working as a scene controller with MySensors. Before I decided to run hard power wire to each point I want to run a keypad, I would like to look at going battery powered. I know I can't run the Nano and the radio continuously for long, so I need to use a sleep function. The only problem with that of course is, the 8 pins I am using for the keypad aren't all interrupts.

    Just wondering if there is any way around this?


  • Hero Member


  • Hardware Contributor


  • @Ivan-Z

    Yes, I have seen your project 🙂 I love it, and would love to incorporate it for my scene controllers; just presently I need to have access to 8 digital pins for it to work right. I'm working on a way to get itdown to 1 analog pin, but that doesn't help my interrupt problem at all.

    @Sparkman

    I'll look into this more, thank you.


  • @Ivan-Z

    Just looked closer at your design; you already have the interrupt set up on D2 don't you? 🙂

    If that's the case; out of curiosity, is there room for a couple of analog pins in the design that could work as digital?


  • Hardware Contributor

    This is only a project (In progress).
    Be sure to add
    But I think that it only increase consumption


  • Hero Member

    @drock1985 A quick drawing of a circuit which enables you to use only one interrupt...

    When any of the keys is pressed you get an interrupt (FALLING) on D2. From that moment on you can poll the keyboard. Any of the digital and analog pins can be used for that purpose (except those in use by the radio..)

    0_1455631736914_upload-4b4253c4-b2ea-4aa7-862f-efe109b9b269

    (you need to change the resistor values on the left side of the drawing to 10Mohm)


  • @AWI

    Thanks AWI, i'll prototype something out a bit later and give it a shot.


  • @AWI I have such a keypad 4x4 and I would like to use it with the famous my slim aa battery node. I think I understand your drawing. What I don't understand is what diodes do I need to use? I mean what type?

    Also, if I was to include a green and red diode, or a bi-colour diode, what specifications would they need to have? Any links to the usual "shops"?

    Thanks!


  • Hero Member

    @karl261 You can use almost any diode, e.g a 1Nxxxx type

    And for bi-color LED's many choices , just include a resistor (around 300ohm) in series.


  • Hardware Contributor

    Maybe a stupid question but why don't you change your keypad with a capacitive touch keypad ?
    I have one of these and it's convenient, low power usage in sleep mode and one interrupt pin for keypress on any of the keys. Just make sure you only connect it to 3.3V, for power AND logic.
    http://www.aliexpress.com/item/MPR121-Capacitive-Touch-Keypad-Shield-module-sensitive-key-keyboard/32642505921.html


  • @Nca78 yes, you are absolutely right. Maybe that is what I'll do. Sound much easier. Thanks for the link, I check it out!


  • But in the end, I prefer the keypad I have. It looks nice.

    Maybe this is the simplest solution? It turns the keypad into i2c:
    https://www.hackster.io/venkatesh_rao/i2c-keypad-73a012


  • Wow, this is so cool, the pcf8574 port expander works out of the box. If now even the interrupt works...


  • Ok, in the end I am stuck. So, I got the keypad working, no problem. But I cannot get it to trigger an interrupt. The PCF8574 has an interrupt pin, but it seems this does not work with this keypad. Or at least I could not figure out how to. So, my keypad speaks I2C now, but still has no interrupt capabilites.

    Can anyone advise?

    If not I will need to build the circuit from @AWI. Btw, in that circuit, Are ALL resistors 10 MOhm?

    Or are R1-4 1 MOhm?


  • Few crazy solutions:

    1. I put in an on / off switch. So before I type, I switch the whole thing on, wait until it registers with the gw, and then here we go. And then off. No need to sleep and wait for interrupts.

    2. I can install a button device. So, the thing is sleeping, I press the button, the thing wakes up for 30 secs, that gives me time to type and send, and back it goes to sleep.

    3. I have a 4x4 keypad. So, I don't need the ABCD. I could connect the ABCD in a way, that it acts like button device, so I can trigger the interrupt with ABCD, then type my number, and then it goes back to sleep.


  • Hero Member

    @karl261 these options seem all very odd to me. I2c should work, did you activate a pull-up for the interrupt pin? Can you post your sketch and hardware connections?


  • @AWI Thanks for trying to help! Just a quick question first: Do I draw the circuit by hand or is there a good cheap (free) way to do it on the PC? Or tablet?

    I think it is how the pcf8574 is designed. I detect no change on the interrupt pin. But yes, maybe my wiring is not good.


  • Mod

    @karl261 by hand is quick and easy. I like to use Fritzing, which is a free tool.


  • Hero Member

    @karl261 As @mfalkvidd said. just make an simple hand drawing on how you connected the pfc8574 and the int pin. The rest is obvious. The pcf8574 can generate an interrupt on any change of the input pins.


  • @mfalkvidd Cool stuff, thanks!

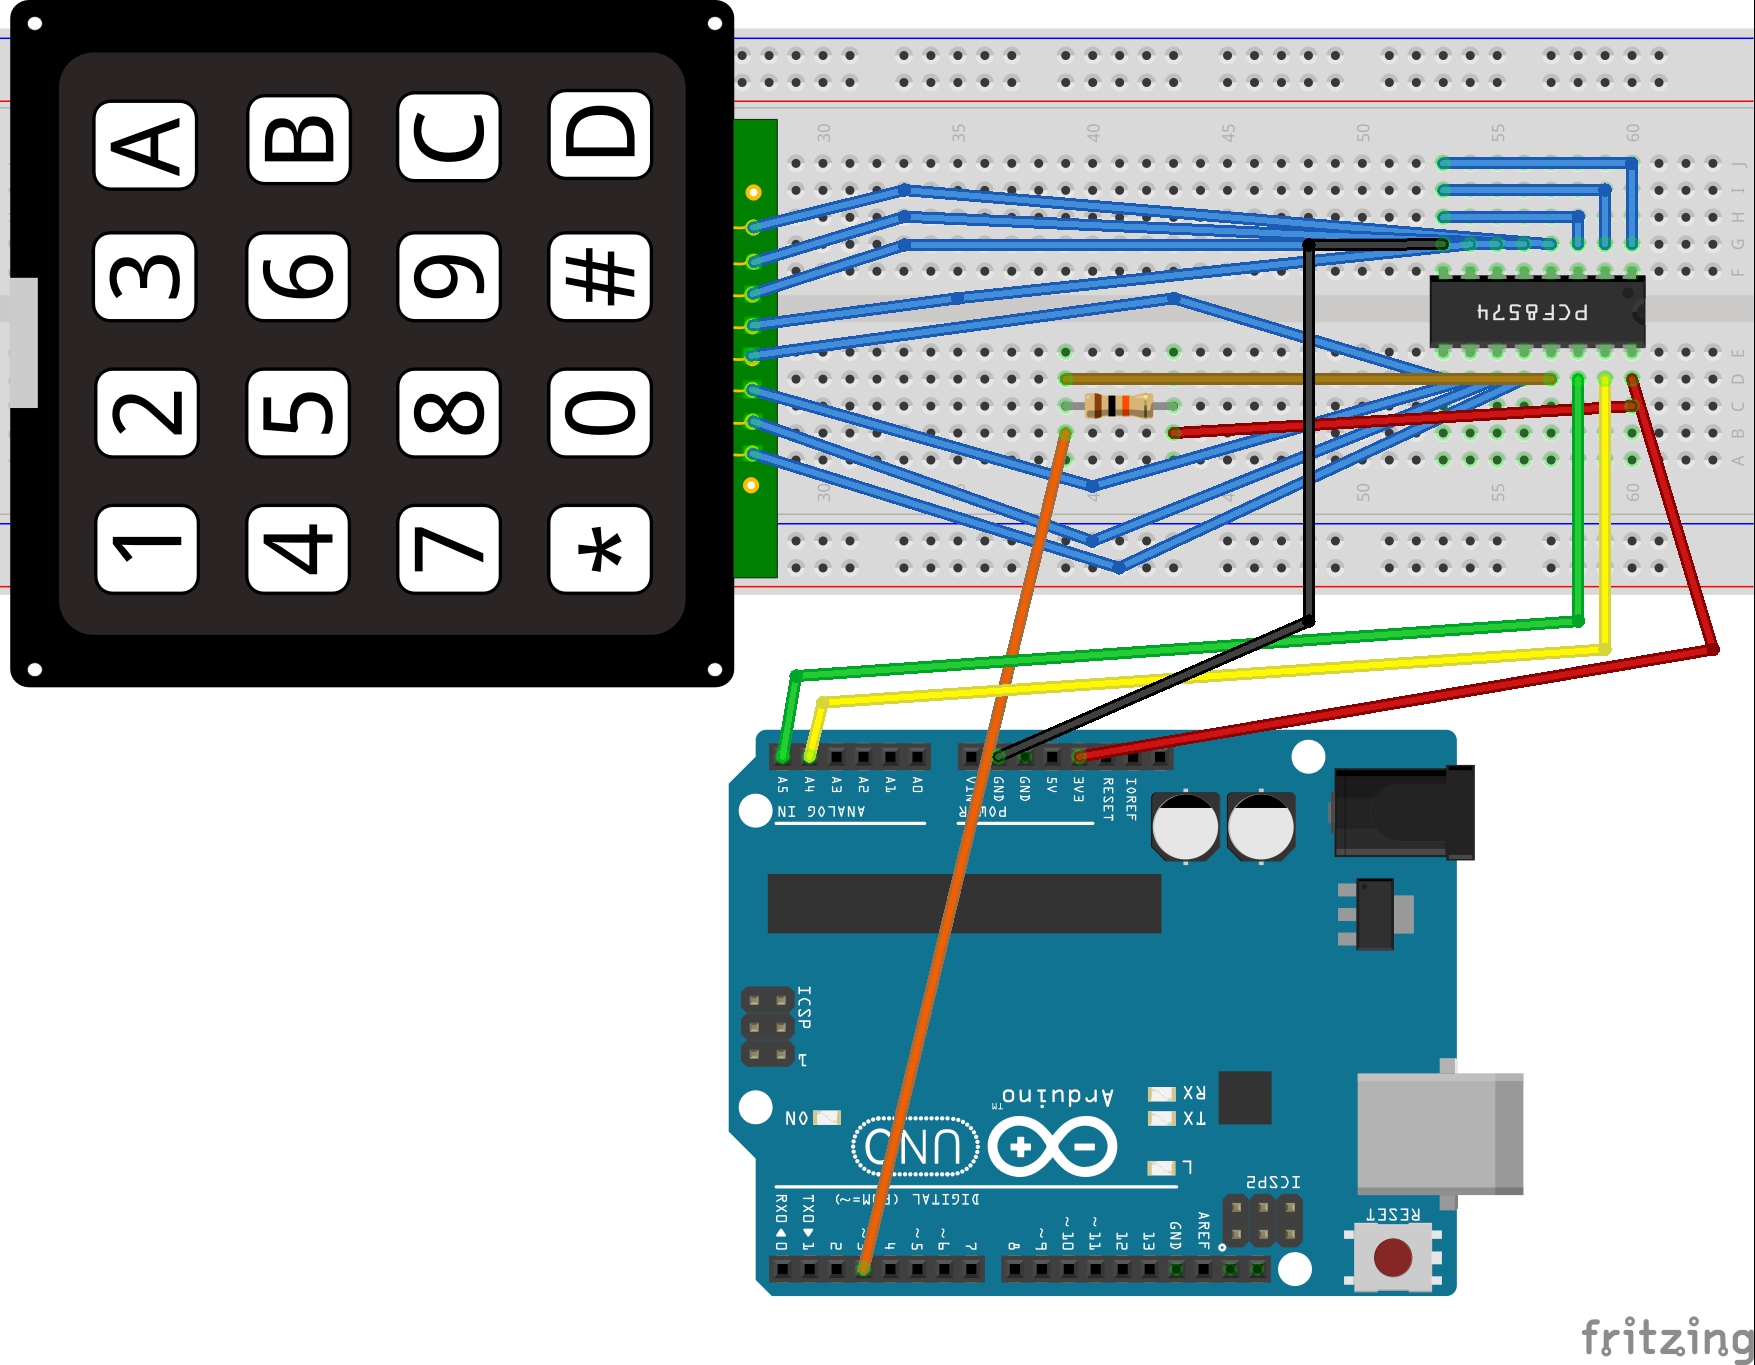
    @AWI Here you go. What a chaos... Sorry. 🙂 I thought of a setup like this. But the interrupt pin of the pcf is not doing anything. Maybe I need another chip?

    The resistor is 10kOhm.

    NRF is also connected. And working.

    The sketch is not ready, but the keyboard works on the serial line.

    0_1474716234250_Untitled Sketch_Steckplatine.jpg

    #include <Wire.h>
    #include <Keypad_I2C.h>
    #include <Keypad.h>
    #define I2CADDR 0x38
    
    #define MY_DEBUG
    #define MY_RADIO_NRF24
    #define MY_NODE_ID 8
    
    
    #include <MySensors.h>
    #include <SPI.h>
    
    
    unsigned long SLEEP_TIME = 0; // Sleep time between reports (in milliseconds)
    #define DIGITAL_INPUT_SENSOR 3   // The digital input you attached your motion sensor.  (Only 2 and 3 generates interrupt!)
    #define CHILD_ID 1   // Id of the sensor child
    
    const byte ROWS = 4; //four rows
    const byte COLS = 4; //three columns
    char keys[ROWS][COLS] = {
      {'1','2','3','A'},
      {'4','5','6','B'},
      {'7','8','9','C'},
      {'*','0','#','D'}
    };
    
    // Digitran keypad, bit numbers of PCF8574 i/o port
    byte rowPins[ROWS] = {0, 1, 2, 3}; //connect to the row pinouts of the keypad
    byte colPins[COLS] = {4, 5, 6, 7}; //connect to the column pinouts of the keypad
    
    Keypad_I2C kpd( makeKeymap(keys), rowPins, colPins, ROWS, COLS, I2CADDR, PCF8574 );
    
    void setup(){
        Wire.begin( );
        kpd.begin( makeKeymap(keys) );
    //    Serial.begin(9600);
        Serial.println( "start" );
        pinMode(DIGITAL_INPUT_SENSOR, INPUT);      // sets the motion sensor digital pin as input
    }
    
    void loop(){
    
        Serial.println("Waking up");
    
        char key = kpd.getKey();
        
        if (key){
        Serial.println(key);
        }
    
        Serial.println("Good Night");
        delay(100);
        sleep(digitalPinToInterrupt(DIGITAL_INPUT_SENSOR), FALLING, SLEEP_TIME);
    }
    

  • Hero Member

    @karl261 Nice Job! I have to dive into the Keypad library to determine if the interrupt is activated... just give me a little longer ..


  • @AWI Thanks for the flowers. 😉 Your help is much appreciated!


  • Hero Member

    @karl261 It is a pretty hard to find where a possible cause is.. 😕
    What should happen to generate an interrupt is a change in one of the inputs. In a standard application the outputs (i.e. rows or colums) will be set to low and the inputs (colums or rows) pulled-up.
    I can't figure out what the state of the row's/ column's is in the idle state from the library. YOu can probably measure if the rows en colums have a different level Sorry for now...


  • @AWI I don't recall that columns and rows have a different level. Of what I measured yesterday was that all 8 pins of the keyboard were at 3.3 V. So the only thing that happens is that there will be a connection made between column and row when a key is pressed. It seems that nothing is pulled up or down. 😕

    So you think the ic can do it? Then we have to re-program the library... 😞

    http://www.ti.com/lit/ds/symlink/pcf8574.pdf
    On page 15 is a wiring example. Maybe we can learn something from this. Some pull up missing?

    EDIT: No, still can"t get it to work. Buh.


  • No progress....

    Maybe this library is better to understand the pcf...

    https://github.com/RobTillaart/Arduino/tree/master/libraries/PCF8574

    Also here are some explanations (in German) and some code examples (in English)...

    http://www.mikrocontroller.net/articles/Port-Expander_PCF8574


  • Hero Member

    @karl261 There is no clue reading through the articles. I suggest you try to force an interrupt by pulling one pin low in idle. If that works, we go from there.

    There are a few 16key & 8key more simple examples 😉 with touch keypads


  • @AWI I think the problem is with the keypad. Because it is not really putting a signal to its pins. The only thing it does is short circuiting them when a key is pressed... No change in high or low.

    I tried for example to pull row 1 to high and column 1 to low. Then the interrupt fires ( I think) but there is no key press detected any more. But I am not sure if the interrupt fires correctly.

    I tested some variations last night, but nothing works. It's all still set up on the breadboard, so if you have some suggestions I am happy to try.


  • Hero Member

    @karl261 That's how it is supposed to be. When the library "scans" the keyboard it succesively pulls one of the rows (or colums) and check in the colums (or rows) if there is a connection. To have interrupts detected either the rows of colums should be set to low to detect a change. That would mean adapting the library (if possible) -or- (more fun) build your own routine by using Rob Tillaarts basic library from your previous post.
    I don't have any PCF8574 to play with...


  • @AWI Yes, basically, 4 inputs should be set to high in the library, and 4 inputs to low. Rows and columns. I had a look at the library examples yesterday, but so far it is beyond my programming skills. As far as I understand from all the docs this is theoretically possible.

    Then, if done so, the pcf should detect a change in the low/high of the input pins and also detect what key was pressed. Or better the library interprets the received data by i2c correctly.


  • @AWI Yeah, I guess just getting another keypad would be the easiest solution. Pitty though. I like my keypad and the fact that it is self-adhesive on the outside of the case.


  • Or I go back to my three proposed solutions. For example solution 3) works fine. I tested it.


  • @AWI I think this Library sounds very promising. What do you think? At least it talks about high and low.

    http://playground.arduino.cc/Main/I2CPortExpanderAndKeypads


  • Hero Member

    @karl261 At least it is a more comprehensible library but it does not deal with interrupts (yet).
    Are you able to do the following experiment?

    • Using the library you quoted, execute the following sketch
    #include <Wire.h>
    #include <i2ckeypad.h>
    
    #define ROWS 4
    #define COLS 3
    
    // With A0, A1 and A2 of PCF8574 to ground I2C address is 0x20
    #define PCF8574_ADDR 0x20
    
    
    i2ckeypad kpd = i2ckeypad(PCF8574_ADDR, ROWS, COLS);
    
    void setup()
    {
      Serial.begin(9600);
    
      Wire.begin();
    
      kpd.init();
       
    
      Serial.print("Testing keypad/PCF8574 I2C port expander arduino lib\n\n");
    
      pcf8574_write(pcf8574_i2c_addr, 0xf0);
    
    }
    
    void loop()
    {
    }
    
    
    • measure the input/output pins of the pcf8574 (should be 4 pins low/ 4 pins high)
    • measure the power consumption of the pcf8574 (hope it is next to nothing)

    IF the above is true we can easily rework te sketch to use the interrupt.


  • @AWI Thanks. I am in the train now and I am spending my time to try to understand how things work. I also made some progress in my brain. My idea is similar, but you already have a sketch ready. 🙂 I will try it out, I guess on Saturday. Until then I will try to deepen my knowledge of the libraries.

    It is also possible with the "original" library, but you are right: the "new" library is much clearer.


  • @AWI I found this library:

    https://github.com/skywodd/pcf8574_arduino_library

    There is a lot of talk about interrupt functionality and it seems to be somehow implemented. But I don't fully understand how it works. Maybe you can make something out of it?

    Oh, and maybe in even more detail with some examples, I have not read it yet:

    https://github.com/RalphBacon/PCF8574-Pin-Extender-I2C

    ...but it looks like a software interrupt rather than a hardware interrupt??? I am confused.

    ... at least for the last example: It does not need any library. It's all quite clear in one sketch.


  • Hero Member

    @karl261 the last sketch does not work with interrupts. It just mentions them.

    I would stick with the previous suggestion. Measure the current when you set some outputs to low (low is active 1)


  • @AWI Yes, I will work with the test sketch on the weekend. It is clear to me now how to set pins of the PCF8574 to HIGH or LOW, and from there we can see.


  • @AWI Finally:

    Yes, it works as expected. 4 pins are 0 V and 4 pins are 3.3 V. The chip is using 2.5 uA.

    I had to change a little bit the library, it did not compile and was slightly outdated, also the function we wanted to use was private, but I just did the changes in the library.

    I also needed to update to the latest arduino from 1.6.5 to 1.6.12, because i got an error: collect2.exe: error: ld returned 5 exit status. Now it works.

    Where do we go from here?


  • Hero Member

    @karl261 Thats good news! What you now have is 4 rows high/ 4 colums low (or v.v.). Now short a column with a row and and expect 👶 an interrupt (= keypress). If that is the case, you can create (or copy) a routine to read the key or keys pushed.


  • @AWI yeah, I kind of thought the same. I'll try to have rows high and colls low and see if the interrupt pin finally triggers. I should have some pull up on the interrupt pin. Then I'll need to see if I need any pull up or down on the other lines..,

    Hope I'll get something done this weekend.


  • @AWI Ok, so far so good. If I connect 4 high wires to rows and 4 low wires to columns (or vice versa, no idea) then the interrupt pin indeed changes to 0. If I connect the interrupt pin of the IC to D3of the Arduino and then both through a pull up of 10 kOhm to Vcc, the interrupt is at 3.3 V. If I press a key it goes down to 0.040 V. That should be enough to read it as low.

    That sounds good, doesn't it? The question is, whether the key library still works...


  • Hero Member

    @karl261 Certainly and it can be pretty straight forward from here. Stick to the library you use (this), it contains all you need. You need to let MySensors catch the interrupt (in the sleep function) and have the callback routine (receive) execute char key = kpd.get_key(); as described in the example.


  • @AWI It does not compile... I get this stupid error again:

    collect2.exe: error: ld returned 5 exit status

    But I don't know what to do with it.


  • current code

    sketch

    #include <Wire.h>
    #include <i2ckeypad.h>
    
    #define ROWS 4
    #define COLS 4
    
    // With A0, A1 and A2 of PCF8574 to ground I2C address is 0x20
    #define PCF8574_ADDR 0x38
    #define PCF8574_PIN_CONFIG 0xf0
    
    
    i2ckeypad kpd = i2ckeypad(PCF8574_ADDR, ROWS, COLS, PCF8574_PIN_CONFIG);
    
    void setup()
    {
      Serial.begin(9600);
    
      Wire.begin();
    
      kpd.init();
       
    
      Serial.print("Testing keypad/PCF8574 I2C port expander arduino lib\n\n");
    
    //  pcf8574_write(pcf8574_i2c_addr, 0xf0);
    
    }
    
    void loop()
    {
      char key = kpd.get_key();
    
      if(key != '\0') {
            Serial.print(key);
      }
    }
    

    .cpp

    /*
     *  i2ckeypad.cpp v0.1 - keypad/I2C expander interface for Arduino
     *
     *  Copyright (c) 2009 Angel Sancho <angelitodeb@gmail.com>
     *  All rights reserved.
     *
     *  Original source from keypad v0.3 of Mark Stanley <mstanley@technologist.com>
     *  (http://www.arduino.cc/playground/Main/KeypadTutorial)
     *
     *
     *  LICENSE
     *  -------
     *  This program is free software: you can redistribute it and/or modify
     *  it under the terms of the GNU General Public License as published by
     *  the Free Software Foundation, either version 3 of the License, or
     *  (at your option) any later version.
     *  
     *  This program is distributed in the hope that it will be useful,
     *  but WITHOUT ANY WARRANTY; without even the implied warranty of
     *  MERCHANTABILITY or FITNESS FOR A PARTICULAR PURPOSE.  See the
     *  GNU General Public License for more details.
     *  
     *  You should have received a copy of the GNU General Public License
     *  along with this program.  If not, see <http://www.gnu.org/licenses/>.
     *
     *
     *  EXPLANATION
     *  -----------
     *  This library is designed for use with PCF8574, but can possibly be
     *  adapted to other I2C port expanders
     *
     *  Wiring diagrams for PCF8574 and 4x3 keypad can be found under
     *  examples directory. Library runs correctly without cols pull-up
     *  resistors but it's better to use it
     *
     *  You can change pin connections between PCF8574 and keypad under
     *  PIN MAPPING section below
     *
     *  IMPORTANT! You have to call Wire.begin() before init() in your code
     *
     *  ... and sorry for my poor english!
     */
    
    #include "i2ckeypad.h"
    #include <Wire.h>
    
    //extern "C" {
    //  #include "WConstants.h"
    //}
    
    
    /*
     *  PIN MAPPING
     *
     *  Here you can change your wire mapping between your keypad and PCF8574
     *  Default mapping is for sparkfun 4x3 keypad
     */
    
    #define COL0  2  // P2 of PCF8574, col0 is usually pin 3 of 4x3 keypads
    #define COL1  0  // P0 of PCF8574, col1 is usually pin 1 of 4x3 keypads
    #define COL2  4  // P4 of PCF8574, col2 is usually pin 5 of 4x3 keypads
    #define COL3  7  // sorry, don't have a 4x4 keypad to try it
    #define ROW0  1  // P1 of PCF8574, row0 is usually pin 2 of 4x3 keypads
    #define ROW1  6  // P6 of PCF8574, row1 is usually pin 7 of 4x3 keypads
    #define ROW2  5  // P5 of PCF8574, row2 is usually pin 6 of 4x3 keypads
    #define ROW3  3  // P3 of PCF8574, row3 is usually pin 4 of 4x3 keypads
    
    
    /*
     *  KEYPAD KEY MAPPING
     *
     *  Default key mapping for 4x4 keypads, you can change it here if you have or
     *  like different keys
     */
    
    const char keymap[4][5] =
    {
      "123A",
      "456B",
      "789C",
      "*0#D"
    };
    
    
    /*
     *  VAR AND CONSTANTS DEFINITION. Don't change nothing here
     *
     */
    
    // Default row and col pin counts
    int num_rows = 4;
    int num_cols = 3;
    
    // PCF8574 i2c address
    int pcf8574_i2c_addr;
    
    // PCF8574 i2c pin configuration (high low)
    int pcf8574_i2c_pin_cfg;
    
    // Current search row
    static int row_select;
    
    // Current data set in PCF8574
    static int current_data;
    
    // Hex byte statement for each port of PCF8574
    const int hex_data[8] = {0x01, 0x02, 0x04, 0x08, 0x10, 0x20, 0x40, 0x80};
    
    // Hex data for each row of keypad in PCF8574
    const int pcf8574_row_data[4] = 
    {
      hex_data[ROW1] | hex_data[ROW2] | hex_data[ROW3] |
      hex_data[COL0] | hex_data[COL1] | hex_data[COL2] | hex_data[COL3],
      hex_data[ROW0] | hex_data[ROW2] | hex_data[ROW3] |
      hex_data[COL0] | hex_data[COL1] | hex_data[COL2] | hex_data[COL3],
      hex_data[ROW0] | hex_data[ROW1] | hex_data[ROW3] |
      hex_data[COL0] | hex_data[COL1] | hex_data[COL2] | hex_data[COL3],
      hex_data[ROW0] | hex_data[ROW1] | hex_data[ROW2] |
      hex_data[COL0] | hex_data[COL1] | hex_data[COL2] | hex_data[COL3],
    };
    
    // Hex data for each col of keypad in PCF8574
    int col[4] = {hex_data[COL0], hex_data[COL1], hex_data[COL2], hex_data[COL3]};
    
    
    /*
     *  CONSTRUCTORS
     */
    
    i2ckeypad::i2ckeypad(int addr)
    {
      pcf8574_i2c_addr = addr;
    }
    
    i2ckeypad::i2ckeypad(int addr, int r, int c, int pinc)
    {
      pcf8574_i2c_addr = addr;
      num_rows = r;
      num_cols = c;
      pcf8574_i2c_pin_cfg = pinc;
    }
    
    
    /*
     *  PUBLIC METHODS
     */
    
    void i2ckeypad::init()
    {
      // All PCF8574 ports high
      pcf8574_write(pcf8574_i2c_addr, pcf8574_i2c_pin_cfg);
    
      // Start with the first row
      row_select = 0;
    }
    
    char i2ckeypad::get_key()
    {
      static int temp_key;
    
      int tmp_data;
      int r;
    
      int key = '\0';
    
      // Search row low
      pcf8574_write(pcf8574_i2c_addr, pcf8574_row_data[row_select]);
    
      for(r=0;r<num_cols;r++) {
        // Read pcf8574 port data
        tmp_data = pcf8574_byte_read(pcf8574_i2c_addr);
    
        // XOR to compare obtained data and current data and know
        // if some column are low
        tmp_data ^= current_data;
    
        // Key pressed!
        if(col[r] == tmp_data) {
          temp_key = keymap[row_select][r];
          return '\0';
        }
      }
    
      // Key was pressed and then released
      if((key == '\0') && (temp_key != '\0'))    
      {
        key = temp_key;
        temp_key = '\0';
        return key;
      }
    
      // All PCF8574 ports high again
      pcf8574_write(pcf8574_i2c_addr, pcf8574_i2c_pin_cfg);
    
      // Next row
      row_select++;
      if(row_select == num_rows) {
        row_select = 0;
      }
    
      return key;
    }
    
    /*
     *  PRIVATE METHODS
     */
    
    void i2ckeypad::pcf8574_write(int addr, int data)
    {
      current_data = data;
    
      Wire.beginTransmission(addr);
      Wire.write(data);
      Wire.endTransmission();
    }
    
    int i2ckeypad::pcf8574_byte_read(int addr)
    {
      Wire.requestFrom(addr, 1);
    
      return Wire.read();
    }
    

    .h

    #ifndef i2ckeypad_h
    #define i2ckeypad_h
    
    #include <inttypes.h>
    
    #if ARDUINO >= 100
    #include "Arduino.h"
    #else
    #include "WProgram.h"
    #endif
    
    
    class i2ckeypad {
    public:
      i2ckeypad(int);
      i2ckeypad(int, int, int, int);
      char get_key();
      void init();
      
    private:
      void pcf8574_write(int, int);
      int pcf8574_byte_read(int);
    };
    
    #endif
    

  • Hero Member

    @karl261 I compiled the thing without any errors...
    what I did:

    • All the files (including the library) in (sub)folder Keypad
    • Saved the sketch as Keypad.ino
    • Changed <i2ckeypad.h> to "i2ckeypad.h"

    p.s. a google search showed that the error occurs with many for no obvious reason...


  • @AWI yes, I checked Google too, but there is now real solution. I can go back to 1.6.5r5 maybe this works.


  • @AWI This makes no sense at all! I did what you did, and it compiled. Then I reverted the steps, to my original setup, and it compiles too. WHY? I would be SO HAPPY if somebody could explain.

    So the sketch works, but not all keys...


  • Ok, the keypad works. All keys. Now I have to check the interrupt.

    The interrupt is not working any more. At least I don't see it on the Voltmeter. The interrupt pin remains high all the time.

    I think this is because to get the key pressed, the library is scanning through the pins and writes different high low states to the ports of the pcf. This kills again the interrupt functionality.

    Yes, if I take out the loop function char key = kpd.get_key(); then the interrupt works again, because the library only writes 0xf0 and then it works. When the library is scanning, it does not work anymore.

    maybe it is possible to write 0xf0 before going to sleep... Then it won't scan, just wait for the interrupt?

    With the knew knowledge of 0xf0 writing I could also test the keypad_I2C library.


  • Hero Member

    @karl261 A lot of thoughts 😉 My idea is:

    • write the 0x0f
    • go to sleep
    • if interrupt (wake-up) scan the keyboard and get the key
    • Do whatever you need to do with the key
    • write the 0x0f
    • go to sleep
    • etc...


  • @AWI I am trapped between "collect2.exe: error: ld returned 5 exit status" errors and non working sketches. This is the world of pain. I am tempted to give up. It just does not make sense. I like things that do make sense...


  • Hero Member

    @karl261 don't give up.. ☺ we will get you there. Not much I can do about the 'collect' error but if you post your sketch..


  • @AWI Ok, I got it working somehow, now with the original Keypad_I2C library, because it had the functions ready to write to the pins... But it needs some more tine tuning. And it does not work all the time, sometimes I need to reset the PCF, by disconnecting it from power and then restart the Arduino.

    In the log below the first try does not work, the second try after reset it works.

    And after the log the sketch. It sure needs some improvement.

    Starting sensor (RNNNA-, 2.0.0)
    TSM:INIT
    TSM:RADIO:OK
    TSP:ASSIGNID:OK (ID=8)
    TSM:FPAR
    TSP:MSG:SEND 8-8-255-255 s=255,c=3,t=7,pt=0,l=0,sg=0,ft=0,st=bc:
    TSP:MSG:READ 0-0-8 s=255,c=3,t=8,pt=1,l=1,sg=0:0
    TSP:MSG:FPAR RES (ID=0, dist=0)
    TSP:MSG:PAR OK (ID=0, dist=1)
    TSP:MSG:READ 99-99-8 s=255,c=3,t=8,pt=1,l=1,sg=0:1
    TSP:MSG:FPAR RES (ID=99, dist=1)
    TSM:FPAR:OK
    TSM:ID
    TSM:CHKID:OK (ID=8)
    TSM:UPL
    TSP:PING:SEND (dest=0)
    TSP:MSG:SEND 8-8-0-0 s=255,c=3,t=24,pt=1,l=1,sg=0,ft=0,st=ok:1
    TSP:MSG:READ 0-0-8 s=255,c=3,t=25,pt=1,l=1,sg=0:1
    TSP:MSG:PONG RECV (hops=1)
    TSP:CHKUPL:OK
    TSM:UPL:OK
    TSM:READY
    start
    TSP:MSG:SEND 8-8-0-0 s=255,c=3,t=15,pt=6,l=2,sg=0,ft=0,st=ok:0100
    !TSP:MSG:SEND 8-8-0-0 s=255,c=0,t=17,pt=0,l=5,sg=0,ft=0,st=fail:2.0.0
    TSP:MSG:SEND 8-8-0-0 s=255,c=3,t=6,pt=1,l=1,sg=0,ft=1,st=ok:0
    TSP:MSG:READ 0-0-8 s=255,c=3,t=6,pt=0,l=1,sg=0:M
    Request registration...
    TSP:MSG:SEND 8-8-0-0 s=255,c=3,t=26,pt=1,l=1,sg=0,ft=0,st=ok:2
    TSP:MSG:READ 0-0-8 s=255,c=3,t=27,pt=1,l=1,sg=0:1
    Node registration=1
    Init complete, id=8, parent=0, distance=1, registration=1
    Waking up
    1
    Good Night
    Waking up
    Good Night
    Waking up
    Good Night
    Waking up
    Good Night
    Waking up
    Good Night
    Waking up
    Good Night
    Waking up
    Starting sensor (RNNNA-, 2.0.0)
    TSM:INIT
    TSM:RADIO:OK
    TSP:ASSIGNID:OK (ID=8)
    TSM:FPAR
    TSP:MSG:SEND 8-8-255-255 s=255,c=3,t=7,pt=0,l=0,sg=0,ft=0,st=bc:
    TSP:MSG:READ 0-0-8 s=255,c=3,t=8,pt=1,l=1,sg=0:0
    TSP:MSG:FPAR RES (ID=0, dist=0)
    TSP:MSG:PAR OK (ID=0, dist=1)
    TSP:MSG:READ 99-99-8 s=255,c=3,t=8,pt=1,l=1,sg=0:1
    TSP:MSG:FPAR RES (ID=99, dist=1)
    TSM:FPAR:OK
    TSM:ID
    TSM:CHKID:OK (ID=8)
    TSM:UPL
    TSP:PING:SEND (dest=0)
    TSP:MSG:SEND 8-8-0-0 s=255,c=3,t=24,pt=1,l=1,sg=0,ft=0,st=ok:1
    TSP:MSG:READ 0-0-8 s=255,c=3,t=25,pt=1,l=1,sg=0:1
    TSP:MSG:PONG RECV (hops=1)
    TSP:CHKUPL:OK
    TSM:UPL:OK
    TSM:READY
    start
    TSP:MSG:SEND 8-8-0-0 s=255,c=3,t=15,pt=6,l=2,sg=0,ft=0,st=ok:0100
    !TSP:MSG:SEND 8-8-0-0 s=255,c=0,t=17,pt=0,l=5,sg=0,ft=0,st=fail:2.0.0
    TSP:MSG:SEND 8-8-0-0 s=255,c=3,t=6,pt=1,l=1,sg=0,ft=1,st=ok:0
    TSP:MSG:READ 0-0-8 s=255,c=3,t=6,pt=0,l=1,sg=0:M
    Request registration...
    TSP:MSG:SEND 8-8-0-0 s=255,c=3,t=26,pt=1,l=1,sg=0,ft=0,st=ok:2
    TSP:MSG:READ 0-0-8 s=255,c=3,t=27,pt=1,l=1,sg=0:1
    Node registration=1
    Init complete, id=8, parent=0, distance=1, registration=1
    Waking up
    Good Night
    Waking up
    1
    Good Night
    Waking up
    2
    Good Night
    Waking up
    3
    Good Night
    Waking up
    A
    Good Night
    Waking up
    4
    Good Night
    Waking up
    5
    Good Night
    Waking up
    6
    Good Night
    Waking up
    B
    Good Night
    Waking up
    7
    Good Night
    Waking up
    8
    Good Night
    Waking up
    9
    Good Night
    Waking up
    C
    Good Night
    Waking up
    *
    Good Night
    Waking up
    0
    Good Night
    Waking up
    #
    Good Night
    Waking up
    D
    Good Night
    
    #include <Wire.h>
    #include <Keypad_I2C.h>
    #include <Keypad.h>
    #define I2CADDR 0x38
    
    #define MY_DEBUG
    #define MY_RADIO_NRF24
    #define MY_NODE_ID 8
    
    
    #include <MySensors.h>
    #include <SPI.h>
    
    word temp_pin_state;
    
    unsigned long time;
    
    
    unsigned long SLEEP_TIME = 0; // Sleep time between reports (in milliseconds)
    #define DIGITAL_INPUT_SENSOR 3   // The digital input you attached your motion sensor.  (Only 2 and 3 generates interrupt!)
    #define CHILD_ID 1   // Id of the sensor child
    
    const byte ROWS = 4; //four rows
    const byte COLS = 4; //three columns
    char keys[ROWS][COLS] = {
      {'1','2','3','A'},
      {'4','5','6','B'},
      {'7','8','9','C'},
      {'*','0','#','D'}
    };
    
    // Digitran keypad, bit numbers of PCF8574 i/o port
    byte rowPins[ROWS] = {0, 1, 2, 3}; //connect to the row pinouts of the keypad
    byte colPins[COLS] = {4, 5, 6, 7}; //connect to the column pinouts of the keypad
    
    Keypad_I2C kpd( makeKeymap(keys), rowPins, colPins, ROWS, COLS, I2CADDR, PCF8574 );
    
    void setup(){
        Wire.begin( );
        kpd.begin( makeKeymap(keys) );
    //    Serial.begin(9600);
        Serial.println( "start" );
        pinMode(DIGITAL_INPUT_SENSOR, INPUT);      // sets the motion sensor digital pin as input
        temp_pin_state = kpd.pinState_set( );
    }
    
    void loop(){
    
        Serial.println("Waking up");
    
        kpd.port_write( temp_pin_state );
        wait(100);
    
        time = millis();
        while ((millis() - time) < 500) {
          char key = kpd.getKey();
        
          if (key){
            Serial.println(key);
          }
        }
        
    
        Serial.println("Good Night");
        temp_pin_state = kpd.pinState_set( );
        kpd.port_write( 0xf0 );
        wait(100);
        sleep(digitalPinToInterrupt(DIGITAL_INPUT_SENSOR), FALLING, SLEEP_TIME);
    }


  • This sketch works a little bit better... Hm, it sometimes is not reading a key, but it seems to be the loose cable connections?!

    #include <Wire.h>
    #include <Keypad_I2C.h>
    #include <Keypad.h>
    #define I2CADDR 0x38
    
    #define MY_DEBUG
    #define MY_RADIO_NRF24
    #define MY_NODE_ID 8
    
    
    #include <MySensors.h>
    #include <SPI.h>
    
    word temp_pin_state;
    
    unsigned long time;
    
    
    unsigned long SLEEP_TIME = 0; // Sleep time between reports (in milliseconds)
    #define DIGITAL_INPUT_SENSOR 3   // The digital input you attached your motion sensor.  (Only 2 and 3 generates interrupt!)
    #define CHILD_ID 1   // Id of the sensor child
    
    const byte ROWS = 4; //four rows
    const byte COLS = 4; //three columns
    char keys[ROWS][COLS] = {
      {'1','2','3','A'},
      {'4','5','6','B'},
      {'7','8','9','C'},
      {'*','0','#','D'}
    };
    
    // Digitran keypad, bit numbers of PCF8574 i/o port
    byte rowPins[ROWS] = {0, 1, 2, 3}; //connect to the row pinouts of the keypad
    byte colPins[COLS] = {4, 5, 6, 7}; //connect to the column pinouts of the keypad
    
    Keypad_I2C kpd( makeKeymap(keys), rowPins, colPins, ROWS, COLS, I2CADDR, PCF8574 );
    
    void setup(){
        Wire.begin( );
        kpd.begin( makeKeymap(keys) );
    //    Serial.begin(9600);
        Serial.println( "start" );
        pinMode(DIGITAL_INPUT_SENSOR, INPUT);      // sets the motion sensor digital pin as input
        kpd.port_write( 0xff );
        temp_pin_state = kpd.pinState_set( );
    }
    
    void loop(){
    
        Serial.println("Waking up");
    
        kpd.port_write( temp_pin_state );
    //    wait(100);
    
        time = millis();
        while ((millis() - time) < 250) {
          char key = kpd.getKey();
        
          if (key){
            Serial.println(key);
          }
        }
        
    
        Serial.println("Good Night");
        temp_pin_state = kpd.pinState_set( );
        kpd.port_write( 0xf0 );
        wait(50);
        sleep(digitalPinToInterrupt(DIGITAL_INPUT_SENSOR), FALLING, SLEEP_TIME);
    }
    
    Starting sensor (RNNNA-, 2.0.0)
    TSM:INIT
    TSM:RADIO:OK
    TSP:ASSIGNID:OK (ID=8)
    TSM:FPAR
    TSP:MSG:SEND 8-8-255-255 s=255,c=3,t=7,pt=0,l=0,sg=0,ft=0,st=bc:
    TSM:FPAR
    TSP:MSG:SEND 8-8-255-255 s=255,c=3,t=7,pt=0,l=0,sg=0,ft=0,st=bc:
    TSP:MSG:READ 0-0-8 s=255,c=3,t=8,pt=1,l=1,sg=0:0
    TSP:MSG:FPAR RES (ID=0, dist=0)
    TSP:MSG:PAR OK (ID=0, dist=1)
    TSP:MSG:READ 99-99-8 s=255,c=3,t=8,pt=1,l=1,sg=0:1
    TSP:MSG:FPAR RES (ID=99, dist=1)
    TSM:FPAR:OK
    TSM:ID
    TSM:CHKID:OK (ID=8)
    TSM:UPL
    TSP:PING:SEND (dest=0)
    TSP:MSG:SEND 8-8-0-0 s=255,c=3,t=24,pt=1,l=1,sg=0,ft=0,st=ok:1
    TSP:MSG:READ 0-0-8 s=255,c=3,t=25,pt=1,l=1,sg=0:1
    TSP:MSG:PONG RECV (hops=1)
    TSP:CHKUPL:OK
    TSM:UPL:OK
    TSM:READY
    start
    TSP:MSG:SEND 8-8-0-0 s=255,c=3,t=15,pt=6,l=2,sg=0,ft=0,st=ok:0100
    !TSP:MSG:SEND 8-8-0-0 s=255,c=0,t=17,pt=0,l=5,sg=0,ft=0,st=fail:2.0.0
    TSP:MSG:SEND 8-8-0-0 s=255,c=3,t=6,pt=1,l=1,sg=0,ft=1,st=ok:0
    TSP:MSG:READ 0-0-8 s=255,c=3,t=6,pt=0,l=1,sg=0:M
    Request registration...
    TSP:MSG:SEND 8-8-0-0 s=255,c=3,t=26,pt=1,l=1,sg=0,ft=0,st=ok:2
    TSP:MSG:READ 0-0-8 s=255,c=3,t=27,pt=1,l=1,sg=0:1
    Node registration=1
    Init complete, id=8, parent=0, distance=1, registration=1
    Waking up
    Good Night
    Waking up
    1
    Good Night
    Waking up
    2
    Good Night
    Waking up
    3
    Good Night
    Waking up
    A
    Good Night
    Waking up
    4
    Good Night
    Waking up
    5
    Good Night
    Waking up
    Good Night
    Waking up
    B
    Good Night
    Waking up
    7
    Good Night
    Waking up
    Good Night
    Waking up
    9
    Good Night
    Waking up
    C
    Good Night
    Waking up
    *
    Good Night
    Waking up
    0
    Good Night
    Waking up
    #
    Good Night
    Waking up
    D
    Good Night
    

  • Hero Member

    @karl261 it looks good to me. Try to get your connections stable.


Log in to reply
 

Suggested Topics

  • 3
  • 24
  • 10
  • 2
  • 15
  • 3

0
Online

11.2k
Users

11.1k
Topics

112.5k
Posts