Skip to content

My Project

Show off and share your great projects here! We love pictures!
961 Topics 13.4k Posts
  • Round water tank level sensor

    55
    6 Votes
    55 Posts
    23k Views
    greyy greyyG
    interesting, i will buy same sensor too
  • s_cover commands, doubts??

    8
    0 Votes
    8 Posts
    597 Views
    G
    @skywatch Kkkkkkkkkkkk. Great joke !!
  • A tiny BME node - BME280 on ATtiny85

    28
    5
    11 Votes
    28 Posts
    573 Views
    chamroeun ouC
    @BearWithBeard said in A tiny BME node - BME280 on ATtiny85: Overview page @BearWithBeard thanks, now i got my Attiny167+Sht30 working with Mysensors and Mysensor gateway. Next step will be formatting the data for Thingsboard cloud.
  • ESP8266 gateway with I2C port expander

    1
    2 Votes
    1 Posts
    29 Views
    No one has replied
  • Alternative battery operated motion sensor using 433MHz sensors

    3
    2 Votes
    3 Posts
    2k Views
    skywatchS
    @korttoma I set up a pir node with promini and nrf24l01+ about 6 weeks ago running on 2xAAA batterues. No false triggers yet and it detects many movements each day. Battery level is still 100% (3V) so it is possible to do this. Maybe something else is affecting your previous test, like situation, distance or interfereing signals? But you have another solution that mighte well be useful to someone else with the issues you faced. Good of you to share it.
  • Washing machine state sensor

    32
    0 Votes
    32 Posts
    21k Views
    J
    I bought one this year and i am really happy with it.
  • Capacitive Soil Moisture Sensor

    1
    4
    5 Votes
    1 Posts
    50 Views
    No one has replied
  • RFID Garage Opener

    1
    3
    2 Votes
    1 Posts
    43 Views
    No one has replied
  • Correct Usage of MY_DEBUGDEVICE

    6
    0 Votes
    6 Posts
    94 Views
    T
    @skywatch Ah, and you are right about the LED. I re-designed the circuitry a while ago to accommodate a RFM69 on the PCB back side, and meanwhile forgot the fact that my LED is now connected to Atmega328‘s port D3 now. For the serial function test it does not make a difference, however.
  • This topic is deleted!

    15
    2
    1 Votes
    15 Posts
    217 Views
  • Safe AC dimmer with code

    3
    0 Votes
    3 Posts
    76 Views
    DbagioniD
    The code I posted is the raw code for the zero-cross dimmer. When I had tried to merge the "dimmer with rotary encoder" sketch and the zero-cross code I had wired it up with the ZC pin as 2 and the PWM pin on 3. Encoder was wired: SW pin on 4, CLK pin on 5 and CE pin on 6. 7/8/A2 were used for status LED's. I was running it with an older NANO with the 328.
  • How To: Automate Devices with Existing Buttons

    6
    7
    6 Votes
    6 Posts
    4k Views
    P
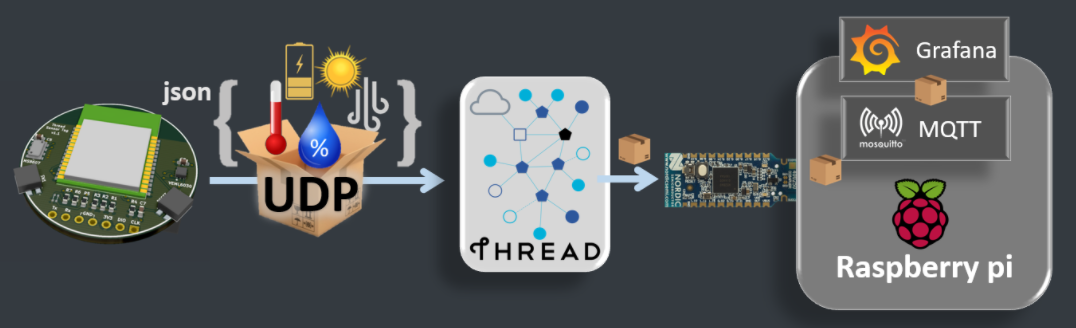
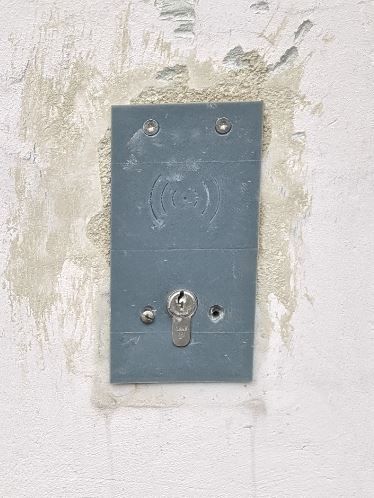
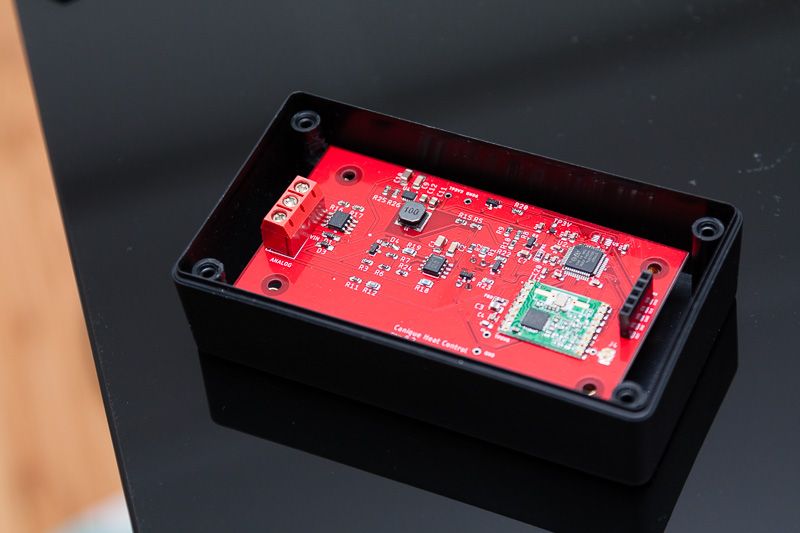
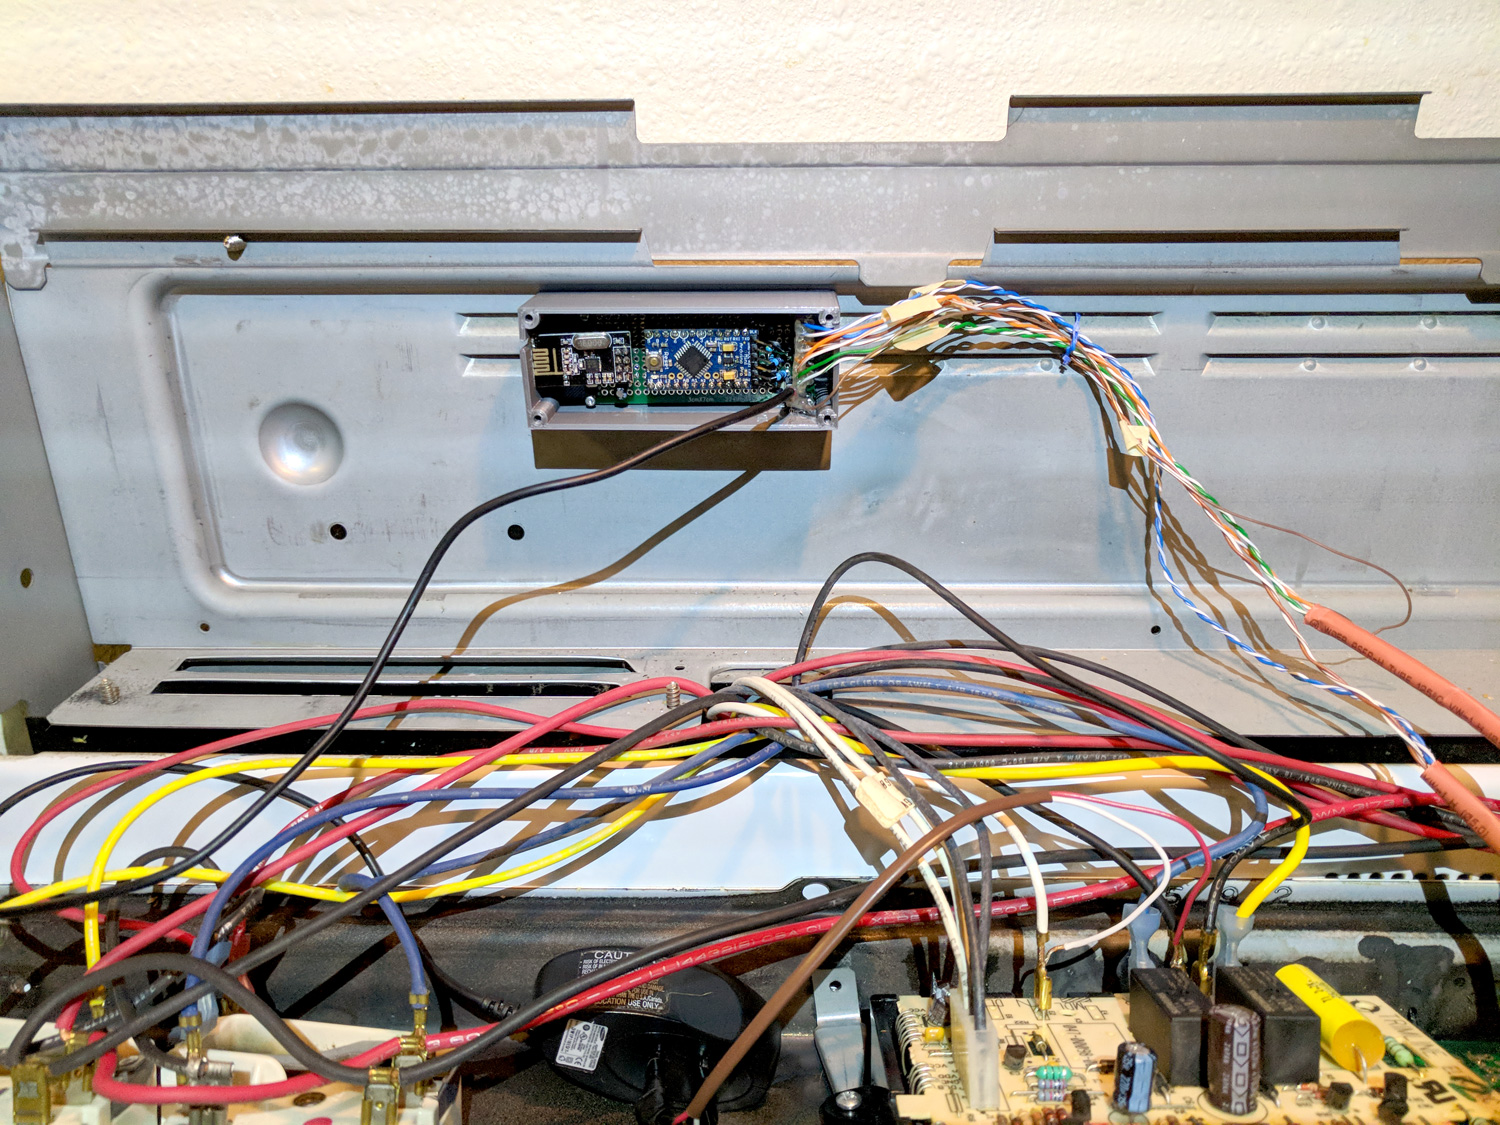
    @petewill Thanks for sharing your knowledge. I am picking this after 2.5 years as this is what I would like to build. i have established my switch is connected to grounds and build a prototype successfully. However, my issue is the code as i am lacking in the software side and appreciate if @petewill or someone else can advise me. Issue 1: when i press the button, it shows twice in the log and i can see the communicating successfully with the gateway. Issue 2: when i send the command via mqtt it is not turning on the led. Thanks for input in advance. my code is as follows, #define SKETCH_NAME "Oven Control" #define SKETCH_VERSION "1.0" // Enable debug prints to serial monitor #define MY_DEBUG //MySensors debug messages //#define LOCAL_DEBUG //Code specific debug messages // Enable and select radio type attached #define MY_RADIO_RF24 //#define MY_RADIO_RFM69 #define MY_RF24_PA_LEVEL RF24_PA_HIGH //Options: RF24_PA_MIN, RF24_PA_LOW, RF24_PA_HIGH, RF24_PA_MAX #define MY_RF24_CHANNEL 76 #define MY_NODE_ID 4 //Manually set the node ID here. Comment out to auto assign #include <MySensors.h> #include <Bounce2.h> #ifndef BAUD_RATE #define BAUD_RATE 115200 #endif #ifdef LOCAL_DEBUG #define dbg(...) Serial.print(__VA_ARGS__) #define dbgln(...) Serial.println(__VA_ARGS__) #else #define dbg(x) #define dbgln(x) #endif #define DWELL_TIME 50 //value used in all wait calls (in milliseconds) this allows for radio to come back to power after a transmission, ideally 0 #define CHILD_ID_OVEN 0 #define GND_GATE_PIN 3 #define GND_DETECT_PIN 4 #define BUTTON_PRESS_DELAY 100 //The amount of delay used for a button press //Track button presses uint8_t gndValuePrev = 1; //LED button on/off tracking uint8_t gndLedOn = 0; unsigned long gndMillis; // Instantiate a Bounce object Bounce gndDebouncer = Bounce(); Bounce vccDebouncer = Bounce(); MyMessage msgHeatMode(CHILD_ID_OVEN, V_HVAC_FLOW_STATE); void setup() { Serial.begin(115200); //Setup the pins pinMode(GND_GATE_PIN, OUTPUT); pinMode(GND_DETECT_PIN, INPUT_PULLUP); //Start with all outputs (buttons) not enabled (pressed) digitalWrite(GND_GATE_PIN, 0); // After setting up the buttons, setup debouncers gndDebouncer.attach(GND_DETECT_PIN); gndDebouncer.interval(50); } void presentation() { // Send the sketch version information to the gateway sendSketchInfo(SKETCH_NAME, SKETCH_VERSION); // Register all sensors to gw (they will be created as child devices) present(CHILD_ID_OVEN, S_HEATER); wait(DWELL_TIME); //metric = getConfig().isMetric; //This has been removed as it will default to metric if connection to the gateway is not established (bad for imperial users) //wait(DWELL_TIME); } void loop() { unsigned long currentMillis = millis(); //Get the current millis (used for timers) // Update the debouncers gndDebouncer.update(); // Get the update value uint8_t gndValue = gndDebouncer.read(); if (gndValue != gndValuePrev) { if (gndValue == 0) { Serial.println(F("Ground Button Pressed")); if (gndLedOn == 0) { //Don't echo the button push if it was turned on by the Arduino gndMillis = currentMillis + 1000; gndLedOn = 1; } } gndValuePrev = gndValue; send(msgHeatMode.set(gndLedOn == 1 ? "HeatOn" : "Off")); dbgln(gndValue); } //Turn on led 1 second after button pressed if (gndLedOn == 1 && currentMillis > gndMillis) { nChannelPress(GND_GATE_PIN); gndLedOn = 0; } } void nChannelPress(uint8_t buttonPinName) { //Simulate a button press digitalWrite(buttonPinName, 1); //VCC to disable delay(BUTTON_PRESS_DELAY); digitalWrite(buttonPinName, 0); //Ground to enable delay(BUTTON_PRESS_DELAY); } The log is as follows, 22:35:51.655 -> 2189 TSF:MSG:SEND,4-4-0-0,s=255,c=3,t=11,pt=0,l=12,sg=0,ft=0,st=OK:Oven Control 22:35:51.655 -> 2198 TSF:MSG:SEND,4-4-0-0,s=255,c=3,t=12,pt=0,l=3,sg=0,ft=0,st=OK:1.0 22:35:51.655 -> 2206 TSF:MSG:SEND,4-4-0-0,s=0,c=0,t=14,pt=0,l=0,sg=0,ft=0,st=OK: 22:35:51.724 -> 2262 MCO:REG:REQ 22:35:51.724 -> 2265 TSF:MSG:SEND,4-4-0-0,s=255,c=3,t=26,pt=1,l=1,sg=0,ft=0,st=OK:2 22:35:51.724 -> 2276 TSF:MSG:READ,0-0-4,s=255,c=3,t=27,pt=1,l=1,sg=0:1 22:35:51.724 -> 2281 MCO:PIM:NODE REG=1 22:35:51.724 -> 2283 MCO:BGN:STP 22:35:51.758 -> 2285 MCO:BGN:INIT OK,TSP=1 22:35:52.541 -> Ground Button Pressed 22:35:52.541 -> 3073 TSF:MSG:SEND,4-4-0-0,s=0,c=1,t=21,pt=0,l=6,sg=0,ft=0,st=OK:HeatOn 22:35:52.745 -> 3291 TSF:MSG:SEND,4-4-0-0,s=0,c=1,t=21,pt=0,l=6,sg=0,ft=0,st=OK:HeatOn 22:39:09.887 -> 200479 TSF:MSG:READ,0-0-4,s=255,c=3,t=6,pt=0,l=0,sg=0: 22:42:23.738 -> 394357 TSF:MSG:READ,0-0-255,s=255,c=3,t=20,pt=0,l=0,sg=0: 22:42:23.738 -> 394362 TSF:MSG:BC 22:42:23.895 -> 394502 TSF:MSG:SEND,4-4-0-0,s=255,c=3,t=21,pt=1,l=1,sg=0,ft=0,st=OK:0 22:44:19.647 -> Ground Button Pressed 22:44:19.647 -> 510285 TSF:MSG:SEND,4-4-0-0,s=0,c=1,t=21,pt=0,l=6,sg=0,ft=0,st=OK:HeatOn 22:44:19.958 -> 510600 TSF:MSG:SEND,4-4-0-0,s=0,c=1,t=21,pt=0,l=6,sg=0,ft=0,st=OK:HeatOn```
  • Voltage divider resistors - using different resistor values

    battery
    2
    0 Votes
    2 Posts
    53 Views
    mfalkviddM
    Welcome to the forum @mitchdes Yes, you are correct.
  • Automated Pergola

    6
    7 Votes
    6 Posts
    130 Views
    nagelcN
    Wow. Very cool! Now I'm thinking of some similar projects I need to do for Summer.
  • 5 Votes
    5 Posts
    146 Views
    William MeliW
    @NeverDie Thx for appreciating the work done. There will also be an open source part in the future. When and how extensive the open source part will be, remains to be seen. The release of certain information (block diagram, ..., in this post) is related to those open source parts. There are some OBD solutions, however most of them (in my experience) give back low frequency data put by the car manufacturer on the OBD-bus (CAN, ...). Therefore transients evolving directly from the battery could only be recorded if the manufacturer sends those data accordingly on the bus. Due to the small bandwidth(also because of other car data that have to be sent, ...), such battery data are sent more often once per second or less. Fast battery events (i.e. cranking events, ...) are therefore imperceptible. Unless the manufacturer processes the fast events and then sends them (once per second or less), which is very unlikely if the manufacturer does not market this feature itself. Third parties devices for high frequency sensing costs several hundreds dollars. In my experience, important battery states (especially the fast ones) are recorded by measuring and processing corresponding data directly on the battery. I agree with you about the limits related to the communication over Bluetooth. But i think Bluetooth 5.0 will improve a lot. However, WiFi will always remain an important option due to the high data throughput. The combination of both (BLE & WiFi), especially with regard to energy consumption, will gain in importance.
  • High-end Weather Station

    3
    3 Votes
    3 Posts
    93 Views
    boanjoB
    @Yveaux Thanks! I've had one of the temp sensors out for two seasons and i haven't noticed any brittle tendecies. The prinouts are covered in a few layers of sparypaint so the colors still look great (as i imagine they wouldn't if not painted). But printing in ABS is of course the safest route to take.
  • Water in-pipe temperature sensor

    5
    0 Votes
    5 Posts
    91 Views
    skywatchS
    @skywatch Just a little update showing graph of boiler water flow (out from boiler) and return.... Extract from My Controller screen. [image: 1609406478387-boiler.jpg]
  • Soldering a coax cable to RFM69

    2
    0 Votes
    2 Posts
    48 Views
    mfalkviddM
    @joaoabs yes that looks fine. Keep the non-shielded part of the cable as short as possible, but you’ve already done a great job so I think it would be hard to make it shorter. Personally I would probably have chosen to solder a pigtail (with sma contact) to the rfm module, to make it possible to switch to a different antenna/coax cable without soldering. But each connector introduces loss, so soldering might be the best choice.
  • DIY LED lens

    led lens
    1
    2
    2 Votes
    1 Posts
    49 Views
    No one has replied
  • Christmas Tree watering node - seasonal greetings

    5
    7
    5 Votes
    5 Posts
    919 Views
    boanjoB
    Just a follow-up 2 years later... Still no water incidents and the simple watersensor still looks surprisingly good! A very satisfying feeling for the third year in a row to just fill the bucket with water and plug it in and it just works :-) The biggest problem now is that it's become harder to argue with the kids that we need to get rid of the spruce tree as it loses very little needles...

30

Online

11.7k

Users

11.2k

Topics

113.1k

Posts