Thank you so much for your support
Posts made by sindrome73
-
RE: Getting Better Range with NRF24L01 Modules
-
RE: Getting Better Range with NRF24L01 Modules
@fsgraz said in Getting Better Range with NRF24L01 Modules:
trollare l'alimentatore
Can you tell me how to lower the speed?
-
Pjon Script
Hello, good evening!!
I'm trying to build two Nodes with two Arduino Pro Minis (a Gateway and a Node, to be precise) connected to each other using the Pjon Protocol.
If I understand correctly, the nodes are connected to each other by a single wire, specifically Pin 12 by default.
I just can't create the sketch.
Can someone provide the Gateway and Node scripts?
Thanks for your help. -
RE: Hey I am new here
@helpmine10 said in Hey I am new here:
er favore qualcuno mi aiuti riguardo a questo sito web.
just ask
-
RE: Ebyte nRF24L01P Wireless rf Transceiver E01-2G4M27D 27dBm SPI 2.4GHz Transmitter
@skywatch said in Ebyte nRF24L01P Wireless rf Transceiver E01-2G4M27D 27dBm SPI 2.4GHz Transmitter:
usando problemi qui. Puoi postare
Good evening!! I also fought with some of those modules believing they didn't work, in the end the problem was the power supply !! Get tested now they work.
Here is the scheme I used:
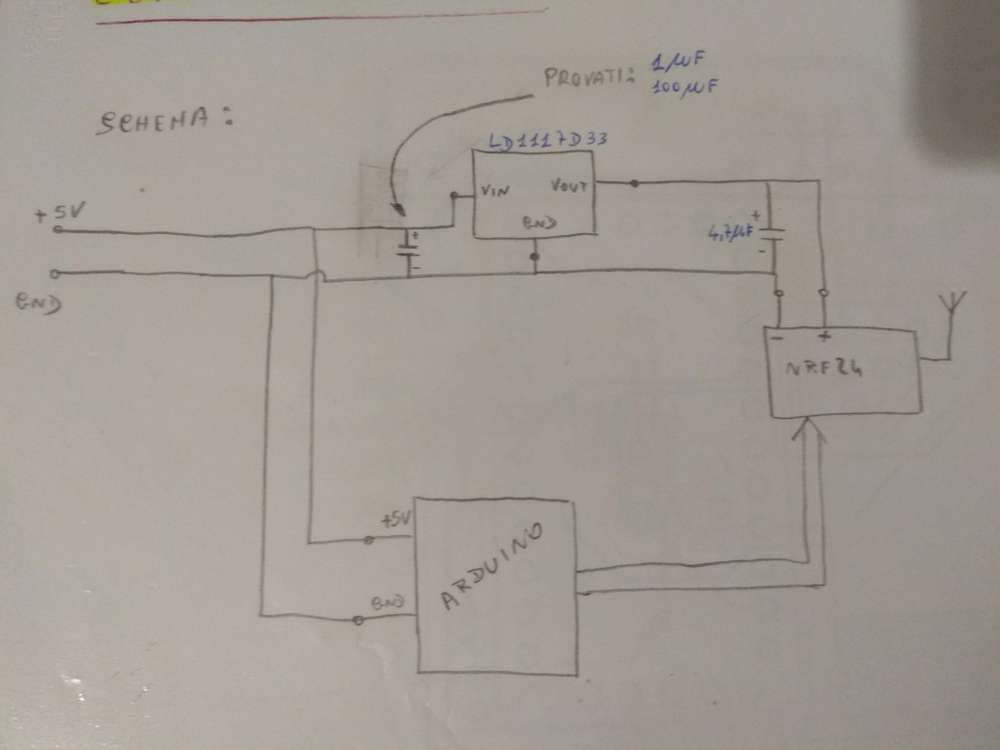
Everything is about providing GOOD Power
I apologize for the bad English
-
RE: MYSBootloader does not work
I for my Atmega328 (Arduino pro Mini) at 16 Mhz I am using 0xFF 0xDA 0xFD
-
RE: Personalize the MQTT topics
I'm interested, can you share some more info on this feature ??
-
RE: [SOLVED] Go to loop(); when parent/gateway can't be found.
@skywatch said in Go to loop(); when parent/gateway can't be found.:
ai tempo, potresti dare un
Just insert this line:
#define MY_TRANSPORT_WAIT_READY_MS 1000
before : #include <MySensors.h>
this is all, so if the Gateway is not available after 1000 Milli seconds, the scketch is performed anyway
-
RE: 986/5000 first steps with battery node
@niclas said in 986/5000 first steps with battery node:
le defi
currently the node absorbs 19mA, it seems a bit high !!
As a motion sensor I am using an sr501, without removing the voltage converter on board !!
If you can give me some more info on Minicore and how to disable the analog converter ?? -
986/5000 first steps with battery node
As the title suggests, I am starting to take the first steps to develop some battery-powered nodes, and I started with some work already done found here on the forum.
I have some Atmel 328P barebones on which following this:
link text
procedure and with an arduino Uno and Arduino IDE, I managed to burn an 8Mhz Bootloader with internal oscillator, and to load a simple scketch of a motion sensor, which should work on battery power, and during sleep, it has an absorption of 0 , 19mA (maybe a little high ???).At this point reading this discussion: link text
it reads that I should set the fuses in order to disable the BOD, which if I understand correctly serves to make my circuit work even with lower voltages !!
Someone tells me the precise setting that I have to give, so I modify my fuses with AVRDUDESS ???Then another thing, when I connect the serial monitor through my arduino Uno that I use to load the sketches I get this Why ???
-
RE: What did you build today (Pictures) ?
@mfalkvidd ok now I understand, and then commands an Arduino or other. thank you
-
RE: What did you build today (Pictures) ?
@berkseo thanks for the scheme. but therefore don't use a sensor ?? i'm sorry noni and clear how do you detect the presence of water ...
-
RE: What did you build today (Pictures) ?
@berkseo I'm sorry if I can, but what kind of sensor are you using to detect water ?? I would like to do something like that but with an Arduino pro !!
-
RE: MYSBootloader 1.3.0-beta.3
@mafe said in MYSBootloader 1.3.0-beta.3:
imenticato di dire che voglio fare FOTA tramite un gateway MQTT. Sta f
If I understand OTA well with an MQTT gateway it is not possible. This at least using MYSBootloader
-
RE: Motion sensor increase Time high status via software
@skywatch said in Motion sensor increase Time high status via software:
ti sei
Hello and sorry, if I gave the idea of being courteous !! sorry again
I didn't publish the code because I really don't know where to start, but now that I understand WAIT, that in MySensors and a separate thing, I also understand your example, and I thank you for helping me !!
But then again I didn't know that this WAIT, was something different from DELAY
I answer little, because I'm a little busy these days ..... But anyway for now thanks again for help -
RE: Motion sensor increase Time high status via software
@skywatch
WAIT and DELAY, aren't they the same thing ??
You can explain me better, because I didn't know this difference, thanks in advance for your availabilitySearching, I found this
link text -
RE: Motion sensor increase Time high status via software
@scalz said in Motion sensor increase Time high status via software:
o non verrΓ mai bloccato e verrΓ eseguito piΓΉ volte come desideri.
Quindi dovrai usare alcune vars per memorizzare tempo / durata. E alcuni bWe know Millis, it's already been used several times, but what I can't solve is the code, I can't process the code !!
-
RE: Motion sensor increase Time high status via software
I had thought of WAIT or rather DELAY, but the sketch is more complex than just the motion sensor, and using DELAY is not correct because it would block the execution of the code.
But can't I find other solutions ??? -
Motion sensor increase Time high status via software
Hello!!
I would need a little help, if possible !! I'm building a Movement node with the PIR sensor HC-SR501, and I started from the example already present on the MySensors site.
With this sensor there is a potentiometer that allows you to adjust once passed in the HIGH state, how long it must last before returning LOW.
What I want to do is put the potentiometer at 0 and do this work in the Code
So every time there is a movement must communicate the new state to the gateway, stay a time of 10 seconds ON and then if the status is New LOW communicate the new state or at each movement lengthen those 10 secondsI don't know how to create the code, does anyone have any examples or can you help me ??
-
Strange problem with OTA
Hello!! As mentioned, I'm slowly introducing OTA into my nodes.
But I found a strange problem, after having done OTA of a scketch, it's all OK and the node works.
But after 3/4 lack of power supply to the node (for example, lack of electricity, due to bad weather), the node no longer has the scketch inside and to make it work I have to make a new OTA.
A behavior, can anyone help me ???I write my scene here
- Arduino pro Mini 5v 16Mhz
- Radio nRF24
- For OTA I used MYSController
- FUSE Arduino settings L = 0xF7 H = 0xDA E = 06
Thanks in advance of the Attention
-
Help for Signature and OTA on the same node, How To
Good morning!! I need a clarification, I have some MySensors nodes that work regularly, and on some of these I have also activated the Firma Software, so far all Ok.
Now, as a matter of convenience, I am introducing the OTA overruns.
My question is, in a node with a signature to which I want to add OTA, how to proceed ???- I customize the Node
- Load the new Bootloader
- Load the new sketck via OTA
it's correct?? or are the steps to follow others?
Thanks to those who want to clarify my ideas
-
RE: Is it necessairy to use child id when requestin battery level or sketch name ... ?
@jimmy-loyens said in Is it necessairy to use child id when requestin battery level or sketch name ... ?:
me richiedere valori da un nodo. Quando si richiede una temperatura o un altro sensore leggendo la sua logica per consentire al nodo di rispondere tramite il figlio del sensore in questione. Ma cosa succede se si richiede un messaggio interno come il nome dello sch
Hi, I'm bothering you for an info.
You said that: "request a value at a node"
And one thing that interests me, can you share how you do ?? Thanks for the time you want to dedicate .... -
RE: π¬ FOTA (Wireless Programming)
Hello!! And thank you again ......
A really good job, it's something that was definitely missing ......
I would suggest to the directors to expand the guide on OTA you better explain the steps to change channels and make a link to your great job !!Now if I understand this and the Bootloader that I have to load on my Arduino Pro-Mini, in practice insert in the path of the IDE of Arduino when I make the updates use that channel
As soon as I can I try them and I'll let you know, in a lot of thanks again ......
-
RE: π¬ FOTA (Wireless Programming)
@sindrome73 Hi Good evening, and I'm sorry for the delay in the reply.
As you have never done a Bootloader, if you are kind enough to do it, I thank you.
The channel I'm using is the "Channel 84" for now I'm using only the 16MHZ Bootloade, but if you want, the others are fine too.
In addition you can give me some starting point to be able to fill in too ??
Thanks for your availability, greetings -
RE: π¬ FOTA (Wireless Programming)
@guillermo-schimmel Thanks for the reply.
Very useful, but can you tell me more accurately what software to use to recompile after making the change ????
Maybe some links to the software to download ..... thanks again for the availability -
RE: π¬ FOTA (Wireless Programming)
@mfalkvidd Hello.
From what I read it is possible to somehow modify the channel for OTA updates, this is also said here.
https://www.mysensors.org/about/fotaBut I can not find other info on how to proceed to change the channel .....
Can you give me some other clarification or link to follow ??? -
RE: Request data from Domoticz
this is a good place to start and start to understand.
I'm not a lot of diggers, however I start reading something, and in case I'll ask for help
In a lot of thanks -
RE: Request data from Domoticz
@kimot I did not understand what you tell me, can you explain better or with some examples ??
-
RE: Request data from Domoticz
Hello
So if I understand, a node from domoticz can only ask the status of a sensor connected already him, and not the status of other nodes of the network!
So it is impossible for me to create nodes / displays to display the status of other sensors in the network.
The only way is to use some old mobile phone as a display point -
RE: Request data from Domoticz
do you mean that it is not possible to request those data from the node that will make the display ??
-
RE: Request data from Domoticz
@pjr
yes, I intend to receive data from devices that do not belong to that node, but to other nodes.
So random devices of the network -
Request data from Domoticz
Hello!!
I would like to make some small displays to put in the house where you can see the status of some lights and temperatures.
So it was my intention to retrieve this info from Domoticz from time to time. If I understand correctly I should use the "request" command only that I have no idea where to start ....
Has anyone already done something like this and wants to share their experience and / or a piece of code already done ?? -
RE: I encounter OTA MYSBootloader problems
@fac13 I looked a little bit the problem is not MYSbootloader, because if I have seen well, it has a configuration files where you go to Change the channel !!
The problem is the .HEX files that you go to put in the IDE of Arduiono and that write the new BootLoader on Arduino, these predispose the channel 76 in reception, and here the problem .....
In addition, as already mentioned, I noticed that the arduino of which you change the Bootloader have problems when you remove the power and put it back .... Many times they lose the sketch -
RE: battery powered sensor / watchdog?
Excuse me but I go a little OT ..... What dashboard and this are you using?
-
RE: I encounter OTA MYSBootloader problems
No for OTA the Defaul channel and 76, the one with which and by default MYSENSORS, you should change it to MYSController, but I do not know how to do it !!
I also sent a message to the TEKKA user who invented MYSController, but I did not get an answer !!
If someone knows how to do it ?? It would give us a great help .... -
RE: I encounter OTA MYSBootloader problems
@sindrome73 Hello!! after many tests maybe I could solve the problem, but now I have another question.
So I discovered that the problem that OTAQs did not work is because I changed the default Radio channel of mysensors for RF24 radiosNow my question and this, you can use a different channel for OTA updates, if you like ??
-
I encounter OTA MYSBootloader problems
Hello!!
I managed with some time doing OTA updates of a node using MYSBootloader, and after some tests, OTAs work.The node in question is a 5v pro-mini arduino with RF24 radio
But I'm having problems now, I noticed that the node, followed by some power failures and as if he lost the sketc, and then I have to reload the sketch via FTDI.
In addition now on this node, once the sketch is reloaded I am no longer able to do the OTA update via MYSController connected to a serial gateway.
In addition I wanted to ask for a clarification, for an Arduino Pro-Mini 5v at 16Mhz, the fuses with AVRDUDESS must be set as follows:
L = 0xFF
H = 0xDA
E = 0x06 -
RE: What did you build today (Pictures) ?
@kalina
And then once connected to the Raspy ?? What are you doing?? And a new thing for me !! -
RE: What did you build today (Pictures) ?
@kalina said in What did you build today (Pictures) ?:
ione di installare questa scatola
if I can know !! The audio socket what is it for ???
-
RE: Possible Bug version 2.2.0
Other sketches work, already tried !! And this from problems with 2.2
-
RE: Possible Bug version 2.2.0
Hello!! Sorry if I'm late.....
So I tried to do the checks as suggested .....If I load the schetck with Mysensors Ver 2.1 the Arduino IDE gives me 28620 Bytes used 93% of the space
If I load the schetck with Mysensors Ver 2.2 the IDE of Arduino gives me 29310 Bytes used 95% of the space
So it could be a problem of space and therefore makes my Arduino Pro unstable .....
Tomorrow I'll try to load the same Scketch on An Arduino Uno that should have a little more space ..... I keep you updated on the developments -
RE: Possible Bug version 2.2.0
Ok tomorrow calmly I will make these changes and update you .... A Tomorrow, and thanks for now .....
-
RE: Possible Bug version 2.2.0
But it is the same with both 2.2 and 2.1.
With Arduino Pro Mini, enabling the signature debugging must be disabled because it exceeds counque the maximum available memory ....... -
RE: Possible Bug version 2.2.0
Ok .... Tomorrow I'll do it ..... But it will be difficult to have the Gateway Log because with the signature enabled, the sketch is very large, and does not allow me to activate the Debug ....
-
RE: Possible Bug version 2.2.0
Yes indeed I have already said this !! So true that to have the DEBUG of the signature I had to disable the DEBUG.
But with this same script, and going to Mysensors 2.1 it works !!
-
RE: Possible Bug version 2.2.0
Here is the log with the Debug signed abbreviation.
I specify that I had to disable // # define MY_DEBUG because the scketch is too big -
RE: Possible Bug version 2.2.0
tell me how to abbilitate the detailed signature debug .....
-
RE: Possible Bug version 2.2.0
Here I am at home .... I proceeded to redo the procedure and this sot is the log ....
I had to put an image because the last signs that mida I can not copy them as text ....
-
RE: Possible Bug version 2.2.0
In the evening ..... Now I'm at work and I can not
-
RE: Possible Bug version 2.2.0
I apologize, but I did not understand what you tell me ....
I would like to add that the script without the signature with the 2.2 version works, while the signature works only with MySensors 2.1
-
RE: Possible Bug version 2.2.0
532/5000
I made the customization from the beginning, with MySensors 2.2.0I followed these steps:
- The EEPROM has been deleted
- Open SecurityPersonalize.ino inserted the new Key
- loaded the scketch and it does not go
I redid the same procedure above, then EEprom deleted, SecurityPersonalize file, and loaded the scketch, but this time using Mysensors 2.1.1
And here it worked ..... The same thing I did on Several Pro Mini at 5V 16Mhz and the result is the same ..... That's why I assume there may be something wrong with 2.2.0 -
Possible Bug version 2.2.0
Good morning, for one of my Weather Station (very early stage) I used the code below. Which works perfectly with MySensors 2.1.1
Yesterday I updated my Arduino IDE to Version 2.2.0 and when I try to compile the code it goes, but once loaded the scketch on my arduino Pro, it does not work, while reloading the code compiled with MySensors 2.1.1 It works !!I think there is something wrong with the latest version of Mysensors
// ---- - Stazione Meteo Francy Ver 1 - ---- // Enable debug prints #define MY_DEBUG // Enable and select radio type attached #define MY_RADIO_NRF24 #define MY_PARENT_NODE_ID 0 #define MY_PARENT_NODE_IS_STATIC #define MY_RF24_CHANNEL 84 #define MY_SIGNING_SOFT #define MY_SIGNING_SOFT_RANDOMSEED_PIN 7 #define MY_SIGNING_REQUEST_SIGNATURES // Definisco il Nodo #define MY_NODE_ID 66 // Nomino i figli del Nodo #define CHILD_ID_TEMP 1 #define CHILD_ID_aaaa 2 #define CHILD_ID_HUMI 3 #define CHILD_ID_bbbb 4 #define CHILD_ID_BARO 5 #define CHILD_ID_LIGHT 6 #define LIGHT_SENSOR_ANALOG_PIN 0 const float ALTITUDE = 335; //----------------------------- Pressione //float pressione = 1017; //int forecast = 4; const char *weather[] = { "stable", "sunny", "cloudy", "unstable", "thunderstorm", "unknown" }; enum FORECAST { STABLE = 0, // "Stable Weather Pattern" SUNNY = 1, // "Slowly rising Good Weather", "Clear/Sunny " CLOUDY = 2, // "Slowly falling L-Pressure ", "Cloudy/Rain " UNSTABLE = 3, // "Quickly rising H-Press", "Not Stable" THUNDERSTORM = 4, // "Quickly falling L-Press", "Thunderstorm" UNKNOWN = 5 // "Unknown (More Time needed) }; //----------------------------------------- #include <SPI.h> #include <MySensors.h> #include <DHT.h> #include <Wire.h> #include <Adafruit_BMP085.h> DHT dht; //----------------------------- Adafruit_BMP085 bmp = Adafruit_BMP085(); // Digital Pressure Sensor float lastPressure = -1; float lastTemp = -1; int lastForecast = -1; const int LAST_SAMPLES_COUNT = 5; float lastPressureSamples[LAST_SAMPLES_COUNT]; // this CONVERSION_FACTOR is used to convert from Pa to kPa in forecast algorithm // get kPa/h be dividing hPa by 10 #define CONVERSION_FACTOR (1.0/10.0) int minuteCount = 0; bool firstRound = true; // average value is used in forecast algorithm. float pressureAvg; // average after 2 hours is used as reference value for the next iteration. float pressureAvg2; float dP_dt; bool metric; //----------------------------- //Dichiarazioni per pause dei diversi blocchi unsigned long int time; unsigned long int lettura_Press; unsigned long int lettura_Temp; unsigned long int letturaluce_time; //------------------------------ int lastLightLevel; //Dichiarazione Luminosita float temperatureDTH2; void presentation() { sendSketchInfo("Temp e Umidita", "3"); present(CHILD_ID_TEMP, S_TEMP); present(CHILD_ID_aaaa, S_LIGHT); present(CHILD_ID_HUMI, S_HUM); present(CHILD_ID_bbbb, S_LIGHT); present(CHILD_ID_BARO, S_BARO); present(CHILD_ID_LIGHT, S_LIGHT_LEVEL); } MyMessage msgTemp(CHILD_ID_TEMP, V_TEMP); MyMessage msgaaaa(CHILD_ID_HUMI, V_LIGHT); MyMessage msgHumi(CHILD_ID_HUMI, V_HUM); MyMessage msgbbbb(CHILD_ID_HUMI, V_LIGHT); MyMessage msgPres(CHILD_ID_BARO, V_PRESSURE); MyMessage msgForecast(CHILD_ID_BARO, V_FORECAST); MyMessage msg4(CHILD_ID_LIGHT, V_LIGHT_LEVEL); void setup() { // Setto il Pin dove e collegato il sensore di Temperatura DHT22 dht.setup(3); //Settaggi del BMP180 if (!bmp.begin()) { Serial.println("Could not find a valid BMP085 sensor, check wiring!"); while (1) {} } metric = getControllerConfig().isMetric; //Fine settaggi BMP180 //-- Setup Variabili MILLIS per sensore di Pressione time=millis(); lettura_Press = millis(); lettura_Temp = millis(); letturaluce_time = millis(); } void loop() { //Attivo Time MILLIS time=millis(); //----------- Inizio DHT22 ------------------------ if(time>lettura_Temp+12000){ delay(dht.getMinimumSamplingPeriod()); Serial.println("--- Temperatura --- "); float temperatureDTH; float humidity = dht.getHumidity(); float temperatureDHT = dht.getTemperature(); temperatureDTH2 = temperatureDTH; //Invio la lettura della Temperatura send(msgTemp.set(temperatureDHT, 1)); //delay(6000); // Faccio una pausa ed invio altra lettura //Invio lettura Umidita send(msgHumi.set(humidity, 1)); //delay(4000); lettura_Temp=millis(); } //---------- Inizio Pressione --------------------------- if(time>lettura_Press+11000){ Serial.println("--- Tempo passato lego la Pressione--- "); float temperatureDHT2; float pressure = bmp.readSealevelPressure(ALTITUDE) / 100.0; float temperature = temperatureDHT2; if (!metric) { // Convert to fahrenheit temperature = temperature * 9.0 / 5.0 + 32.0; } int forecast = sample(pressure); Serial.print("Pressione = "); Serial.print(pressure); Serial.println(" hPa"); Serial.print("Forecast = "); Serial.println(weather[forecast]); if (pressure != lastPressure) { send(msgPres.set(pressure, 0)); lastPressure = pressure; } if (forecast != lastForecast) { send(msgForecast.set(weather[forecast])); lastForecast = forecast; } lettura_Press=millis(); } //-------------- Inizio Luminosita -------------------------- if(time>letturaluce_time+10000){ Serial.print("Tempo passato lego la Luce: "); int16_t lightLevel = (1023-analogRead(LIGHT_SENSOR_ANALOG_PIN))/10.23; Serial.println(lightLevel); //delay(1000); if (lightLevel != lastLightLevel) { if(lightLevel > lastLightLevel + 7 || lightLevel < lastLightLevel - 7){ send(msg4.set(lightLevel)); Serial.print("Invio nuova lettura LUX: "); Serial.println(lightLevel); lastLightLevel = lightLevel; } } letturaluce_time=millis(); } //Fine Luminosita //--------- Eventuale 4 Modulo ------------------------- // Chiusura Loop } //------------ Aggiuntivo Previsione del Barometro --------------------- float getLastPressureSamplesAverage() { float lastPressureSamplesAverage = 0; for (int i = 0; i < LAST_SAMPLES_COUNT; i++) { lastPressureSamplesAverage += lastPressureSamples[i]; } lastPressureSamplesAverage /= LAST_SAMPLES_COUNT; return lastPressureSamplesAverage; } // Algorithm found here // http://www.freescale.com/files/sensors/doc/app_note/AN3914.pdf // Pressure in hPa --> forecast done by calculating kPa/h int sample(float pressure) { // Calculate the average of the last n minutes. int index = minuteCount % LAST_SAMPLES_COUNT; lastPressureSamples[index] = pressure; minuteCount++; if (minuteCount > 185) { minuteCount = 6; } if (minuteCount == 5) { pressureAvg = getLastPressureSamplesAverage(); } else if (minuteCount == 35) { float lastPressureAvg = getLastPressureSamplesAverage(); float change = (lastPressureAvg - pressureAvg) * CONVERSION_FACTOR; if (firstRound) // first time initial 3 hour { dP_dt = change * 2; // note this is for t = 0.5hour } else { dP_dt = change / 1.5; // divide by 1.5 as this is the difference in time from 0 value. } } else if (minuteCount == 65) { float lastPressureAvg = getLastPressureSamplesAverage(); float change = (lastPressureAvg - pressureAvg) * CONVERSION_FACTOR; if (firstRound) //first time initial 3 hour { dP_dt = change; //note this is for t = 1 hour } else { dP_dt = change / 2; //divide by 2 as this is the difference in time from 0 value } } else if (minuteCount == 95) { float lastPressureAvg = getLastPressureSamplesAverage(); float change = (lastPressureAvg - pressureAvg) * CONVERSION_FACTOR; if (firstRound) // first time initial 3 hour { dP_dt = change / 1.5; // note this is for t = 1.5 hour } else { dP_dt = change / 2.5; // divide by 2.5 as this is the difference in time from 0 value } } else if (minuteCount == 125) { float lastPressureAvg = getLastPressureSamplesAverage(); pressureAvg2 = lastPressureAvg; // store for later use. float change = (lastPressureAvg - pressureAvg) * CONVERSION_FACTOR; if (firstRound) // first time initial 3 hour { dP_dt = change / 2; // note this is for t = 2 hour } else { dP_dt = change / 3; // divide by 3 as this is the difference in time from 0 value } } else if (minuteCount == 155) { float lastPressureAvg = getLastPressureSamplesAverage(); float change = (lastPressureAvg - pressureAvg) * CONVERSION_FACTOR; if (firstRound) // first time initial 3 hour { dP_dt = change / 2.5; // note this is for t = 2.5 hour } else { dP_dt = change / 3.5; // divide by 3.5 as this is the difference in time from 0 value } } else if (minuteCount == 185) { float lastPressureAvg = getLastPressureSamplesAverage(); float change = (lastPressureAvg - pressureAvg) * CONVERSION_FACTOR; if (firstRound) // first time initial 3 hour { dP_dt = change / 3; // note this is for t = 3 hour } else { dP_dt = change / 4; // divide by 4 as this is the difference in time from 0 value } pressureAvg = pressureAvg2; // Equating the pressure at 0 to the pressure at 2 hour after 3 hours have past. firstRound = false; // flag to let you know that this is on the past 3 hour mark. Initialized to 0 outside main loop. } int forecast = UNKNOWN; if (minuteCount < 35 && firstRound) //if time is less than 35 min on the first 3 hour interval. { forecast = UNKNOWN; } else if (dP_dt < (-0.25)) { forecast = THUNDERSTORM; } else if (dP_dt > 0.25) { forecast = UNSTABLE; } else if ((dP_dt > (-0.25)) && (dP_dt < (-0.05))) { forecast = CLOUDY; } else if ((dP_dt > 0.05) && (dP_dt < 0.25)) { forecast = SUNNY; } else if ((dP_dt >(-0.05)) && (dP_dt < 0.05)) { forecast = STABLE; } else { forecast = UNKNOWN; } // uncomment when debugging Serial.print(F("Forecast at minute ")); Serial.print(minuteCount); Serial.print(F(" dP/dt = ")); Serial.print(dP_dt); Serial.print(F("kPa/h --> ")); Serial.println(weather[forecast]); return forecast; }```
-
Which procedure for signature
I wanted a clarification !! As already mentioned in another of my posts, I'm implementing the signature in my network, I wanted to ask, the procedure I find here described
https://www.mysensors.org/apidocs-beta/group__MySigninggrpPub.html
and the same whether I use MySensors 2.1.1 and MySensors 2.2.0 ???
Or should I use different procedures ??? Thanks 10000
-
RE: Clarifications on MY_SIGNING_WEAK_SECURITY
I had thought of an alternative because however the signature requires much more memory of the script, and much more substantial communications !! That's why I wanted to somehow use nodes with signature and nodes without signature !!
But from what I understood, the only node to have a secure network and to have all the nodes with the signature in the network .....Thanks anyway for the idea of a double network ......
-
RE: Clarifications on MY_SIGNING_WEAK_SECURITY
I believe that the use of two gateways, and therefore 2 networks, is perhaps the most correct solution !! A secure network with a signature and a slightly leaner network with all the other Sensors .....
And a right solution !!Further information !!
Using #define MY_SIGNING_REQUEST_SIGNATURES only in the nodes and not in the Gateway, could it be a way to introduce the signature only between some nodes ???
Without incurring a degradation of security ??
It's correct?? Or is it a wrong thing ???? -
Clarifications on MY_SIGNING_WEAK_SECURITY
Good morning!! I wanted to ask some information, I'm starting to build some nodes, made up of Arduino Pro Mini 5v and as radio NRF24L01, and I'm starting to insert a bit of security !! Since I have noticed that without the network and very exposed, in fact it is enough another system that is the same close that commands everything in practice.
So I proceeded, at least to change the default radio channel and introduce the Soft Signature.
Now I would like to know, the signature I have to introduce by force for all nodes, or I can use it only for those nodes that I consider most sensitive (such as lights, gate) and leave without the nodes, which for example send only temperature values, and then I think of minor importance ?????This entering the code: "#define MY_SIGNING_WEAK_SECURITY"
However, since I read: https://www.mysensors.org/apidocs-beta/group__SigningSettingGrpPub.html#gaf44407e0f498eca7069adf5e59ffe052
Doing this involves a significant weakening of the protection !!
So how do you use nodes with Firma and nodes without Signature ??
I hope I managed to explain my doubts well .... Thanks to those who can help me .....
-
RE: Signature verification failing.
But then if I understand correctly, with the current stable version 2.2.0 you can also use:
Β #define MY_SIGNING_SIMPLE_PASSWD "mysecretpw"And it is no longer necessary to customize the nodes and the Gateway ??
If it is so!! Is it safer or less secure ???
-
RE: Help Signing
@anticimex said in Help Signing:
Hi,
first of all, you have spelled a define wrong,#define MY_SIGNING_REQUEST_SIGNATURE
should be
#define MY_SIGNING_REQUEST_SIGNATURES
Secondly, you have to enable signing on the gateway as well.
Thirdly, you have to personalize your devices (as per the documentation) or signing won't work at all.Hello!!
I resume my discussion !! Finally after a long time, I was able to understand the "3" point that Anticimex told me. Where it is said that the device (node ββ/ gateway) must be customized through the SecureActuator.ino files.I did this way:
I loaded the scketch SecureActuator.ino, on the node or on the gateway, and I followed these steps, and we're talking about using only the Firma Software.
Enable GENERATE_KEYS_SOFT
This will generate random keys for HMAC (signing) and AES (encryption). Copy the keys generated and replace the corresponding definitions under "User defined key data", specifically MY_HMAC_KEY and MY_AES_KEY.
Disable GENERATE_KEYS_SOFT and enable PERSONALIZE_SOFT
This will store the HMAC key and the AES key to EEPROM. It will also write a checksum of the personalization data in EEPROM to be able to detect if the data is altered.
Personalization is now complete.At this point if I understand correctly I write my scketch, adding at the beginning before Config.h
How much:#define MY_SIGNING_SOFT
#define MY_SIGNING_REQUEST_SIGNATURES
#define MY_SIGNING_SOFT_RANDOMSEED_PIN 7And load everything, on the node ...... It should be all right now ?? Quite right???
Of course, loading this scketck, gate from the Sardinian SecureActuator.ino, but this is normal because however the HMAC (signing) and AES (encryption), are stored in the EEPROM of arduino !! Quite right???
At this point I'm using the Signature correctly or do I have to do anything else ???
-
MYSController help for beginners
Good evening!!
Question definitely stupid, but I would like to understand how to use MYSController, I downloaded the program, launch the files .exe, but then what should I do to connect to the nodes or else ???
My Mystery Network and so composed:- Domoticz that runs on Raspberry with MQTT
- MQTT Gateway with NRF24L01 radio
- 2 Nodes communicating with the Gateway with radio NRF24L01
How do you use MYSController in these cases ???
Thanks 1000 for the help
-
RE: Help. Domoticz combines the DHT and BMP180 sensors
We hope that in some way the user is given the chance to decide whether to combine the nodes
-
RE: Help. Domoticz combines the DHT and BMP180 sensors
If this is the case, I started from node ID 99 and arrived up to Node 67, doing tests ....
-
RE: Help. Domoticz combines the DHT and BMP180 sensors
However, the behavior in this sense is strange, and I think it is certainly a Domoticz problem.
Or at least the Domoticz Development Team should give the possibility to manage how to use the sensors, whether to combine or not -
RE: Help. Domoticz combines the DHT and BMP180 sensors
In practice it happens that with a node composed of DTH and BMP180, it creates 4 sensors, as follows:
- Only one Temp
- One Temp / HUM / Pressure
- Two for the pressure .....
The data reach up to Domoticz, surely, I see them updated in the HARDWARE tab, but then they do not update ..... or happen that some are updated and others are not of the 4 created.
-
RE: Help. Domoticz combines the DHT and BMP180 sensors
The problem is that when multiple sensors are generated, the node sends the data, but does not update in domoticz
-
RE: Help. Domoticz combines the DHT and BMP180 sensors
Hi Goodmorning.
I had already read this discussion, but still does not indicate a precise solution from what I understand.
In the end, somehow I managed to show Domoticz the DHT22 and BMP180 sensors. In a united way, but able to update, because most of the time creates different sensors between Teperatura Pressure and then even if the data arrive from the node, they are not updated.
Surely all this is a problem of Domoticz, which should try to solve !!Let's see if others can help us .....
-
Help. Domoticz combines the DHT and BMP180 sensors
Hi, I'm trying to assemble a mini Weather station, consisting of a temperature and humidity sensor (DHT22) and a BMP180 pressure sensor.
But Domoticz, in addition to the problem of combining sensors, after a while no longer reads the values sent by the Node.
Is there a way to vitar that domoticz combines sensors ??? I also tried to look, but it seems like a Domoticz problem -
RE: mysensors.json file structure
Sorry the question, but this mysensos.json files where it is located ?? I did not understand it !!
-
RE: π¬ MDMSNode "Power"
for a sketch piece where the ASC711 is used. because I would like to use it for a similar project, but I do not know how to use it to have a reading for AC. so since you used an asc711 in your project, I thought you could help me ....
Thanks 10000 -
RE: π¬ MDMSNode "Power"
thanks .... I wait because I do not know how to use it
-
RE: π¬ MDMSNode "Power"
would it be possible to have the ACS711 sketch ???
-
RE: Help to Build a Sensor with Arduino Pro 3V
Discovered the problem !! I fed through the "RAW" pin while feeding through the VCC
Ok is now working
-
RE: Help to Build a Sensor with Arduino Pro 3V
No firm !! What does not work and Arduino Pro Mini at 3V.
Do not start with two 1.5V batteries.
To work it requires at least 3.3VHow do I do it to make it work with two 3v batteries?
-
Help to Build a Sensor with Arduino Pro 3V
Hello!!
I tried to build a first battery sensor with an Arduino Pro Mini 3V but feeding it with 2 1.5V batteries the sensor will not work !!
But do I need to use a Step Up Boost Module or do I just follow the directions on this page ??? -
RE: Help Signing
Another sore point !! I do not know how to edit Myconfig.H
Send me some links where I can see? -
RE: Help Signing
I copied the same code in the gateway.
For the gateway however I have to disable the debug otherwise sketch and too big !!So I loaded this code both in the Relay Node and in the Gateway:
#define MY_SIGNING_SOFT
#define MY_SIGNING_REQUEST_SIGNATURES
#define MY_SIGNING_SOFT_RANDOMSEED_PIN 7In the Knot Debug I see this:
317050 TSF:MSG:READ,0-0-3,s=1,c=3,t=16,pt=0,l=0,sg=1: 317072 TSF:MSG:SEND,3-3-0-0,s=255,c=3,t=17,pt=6,l=25,sg=1,ft=0,st=OK:FADEB1BB0B066C3F08094CC8C74FD0A63EC503598F2B14C14B 317150 TSF:MSG:READ,0-0-3,s=1,c=1,t=2,pt=0,l=1,sg=1:1 317231 TSF:MSG:ACK REQ 317234 TSF:MSG:SEND,3-3-0-0,s=1,c=1,t=2,pt=0,l=1,sg=0,ft=0,st=OK:1 Incoming change for sensor:1, New status: 1
I think something is working !! Now I would like to try to mix in the network a node that does not require signing
-
RE: Help Signing
But is it so difficult to load an example of a gateway + node that requires signature + a node that does not require signature?
It would help many in my situation !! I try to study the whole thing again but the signature for those like me, is at the beginning of the weapon is not easy as explained
-
RE: Help Signing
They used them but they brought me to the same page anyway
-
RE: Help Signing
But I only find examples for nodes !! While for Gateway I find nothing !!!
-
RE: Help Signing
It's been a month since I read and read the documentation and the various examples, but I can not understand it well !!
And very difficult for me .....I understand that documentation is important but an example of Gateway sketch would be much faster
-
RE: Help Signing
For Signing on Gateway I have to enter the same Code ???
While point 3 does not make me clear !! What should I do in my Relay Node?
Or is it something I then have to do in all the nodes ?? -
Help Signing
I have a MQTT gateway, which interfaces with Domoticz.
I want to make a node relay, and I want to add a Soft signature.
Then add the following code to the Sketch before Config.h:#define MY_SIGNING_SOFT
#define MY_SIGNING_REQUEST_SIGNATURE
#define MY_SIGNING_SOFT_RANDOMSEED_PIN 7It's right??
In the Debug I see no difference, and normal ??
Thanks to who can help me .... -
Two Gateway MQTT
Hello!! For convenience, I wanted to pair 2 MQTT Gateways, with different IP addresses, and only one MQTT Broker installed on a Raspberry, where Domoticz also turns.
The two Gateways work on different channels with the NRF24L01 modules, but by connecting them, the modules sometimes work in Times no !!
Do you have any suggestions for pater use 2 Gateway -
RE: π¬ Security & Signing
As I said, my English is not good and therefore it is difficult for me to follow the discussions.
That's why I was asking for a snapshot already done, in order to study the code and understand how to solve ....
Β If anyone can help me ???? -
RE: π¬ Security & Signing
Hello!! I'm also trying to implement SOFT Signature, but because of my poor English I have many problems !!
Someone could post the socket of a node + a working MQTT gateway.So you can study the code and understand how it works !!!
Thanks 1000 in advance to who can help me
-
RE: Exploit the mysensors network
I got it!! So if I use domoticz as a controller, I should retrieve data from domoticz ...... Okay ???
-
RE: Exploit the mysensors network
No, I do not want to communicate with other mysensors nodes, but I also support another receiver with NRF24L01, and send data from nodes !!
For example, I want to make my gateway load the temperature data on a web page, and this data is taken from a node my sensors
-
Exploit the mysensors network
Hello!!
I'm slowly beginning to learn mysensors .....
For now I am just an amateur.I would like to know if I can somehow, once a node (such as a temperature node) has been created, this in addition to communicating with the gateway, I can somehow take advantage of the radio module to send communications to another arduin. Using this radio module or adding another .......
It's possible???