Navigation

    • Register
    • Login
    • Search
    • OpenHardware.io
    • Categories
    • Recent
    • Tags
    • Popular
    1. Home
    2. ferpando
    3. Posts
    • Profile
    • Following
    • Followers
    • Topics
    • Posts
    • Best
    • Groups

    Posts made by ferpando

    • RE: ESP8266 MQTT gateway radio problem

      Thank you.
      I'll make some tests if I can find one

      posted in Troubleshooting
      ferpando
      ferpando
    • RE: Nap machine / Scene controller

      Hello,
      Here's a simple schematic of the project

      0_1504521460415_Captura de pantalla 2017-09-04 a las 12.34.32.png

      posted in My Project
      ferpando
      ferpando
    • RE: ESP8266 MQTT gateway radio problem

      Thank you.
      I'll keep trying some other things..

      posted in Troubleshooting
      ferpando
      ferpando
    • RE: ESP8266 MQTT gateway radio problem

      yes.. more or less the same

      posted in Troubleshooting
      ferpando
      ferpando
    • RE: Switching multiple lights

      Hello,

      I had a similar problem some time ago..
      Take a look at this to see if it might help

      https://forum.mysensors.org/topic/131/scene-too-fast-for-gateway

      posted in MyNodes.NET
      ferpando
      ferpando
    • RE: ESP8266 MQTT gateway radio problem

      Tried all sorts of things.
      Also tried the module with antenna and the one without..
      The problem is random.

      When it happens, I see the node sending data, and I see the gateway receiving it realtime, but the do not connect.
      That's what I don't understand.

      posted in Troubleshooting
      ferpando
      ferpando
    • RE: Nap machine / Scene controller

      I just draw them in photoshop, save then as monochrome gif, and then use an online service to generate the arrays to use on the code.

      Something like this:

      imageconverter.rest7.com

      posted in My Project
      ferpando
      ferpando
    • ESP8266 MQTT gateway radio problem

      Hello,
      I created an MQTT gateway a few days ago and a node to check communication.
      I'm on 2.1.1 and everything seems to work fine most of the time.

      But sometimes, when powering up the node, I get lots of fail massages.

      The gateway receives messages from the node, but for some reason the don't understand each other.

      Here is the log from the node:

      0 MCO:BGN:INIT NODE,CP=RNNNA--,VER=2.1.1
      3 TSM:INIT
      4 TSF:WUR:MS=0
      11 TSM:INIT:TSP OK
      12 TSM:INIT:STATID=50
      15 TSF:SID:OK,ID=50
      16 TSM:FPAR
      53 TSF:MSG:SEND,50-50-255-255,s=255,c=3,t=7,pt=0,l=0,sg=0,ft=0,st=OK:
      2060 !TSM:FPAR:NO REPLY
      2062 TSM:FPAR
      2098 TSF:MSG:SEND,50-50-255-255,s=255,c=3,t=7,pt=0,l=0,sg=0,ft=0,st=OK:
      4106 !TSM:FPAR:NO REPLY
      4108 TSM:FPAR
      4144 TSF:MSG:SEND,50-50-255-255,s=255,c=3,t=7,pt=0,l=0,sg=0,ft=0,st=OK:
      6152 !TSM:FPAR:NO REPLY
      6154 TSM:FPAR
      6190 TSF:MSG:SEND,50-50-255-255,s=255,c=3,t=7,pt=0,l=0,sg=0,ft=0,st=OK:
      8198 !TSM:FPAR:FAIL
      8199 TSM:FAIL:CNT=1
      8201 TSM:FAIL:PDT
      18204 TSM:FAIL:RE-INIT
      18206 TSM:INIT
      18213 TSM:INIT:TSP OK
      18215 TSM:INIT:STATID=50
      18217 TSF:SID:OK,ID=50
      18220 TSM:FPAR
      18256 TSF:MSG:SEND,50-50-255-255,s=255,c=3,t=7,pt=0,l=0,sg=0,ft=0,st=OK:
      20264 !TSM:FPAR:NO REPLY
      20267 TSM:FPAR
      20303 TSF:MSG:SEND,50-50-255-255,s=255,c=3,t=7,pt=0,l=0,sg=0,ft=0,st=OK:
      22311 !TSM:FPAR:NO REPLY
      22313 TSM:FPAR
      22350 TSF:MSG:SEND,50-50-255-255,s=255,c=3,t=7,pt=0,l=0,sg=0,ft=0,st=OK:
      24357 !TSM:FPAR:NO REPLY
      24359 TSM:FPAR
      24396 TSF:MSG:SEND,50-50-255-255,s=255,c=3,t=7,pt=0,l=0,sg=0,ft=0,st=OK:
      26403 !TSM:FPAR:FAIL
      26404 TSM:FAIL:CNT=2
      26406 TSM:FAIL:PDT
      

      And here is the log from the gateway:

      0;255;3;0;9;MCO:BGN:INIT GW,CP=RNNGE--,VER=2.1.1
      0;255;3;0;9;TSF:LRT:OK
      0;255;3;0;9;TSM:INIT
      0;255;3;0;9;TSF:WUR:MS=0
      scandone
      state: 0 -> 2 (b0)
      state: 2 -> 3 (0)
      state: 3 -> 5 (10)
      add 0
      aid 2
      cnt 
      0;255;3;0;9;TSM:INIT:TSP OK
      0;255;3;0;9;TSM:INIT:GW MODE
      0;255;3;0;9;TSM:READY:ID=0,PAR=0,DIS=0
      0;255;3;0;9;MCO:REG:NOT NEEDED
      f r0, scandone
      ..
      connected with setol, channel 6
      ip:192.168.1.135,mask:255.255.255.0,gw:192.168.1.1
      .IP: 192.168.1.135
      0;255;3;0;9;MCO:BGN:STP
      0;255;3;0;9;MCO:BGN:INIT OK,TSP=1
      IP: 192.168.1.135
      0;255;3;0;9;Attempting MQTT connection...
      0;255;3;0;9;MQTT connected
      0;255;3;0;9;Sending message on topic: mygateway1-out/0/255/0/0/18
      0;255;3;0;9;Message arrived on topic: mygateway1-in/50/1/1/0/19
      0;255;3;0;9;!TSF:MSG:SEND,0-0-50-50,s=1,c=1,t=19,pt=0,l=1,sg=0,ft=0,st=NACK:0
      pm open,type:2 0
      0;255;3;0;9;TSF:MSG:READ,50-50-255,s=255,c=3,t=7,pt=0,l=0,sg=0:
      0;255;3;0;9;TSF:MSG:BC
      0;255;3;0;9;TSF:MSG:FPAR REQ,ID=50
      0;255;3;0;9;TSF:PNG:SEND,TO=0
      0;255;3;0;9;TSF:CKU:OK
      0;255;3;0;9;TSF:MSG:GWL OK
      0;255;3;0;9;!TSF:MSG:SEND,0-0-50-50,s=255,c=3,t=8,pt=1,l=1,sg=0,ft=0,st=NACK:0
      0;255;3;0;9;TSF:MSG:READ,50-50-255,s=255,c=3,t=7,pt=0,l=0,sg=0:
      0;255;3;0;9;TSF:MSG:BC
      0;255;3;0;9;TSF:MSG:FPAR REQ,ID=50
      0;255;3;0;9;TSF:CKU:OK,FCTRL
      0;255;3;0;9;TSF:MSG:GWL OK
      0;255;3;0;9;!TSF:MSG:SEND,0-0-50-50,s=255,c=3,t=8,pt=1,l=1,sg=0,ft=0,st=NACK:0
      0;255;3;0;9;TSF:MSG:READ,50-50-255,s=255,c=3,t=7,pt=0,l=0,sg=0:
      0;255;3;0;9;TSF:MSG:BC
      0;255;3;0;9;TSF:MSG:FPAR REQ,ID=50
      0;255;3;0;9;TSF:CKU:OK,FCTRL
      0;255;3;0;9;TSF:MSG:GWL OK
      0;255;3;0;9;!TSF:MSG:SEND,0-0-50-50,s=255,c=3,t=8,pt=1,l=1,sg=0,ft=0,st=NACK:0
      0;255;3;0;9;TSF:MSG:READ,50-50-255,s=255,c=3,t=7,pt=0,l=0,sg=0:
      0;255;3;0;9;TSF:MSG:BC
      0;255;3;0;9;TSF:MSG:FPAR REQ,ID=50
      0;255;3;0;9;TSF:CKU:OK,FCTRL
      0;255;3;0;9;TSF:MSG:GWL OK
      0;255;3;0;9;!TSF:MSG:SEND,0-0-50-50,s=255,c=3,t=8,pt=1,l=1,sg=0,ft=0,st=NACK:0
      0;255;3;0;9;TSF:MSG:READ,50-50-255,s=255,c=3,t=7,pt=0,l=0,sg=0:
      0;255;3;0;9;TSF:MSG:BC
      0;255;3;0;9;TSF:MSG:FPAR REQ,ID=50
      0;255;3;0;9;TSF:PNG:SEND,TO=0
      0;255;3;0;9;TSF:CKU:OK
      0;255;3;0;9;TSF:MSG:GWL OK
      0;255;3;0;9;!TSF:MSG:SEND,0-0-50-50,s=255,c=3,t=8,pt=1,l=1,sg=0,ft=0,st=NACK:0
      0;255;3;0;9;TSF:MSG:READ,50-50-255,s=255,c=3,t=7,pt=0,l=0,sg=0:
      

      I tried the log parser but I don't see where is the problem.

      I'd appreciate any help.
      Thanks in advance

      posted in Troubleshooting
      ferpando
      ferpando
    • Nap machine / Scene controller

      Hello,

      It's been a while since a posted last. It's been really busy around here.

      I've been using a node with a button to start and stop nap time, and control some scene.

      My controller has been Vera for a long time, but now I think it's time for an upgrade.
      I installed openhab a few weeks back and started to play with it.

      Anyway, I thought it was time to make a new thing to control naps. That's how nap machine was born. But as I was building it, I thought it could do a lot more. Become a grown up scene controller.

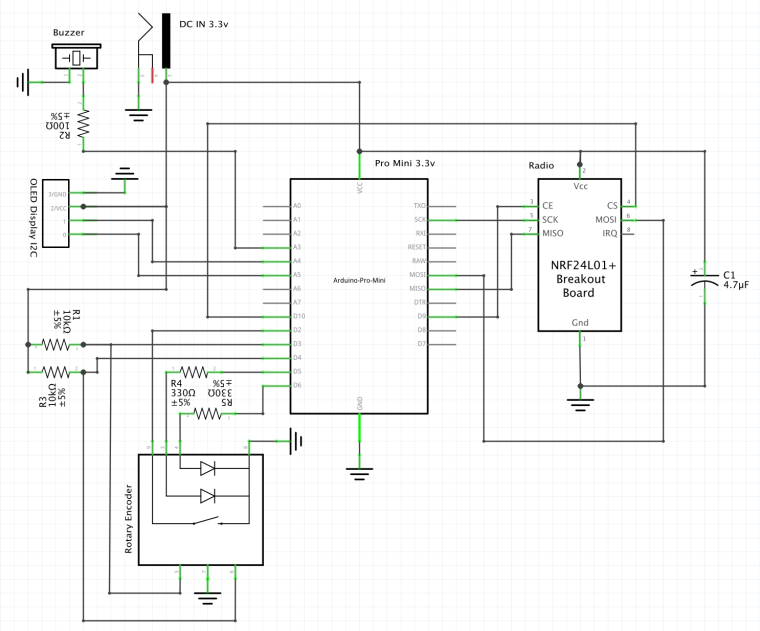
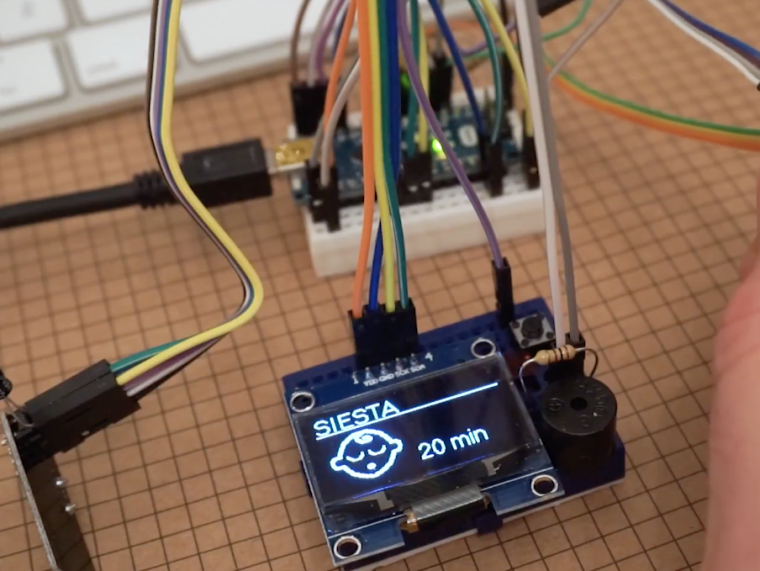
      As you can see in the video, it has an oled display, a rotary encoder and a buzzer.
      It works with SPI displays, as well as I2C. It also has a radio to connect with MySensors gateway.
      The rotary encoder has a integrated button and 2 leds. The program can detect rotation, single click, double click and long click.

      Take a look at the video to see some options. Still in early stage, but it works and it's fully integrated with MySensors.
      I need now to integrate it with openhab, and in this regard I hope to find some help here.

      Feel free to comment or suggest new uses.
      In the following days I'll post the code as it is now, and some schematics for those interested.

      VIDEO:
      napMachine
      0_1504390432905_Captura de pantalla 2017-09-03 a las 0.13.12.png

      posted in My Project
      ferpando
      ferpando
    • RE: Code is required for 16-relays shift register actuator

      @tjay4x4 said:

      16 relay with arduino

      Hello,

      This <MyBuffer.h> is not really needed if you don't want to check if message is received on the node.

      Just remove that line and everything should work.

      posted in Troubleshooting
      ferpando
      ferpando
    • RE: Send a message to MySensors on event

      @sundberg84 said:

      wiki

      Thank you.
      I still have much to learn about how to get things done in Domoticz.
      I'll take a look at the wiki.

      posted in Domoticz
      ferpando
      ferpando
    • Send a message to MySensors on event

      Hi,

      I've been using MySensors with VERA for some time now and no complaints so far.
      I recently wanted to explore Domoticz, so I built a network gateway for Domoticz to test with some new nodes.

      On VERA I used to send messages to my nodes using Lua like this:

      luup.call_action("urn:upnp-arduino-cc:serviceId:arduino1", "SendCommand", 
         {radioId="6;100", variableId="DIMMER", value="0,300"}, 130)
      

      But I don't know how to make the same with Domoticz.
      I made some non standard nodes and I need to send messages to them when an event happens for example.

      Any help or pointers would be much appreciated.

      posted in Domoticz
      ferpando
      ferpando
    • RE: MySensors 1.5.2 Released

      @Anticimex
      Ok, but is there a way to remove them?

      I can confirm it compiles and uploads correctly.

      Thanks

      posted in Announcements
      ferpando
      ferpando
    • RE: MySensors 1.5.2 Released

      I updated to 1.5.3 and I get 2 warnings just by opening arduino IDE

      Warning: platform.txt from core 'MySensors AVR based boards' contains deprecated recipe.ar.pattern="{compiler.path}{compiler.ar.cmd}" {compiler.ar.flags} {compiler.ar.extra_flags} "{build.path}/{archive_file}" "{object_file}", automatically converted to recipe.ar.pattern="{compiler.path}{compiler.ar.cmd}" {compiler.ar.flags} {compiler.ar.extra_flags} "{archive_file_path}" "{object_file}". Consider upgrading this core.
      WARNING: Category '' in library UIPEthernet is not valid. Setting to 'Uncategorized'
      

      I'm using IDE 1.6.6
      It was working before with MySensors 1.5

      posted in Announcements
      ferpando
      ferpando
    • Oregon sensors

      Anyone using a MySensors node to receive data from Oregon probes?

      posted in General Discussion
      ferpando
      ferpando
    • RE: Initialize node with different radio channel

      Why did you remove the possibility? if I may ask

      posted in Troubleshooting
      ferpando
      ferpando
    • RE: Initialize node with different radio channel

      @hek said:

      http://www.mysensors.org/download/sensor_api_15#the-full-api

      That's what I was looking at.
      Take a look at the begin method described there:

      Starting up the library
      
      To initialize radio and start the library, you must call begin(). Begin initializes the sensor node but you can also configure the sensor node operating parameters manually. Call this before anything else in the library
      
      void begin(void (*_msgCallback)(const MyMessage &), uint8_t nodeId, boolean repeaterMode,
      		uint8_t parentNodeId, rf24_pa_dbm_e paLevel, uint8_t channel, rf24_datarate_e dataRate);
      
      incomingMessageCallback - Callback function for incoming messages from other nodes or controller and request responses. Default is NULL.
      nodeId - The unique id (1-254) for this sensor. Default is AUTO(255) which means sensor tries to fetch an id from controller.
      
      repeaterMode - Activate repeater mode. This node will forward messages to other nodes in the radio network. Make sure to call process() regularly. Default in false
      
      parentNodeId - Use this to force node to always communicate with a certain parent node. Default is AUTO which means node automatically tries to find a parent.
      
      paLevel - Radio PA Level for this sensor. Default RF24_PA_MAX
      
      channel - Radio channel. Default is channel 76
      
      dataRate - Radio transmission speed. Default RF24_250KBPS
      

      This should be removed from the page if not possible any more in 1.5 because can cause confusion.

      Thank you for the pointer. I'll take a look at MyConfig.h

      posted in Troubleshooting
      ferpando
      ferpando
    • Initialize node with different radio channel

      I'm trying to choose another channel to make a second network of sensors like this

      gw.begin(incomingMessage, 0, true, 0, RF24_PA_MAX, 80, RF24_250KBPS);
      

      but I'm getting an error

      EthernetGateway.ino: In function 'void setup()':
      EthernetGateway:154: error: no matching function for call to 'MySensor::begin(void (&)(const MyMessage&), int, bool, int, rf24_pa_dbm_e, int, rf24_datarate_e)'
      

      it seems the function does not accept the parameters stated in the API docs

      How can I achieve this then?

      posted in Troubleshooting
      ferpando
      ferpando
    • RE: Having 2 gateways

      @tbowmo said:

      http://forum.mysensors.org/topic/1965/nodered-injected-between-domoticz-and-mysensors

      Thank you for the answer. I'll take a look at that.

      posted in Hardware
      ferpando
      ferpando
    • Having 2 gateways

      Hello,
      I've been using my serial gateway with Vera lite for awhile now and everything works pretty well.
      I recently installed Domoticz to make some tests and I'd like to create a second gateway to control a second network of sensors.
      This time it will be an ethernet one.

      My question is if this could cause problems with the old network. Do I need to change the configuration before compiling?
      Also, how easy is to change one node from the old network to the new one?
      It's enough just to include it on the new network, or should I erase the node and reprogram it?

      My intention is to migrate the nodes to the new network gradually.

      Any help would be appreciated.

      posted in Hardware
      ferpando
      ferpando
    • RE: Strange problem with relay board

      I had the same problem a few months ago.
      The problem solved powering the arduino from a different power supply.
      You can read a bout it here

      Node freezing up

      No more problems since

      posted in Hardware
      ferpando
      ferpando
    • RE: Node freezing up

      @Nuubi
      No more node lock-ups since I installed that power supply, so it works as expected.

      posted in Troubleshooting
      ferpando
      ferpando
    • RE: 6 Way wall touch switch

      @Didi
      YesI will when I have the second version ready.
      This is a bit messy ๐Ÿ™‚
      I'll keep you posted

      posted in My Project
      ferpando
      ferpando
    • RE: 6 Way wall touch switch

      @Vince
      I left some light in the leds because when it's dark/night, you can still find the buttons.
      Now it has 2 leds per button, but the plan is to use an RGB led so it can be further customized.

      posted in My Project
      ferpando
      ferpando
    • RE: 6 Way wall touch switch

      @Dirk_H
      Yes I saw it before and served as inspiration.
      Now I'm making a more compact version with a custom PCB.
      I'm new to smc so let's see how it goes ๐Ÿ™‚

      posted in My Project
      ferpando
      ferpando
    • RE: 230V power supply to Arduino

      Anyone tested one of these cheap power supplies with an osciloscope?
      I got a couple yesterday but not sure if they are good enough

      UT8079rXhXXXXagOFbXc.jpg UT8rBSrXetXXXagOFbX9.jpg UT8u.wlXl0cXXagOFbXN.jpg

      posted in Hardware
      ferpando
      ferpando
    • RE: Motion and lux meters combined in a single device

      @mikemayers
      You need to connect the arduino to pins 4 and 5 for the digital BH1750.
      I don't know why the sketch references pin 0. Must be something left behind from the analog version.

      posted in Hardware
      ferpando
      ferpando
    • RE: Long Term Data Retention and Graphing

      @NotYetRated
      If you use vera you might want to take a look at data yours.
      It looks promising.

      http://forum.micasaverde.com/index.php/topic,30808.0.html

      posted in General Discussion
      ferpando
      ferpando
    • RE: Dimmable led actuator sketch enhancement

      @Drcashman
      by outputs you mean to control 2-3 light fades?
      I guess it wouldn't be too difficult. Just add counters for current and requested values for each fade to keep them independent

      posted in Development
      ferpando
      ferpando
    • RE: Dimmable led actuator sketch enhancement

      @AWI
      You are right but now the blocking is just a few milliseconds instead of the whole fade time.
      I think messages are still received because the are interrupt driven, so in the next cycle message will arrive.
      You will be just delaying a few millis sending new messages.

      Your solutions is indeed an improvement to be considered.
      In my case I don't need that much control.

      posted in Development
      ferpando
      ferpando
    • RE: Dimmable led actuator sketch enhancement

      A few bug fixes and also this sends back to gateway the value of 'requestedValue' instead of 'currentValue' as I think it should be.
      Delays and precise setpoint are now correct.

      /***
       * This program is free software; you can redistribute it and/or
       * modify it under the terms of the GNU General Public License
       * version 2 as published by the Free Software Foundation.
       * 
       * DESCRIPTION
       * This sketch provides a Dimmable LED Light using PWM and based Henrik Ekblad 
       * <henrik.ekblad@gmail.com> Vera Arduino Sensor project.  
       * Developed by Bruce Lacey, inspired by Hek's MySensor's example sketches.
       * 
       * The circuit uses a MOSFET for Pulse-Wave-Modulation to dim the attached LED or LED strip.  
       * The MOSFET Gate pin is connected to Arduino pin 3 (LED_PIN), the MOSFET Drain pin is connected
       * to the LED negative terminal and the MOSFET Source pin is connected to ground.  
       *
       * This sketch is extensible to support more than one MOSFET/PWM dimmer per circuit.
       *
       * REVISION HISTORY
       * Version 1.0 - February 15, 2014 - Bruce Lacey
       * Version 1.1 - August 13, 2014 - Converted to 1.4 (hek) 
       * Version 1.2 - April 13, 2015 - Added long dynamic and precise fade, also made fade non exclusive (ferpando)
       ***/
       
       #include <Time.h> 
       
      #define SN "DimmableLED"
      #define SV "1.2"
      
      #include <MySensor.h> 
      #include <SPI.h>
      
      #define LED_PIN 5      // Arduino pin attached to MOSFET Gate pin
      
      MySensor gw(9,10);
      
      static int currentLevel = 0;  // Current dim level...
      static int requestedLevel = 0;
      boolean preciseFade = false;
      
      MyMessage dimmerMsg(0, V_DIMMER);
      MyMessage lightMsg(0, V_LIGHT);
      
      int FADE_DELAY;   // Delay in ms for each percentage fade up/down (10ms = 1s full-range dim)
      
      /***
       * Dimmable LED initialization method
       */
      void setup()  
      { 
        Serial.println( SN ); 
        gw.begin( incomingMessage );
        
        // Register the LED Dimmable Light with the gateway
        gw.present( 0, S_DIMMER );
        
        gw.sendSketchInfo(SN, SV);
        // Pull the gateway's current dim level - restore light level upon sendor node power-up
        gw.request( 0, V_DIMMER );
      
      }
      
      /***
       *  Dimmable LED main processing loop 
       */
      void loop() 
      {
        gw.process();
        fadeToLevel();
        // if delay is too long, it might stop the node from receiving/sending more messages for a long time.
        //doing it this way, the node can keep functioning regardless fade completition.
      }
      
      void incomingMessage(const MyMessage &message) {
        if (message.type == V_LIGHT || message.type == V_DIMMER) {
          int steps;
          int multiplier;
          if(message.sensor == 100 ){ //fade special, addressed to node 100
            // Message payload: value to fade to, seconds to fade     example: "20,10"
            preciseFade = true;
            String msg=message.getString();
            
            int commaIndex = msg.indexOf(',');
      
            String firstValue = msg.substring(0, commaIndex);
            String secondValue = msg.substring(commaIndex+1);
      
            requestedLevel=firstValue.toInt();
            steps = currentLevel-requestedLevel;
            multiplier = abs(1000 / steps);
            if(commaIndex == -1){
               FADE_DELAY=multiplier * 10;
            }else { 
               FADE_DELAY = multiplier * secondValue.toInt();
            }
          }else { //fade normal
                preciseFade = false;
                steps = currentLevel-requestedLevel;
                multiplier = abs(1000 / steps);
                FADE_DELAY=multiplier * 10;
                //  Retrieve the power or dim level from the incoming request message
                requestedLevel = atoi( message.data );
                
                // Adjust incoming level if this is a V_LIGHT variable update [0 == off, 1 == on]
                requestedLevel *= ( message.type == V_LIGHT ? 100 : 1 );
                
                // Clip incoming level to valid range of 0 to 100
                requestedLevel = requestedLevel > 100 ? 100 : requestedLevel;
                requestedLevel = requestedLevel < 0   ? 0   : requestedLevel;
                
                }
                
          Serial.print( "Changing level to " );
          Serial.print( requestedLevel );
          Serial.print( ", from " ); 
          Serial.println( currentLevel ); 
           
          // Inform the gateway of the current DimmableLED's SwitchPower1 and LoadLevelStatus value...
          gw.send(lightMsg.set(requestedLevel > 0 ? 1 : 0));
      
          // hek comment: Is this really nessesary?
          gw.send( dimmerMsg.set(requestedLevel) );
          
          }
      }
      
      /***
       *  This method provides a graceful fade up/down effect
       */
      void fadeToLevel() {
        
        if ( currentLevel != requestedLevel ) {
          int pwmLevel;
          int delta = ( requestedLevel - currentLevel ) < 0 ? -1 : 1;
          currentLevel += delta;
          Serial.print( "analog write: " );
          if(preciseFade){ //set to specific number
              pwmLevel = (int)currentLevel;
              }else  { //set to 10% increment level
                 pwmLevel=(int)(currentLevel / 100. * 255);
                 }
        Serial.println( pwmLevel );
        analogWrite( LED_PIN, pwmLevel );
        delay( FADE_DELAY );
        }
      }
      
      posted in Development
      ferpando
      ferpando
    • Dimmable led actuator sketch enhancement

      Hello,

      I've been working on a simple mod of the dimmable led actuator available in the examples folder.

      I needed a few things that were not included, like the ability to set a more precise fade level, make longer fades and also being able to change those fade times dynamically.

      Also, as a result of longer dafe times, I had to modify the sketch so the node is still able to send/receive messages during fade time.

      You could send messages from VERA this way:

      luup.call_action("urn:upnp-arduino-cc:serviceId:arduino1", "SendCommand", {radioId="6;100", variableId="DIMMER", value="100,25"}, 130)
      

      This message is sent to node id 6, with parent node id 130, and tells the node to fade to 100% in 25 seconds.
      You could choose any number (0-100) to fade to, instead of the 10% increment Vera offers. Also the old functionality remains working as before.

      Here's the sketch in case someone is interested:

      /***
       * This program is free software; you can redistribute it and/or
       * modify it under the terms of the GNU General Public License
       * version 2 as published by the Free Software Foundation.
       * 
       * DESCRIPTION
       * This sketch provides a Dimmable LED Light using PWM and based Henrik Ekblad 
       * <henrik.ekblad@gmail.com> Vera Arduino Sensor project.  
       * Developed by Bruce Lacey, inspired by Hek's MySensor's example sketches.
       * 
       * The circuit uses a MOSFET for Pulse-Wave-Modulation to dim the attached LED or LED strip.  
       * The MOSFET Gate pin is connected to Arduino pin 3 (LED_PIN), the MOSFET Drain pin is connected
       * to the LED negative terminal and the MOSFET Source pin is connected to ground.  
       *
       * This sketch is extensible to support more than one MOSFET/PWM dimmer per circuit.
       *
       * REVISION HISTORY
       * Version 1.0 - February 15, 2014 - Bruce Lacey
       * Version 1.1 - August 13, 2014 - Converted to 1.4 (hek) 
       * Version 1.2 - April 13, 2015 - Added long dynamic and precise fade, also made fade non exclusive (ferpando)
       ***/
       
       #include <Time.h> 
       
      #define SN "DimmableLED"
      #define SV "1.2"
      
      #include <MySensor.h> 
      #include <SPI.h>
      
      #define LED_PIN 5      // Arduino pin attached to MOSFET Gate pin
      
      MySensor gw(9,10);
      
      static int currentLevel = 0;  // Current dim level...
      static int requestedLevel = 0;
      
      MyMessage dimmerMsg(0, V_DIMMER);
      MyMessage lightMsg(0, V_LIGHT);
      
      int FADE_DELAY;   // Delay in ms for each percentage fade up/down (10ms = 1s full-range dim)
      
      /***
       * Dimmable LED initialization method
       */
      void setup()  
      { 
        Serial.println( SN ); 
        gw.begin( incomingMessage );
        
        // Register the LED Dimmable Light with the gateway
        gw.present( 0, S_DIMMER );
        
        gw.sendSketchInfo(SN, SV);
        // Pull the gateway's current dim level - restore light level upon sendor node power-up
        gw.request( 0, V_DIMMER );
      
      }
      
      /***
       *  Dimmable LED main processing loop 
       */
      void loop() 
      {
        gw.process();
        fadeToLevel();
        // if delay is too long, it might stop the node from receiving/sending more messages for a long time.
        //doing it this way, the node can keep functioning regardless fade completition.
      }
      
      void incomingMessage(const MyMessage &message) {
        if (message.type == V_LIGHT || message.type == V_DIMMER) {
          
          if(message.sensor == 100 ){ //fade special, addressed to node 100
            // Message payload: value to fade to, seconds to fade     example: "20,10"
            
            int commaIndex = msg.indexOf(',');
      
            String firstValue = msg.substring(0, commaIndex);
            String secondValue = msg.substring(commaIndex+1);
      
            requestedLevel=firstValue.toInt();
            int steps=abs(currentLevel-requestedLevel);
      
            if(commaIndex == -1){
               FADE_DELAY=10;
            }else { 
               FADE_DELAY = 1000* secondValue.toInt() / steps;
            }
          }else { //fade normal
          
                FADE_DELAY=10;
                //  Retrieve the power or dim level from the incoming request message
                requestedLevel = atoi( message.data );
                
                // Adjust incoming level if this is a V_LIGHT variable update [0 == off, 1 == on]
                requestedLevel *= ( message.type == V_LIGHT ? 100 : 1 );
                
                // Clip incoming level to valid range of 0 to 100
                requestedLevel = requestedLevel > 100 ? 100 : requestedLevel;
                requestedLevel = requestedLevel < 0   ? 0   : requestedLevel;
                
                }
             
            Serial.print( "Changing level to " );
            Serial.print( requestedLevel );
            Serial.print( ", from " ); 
            Serial.println( currentLevel ); 
             
               
            // Inform the gateway of the current DimmableLED's SwitchPower1 and LoadLevelStatus value...
            gw.send(lightMsg.set(currentLevel > 0 ? 1 : 0));
        
            // hek comment: Is this really nessesary?
            gw.send( dimmerMsg.set(currentLevel) );
          
          }
      }
      
      /***
       *  This method provides a graceful fade up/down effect
       */
      void fadeToLevel() {
      
        if ( currentLevel != requestedLevel ) {
          int delta = ( requestedLevel - currentLevel ) < 0 ? -1 : 1;
        
          currentLevel += delta;
          Serial.print( "analog write: " );
          Serial.println( currentLevel / 100. * 255 );
          analogWrite( LED_PIN, (int)(currentLevel / 100. * 255) );
          delay( FADE_DELAY );
        }
        
      }
      
      posted in Development
      ferpando
      ferpando
    • RE: 6 Way wall touch switch

      @quocanhcgd
      I'll post the project when I finish the PCB and everything is a bit more mature.
      I already uploaded the sketch I used here.
      I made it with a max7219 led driver but you could also use a shift register to control the leds with minimal modifications

      posted in My Project
      ferpando
      ferpando
    • RE: State of the physical switch

      I use something like this in my switches. This devices are also present in your controller, so you can use either physical or virtual switch

      domotique-info-ch54514-package-1.jpg

      Take a look

      http://www.domotique-info.fr/2014/03/micromodule-variateur-di-o-chacon/

      posted in General Discussion
      ferpando
      ferpando
    • RE: Condensation monitoring under a roof

      The problem with these probes is that they are very localized and you don't really know where condensation is going to appear.
      That's why you should rely on good construction rather than spot cheking for moisture.

      posted in General Discussion
      ferpando
      ferpando
    • RE: Condensation monitoring under a roof

      @dumbfif
      What you should do is add the vapor barrier on the warm side of the insulation layer, that way you won't have condensation problems, and no need to check for them either.

      posted in General Discussion
      ferpando
      ferpando
    • RE: Anyone using electronic transformers to power the nodes?

      @Corvl
      Yes, I know it needs a rectifier.
      I got this because it is small and gives 5A so it might be good for lots of leds

      posted in Hardware
      ferpando
      ferpando
    • Anyone using electronic transformers to power the nodes?

      I got yesterday this kind of transformer to test how it behaves

      IMG_8885.JPG

      posted in Hardware
      ferpando
      ferpando
    • RE: 6 Way wall touch switch

      I got it finally installed.
      This is what it looks like.

      https://youtu.be/2AEMxA0ZxUc

      I'm working on a pcb smaller version. I'll keep you posted.

      posted in My Project
      ferpando
      ferpando
    • RE: Node freezing up

      @ServiceXp said:

      http://forum.mysensors.org/topic/338/reliability/3

      Mine doesn`t at the moment, but should be easy to add.

      posted in Troubleshooting
      ferpando
      ferpando
    • RE: Node freezing up

      I made this regulator based on this schematic to power the node independently, to see if it solves the problem.

      IMG_8863.JPG

      7805-5V-Regulated-Power-Supply-Overvoltage-Protection-Circuit-diagram.jpg

      posted in Troubleshooting
      ferpando
      ferpando
    • RE: Node freezing up

      @TimO
      Could you elaborate a bit more about the watchdog?

      posted in Troubleshooting
      ferpando
      ferpando
    • RE: Node freezing up

      @AWI
      Looks like it has a regulator and a 1000uF capacitor plus a smaller one.
      I'll try to add a second regulator with capacitor just for the arduino and see what happens

      image.jpg

      posted in Troubleshooting
      ferpando
      ferpando
    • RE: Node freezing up

      @AWI
      I don't have an oscilloscope to test this.
      I'll try to power both devices separately, but at least they always have a common ground. Could this also affect the radio?
      Adding some capacitors could improve things?

      posted in Troubleshooting
      ferpando
      ferpando
    • RE: 6 Way wall touch switch

      This is a rough integration of the code with MySensors.
      It sends messages back and forth, so if a button is touched it turns on the corresponding device on the controller and if the switch is turned on the controller, the touch leds are updated accordingly

      #include "mpr121.h"
      #include <Wire.h>
      #include "LedControlMS.h"
      #include <MySensor.h>
      #include <SPI.h>
      #include <MyBuffer.h>
      
      #define CHILD_ID1 1   // first child
      #define CHILD_NUM 6    // number of switches
      
      
      //define working pins
       #define BUZZER 7   // buzzer pin
       #define DIN    6   // pin 6 is connected to the DataIn 
       #define CLK    4   // pin 4 is connected to the CLK 
       #define LOD    8   // pin 8 is connected to LOAD 
       #define IRQ    3   // irq pin for touch control
       #define BAKLIT 5   // pin PWM for backlight leds
       
      // ********* MyBuffer ***********************************************************
      MyBuffer buffer;               // define a new buffer
      long previousMillis = 0;       // will store last time buffer was processed
      long interval = 1000;           // interval at which to check buffer
      // ******************************************************************************
      
      MySensor gw;
      
      //define a new led control
      LedControl lc=LedControl(DIN,CLK,LOD,1);
      
      //int irqpin = 3;  // Digital pin IRQ
      boolean touchStates[12]; //to keep track of the previous touch states
      boolean touchMemory[12]; //to keep track of the touch switch states
      
      // correspondence between touch and led pins
      int mapping[2][6]={{0,1,2,3,4,5}     // touch pins
                        ,{1,0,2,5,4,3}};   // led pins
      
      int sound = 500;
      int touchDelay=500;
      
      void setup(){
        // init LED backlight
        pinMode(BAKLIT, OUTPUT);
        analogWrite(BAKLIT, 5);
        
        pinMode(IRQ, INPUT);
        digitalWrite(IRQ, HIGH); //enable pullup resistor
        Wire.begin();
        pinMode(BUZZER, OUTPUT);
        
        for (int i=0; i < 12; i++){
          touchMemory[i]=false;
        }
        mpr121_setup();
        
        //initialize MAX72XX
        lc.shutdown(0,false);
        lc.setIntensity(0,15);
        lc.clearDisplay(0);
        
        gw.begin(incomingMessage, AUTO); //do not make relay node
        gw.sendSketchInfo("WallTouch", "1.0");
        for (int i=0; i<CHILD_NUM;i++) {
         
          gw.present(CHILD_ID1+i, S_LIGHT);
          
          // Set touch button leds to last known state (using eeprom storage) 
          touchMemory[i] = gw.loadState(i)?true:false;
          setLed(mapping[1][i],touchMemory[i]);
        }
      }
      
      void loop(){
        gw.process();
        //watch for touch events
        readTouchInputs();
        //check for buffer items once in a while
        checkTime();
      }
      
      void checkTime(){
         unsigned long currentMillis = millis();
         if(currentMillis - previousMillis > interval) {
              previousMillis = currentMillis;  
              processBuffer();    
            }
      }
      
      void incomingMessage(const MyMessage &message) {
        buffer.push(message.sensor,message.type,message.getString());
      }
      
      //gets message from buffer if exists
      void processBuffer(){
          if(!buffer.isEmpty()){
              String msg=buffer.pop();
              
              int mIndex = msg.indexOf(';');
              int secondmIndex = msg.indexOf(';', mIndex+1);
        
              String firstValue = msg.substring(0, mIndex);
              String secondValue = msg.substring(mIndex+1, secondmIndex);
              String thirdValue = msg.substring(secondmIndex+1);
              
              int sensor = firstValue.toInt();
              int type = secondValue.toInt();
              String data = thirdValue;
        
              Serial.println("    >> Process MSG: s:"+ firstValue +", t:"+secondValue+", d:"+thirdValue);
              
              processMsg(sensor, type, data);
          }
      }
      
      //process message from queue
      void processMsg(int sensor, int type, String data){
        boolean msg;
         switch(type){
              case V_LIGHT: 
                 //comando para 1 rele
                 
                 msg=data.toInt()?1:0;
                 // Store state in eeprom
                 gw.saveState(sensor, msg);      
                 // Write some debug info
                 Serial.print("--> Incoming change for child:");
                 Serial.print(sensor-1);
                 Serial.print(", New status: ");
                 Serial.println(msg);
                 setTouchButton(sensor-1);
                break;
      
            }
      }
      
      void setTouchButton(int pressed){
            MyMessage msg(CHILD_ID1+pressed,V_LIGHT);
            
            Serial.print("pin ");
            Serial.print(pressed);
            Serial.print(" was just touched");
            Serial.print(", turning: ");
            touchMemory[pressed]=touchMemory[pressed]?false:true;
            gw.saveState(pressed, touchMemory[pressed]);
            Serial.println(touchMemory[pressed]?"ON":"OFF");
            setLed(mapping[1][pressed],touchMemory[pressed]?true:false);
        
            gw.send(msg.set(touchMemory[pressed] ? 1 : 0));
            touchSound();
      }
      
      void setLed(int led, boolean lit){
        lc.setLed(0,0,led,lit);
      }
      
      void readTouchInputs(){
        if(!checkInterrupt()){
          
          //read the touch state from the MPR121
          Wire.requestFrom(0x5A,2); 
          
          byte LSB = Wire.read();
          byte MSB = Wire.read();
          
          uint16_t touched = ((MSB << 8) | LSB); //16bits that make up the touch states
      
          
          for (int i=0; i < 12; i++){  // Check what electrodes were pressed
            if(touched & (1<<i)){
            
              if(touchStates[i] == 0){
                 //pin i was just touched
                setTouchButton(i);  
                delay(touchDelay);
                }else if(touchStates[i] == 1){
                  //pin i is still being touched
                }  
            
              touchStates[i] = 1;      
            }else{
             /* if(touchStates[i] == 1){
                Serial.print("pin ");
                Serial.print(i);
              Serial.println(" is no longer being touched");
                
                //pin i is no longer being touched
             }*/
              
              touchStates[i] = 0;
            }
          
          }
        }
      }
      
      void touchSound(){
        tone(BUZZER, sound, 3);
      }
      
      
      void mpr121_setup(void){
      
        set_register(0x5A, ELE_CFG, 0x00); 
        
        // Section A - Controls filtering when data is > baseline.
        set_register(0x5A, MHD_R, 0x01);
        set_register(0x5A, NHD_R, 0x01);
        set_register(0x5A, NCL_R, 0x00);
        set_register(0x5A, FDL_R, 0x00);
      
        // Section B - Controls filtering when data is < baseline.
        set_register(0x5A, MHD_F, 0x01);
        set_register(0x5A, NHD_F, 0x01);
        set_register(0x5A, NCL_F, 0xFF);
        set_register(0x5A, FDL_F, 0x02);
        
        // Section C - Sets touch and release thresholds for each electrode
        set_register(0x5A, ELE0_T, TOU_THRESH);
        set_register(0x5A, ELE0_R, REL_THRESH);
       
        set_register(0x5A, ELE1_T, TOU_THRESH);
        set_register(0x5A, ELE1_R, REL_THRESH);
        
        set_register(0x5A, ELE2_T, TOU_THRESH);
        set_register(0x5A, ELE2_R, REL_THRESH);
        
        set_register(0x5A, ELE3_T, TOU_THRESH);
        set_register(0x5A, ELE3_R, REL_THRESH);
        
        set_register(0x5A, ELE4_T, TOU_THRESH);
        set_register(0x5A, ELE4_R, REL_THRESH);
        
        set_register(0x5A, ELE5_T, TOU_THRESH);
        set_register(0x5A, ELE5_R, REL_THRESH);
        /*
        set_register(0x5A, ELE6_T, TOU_THRESH);
        set_register(0x5A, ELE6_R, REL_THRESH);
        
        set_register(0x5A, ELE7_T, TOU_THRESH);
        set_register(0x5A, ELE7_R, REL_THRESH);
        
        set_register(0x5A, ELE8_T, TOU_THRESH);
        set_register(0x5A, ELE8_R, REL_THRESH);
        
        set_register(0x5A, ELE9_T, TOU_THRESH);
        set_register(0x5A, ELE9_R, REL_THRESH);
        
        set_register(0x5A, ELE10_T, TOU_THRESH);
        set_register(0x5A, ELE10_R, REL_THRESH);
        
        set_register(0x5A, ELE11_T, TOU_THRESH);
        set_register(0x5A, ELE11_R, REL_THRESH);
        */
        // Section D
        // Set the Filter Configuration
        // Set ESI2
       set_register(0x5A, FIL_CFG, 0x12);  //12 mas  menos
        
         //set_register(0x5A, FIL_CFG, 0x24);  //segundo filtro
       // set_register(0x5A, 0x5C, 0x28);    // primer filtro (mio)
        //ajuste de la corrente de carga de cada pin
         /*  set_register(0x5A, 0x5F, CDC_sensor[0]);   //el 0
            set_register(0x5A, 0x60, CDC_sensor[1]);   //el 1
            set_register(0x5A, 0x61, CDC_sensor[2]);   //el 2
            set_register(0x5A, 0x62, CDC_sensor[3]);   //el 3
            set_register(0x5A, 0x63, CDC_sensor[4]);   //el 4
            set_register(0x5A, 0x64, CDC_sensor[5]);   //el 5
        */
        
        
        // Section E
        // Electrode Configuration
        // Set ELE_CFG to 0x00 to return to standby mode
        set_register(0x5A, ELE_CFG, 0x0C);  // Enables all 12 Electrodes
        
        
        // Section F
        // Enable Auto Config and auto Reconfig
        /*set_register(0x5A, ATO_CFG0, 0x0B);
        set_register(0x5A, ATO_CFGU, 0xC9);  // USL = (Vdd-0.7)/vdd*256 = 0xC9 @3.3V   set_register(0x5A, ATO_CFGL, 0x82);  // LSL = 0.65*USL = 0x82 @3.3V
        set_register(0x5A, ATO_CFGT, 0xB5);*/  // Target = 0.9*USL = 0xB5 @3.3V
        
        set_register(0x5A, ELE_CFG, 0x0C);
        
      }
      
      
      boolean checkInterrupt(void){
        return digitalRead(IRQ);
      }
      
      
      void set_register(int address, unsigned char r, unsigned char v){
          Wire.beginTransmission(address);
          Wire.write(r);
          Wire.write(v);
          Wire.endTransmission();
      }
      
      posted in My Project
      ferpando
      ferpando
    • RE: Node freezing up

      @Magiske
      Ok got it.
      I have a led on board, so I'll make it blink to see if it is still alive

      posted in Troubleshooting
      ferpando
      ferpando
    • RE: Node freezing up

      @Magiske
      Yes it has a cap on the radio.
      What do you mean by add a blink?

      posted in Troubleshooting
      ferpando
      ferpando
    • RE: Node freezing up

      @GuyP
      sorry no diagram, but the node is basically an arduino with radio connected to this relay board

      posted in Troubleshooting
      ferpando
      ferpando
    • RE: Node freezing up

      @AWI
      Relays are isolated using opto-couplers so it should`t be a problem.
      The relay board is this or very similar:

      http://www.ebay.com/itm/Durable-New-16-Channel-12V-Relay-Module-Interface-Board-For-Arduino-PIC-ARM-DSP-/331477749403

      Power goes to the relay board and then it powers the arduino

      posted in Troubleshooting
      ferpando
      ferpando
    • RE: Node freezing up

      @Magiske
      12V power supply

      posted in Troubleshooting
      ferpando
      ferpando
    • RE: 6 Way wall touch switch

      @korttoma
      Yes that's the module.
      Maybe i should use just the chip in next versions to integrate better with the rest so the final board could be smaller

      posted in My Project
      ferpando
      ferpando
    • RE: Node freezing up

      @korttoma
      Yes I did check the power but maybe is a defective module?
      It only happens when not connected to the console, so it's hard to track down

      posted in Troubleshooting
      ferpando
      ferpando
    • Node freezing up

      Hello,

      I have a node that every once in a while just stops responding.
      I have to unplug it to get it back working.
      It is strange because it doesn't appear to be a reason.
      Anyone had issues like this before?

      posted in Troubleshooting
      ferpando
      ferpando
    • RE: 6 Way wall touch switch

      @Atman
      Yes it is all hand made.
      Next step would be to make a board to make it smaller and easier to make

      posted in My Project
      ferpando
      ferpando
    • 6 Way wall touch switch

      Hello,

      This weekend I've been busy with a prototype for a touch wall switch.
      So far is going pretty well and everything seems to work.
      I still need to integrate it with MySensors, but I hope this will be the easiest part.
      The only problem I found is with the sensitivity of the touch sensors when connected to external power.
      It works perfectly when using USB power, but not quite right then using AC power.

      Here's how it looks so far. Remember this is just a proof of concept and many things where just do as I go and probably will be a better way to do it.

      Any suggestions / comments will be greatly appreciated.

      This is the front plate made with a 2mm methacrylate plastic, with a printed paper behind.
      c100.jpg

      This is the back side with the touch controller
      c100-5.jpg

      And this is the actual node with the led driver and the buzzer
      c100-6.jpg

      And this is how it works for now
      c100b.mp4

      posted in My Project
      ferpando
      ferpando
    • RE: Dimmer sensor

      @mainali
      Dimming AC current is far more complex than dimming DC from the hardware perpective.
      Do a search on the internet about it and come back with a solution that fits your needs.

      posted in Development
      ferpando
      ferpando
    • RE: What Happens to messages from Gateway when Node is not connected.

      My gateway is an arduino, and I don't think Vera uses mqqt protocol.

      posted in Development
      ferpando
      ferpando
    • RE: What Happens to messages from Gateway when Node is not connected.

      @mainali
      Messages are stored on the controller (Vera plugin in this case)
      If messages are generated directly by the gw then it could potentially be a problem if you store too many messages.
      My code deletes the message once it is ack'd, so it won't be sent again.
      If you need to store messages in the gw, maybe you could implement an external eeprom to store the messages until they are sent

      posted in Development
      ferpando
      ferpando
    • RE: What Happens to messages from Gateway when Node is not connected.

      From my experience, messages are lost if a node is not available when the message is sent.

      I'm working on a way to give the system a queue for messages. I use Vera as the controller.
      In my case, it is for messages that are sent too fast for the nodes to process, so messages are sent a few times until ack is received.

      I have it to retry a few times before it gives up, which is good enough for my needs at the moment, but I guess it wouldn't be difficult to implement somehting a bit more complex that keeps messages stored until the node becomes abailable.

      You can read about it here

      http://forum.mysensors.org/topic/131/scene-too-fast-for-gateway/52

      posted in Development
      ferpando
      ferpando
    • 16 relay with arduino. Change many at the same time

      I'm working on a node with 16 relays controlled by Vera.
      I use shift registers and opto couplers to connect the relays to the arduino board. This is system is apparently a bit slow, so if you try to change a few of the relays at the same time, most of them will fail.

      I've been working on a solution adding a buffer to the system, both at Vera's end and node end. If you are interested, you can read about it here:

      http://forum.mysensors.org/topic/131/scene-too-fast-for-gateway/4

      What come next is a addition to that system.
      This sketch allows to operate the relays as before (1 relay at a time), but also allows to receive a message that changes many or all o f the relays at the same time, with only one message sent by Vera.

      First of all I created a function in the startup Lua to make it easier to send messages to the node.

      -- send to multiple relays Mysensor.org
      function updateRelays(parent, child, msg)
          local newRadioId=tostring(child)..";100"
          luup.call_action("urn:upnp-arduino-cc:serviceId:arduino1", "SendCommand",
          {radioId=newRadioId, variableId="LIGHT", value=msg}, parent)
          end
      

      Then I use this code to send the message from a scene or Pleg

      -- order: (first......last)
      -- 1: relay ON, 0: relay OFF
      -- guide       1234567812345678
      local relays="b1100100000000100"
      updateRelays(130, 3, relays)
      

      In my case, 130 is the parent node id, 3 is the relay node id, and relays contains a binary representation of every relay, 1 mening ON and 0 meaning OFF.

      This is all you need to do to turn a buch of the relays in any way you need, all at the same time. The rest is taken care by the sketch (decoding the binary message, sending back the ack's to the gw, etc)

      
      // This  will remember relay state even after power failure.
      
      
      #include <MySensor.h>
      #include <SPI.h>
      #include <MyBuffer.h>
      
      #define RELAY_1  0  // number for first relay (second on pin+1 etc)
      #define NUMBER_OF_RELAYS 16 // Total number of attached relays
      #define RELAY_ON HIGH  // GPIO value to write to turn on attached relay
      #define RELAY_OFF LOW // GPIO value to write to turn off attached relay
      
      int dataPin  = 6;//11;        //Define which pins will be used for the Shift Register control
      int latchPin = 4;//8;
      int clockPin = 7;//12;
      
      boolean registers[16];//={HIGH,HIGH,HIGH,HIGH,HIGH,HIGH,HIGH,HIGH,HIGH,HIGH,HIGH,HIGH,HIGH,HIGH,HIGH,HIGH};
      
      long previousMillis = 0;        // will store last time buffer was processed
      long interval = 1000;           // interval at which to check buffer
      
      MyBuffer buffer;                // define a new buffer
      MySensor gw;
      MyMessage msgRelay(0,V_LIGHT);  //message for akc multiple relays back to gw
      
      void setup()  
      {   
          // Then set relay pins in output mode 
          pinMode(dataPin, OUTPUT); 
          pinMode(latchPin, OUTPUT);
          pinMode(clockPin, OUTPUT);
          
          writeReg(false); //reset all relays to off at boot
          
          // Initialize library and add callback for incoming messages
          gw.begin(incomingMessage, AUTO);
          
          // Send the sketch version information to the gateway and Controller
          gw.sendSketchInfo("HomeRelay_1", "1.1");
          
          //loop through the relays
          for (int sensor=RELAY_1; sensor<NUMBER_OF_RELAYS; sensor++) 
              {
              // Register all sensors to gw (they will be created as child devices)
              gw.present(sensor, S_LIGHT);
           
              // Set relays array to last known state (using eeprom storage) 
              registers[sensor] = gw.loadState(sensor)?RELAY_ON:RELAY_OFF;
              }
      
          //set relays
          writeReg(true);
      }
      
      
      void loop() 
      {
        // Alway process incoming messages whenever possible
        gw.process();
        
        //check for buffer items one in a while
        checkTime();
      }
      
      void incomingMessage(const MyMessage &message) {
        buffer.push(message.sensor,message.type,message.getString());
      }
      
      void checkTime(){
         unsigned long currentMillis = millis();
         if(currentMillis - previousMillis > interval) {
              previousMillis = currentMillis;  
              processBuffer();    
            }
      }
      
      //gets message from buffer if exists
      void processBuffer(){
          if(!buffer.isEmpty()){
              String msg=buffer.pop();
              
              int mIndex = msg.indexOf(';');
              int secondmIndex = msg.indexOf(';', mIndex+1);
        
              String firstValue = msg.substring(0, mIndex);
              String secondValue = msg.substring(mIndex+1, secondmIndex);
              String thirdValue = msg.substring(secondmIndex+1);
              
              int sensor = firstValue.toInt();
              int type = secondValue.toInt();
              String data = thirdValue;
        
              Serial.println("    >> Process MSG: s:"+ firstValue +", t:"+secondValue+", d:"+thirdValue);
              
              processMsg(sensor, type, data);
          }
      }
      
      void processMsg(int sensor, int type, String data){
           boolean msg;
      
          // We only expect one type of message from controller. But we better check anyway.
          if (type==V_LIGHT) {
         
             if(sensor==100){ //command for all relays
              for (int i = 16; i>=1; i--)
                  {
                  
                  msg=data.substring(i,i+1).toInt()?RELAY_OFF:RELAY_ON;
                 
                  registers[i-1]=msg;
                  gw.saveState(i-1, msg);
                  
                  //send message back to gw to change child devices accordingly
                  gw.send(msgRelay.setSensor(i-1).set(msg?RELAY_OFF:RELAY_ON));
                  }
             }else{ //command for one relay
                 //my relays need LOW to activate. Others might be different
                 msg=data.toInt()?RELAY_OFF:RELAY_ON;
                 
                 registers[sensor]=msg;
               
                 // Store state in eeprom
                 gw.saveState(sensor, msg);
                 }
      
             //set relays
             writeReg(true);
           } 
      }
      
      void writeReg(boolean rst){
        int loc_reg;
        digitalWrite(latchPin, LOW);
        for (int i = 15; i>=0; i--)
          {
          loc_reg=rst?registers[i]:HIGH;
          digitalWrite(clockPin, LOW);
          digitalWrite(dataPin, loc_reg );
          digitalWrite(clockPin, HIGH);
          }
        digitalWrite(latchPin, HIGH);
      
      }
      
      
      posted in Development
      ferpando
      ferpando
    • RE: Scene too fast for gateway?

      @hek
      I've been trying to get some buttons in the vera plugin but I've had not much luck.
      I addded some code to arduino.xml and arduino.json but nothing appears.
      I uploaded the files to the repo. Could you take a look when you have the time?

      S_Arduino.xml
      D_Arduino1.json
      L_Arduino.lua

      Yesterday I also made a new system for the nodes to have also a queue.
      Looks something like this:

      
      #include <MySensor.h>
      #include <SPI.h>
      #include <MyBuffer.h>
      
      .......
      
      long previousMillis = 0;       // will store last time buffer was processed
      long interval = 1000;           // interval at which to check buffer
      MyBuffer buffer;               // define a new buffer
      MySensor gw;
      
      ..........
      void setup() {  .... sensor setup code....  }
      
      void loop() 
      { 
        gw.process();
              
        unsigned long currentMillis = millis();
        if(currentMillis - previousMillis > interval) {
              previousMillis = currentMillis;  
              processBuffer();    
            }
      } 
      
      void incomingMessage(const MyMessage &message) {
          buffer.push(message.sensor,message.type);
      }
      
      //gets message from buffer if exists
      void processBuffer(){
      if(!buffer.isEmpty()){
            String msg=buffer.pop();
            
            int mIndex = msg.indexOf(';');
            int secondmIndex = msg.indexOf(';,', mIndex+1);
      
            String firstValue = msg.substring(0, mIndex);
            String secondValue = msg.substring(mIndex+1, secondmIndex);
            
            int sensor = firstValue.toInt();
            int type = secondValue.toInt();
         
            processMsg(sensor, type);
        }
      }
      
      //process message from queue
      void processMsg(int sensor, int type){
           //do some stuff
      }
      

      It's pretty basic but it works.
      The library files are here:

      MyBuffer.h
      MyBuffer.cpp

      posted in Vera
      ferpando
      ferpando
    • RE: Scene too fast for gateway?

      @hek
      Messages now are correctly ack'd because of the queue. Before they were lost.
      But that is not all to it, because now the lost messages are re-sent, ack'd back but not executed by the node.

      I'll do some more testing and post back

      posted in Vera
      ferpando
      ferpando
    • RE: Scene too fast for gateway?

      @hek
      I have to say dispite this queue upgrade I'm still getting some messages lost. Not really lost, because they are ack'd but never executed by the remote node.

      I started to investigate other posibilities, and since I'm using shift registers and optocouplers on some nodes (the problematic ones), maybe those components are just to slow to respond and if I change the register too fast, the optocupler does not have the time to really trigger anything.

      Although I think this queue would be a good thing to add to the system, I might need to add something similar to the receiving part to slow down the procesing of messages, because shometimes might be neded.

      I didn't try to use relays directly attached to the arduino without the optocouplers, so in that instance might no be really necesary. I read somewhere this particular shift register can be as fast as 500.000 changes per second.

      Anyway, I'll think of something for the nodes and let you know.

      posted in Vera
      ferpando
      ferpando
    • RE: Scene too fast for gateway?

      @hek
      Here's the link

      https://github.com/Fernando-Checa/Vera/blob/master/L_Arduino.lua

      Now it has a delay of 5 seconds just for testing, but that should be reduced
      Also changed some log calls just for clarity, but that will be discarded later on

      posted in Vera
      ferpando
      ferpando
    • RE: Scene too fast for gateway?

      @hek
      I use 2 variables that might be user configurable. One is the number of retries and the other is the time between retries.
      I suppose there will always be someone willing to change something.

      I've been thinking about the approach for a while and I'd like to have your input on this.

      Now, as I coded, commands are sent by sendCommandWithMessageType() and then added to the queue. Then the timer starts and tries to re-send lost messages.

      What I was thinking is if sendCommandWithMessageType() should send the messages directly to the queue function, and let that manage the sending and ack's.

      It would be more organized don't you think?

      posted in Vera
      ferpando
      ferpando
    • RE: Scene too fast for gateway?

      @hek

      Well, I think it sort of works for now.. still too slow and a lot of polishing might be needed, but the concept I think is valid.

      Here I turn on 2 devices on an unplugged node, so the commands are put into the queue and the timer is started. Because the node i sunplugged no response is received.

      08 03/20/15 22:13:19.706 JobHandler_LuaUPnP::HandleActionRequest device: 219 service: urn:upnp-org:serviceId:SwitchPower1 action: SetTarget <0x2f7fc680>
      08 03/20/15 22:13:19.707 JobHandler_LuaUPnP::HandleActionRequest argument DeviceNum=219 <0x2f7fc680>
      08 03/20/15 22:13:19.707 JobHandler_LuaUPnP::HandleActionRequest argument serviceId=urn:upnp-org:serviceId:SwitchPower1 <0x2f7fc680>
      08 03/20/15 22:13:19.707 JobHandler_LuaUPnP::HandleActionRequest argument action=SetTarget <0x2f7fc680>
      08 03/20/15 22:13:19.707 JobHandler_LuaUPnP::HandleActionRequest argument newTargetValue=1 <0x2f7fc680>
      08 03/20/15 22:13:19.708 JobHandler_LuaUPnP::HandleActionRequest argument rand=0.980960675558267 <0x2f7fc680>
      50 03/20/15 22:13:19.710 luup_log:130: ****<-*->**** Arduino: ****<-*->**** >F> switchPower <0x2ac6e000>
      50 03/20/15 22:13:19.710 luup_log:130: ****<-*->**** Arduino: ****<-*->**** >F> sendCommand <0x2ac6e000>
      50 03/20/15 22:13:19.711 luup_log:130: ****<-*->**** Arduino: *** **** **** **** *** *** Sending: 6;0;1;1;2;1 <0x2ac6e000>
      04 03/20/15 22:13:19.714 <Job ID="5" Name="" Device="219" Created="2015-03-20 22:13:19" Started="2015-03-20 22:13:19" Completed="2015-03-20 22:13:19
      
      08 03/20/15 22:13:22.567 JobHandler_LuaUPnP::HandleActionRequest device: 221 service: urn:upnp-org:serviceId:SwitchPower1 action: SetTarget <0x2f5fc680>
      08 03/20/15 22:13:22.567 JobHandler_LuaUPnP::HandleActionRequest argument DeviceNum=221 <0x2f5fc680>
      08 03/20/15 22:13:22.568 JobHandler_LuaUPnP::HandleActionRequest argument serviceId=urn:upnp-org:serviceId:SwitchPower1 <0x2f5fc680>
      08 03/20/15 22:13:22.568 JobHandler_LuaUPnP::HandleActionRequest argument action=SetTarget <0x2f5fc680>
      08 03/20/15 22:13:22.568 JobHandler_LuaUPnP::HandleActionRequest argument newTargetValue=1 <0x2f5fc680>
      08 03/20/15 22:13:22.568 JobHandler_LuaUPnP::HandleActionRequest argument rand=0.3527142092837271 <0x2f5fc680>
      50 03/20/15 22:13:22.570 luup_log:130: ****<-*->**** Arduino: ****<-*->**** >F> switchPower <0x2ac6e000>
      50 03/20/15 22:13:22.570 luup_log:130: ****<-*->**** Arduino: ****<-*->**** >F> sendCommand <0x2ac6e000>
      50 03/20/15 22:13:22.571 luup_log:130: ****<-*->**** Arduino: *** **** **** **** *** *** Sending: 6;1;1;1;2;1 <0x2ac6e000>
      04 03/20/15 22:13:22.573 <Job ID="6" Name="" Device="221" Created="2015-03-20 22:13:22" Started="2015-03-20 22:13:22" Completed="2015-03-20 22:13:22"


      then it starts to try to resend the messages. i did set a limit of retries and then the message is deleted for good.

      50 03/20/15 22:13:24.101 luup_log:130: ****<-*->**** Arduino: -=OOOO-chk-OOOO=- queue length: 2 <0x2cba1680>
      50 03/20/15 22:13:24.102 luup_log:130: ****<-*->**** Arduino: -=OOOO-chk-OOOO=- queue : {6;0;1;1;2;1, 6;1;1;1;2;1, } <0x2cba1680>
      50 03/20/15 22:13:24.102 luup_log:130: ****<-*->**** Arduino: queue last elem: 6;1;1;1;2;1 retried: 0 <0x2cba1680>
      50 03/20/15 22:13:24.102 luup_log:130: ****<-*->**** Arduino: ****<-*->**** -=OOOO-snd-OOOO=- resending: 6;1;1;1;2;1 <0x2cba1680>
      50 03/20/15 22:13:24.104 luup_log:130: ****<-*->**** Arduino: -=OOOO-ooo-OOOO=- starting timer <0x2cba1680>
      
      ........
      
      50 03/20/15 22:13:49.102 luup_log:130: ****<-*->**** Arduino: -=OOOO-chk-OOOO=- queue length: 2 <0x2cba1680>
      50 03/20/15 22:13:49.102 luup_log:130: ****<-*->**** Arduino: -=OOOO-chk-OOOO=- queue : {6;0;1;1;2;1, 6;1;1;1;2;1, } <0x2cba1680>
      50 03/20/15 22:13:49.102 luup_log:130: ****<-*->**** Arduino: queue last elem: 6;1;1;1;2;1 retried: 5 <0x2cba1680>
      50 03/20/15 22:13:49.103 luup_log:130: ****<-*->**** Arduino: ****<-*->**** -=OOOO-snd-OOOO=- resending: 6;1;1;1;2;1 <0x2cba1680>
      50 03/20/15 22:13:49.105 luup_log:130: ****<-*->**** Arduino: -=OOOO-ooo-OOOO=- starting timer <0x2cba1680>
      

      then when I connect the node back online, the messages are delivered

      50 03/20/15 22:13:54.179 luup_log:130: ****<-*->**** Arduino: ****<-*->**** >F> processIncoming msg: 6;1;1;1;2;1 <0x2e3fc680>
      50 03/20/15 22:13:54.180 luup_log:130: ****<-*->**** Arduino: ****<-*->**** >T> queue : {6;0;1;1;2;1, 6;1;1;1;2;1, } <0x2e3fc680>
      50 03/20/15 22:13:54.180 luup_log:130: ****<-*->**** Arduino: ****<-*->**** >T> queue retries: {0, 7, } <0x2e3fc680>
      50 03/20/15 22:13:54.181 luup_log:130: ****<-*->**** Arduino: msg found in pos: 2. Removing from list... <0x2e3fc680>
      50 03/20/15 22:13:54.182 luup_log:130: ****<-*->**** Arduino: ****<-->**** Set variable: 6;1;1;1;2;1 <0x2e3fc680>
      50 03/20/15 22:13:54.182 luup_log:130: ****<-*->**** Arduino: ****<-*->**** >F> setVariable <0x2e3fc680>
      50 03/20/15 22:13:54.182 luup_log:130: ****<-*->**** Arduino: Setting variable 'Status' to value '1' <0x2e3fc680>
      
      ........
      
      50 03/20/15 22:13:59.101 luup_log:130: ****<-*->**** Arduino: -=OOOO-chk-OOOO=- queue length: 1 <0x2cba1680>
      50 03/20/15 22:13:59.101 luup_log:130: ****<-*->**** Arduino: -=OOOO-chk-OOOO=- queue : {6;0;1;1;2;1, } <0x2cba1680>
      50 03/20/15 22:13:59.102 luup_log:130: ****<-*->**** Arduino: queue last elem: 6;0;1;1;2;1 retried: 0 <0x2cba1680>
      50 03/20/15 22:13:59.102 luup_log:130: ****<-*->**** Arduino: ****<-*->**** -=OOOO-snd-OOOO=- resending: 6;0;1;1;2;1 <0x2cba1680>
      50 03/20/15 22:13:59.104 luup_log:130: ****<-*->**** Arduino: -=OOOO-snd-OOOO=- set cheking off queue just emptied <0x2cba1680>
      50 03/20/15 22:13:59.209 luup_log:130: ****<-*->**** Arduino: ****<-*->**** >F> processIncoming msg: 6;0;1;1;2;1 <0x2e3fc680>
      50 03/20/15 22:13:59.210 luup_log:130: ****<-*->**** Arduino: ****<-*->**** >T> queue : {6;0;1;1;2;1, } <0x2e3fc680>
      50 03/20/15 22:13:59.210 luup_log:130: ****<-*->**** Arduino: ****<-*->**** >T> queue retries: {1, } <0x2e3fc680>
      50 03/20/15 22:13:59.211 luup_log:130: ****<-*->**** Arduino: msg found in pos: 1. Removing from list... <0x2e3fc680>
      50 03/20/15 22:13:59.211 luup_log:130: ****<-*->**** Arduino: ****<-*->**** >T> queue updated: {} <0x2e3fc680>
      50 03/20/15 22:13:59.212 luup_log:130: ****<-*->**** Arduino: ****<-->**** Set variable: 6;0;1;1;2;1 <0x2e3fc680>
      50 03/20/15 22:13:59.212 luup_log:130: ****<-*->**** Arduino: ****<-*->**** >F> setVariable <0x2e3fc680>
      50 03/20/15 22:13:59.212 luup_log:130: ****<-*->**** Arduino: Setting variable 'Status' to value '1' <0x2e3fc680>
      

      I don't really know if this would be a useful way to solve the problem, or maybe I should look somewhere else

      posted in Vera
      ferpando
      ferpando
    • RE: Scene too fast for gateway?

      @hek
      I got the timer working with this help:

      http://forum.micasaverde.com/index.php?topic=10258.0

      I'll implement it and see what happens

      posted in Vera
      ferpando
      ferpando
    • RE: Scene too fast for gateway?

      Well, If I call the function directly at the begining it gets executed, but neither timer nor delay work.

      posted in Vera
      ferpando
      ferpando
    • RE: Scene too fast for gateway?

      @hek
      yes I saw it too, but in this case, the call should be recursive, so it should be better to use the timer version.
      I'll try with delay and see if at least works.

      posted in Vera
      ferpando
      ferpando
    • RE: Scene too fast for gateway?

      @hek
      yes, I call the timer again at the end of the function, but the first is inside the start function

      posted in Vera
      ferpando
      ferpando
    • RE: Scene too fast for gateway?

      @hek
      I almost got it but for some reason the call_timer is not being excuted. Not even the first time.

      Looking at the logs, i can see that the 6 commands are sent really quickly within milliseconds, and as you can see at the end, only 3 of the messages get through, leaving 3 lost

      08	03/20/15 14:26:46.549	Scene::RunScene running 81 test6on <0x2f250680>
      08	03/20/15 14:26:46.550	JobHandler_LuaUPnP::HandleActionRequest device: 219 service: urn:upnp-org:serviceId:SwitchPower1 action: SetTarget <0x2f250680>
      08	03/20/15 14:26:46.550	JobHandler_LuaUPnP::HandleActionRequest argument newTargetValue=1 <0x2f250680>
      50	03/20/15 14:26:46.553	luup_log:130: ****<-*->**** Arduino: ****<-*->**** >F> switchPower <0x2b2c1000>
      50	03/20/15 14:26:46.554	luup_log:130: ****<-*->**** Arduino: ****<-*->**** >F> sendCommand <0x2b2c1000>
      50	03/20/15 14:26:46.554	luup_log:130: ****<-*->**** Arduino: *** **** **** **** *** *** Sending: 6;0;1;1;2;1 <0x2b2c1000>
      04	03/20/15 14:26:46.556	<Job ID="42" Name="" Device="219" Created="2015-03-20 14:26:46" Started="2015-03-20 14:26:46" Completed="2015-03-20 14:26:46" Duration="0.4574000" Runtime="0.2382000" Status="Successful" LastNote=""/> <0x2b2c1000>
      08	03/20/15 14:26:46.562	JobHandler_LuaUPnP::HandleActionRequest device: 221 service: urn:upnp-org:serviceId:SwitchPower1 action: SetTarget <0x2f250680>
      08	03/20/15 14:26:46.562	JobHandler_LuaUPnP::HandleActionRequest argument newTargetValue=1 <0x2f250680>
      08	03/20/15 14:26:46.595	JobHandler_LuaUPnP::HandleActionRequest device: 216 service: urn:upnp-org:serviceId:SwitchPower1 action: SetTarget <0x2f250680>
      08	03/20/15 14:26:46.596	JobHandler_LuaUPnP::HandleActionRequest argument newTargetValue=1 <0x2f250680>
      08	03/20/15 14:26:46.597	JobHandler_LuaUPnP::HandleActionRequest device: 215 service: urn:upnp-org:serviceId:SwitchPower1 action: SetTarget <0x2f250680>
      08	03/20/15 14:26:46.598	JobHandler_LuaUPnP::HandleActionRequest argument newTargetValue=1 <0x2f250680>
      08	03/20/15 14:26:46.599	JobHandler_LuaUPnP::HandleActionRequest device: 218 service: urn:upnp-org:serviceId:SwitchPower1 action: SetTarget <0x2f250680>
      08	03/20/15 14:26:46.600	JobHandler_LuaUPnP::HandleActionRequest argument newTargetValue=1 <0x2f250680>
      50	03/20/15 14:26:46.601	luup_log:130: ****<-*->**** Arduino: ****<-*->**** >F> switchPower <0x2b2c1000>
      50	03/20/15 14:26:46.602	luup_log:130: ****<-*->**** Arduino: ****<-*->**** >F> sendCommand <0x2b2c1000>
      50	03/20/15 14:26:46.602	luup_log:130: ****<-*->**** Arduino: *** **** **** **** *** *** Sending: 6;1;1;1;2;1 <0x2b2c1000>
      04	03/20/15 14:26:46.604	<Job ID="43" Name="" Device="221" Created="2015-03-20 14:26:46" Started="2015-03-20 14:26:46" Completed="2015-03-20 14:26:46" Duration="0.40816000" Runtime="0.2283000" Status="Successful" LastNote=""/> <0x2b2c1000>
      50	03/20/15 14:26:46.605	luup_log:130: ****<-*->**** Arduino: ****<-*->**** >F> switchPower <0x2b2c1000>
      50	03/20/15 14:26:46.606	luup_log:130: ****<-*->**** Arduino: ****<-*->**** >F> sendCommand <0x2b2c1000>
      50	03/20/15 14:26:46.606	luup_log:130: ****<-*->**** Arduino: *** **** **** **** *** *** Sending: 6;2;1;1;2;1 <0x2b2c1000>
      04	03/20/15 14:26:46.608	<Job ID="44" Name="" Device="216" Created="2015-03-20 14:26:46" Started="2015-03-20 14:26:46" Completed="2015-03-20 14:26:46" Duration="0.11100000" Runtime="0.2205000" Status="Successful" LastNote=""/> <0x2b2c1000>
      50	03/20/15 14:26:46.610	luup_log:130: ****<-*->**** Arduino: ****<-*->**** >F> switchPower <0x2b2c1000>
      50	03/20/15 14:26:46.610	luup_log:130: ****<-*->**** Arduino: ****<-*->**** >F> sendCommand <0x2b2c1000>
      50	03/20/15 14:26:46.610	luup_log:130: ****<-*->**** Arduino: *** **** **** **** *** *** Sending: 6;3;1;1;2;1 <0x2b2c1000>
      08	03/20/15 14:26:46.614	JobHandler_LuaUPnP::HandleActionRequest device: 220 service: urn:upnp-org:serviceId:SwitchPower1 action: SetTarget <0x2f250680>
      08	03/20/15 14:26:46.614	JobHandler_LuaUPnP::HandleActionRequest argument newTargetValue=1 <0x2f250680>
      04	03/20/15 14:26:46.620	<Job ID="45" Name="" Device="215" Created="2015-03-20 14:26:46" Started="2015-03-20 14:26:46" Completed="2015-03-20 14:26:46" Duration="0.20340000" Runtime="0.9573000" Status="Successful" LastNote=""/> <0x2b2c1000>
      50	03/20/15 14:26:46.624	luup_log:130: ****<-*->**** Arduino: ****<-*->**** >F> switchPower <0x2b2c1000>
      50	03/20/15 14:26:46.624	luup_log:130: ****<-*->**** Arduino: ****<-*->**** >F> sendCommand <0x2b2c1000>
      50	03/20/15 14:26:46.625	luup_log:130: ****<-*->**** Arduino: *** **** **** **** *** *** Sending: 6;4;1;1;2;1 <0x2b2c1000>
      04	03/20/15 14:26:46.627	<Job ID="46" Name="" Device="218" Created="2015-03-20 14:26:46" Started="2015-03-20 14:26:46" Completed="2015-03-20 14:26:46" Duration="0.25886000" Runtime="0.5533000" Status="Successful" LastNote=""/> <0x2b2c1000>
      50	03/20/15 14:26:46.628	luup_log:130: ****<-*->**** Arduino: ****<-*->**** >F> switchPower <0x2b2c1000>
      50	03/20/15 14:26:46.629	luup_log:130: ****<-*->**** Arduino: ****<-*->**** >F> sendCommand <0x2b2c1000>
      50	03/20/15 14:26:46.629	luup_log:130: ****<-*->**** Arduino: *** **** **** **** *** *** Sending: 6;5;1;1;2;1 <0x2b2c1000>
      04	03/20/15 14:26:46.631	<Job ID="47" Name="" Device="220" Created="2015-03-20 14:26:46" Started="2015-03-20 14:26:46" Completed="2015-03-20 14:26:46" Duration="0.15803000" Runtime="0.2479000" Status="Successful" LastNote=""/> <0x2b2c1000>
      50	03/20/15 14:26:46.672	luup_log:130: ****<-*->**** Arduino: ****<-*->**** >F> processIncoming msg: 6;0;1;1;2;1 <0x2e850680>
      50	03/20/15 14:26:46.673	luup_log:130: ****<-*->**** Arduino: ****<-*->**** >T> queue        : {6;0;1;1;2;1, 6;1;1;1;2;1, 6;2;1;1;2;1, 6;3;1;1;2;1, 6;4;1;1;2;1, 6;5;1;1;2;1, } <0x2e850680>
      50	03/20/15 14:26:46.674	luup_log:130: ****<-*->**** Arduino: ****<-*->**** >T> queue retrais: {0, 0, 0, 0, 0, 0, } <0x2e850680>
      50	03/20/15 14:26:46.674	luup_log:130: ****<-*->**** Arduino: msg found in pos: 1. Removing from list... <0x2e850680>
      50	03/20/15 14:26:46.677	luup_log:130: ****<-*->**** Arduino: ****<-*->**** >T> queue updated: {6;1;1;1;2;1, 6;2;1;1;2;1, 6;3;1;1;2;1, 6;4;1;1;2;1, 6;5;1;1;2;1, } <0x2e850680>
      50	03/20/15 14:26:46.677	luup_log:130: ****<-*->**** Arduino: ****<-*->**** >T> queue retrais: {0, 0, 0, 0, 0, } <0x2e850680>
      50	03/20/15 14:26:46.678	luup_log:130: ****<-*->**** Arduino: ****<-->**** Set variable: 6;0;1;1;2;1 <0x2e850680>
      50	03/20/15 14:26:46.678	luup_log:130: ****<-*->**** Arduino: ****<-*->**** >F> setVariable <0x2e850680>
      50	03/20/15 14:26:46.679	luup_log:130: ****<-*->**** Arduino: Setting variable 'Status' to value '1' <0x2e850680>
      50	03/20/15 14:26:46.679	luup_log:130: ****<-*->**** Arduino: ****<-*->**** >F> setVariableIfChanged <0x2e850680>
      50	03/20/15 14:26:46.679	luup_log:130: ****<-*->**** Arduino: ****<-*->**** urn:upnp-org:serviceId:SwitchPower1,Status, 1, 219 <0x2e850680>
      06	03/20/15 14:26:46.680	Device_Variable::m_szValue_set device: 219 service: urn:upnp-org:serviceId:SwitchPower1 variable: Status was: 0 now: 1 #hooks: 4 upnp: 0 v:0x9b41e8/NONE duplicate:0 <0x2e850680>
      50	03/20/15 14:26:46.680	luup_log:130: ****<-*->**** Arduino: ****<-*->**** >F> setVariableIfChanged <0x2e850680>
      50	03/20/15 14:26:46.684	luup_log:130: ****<-*->**** Arduino: ****<-*->**** urn:micasaverde-com:serviceId:HaDevice1,LastUpdate, 1426858006, 219 <0x2e850680>
      06	03/20/15 14:26:46.685	Device_Variable::m_szValue_set device: 219 service: urn:micasaverde-com:serviceId:HaDevice1 variable: LastUpdate was: 1426688846 now: 1426858006 #hooks: 0 upnp: 0 v:(nil)/NONE duplicate:0 <0x2e850680>
      50	03/20/15 14:26:46.685	luup_log:130: ****<-*->**** Arduino: ****<-*->**** >F> setVariableIfChanged <0x2e850680>
      50	03/20/15 14:26:46.686	luup_log:130: ****<-*->**** Arduino: ****<-*->**** urn:micasaverde-com:serviceId:HaDevice1,LastUpdate, 1426858006, 217 <0x2e850680>
      06	03/20/15 14:26:46.686	Device_Variable::m_szValue_set device: 217 service: urn:micasaverde-com:serviceId:HaDevice1 variable: LastUpdate was: 1426857982 now: 1426858006 #hooks: 0 upnp: 0 v:(nil)/NONE duplicate:0 <0x2e850680>
      50	03/20/15 14:26:46.687	luup_log:130: ****<-*->**** Arduino: ****<-*->**** >F> setVariableIfChanged <0x2e850680>
      50	03/20/15 14:26:46.688	luup_log:130: ****<-*->**** Arduino: ****<-*->**** urn:micasaverde-com:serviceId:HaDevice1,LastUpdateHR, 14:26, 217 <0x2e850680>
      50	03/20/15 14:26:46.752	luup_log:130: ****<-*->**** Arduino: ****<-*->**** >F> processIncoming msg: 6;1;1;1;2;1 <0x2e850680>
      50	03/20/15 14:26:46.753	luup_log:130: ****<-*->**** Arduino: ****<-*->**** >T> queue        : {6;1;1;1;2;1, 6;2;1;1;2;1, 6;3;1;1;2;1, 6;4;1;1;2;1, 6;5;1;1;2;1, } <0x2e850680>
      50	03/20/15 14:26:46.753	luup_log:130: ****<-*->**** Arduino: ****<-*->**** >T> queue retrais: {0, 0, 0, 0, 0, } <0x2e850680>
      50	03/20/15 14:26:46.754	luup_log:130: ****<-*->**** Arduino: msg found in pos: 1. Removing from list... <0x2e850680>
      50	03/20/15 14:26:46.754	luup_log:130: ****<-*->**** Arduino: ****<-*->**** >T> queue updated: {6;2;1;1;2;1, 6;3;1;1;2;1, 6;4;1;1;2;1, 6;5;1;1;2;1, } <0x2e850680>
      50	03/20/15 14:26:46.755	luup_log:130: ****<-*->**** Arduino: ****<-*->**** >T> queue retrais: {0, 0, 0, 0, } <0x2e850680>
      50	03/20/15 14:26:46.755	luup_log:130: ****<-*->**** Arduino: ****<-->**** Set variable: 6;1;1;1;2;1 <0x2e850680>
      50	03/20/15 14:26:46.756	luup_log:130: ****<-*->**** Arduino: ****<-*->**** >F> setVariable <0x2e850680>
      50	03/20/15 14:26:46.756	luup_log:130: ****<-*->**** Arduino: Setting variable 'Status' to value '1' <0x2e850680>
      50	03/20/15 14:26:46.756	luup_log:130: ****<-*->**** Arduino: ****<-*->**** >F> setVariableIfChanged <0x2e850680>
      50	03/20/15 14:26:46.757	luup_log:130: ****<-*->**** Arduino: ****<-*->**** urn:upnp-org:serviceId:SwitchPower1,Status, 1, 221 <0x2e850680>
      06	03/20/15 14:26:46.757	Device_Variable::m_szValue_set device: 221 service: urn:upnp-org:serviceId:SwitchPower1 variable: Status was: 0 now: 1 #hooks: 4 upnp: 0 v:0x9b41e8/NONE duplicate:0 <0x2e850680>
      50	03/20/15 14:26:46.759	luup_log:130: ****<-*->**** Arduino: ****<-*->**** >F> setVariableIfChanged <0x2e850680>
      50	03/20/15 14:26:46.759	luup_log:130: ****<-*->**** Arduino: ****<-*->**** urn:micasaverde-com:serviceId:HaDevice1,LastUpdate, 1426858006, 221 <0x2e850680>
      06	03/20/15 14:26:46.760	Device_Variable::m_szValue_set device: 221 service: urn:micasaverde-com:serviceId:HaDevice1 variable: LastUpdate was: 1426688847 now: 1426858006 #hooks: 0 upnp: 0 v:(nil)/NONE duplicate:0 <0x2e850680>
      50	03/20/15 14:26:46.760	luup_log:130: ****<-*->**** Arduino: ****<-*->**** >F> setVariableIfChanged <0x2e850680>
      50	03/20/15 14:26:46.761	luup_log:130: ****<-*->**** Arduino: ****<-*->**** urn:micasaverde-com:serviceId:HaDevice1,LastUpdate, 1426858006, 217 <0x2e850680>
      06	03/20/15 14:26:46.761	Device_Variable::m_szValue_set device: 217 service: urn:micasaverde-com:serviceId:HaDevice1 variable: LastUpdate was: 1426858006 now: 1426858006 #hooks: 0 upnp: 0 v:(nil)/NONE duplicate:1 <0x2e850680>
      50	03/20/15 14:26:46.762	luup_log:130: ****<-*->**** Arduino: ****<-*->**** >F> setVariableIfChanged <0x2e850680>
      50	03/20/15 14:26:46.762	luup_log:130: ****<-*->**** Arduino: ****<-*->**** urn:micasaverde-com:serviceId:HaDevice1,LastUpdateHR, 14:26, 217 <0x2e850680>
      50	03/20/15 14:26:46.862	luup_log:130: ****<-*->**** Arduino: ****<-*->**** >F> processIncoming msg: 6;2;1;1;2;1 <0x2e850680>
      50	03/20/15 14:26:46.863	luup_log:130: ****<-*->**** Arduino: ****<-*->**** >T> queue        : {6;2;1;1;2;1, 6;3;1;1;2;1, 6;4;1;1;2;1, 6;5;1;1;2;1, } <0x2e850680>
      50	03/20/15 14:26:46.863	luup_log:130: ****<-*->**** Arduino: ****<-*->**** >T> queue retrais: {0, 0, 0, 0, } <0x2e850680>
      50	03/20/15 14:26:46.864	luup_log:130: ****<-*->**** Arduino: msg found in pos: 1. Removing from list... <0x2e850680>
      50	03/20/15 14:26:46.864	luup_log:130: ****<-*->**** Arduino: ****<-*->**** >T> queue updated: {6;3;1;1;2;1, 6;4;1;1;2;1, 6;5;1;1;2;1, } <0x2e850680>
      
      posted in Vera
      ferpando
      ferpando
    • RE: Scene too fast for gateway?

      @hek
      Here's a basic implementation of the sending queue I came up with.

      First I modified this functions:

      function sendCommandWithMessageType(altid, messageType, ack, variableId, value)
      
      	local cmd = altid..";".. msgType[messageType] .. ";" .. ack .. ";" .. variableId .. ";" .. value
      
      	-- only add to list if of SET type
      	if (messageType =="SET") then
      		addToMyQueue(cmd)
       	end
      
      	if (luup.io.write(cmd) == false)  then
      		task("Cannot send command - communications error", TASK_ERROR)
      		luup.set_failure(true)
      		return false
      	end
      
      	return true
      end
      
      function processIncoming(s)
      	local incomingData = s:split(";")
      	if (#incomingData >=4) then
      		-- check if msg is in the list to remove it
      		checkMyQueue(s);
      
      		local nodeId = incomingData[1]
      
      ...
      
      end
      

      And added this other functions:

      -- adds cmd msg to the list before sending
      function addToMyQueue(myCmd)
      
      	local isFound = inTable(MyMsgs, myCmd);
      	-- if not already in the list, add it
      	if (isFound == false) then
      		table.insert( MyMsgs, myCmd )
      	end
      	
      end
      
      -- check if msg is in the list to remove it
      function checkMyQueue(msg)
      	log(MyPrefix .. ">T> queue        : " .. printTable(MyMsgs) )
      	local isFound = inTable(MyMsgs, msg);
      	-- if msg found, remove it because has been executed
      	if (isFound ~= false) then
      		log("msg found in pos: "..isFound..". Removing from list...")
      		table.remove (MyMsgs , isFound) 
      		else
      
      			log("msg not found in list") 
      		end
      	log(MyPrefix .. ">T> queue updated: " .. printTable(MyMsgs) )
      end
      
      function inTable(tbl, item)
          for key, value in pairs(tbl) do
              if value == item then return key end
          end
          return false
      end
      

      It basically works but the problem with this is that processIncoming() is only processed when a new message arrives, so there is no way we could re-send lost messages when iddle.

      We need a function that could be executed at regular intervals to check if there are any messages left in the queue to be re-send.

      posted in Vera
      ferpando
      ferpando
    • RE: Clone 2 skelets Relay and Button's

      @tomrask
      What Hek is trying to tell you is that you can't have 2 devices with the same number.

      Change your first loop for:

        for (int sensor=0, pin=RELAY_1; sensor<NUMBER_OF_RELAYS;sensor++, pin++) {
          // Register all sensors to gw (they will be created as child devices)
          gw.present(sensor, S_LIGHT);
          // Then set relay pins in output mode
          pinMode(pin, OUTPUT);   
          // Set relay to last known state (using eeprom storage) 
          digitalWrite(pin, gw.loadState(sensor)?RELAY_ON:RELAY_OFF);
        }
      

      Change your second presentation loop for this

        for (int i = NUMBER_OF_RELAYS; i < (NUMBER_OF_RELAYS+NUMBER_OF_SWITCHES); i++)
        {
          gw.present(i, S_DOOR);
          delay(250);
        }
      

      This way you are creating relays 0 and 1, and then switches 2, 3 and 4

      posted in My Project
      ferpando
      ferpando
    • RE: Scene too fast for gateway?

      @hek
      I think the problem might be that I'm trying to create the symLink as root and the cfis is using another user to connect to the nas

      posted in Vera
      ferpando
      ferpando
    • RE: Scene too fast for gateway?

      @hek
      I'm no linux expert, but I tried this:

      ln -s /var/log/cmh/LuaUPnP.log /dataMine/log/vera.log
      ln: /dataMine/log/vera.log: Permission denied
      

      and it didn't work

      posted in Vera
      ferpando
      ferpando
    • RE: ethernet gateway compile problem

      @hek
      version 1.0.6
      ok, I added the include and compiled correctly.
      Thank you

      posted in Troubleshooting
      ferpando
      ferpando
    • RE: Scene too fast for gateway?

      @hek
      I'll take a look at this. Thank you.
      I already have my NAS mounted for datamine storage. How can I send the vera logs to the nas?

      posted in Vera
      ferpando
      ferpando
    • RE: ethernet gateway compile problem

      @hek
      all I did was remove the comment from last line

        /*** USER DEFINES:  ***/  
        //#define FAILURE_HANDLING
        //#define SERIAL_DEBUG  
        #define MINIMAL
        //#define SPI_UART  // Requires library from https://github.com/TMRh20/Sketches/tree/master/SPI_UART
        #define SOFTSPI   // Requires library from https://github.com/greiman/DigitalIO
        /**********************/```
      posted in Troubleshooting
      ferpando
      ferpando
    • RE: Scene too fast for gateway?

      @hek
      Nothing seems to work.
      I will upgrade the capacitor for the radio but I don't have many expectations.

      As for the plugin, I would need to know more about how vera works.
      Is there a main function in the plugin?
      Also, how do you debug the code in vera?

      posted in Vera
      ferpando
      ferpando
    • ethernet gateway compile problem

      Hello,

      I just started to put together this type of gateway just to do some testing and I'm getting this error when compiling:

      In file included from /Volumes/Macintosh HD/Users/fernandocheca/Documents/Arduino/libraries/MySensors/MySensor.h:28,
                       from EthernetGateway.ino:52:
      /Volumes/Macintosh HD/Users/fernandocheca/Documents/Arduino/libraries/MySensors/utility/RF24.h:51: error: ISO C++ forbids declaration of 'SoftSPI' with no type
      /Volumes/Macintosh HD/Users/fernandocheca/Documents/Arduino/libraries/MySensors/utility/RF24.h:51: error: expected ';' before '<' token
      

      What could be the problem?

      I just uncommented the softSPI line and compile.

      posted in Troubleshooting
      ferpando
      ferpando
    • RE: Scene too fast for gateway?

      After deleting the files and reuploading the 9600 version, nothing changed, so this is not the problem.

      From the lua file, I see there is a function that sends the data to the nodes.
      How does it work? Is it invoked by vera when you push some button?

      Would it be too complex to make the function store command on an array for instance and send a command to a node from that array queue and not sending another until acknowledge is recevied?

      posted in Vera
      ferpando
      ferpando
    • RE: Scene too fast for gateway?

      @hek
      I recompiled the gateway with 9600 bauds but the vera plugin won't start if not 115200.

      Any way to change this without messing everything up?
      I reuploaded L_Arduino.lua changing the setting but vera does not use the new file. I can see both in the list.
      I'll try to delete both via ssh and reupload to see what happens

      posted in Vera
      ferpando
      ferpando
    • RE: Scene too fast for gateway?

      10 mF also no change. I'll try someting bigger when i can

      posted in Vera
      ferpando
      ferpando
    • RE: Scene too fast for gateway?

      Powered hub alone did not make any improvements.
      I'll try bigger capacitor next.

      posted in Vera
      ferpando
      ferpando
    • RE: Scene too fast for gateway?

      @hek
      I'll try lowering the rate after upgrading the powersupply. Maybe this will also help a bit more.
      About the buffer, would an ethernet gateway behave better in this matter?
      Maybe all this could resolve itself changing gateway type?

      posted in Vera
      ferpando
      ferpando
    • RE: Scene too fast for gateway?

      @olaeke
      If you are able to turn 4 devices at the same time that is more than I can do at the moment. Maybe power is one of the issues as @Zeph suggested, but not the only one.

      posted in Vera
      ferpando
      ferpando
    • RE: Scene too fast for gateway?

      @Zeph
      As you can see in the log above, the gateway starts to send messages and only the first and second reach the corresponding node.
      Maybe it is a power issue. I'll try a powered hub and see what happens.

      posted in Vera
      ferpando
      ferpando
    • RE: Scene too fast for gateway?

      @BulldogLowell I have some 10mF. Would this be enough or do you suggest somthing bigger...

      posted in Vera
      ferpando
      ferpando
    • RE: Scene too fast for gateway?

      @hek
      So it would be ok to increase radio power on the standard version without causing problems?

      I noticed if I put the antenna inside a plastic box starts to fail a lot. But the distance is not much, 4m at the most.

      Also increasing datarate could help with this problem? If data is sent faster, maybe works better?

      posted in Vera
      ferpando
      ferpando
    • RE: Scene too fast for gateway?

      All this was on a test board.
      Now I'm trying it in the real world and it doesn't work.

      I noticed nodes have radio power set to max and gateway to low by default.
      Why is this?
      Maybe increasing gateway radio power would help?

      posted in Vera
      ferpando
      ferpando
    • RE: Scene too fast for gateway?

      If I use the above code with the delays in lua, it seams to work:

      read: 0-2-6 s=0,c=1,t=2,pt=0,l=1:1
      send: 6-6-2-0 s=0,c=1,t=2,pt=0,l=1,st=ok:1
      --> Incoming change for relay:0, New status: ON
      Time ms: 1
      ************************************************
      read: 0-2-6 s=1,c=1,t=2,pt=0,l=1:1
      send: 6-6-2-0 s=1,c=1,t=2,pt=0,l=1,st=ok:1
      --> Incoming change for relay:1, New status: ON
      Time ms: 1
      ************************************************
      read: 0-2-6 s=2,c=1,t=2,pt=0,l=1:1
      send: 6-6-2-0 s=2,c=1,t=2,pt=0,l=1,st=ok:1
      --> Incoming change for relay:2, New status: ON
      Time ms: 1
      ************************************************
      read: 0-2-6 s=3,c=1,t=2,pt=0,l=1:1
      send: 6-6-2-0 s=3,c=1,t=2,pt=0,l=1,st=ok:1
      --> Incoming change for relay:3, New status: ON
      Time ms: 1
      ************************************************
      read: 0-2-6 s=4,c=1,t=2,pt=0,l=1:1
      send: 6-6-2-0 s=4,c=1,t=2,pt=0,l=1,st=ok:1
      --> Incoming change for relay:4, New status: ON
      Time ms: 1
      ************************************************
      read: 0-2-6 s=5,c=1,t=2,pt=0,l=1:1
      send: 6-6-2-0 s=5,c=1,t=2,pt=0,l=1,st=ok:1
      --> Incoming change for relay:5, New status: ON
      Time ms: 1
      

      but if I use the devices on the scenes, the result I get is this:

      read: 0-2-6 s=0,c=1,t=2,pt=0,l=1:1
      send: 6-6-2-0 s=0,c=1,t=2,pt=0,l=1,st=ok:1
      --> Incoming change for relay:0, New status: ON
      Time ms: 0
      ************************************************
      read: 0-2-6 s=1,c=1,t=2,pt=0,l=1:1
      send: 6-6-2-0 s=1,c=1,t=2,pt=0,l=1,st=ok:1
      --> Incoming change for relay:1, New status: ON
      Time ms: 0
      

      only 2 of the 6 are received.

      If I lower the delay too much I also start to miss some of them.

      posted in Vera
      ferpando
      ferpando
    • RE: Scene too fast for gateway?

      @BulldogLowell
      I use the VERA's USB to power my serial gateway.
      Would an ethernet gateway behave better?
      I tried adding the delay but all I get is a lot of fails in the messages. Maybe the gateway is busy waiting and doesn't catch new messages?
      This is the log from the node:

      read: 0-0-6 s=0,c=1,t=2,pt=0,l=1:0
      send: 6-6-0-0 s=0,c=1,t=2,pt=0,l=1,st=fail:0
      --> Incoming change for relay:0, New status: OFF
      Time ms: 1
      ************************************************
      read: 0-0-6 s=0,c=1,t=2,pt=0,l=1:0
      send: 6-6-0-0 s=0,c=1,t=2,pt=0,l=1,st=ok:0
      --> Incoming change for relay:0, New status: OFF
      Time ms: 1
      ************************************************
      read: 0-0-6 s=0,c=1,t=2,pt=0,l=1:1
      send: 6-6-0-0 s=0,c=1,t=2,pt=0,l=1,st=ok:1
      --> Incoming change for relay:0, New status: ON
      Time ms: 1
      ************************************************
      read: 0-0-6 s=0,c=1,t=2,pt=0,l=1:1
      send: 6-6-0-0 s=0,c=1,t=2,pt=0,l=1,st=fail:1
      --> Incoming change for relay:0, New status: ON
      Time ms: 1
      ************************************************
      read: 0-0-6 s=0,c=1,t=2,pt=0,l=1:1
      send: 6-6-0-0 s=0,c=1,t=2,pt=0,l=1,st=fail:1
      --> Incoming change for relay:0, New status: ON
      Time ms: 1
      ************************************************
      read: 0-0-6 s=0,c=1,t=2,pt=0,l=1:1
      send: 6-6-0-0 s=0,c=1,t=2,pt=0,l=1,st=fail:1
      --> Incoming change for relay:0, New status: ON
      Time ms: 1
      

      Your other option adding delays in code and call devices also in code seams to work for now. Something like this:

      local myDelay=300;
      luup.call_action("urn:upnp-org:serviceId:SwitchPower1","SetTarget",{newTargetValue="1"},219)
      luup.sleep(myDelay)
      luup.call_action("urn:upnp-org:serviceId:SwitchPower1","SetTarget",{newTargetValue="1"},221)
      luup.sleep(myDelay)
      luup.call_action("urn:upnp-org:serviceId:SwitchPower1","SetTarget",{ newTargetValue="1"},216)
      

      I'm gonna explore more this option and get back to you.

      posted in Vera
      ferpando
      ferpando
    • RE: Motion and lux meters combined in a single device

      @rvendrame
      Not at the moment. It is designed to be on a wall socket.
      If you plan to use it on battery, probably would be a good idea to by pass both voltage regulators on the devices and run on 3.3V.
      Also consider increasing the time between light reads.

      posted in Hardware
      ferpando
      ferpando
    • RE: Motion and lux meters combined in a single device

      Thank you @hek and @blacey
      It works pretty well.
      It updates light level every 30 seconds and also when movement is detected.
      Also the dome helps average the light level of the room making it more consistent.

      posted in Hardware
      ferpando
      ferpando
    • Motion and lux meters combined in a single device

      Hello,

      I always wanted a motion sensor that could also detect light levels.
      Until now I used two sensors attached to one arduino to achieve that, but now I make a hardware combination that works and also looks more discreet.

      This is the device I used as a base, adding the light sensor.

      _DSC8283.jpg

      First of all I removed the white dome.
      Then a little adjustment was needed becasue the light sensor is too long so the sensor chip fits properly inside the dome.

      _DSC8284.jpg

      Also the white plastic needed some cutting to allow the circuit to enter the dome.

      _DSC8285.jpg

      The light sensor circuit has to be on the opposite side of this little metal pit in order to fit properly.

      _DSC8286.jpg

      Here is the assembly almos done, with the light sensing chip facing up inside the dome.

      _DSC8287.jpg

      Little hotglue on the corners to hold it toghether

      _DSC8290.jpg

      And that's all to it.

      _DSC8291.jpg

      Here's the code. Just a simple combine of the 2 sensors.

      #include <MySensor.h>  
      #include <SPI.h>
      #include <BH1750.h>
      #include <Wire.h> 
      
      #define CHILD_ID_LIGHT 0
      #define LIGHT_SENSOR_ANALOG_PIN 0
      unsigned long SLEEP_TIME = 30000; // Sleep time between reads (in milliseconds)
      
      #define DIGITAL_INPUT_SENSOR 3   // The digital input you attached your motion sensor.  (Only 2 and 3 generates interrupt!)
      #define INTERRUPT DIGITAL_INPUT_SENSOR-2 // Usually the interrupt = pin -2 (on uno/nano anyway)
      #define CHILD_ID 1   // Id of the sensor child
      
      BH1750 lightSensor;
      
      MySensor gw;
      // Initialize motion message
      MyMessage msg(CHILD_ID, V_TRIPPED);
      MyMessage msg2(CHILD_ID_LIGHT, V_LIGHT_LEVEL);
      uint16_t lastlux;
      
      void setup()  
      {  
        gw.begin();
      
        // Send the sketch version information to the gateway and Controller
        gw.sendSketchInfo("MotionLuxSensor", "1.0");
      
        pinMode(DIGITAL_INPUT_SENSOR, INPUT);      // sets the motion sensor digital pin as input
      
        // Register all sensors to gw (they will be created as child devices)
        gw.present(CHILD_ID, S_MOTION);
        gw.present(CHILD_ID_LIGHT, S_LIGHT_LEVEL);
      
        lightSensor.begin();
      }
      
      void loop()     
      {     
        // Read digital motion value
        boolean tripped = digitalRead(DIGITAL_INPUT_SENSOR) == HIGH; 
          
        Serial.println(tripped);
        gw.send(msg.set(tripped?"1":"0"));  // Send tripped value to gw 
      
        uint16_t lux = lightSensor.readLightLevel();// Get Lux value
        Serial.println(lux);
        if (lux != lastlux) {
            gw.send(msg2.set(lux));
            lastlux = lux;
        }
      
      
        // Sleep until interrupt comes in on motion sensor. Send update every two minute. 
        gw.sleep(INTERRUPT,CHANGE, SLEEP_TIME);
      }
      posted in Hardware
      ferpando
      ferpando
    • RE: Scene too fast for gateway?

      That would be ok for 2 or 3 devices, but if you need to turn on let's say 5, waiting all those seconds is no good. Epecially if they are lights.

      I have some Chacon DIยทO 433Mhz plugs controlled by rfxcom and I can turn 10 of them off without problem. They just go one after the other but very quickly.

      That's why I guess the problem is in the plugin that sends messages too fast for the nodes.

      Any of the programmers have some clue about this?

      posted in Vera
      ferpando
      ferpando
    • RE: Scene too fast for gateway?

      Yes, tha's exactly what I do, but is not the best solution.
      It would be best is the system (plugin) had some kind of buffer and the nodes didn't get the next message from the gateway until the arduino was free to process.
      Maybe checking for messages in the main loop?
      I don't really know how the system works right now, but messages are lost if sent too fast.

      posted in Vera
      ferpando
      ferpando
    • RE: Vera to relays not working

      Yes I know... some of these days I'll get one ๐Ÿ™‚

      posted in Troubleshooting
      ferpando
      ferpando
    • RE: Scene too fast for gateway?

      @hek
      I've been trying some things and the problem is consistent.
      If I turn on/off 2 or more devices on a scene at the same time, not all work.
      The message to some devices is lost never reaching its destination.

      How does the plugin handle this? Does it have some kind of buffer?

      From the node point of view, if 2 messages arrive too fast, what happens?
      If the arduino is busy doing something, will it receive the next message when it finishes processing?

      I don't know how to solve this. Just the 2-3 second delay between messages is working, but it is a bit annoying and not very practical.

      posted in Vera
      ferpando
      ferpando
    • RE: Vera to relays not working

      After a while going crazy I just changes the AC adapter for another one I had laying around and everithing started working.
      I did check the old one and it was ok.
      I don't know what could have been but now it is working properly.

      posted in Troubleshooting
      ferpando
      ferpando