rs485 on nano


  • hi,
    I haved hooked up a mega as my serial to rs485 gateway, it shows nicely up in my myscontroller as node0-gateway, to this I have connected a rs485 shield(same as here: https://www.mysensors.org/build/rs485)
    so i connected DE and RE on shield to digital pin 2
    on gateway i connected DI to 46 and R0 to 48 similiar my node which is nano is connected with DI to 9 and R0 to 8. They have not vcc or GND in common.

    I downloaded the gateway and motion sensor example from link above, but the motion sensor node does not show up, did I wire something wrong?


  • hi,
    I also have this experience and I controlled the wiring several times. Tested several (for rs485 modified) sketches against rs485 gateway without success. To test hardware I used this examples and the communication is functioning, so hardware seems ok.
    Is there anyone who can help?


  • Hardware Contributor

    I can't help, but I'm sure debug prints will be needed.


  • @skatun I am assuming that the motion sensor is a separate node from the gateway? Do you have any kind of RS485 USB adapter? When I created my RS485 thermostat bridge node, my RS485 USB adapter was a big help. I used that connected to terminal software so that I could see any data that was transmitted on the RS485 network. It really helped in debugging. If you do not see any data coming across the RS485 network, you may either have wiring mixed up or something wrong in your sketch on either end.

    One thing to check is whether or not you have your data lines wired correctly. In MOST cases, RS485 is polarity insensitive, but just in case one end or the other cannot determine polarity, make sure you have the + to + and - to - between nodes.

    The adapter I have that I use for debugging looks like this:
    alt text


  • @dbemowsk What do you mean by + to + and - to - between nodes.? Isnt that just to power the max 485 chip?

    I do have a usb dongle like u mentioned laying around somewhere, so I can just add that as a 3rd rs485 node, and use arduino serial monitor for it?

    on the gateway i commented all the led and inclusion code, this doesnt effect the rs485 right?

    My setup is shown below:
    0_1481507952218_IMG_20161212_014106.jpg

    @m26872 I have now enabled debug mode, see output below

    0_1481508017785_Capture.JPG


  • @skatun said:

    What do you mean by + to + and - to - between nodes.?

    If you look at your RS485 adapter connections you may see A and B. A is positive (+) or data+ and B is negative (-) or data-. Make sure you wire A to A and B to B. As I mentioned, in MOST adapters, the polarity is auto sensed, but just to rule it out, wire it that way. Once you know it is transmitting, you can test a reverse of the data lines.

    I do have a usb dongle like u mentioned laying around somewhere, so I can just add that as a 3rd rs485 node, and use arduino serial monitor for it?

    Yes, it will act as a 3rd node on the RS485 chain. You should be able to use the serial monitor. I installed a software called realterm and used that so I could use the serial monitor for debug messages. You can download it here

    on the gateway i commented all the led and inclusion code, this doesnt effect the rs485 right?

    I am not sure what you mean that you commented the LED code. You cannot comment out any "#include ..." lines. These are what initiate the needed libraries that make the sketch work. If you commented these, that could be your problem.


  • @skatun
    Hi,
    I have exactly the same output of log. The RS485 modules I use seems to be the same ones. I use 2 Nanos. The RX/TX/Error-LEDs #defines and the Inclusion-mode #defines in the Gateway-/Node-Sketch are not commented.
    How can I get more infos to solve the problem?


  • @skatun One other thing. I see that one of your boards is an arduino mega. I have never used a mega board, but in some reading that I have done the pins are defined slightly different on those. So the pin numbers you have defined in your sketch may not match correctly to where you have things connected on the mega. Don't quote me 100% on this, but do some searches in the forum for using a mega and you might find the info you are looking for.


  • @dbemowsk so i added the usb device, it produces gibberish:

    ~þx
    

    different baud-rates, gibberish changes.....

    gibberish from the node, but nothing from gateway, I also changed gateway to uno as a test without success, here is the code on gateway which i commented out:

    
    // Flash leds on rx/tx/err
    //#define MY_LEDS_BLINKING_FEATURE
    // Set blinking period
    //#define MY_DEFAULT_LED_BLINK_PERIOD 300
    
    // Enable inclusion mode
    //#define MY_INCLUSION_MODE_FEATURE
    // Enable Inclusion mode button on gateway
    //#define MY_INCLUSION_BUTTON_FEATURE
    // Set inclusion mode duration (in seconds)
    //#define MY_INCLUSION_MODE_DURATION 60 
    // Digital pin used for inclusion mode button
    //#define MY_INCLUSION_MODE_BUTTON_PIN  3 
    
    //#define MY_DEFAULT_ERR_LED_PIN 4  // Error led pin
    //#define MY_DEFAULT_RX_LED_PIN  5  // Receive led pin
    //#define MY_DEFAULT_TX_LED_PIN  6  // the PCB, on board LED


  • @skatun

    so i added the usb device, it produces gibberish:

    When working with serial communication, gibberish means that your nodes are talking at different baud rates. Once you get the same baud on both ends, you should see something readable. What baud rate do you have your node set to for the software serial connection? Whatever that is set to is the baud rate that you need to set the USB device to. Once you get that communicating, then check the software serial baud on the gateway. The problem could be that you have differing baud rates on both. If that is the case, your gateway is seeing similar gibberish that you are seeing on your USB adapter and thus does not know what to do with it.

    Another thing is that if you have your baud rate set too high, even though both sides are using matching baud rates, you can still see gibberish. Try starting everything on a lower baud like 9600. If that works, try the next baud rate, and the next. You may be able to run at 115200, but if you have debugging turned on it may have trouble communicating at that speed.

    Also, don't confuse your hardware serial with your software serial. This is the hardware UART serial baud definition:

    Serial.begin(115200);
    

    And this is the software serial baud definition:

    RS485Serial.begin(9600);
    

    These do not necessarily need to match. It is the software serial at all points that need to match.

    Let me know if any of that helps.


  • @skatun
    Hi,
    I found the solution.

    Look at this

    Place the following in your Node-Sketch e.g. for Node ID 23

     #define MY_NODE_ID 23
    

    and the communication between node and Gateway is ok.

    I hope this works for you.


  • @skatun did you got this working?
    I faced similar situation when I was accidentally connected rx & tx wrong way around on my GW. The sensor node was constantly polling for parent but got no response.

    The "gibberish" on RS485 bus might also be the control chars the transport uses.. SOH, STX, ETX and EOT.
    See this post.

    In my GW sketch I have these two enabled:

    #define MY_INCLUSION_MODE_FEATURE
    #define MY_INCLUSION_MODE_DURATION 60 


  • @pjr @consul58 Have been away the last 5 days, will update the thread with the result tomorrow. Can anyone lighten me up on benefit of having inclusion button, and what inclusion time should be set to?


  • Admin

    The inclusion mode was initially developed for Vera because it had the bad behaviour of needing a restart (of its main process) each time a device was added.

    It is all a controller-side thing after all (all messages, including presentation is always passed to controller). But the mode can be turned on using a physical button on the gateway device. Which results in a message to controller saying start/stop inclusion mode.


  • Good to know. Think then I can throw that away since I'm using domoticz.


  • Implemented fixed node ID without success, I think maybe the rs485 adapter on gateway is broken, will test more tomorrow


  • @skatun Will join this discussion as well. I have exately the same issue. My set up is a nano as sensor and an uno as gateway.
    I verified correct wiring of RS485 network is correctly doen I used this sketch (swith ReceiveOrSend to RS485Transmit or RS485Receive on both nodes;
    :

    #include <AltSoftSerial.h>
    
    AltSoftSerial altSerial;
    #define SSerialTxControl 2 //RS485 Direction control
    
    #define RS485Transmit HIGH
    #define RS485Receive LOW
    bool ReceiveOrSend = RS485Transmit;
    
    void setup() {
    
    Serial.begin(9600);
    Serial.println("AltSoftSerial Test Begin");
    pinMode(SSerialTxControl, OUTPUT);
    digitalWrite(SSerialTxControl, RS485Transmit); // Enable RS485 Transmit
    altSerial.begin(9600);
    if (ReceiveOrSend ){
    Serial.println("send mode");
    digitalWrite(SSerialTxControl, RS485Transmit); // Enable RS485 Transmit
    } else
    {
    digitalWrite(SSerialTxControl, RS485Receive); // Enable RS485 Transmit
    Serial.println("receive mode");
    }
    }
    
    void loop() {
    char receivedOnRS485;
    
    if (ReceiveOrSend ){
    altSerial.println(" Hello world");
    delay(2000);
    } else
    {
    
    if (altSerial.available()) {
    receivedOnRS485 = altSerial.read();
    Serial.print("ontvagen=");
    Serial.println(receivedOnRS485);
    }
    }
    }```


  • @wimd As my reply stated in the other thread, it would be helpful to see all sketches being used so we can determine better where the problem may lie.


  • @dbemowsk It are the standard examples.

    For the gateway (Uno) :

    * The MySensors Arduino library handles the wireless radio link and protocol
     * between your home built sensors/actuators and HA controller of choice.
     * The sensors forms a self healing radio network with optional repeaters. Each
     * repeater and gateway builds a routing tables in EEPROM which keeps track of the
     * network topology allowing messages to be routed to nodes.
     *
     * Created by Henrik Ekblad <henrik.ekblad@mysensors.org>
     * Copyright (C) 2013-2015 Sensnology AB
     * Full contributor list: https://github.com/mysensors/Arduino/graphs/contributors
     *
     * Documentation: http://www.mysensors.org
     * Support Forum: http://forum.mysensors.org
     *
     * This program is free software; you can redistribute it and/or
     * modify it under the terms of the GNU General Public License
     * version 2 as published by the Free Software Foundation.
     *
     *******************************
     *
     * DESCRIPTION
     * The RS485 Gateway prints data received from sensors on the serial link. 
     * The gateway accepts input on seral which will be sent out on
     * the RS485 link.
     *
     * Wire connections (OPTIONAL):
     * - Inclusion button should be connected between digital pin 3 and GND  
     * - RX/TX/ERR leds need to be connected between +5V (anode) and digital pin 6/5/4 with resistor 270-330R in a series
     *
     * LEDs (OPTIONAL):
     * - To use the feature, uncomment MY_LEDS_BLINKING_FEATURE in MyConfig.h
     * - RX (green) - blink fast on radio message recieved. In inclusion mode will blink fast only on presentation recieved
     * - TX (yellow) - blink fast on radio message transmitted. In inclusion mode will blink slowly
     * - ERR (red) - fast blink on error during transmission error or recieve crc error 
     * 
     * The gateway uses AltSoftSerial to handle two serial links 
     * on one Arduino. Use the following pins for RS485 link
     * 
     *  Board          Transmit  Receive   PWM Unusable
     * -----          --------  -------   ------------
     * Teensy 3.0 & 3.1  21        20         22
     * Teensy 2.0         9        10       (none)
     * Teensy++ 2.0      25         4       26, 27
     * Arduino Uno        9         8         10
     * Arduino Leonardo   5        13       (none)
     * Arduino Mega      46        48       44, 45
     * Wiring-S           5         6          4
     * Sanguino          13        14         12
     * 
     */
    
    // Enable debug prints to serial monitor
    #define MY_DEBUG 
    
    // Enable RS485 transport layer
    #define MY_RS485
    
    // Define this to enables DE-pin management on defined pin 
    #define MY_RS485_DE_PIN 2
    
    // Set RS485 baud rate to use
    #define MY_RS485_BAUD_RATE 9600
    
    // Enable serial gateway
    #define MY_GATEWAY_SERIAL
    
    // Flash leds on rx/tx/err
    #define MY_LEDS_BLINKING_FEATURE
    // Set blinking period
    #define MY_DEFAULT_LED_BLINK_PERIOD 300
    
    // Enable inclusion mode
    #define MY_INCLUSION_MODE_FEATURE
    // Enable Inclusion mode button on gateway
    #define MY_INCLUSION_BUTTON_FEATURE
    // Set inclusion mode duration (in seconds)
    #define MY_INCLUSION_MODE_DURATION 60 
    // Digital pin used for inclusion mode button
    #define MY_INCLUSION_MODE_BUTTON_PIN  3 
    
    #define MY_DEFAULT_ERR_LED_PIN 4  // Error led pin
    #define MY_DEFAULT_RX_LED_PIN  5  // Receive led pin
    #define MY_DEFAULT_TX_LED_PIN  6  // the PCB, on board LED
    
    #include <SPI.h>
    #include <MySensors.h>  
    
    void setup() { 
      // Setup locally attached sensors
    }
    
    void presentation() {
     // Present locally attached sensors 
    }
    
    void loop() { 
      // Send locally attached sensor data here 
    }
    

    For the sensor (Nano):

    /**
     * The MySensors Arduino library handles the wireless radio link and protocol
     * between your home built sensors/actuators and HA controller of choice.
     * The sensors forms a self healing radio network with optional repeaters. Each
     * repeater and gateway builds a routing tables in EEPROM which keeps track of the
     * network topology allowing messages to be routed to nodes.
     *
     * Created by Henrik Ekblad <henrik.ekblad@mysensors.org>
     * Copyright (C) 2013-2015 Sensnology AB
     * Full contributor list: https://github.com/mysensors/Arduino/graphs/contributors
     *
     * Documentation: http://www.mysensors.org
     * Support Forum: http://forum.mysensors.org
     *
     * This program is free software; you can redistribute it and/or
     * modify it under the terms of the GNU General Public License
     * version 2 as published by the Free Software Foundation.
     *
     *******************************
     *
     * REVISION HISTORY
     * Version 1.0 - Henrik Ekblad
     * 
     * DESCRIPTION
     * This is an example of sensors using RS485 as transport layer
     * 
     * Motion Sensor example using HC-SR501 
     * http://www.mysensors.org/build/motion
     * 
     * The transport uses AltSoftSerial to handle two serial links 
     * on one Arduino. Use the following pins for RS485 link
     * 
     *  Board          Transmit  Receive   PWM Unusable
     * -----          --------  -------   ------------
     * Teensy 3.0 & 3.1  21        20         22
     * Teensy 2.0         9        10       (none)
     * Teensy++ 2.0      25         4       26, 27
     * Arduino Uno        9         8         10
     * Arduino Leonardo   5        13       (none)
     * Arduino Mega      46        48       44, 45
     * Wiring-S           5         6          4
     * Sanguino          13        14         12 * 
     * 
     */
    
    
    // Enable RS485 transport layer
    #define MY_RS485
    
    // Define this to enables DE-pin management on defined pin 
    #define MY_RS485_DE_PIN 2
    
    // Set RS485 baud rate to use
    #define MY_RS485_BAUD_RATE 9600
    
    #include <SPI.h>
    #include <MySensors.h>
    
    unsigned long SLEEP_TIME = 120000; // Sleep time between reports (in milliseconds)
    #define DIGITAL_INPUT_SENSOR 3   // The digital input you attached your motion sensor.  (Only 2 and 3 generates interrupt!)
    #define CHILD_ID 1   // Id of the sensor child
    
    // Initialize motion message
    MyMessage msg(CHILD_ID, V_TRIPPED);
    
    void setup()  
    {  
      pinMode(DIGITAL_INPUT_SENSOR, INPUT);      // sets the motion sensor digital pin as input
    }
    
    void presentation()  {
      // Send the sketch version information to the gateway and Controller
      sendSketchInfo("Motion Sensor", "1.0");
    
      // Register all sensors to gw (they will be created as child devices)
      present(CHILD_ID, S_MOTION);
    }
    
    void loop()     
    {     
      // Read digital motion value
      boolean tripped = digitalRead(DIGITAL_INPUT_SENSOR) == HIGH; 
            
      Serial.println(tripped);
      send(msg.set(tripped?"1":"0"));  // Send tripped value to gw 
    
      // Sleep until interrupt comes in on motion sensor. Send update every two minute.
      sleep(digitalPinToInterrupt(DIGITAL_INPUT_SENSOR), CHANGE, SLEEP_TIME);
    }


  • @wimd include debug and remove inclusion from the sketches and it should be ok. I have ordered new rs485 shield, i expect that to be the issue..


  • @consul58 said:

    #define MY_NODE_ID 23

    Thanks for the tip now works


  • @skatun include debug, removal of inclusion and define MY_NODE_ID enabled communication on the RS485 bus.


  • This post is deleted!


  • @skatun my problem is solve . you test this and feedback me. use 3.3v and gnd pins in arduino use for rs485 module.


  • is this wiring true for rs485 ? thank you
    0_1485716457105_123.jpg

    also which cable is appropriate for A and B?


  • @Reza

    no. rs485 must have LINEAR BUS topology.


  • @b0rmann my pic is not a bus ? i think this is a bus topology !


  • @b0rmann
    this is a bus ?
    0_1485723151109_RS485-Schnittstelle-11.png

    so in end of A and B , what am i do ?


  • This post is deleted!


  • @Reza Though your two pictures are both bus topologies, your first one is a star bus topology and your second is a linear bus topology. As to your second question "so in end of A and B , what am i do ?" Depending on a few factors such as equipment connected, cable type, cable length and data speed (baud rate) used, you may or may not need a termination resistor at the end of the line. For short runs you typically won't need them, but if you have hundreds of feet you are working with, you may want them, especially if you want to run at a higher baud like 115200 or higher. As to the resistor value, just do a google search for "RS485 termination resistor."


  • @Reza

    This is how you build your network.

    0_1485774949144_upload-db051496-c19d-4aea-8587-147867877ea3

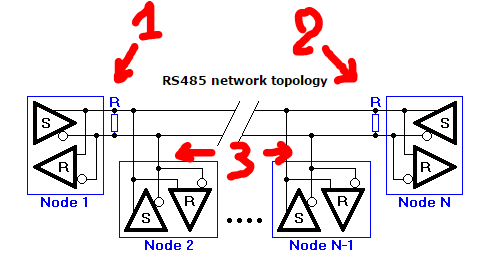
    I assume that you use these :
    0_1485775090027_upload-6265356e-49b3-4577-8666-060af56319df

    Node 1 is the MAX485 RS-485 Module connected to your gateway.
    Node N is the MAX485 RS-485 Module connected to your last sensor of your network.

    Between node 1 and N you can add addtional nodes but you need to keep the bus structure.

    Important are the terminating resistors (1) and (2). They are R7 on the RS-485 module.
    If you add modules between node 1 and node N and you have a failure in transmitting, check then with removal of R7 on that added node.


  • @wimd
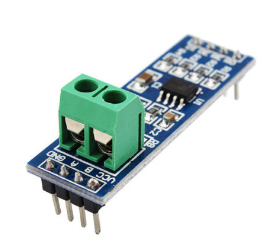
    i use this module (rs485) . for max 30 or 40 meter. is need resistors ? ( if need 100 ohm is good ?)
    i think the problem that @skatun told was solve with 3.3v pin on arduino but no. i use static ID for nodes and remove INCLUSION MODE in gateway but when connect i have error:

    2035 !TSM:FPAR:NO REPLY
    2037 TSM:FPAR
    2055 TSF:MSG:SEND,1-1-255-255,s=255,c=3,t=7,pt=0,l=0,sg=0,ft=0,st=OK:
    4063 !TSM:FPAR:NO REPLY
    4065 TSM:FPAR
    4082 TSF:MSG:SEND,1-1-255-255,s=255,c=3,t=7,pt=0,l=0,sg=0,ft=0,st=OK:
    6090 !TSM:FPAR:NO REPLY
    6092 TSM:FPAR
    6110 TSF:MSG:SEND,1-1-255-255,s=255,c=3,t=7,pt=0,l=0,sg=0,ft=0,st=OK:
    8118 !TSM:FPAR:FAIL
    8119 TSM:FAIL:CNT=1
    8121 TSM:FAIL:PDT
    

    after some reset and change pins of vcc and gnd , when use 3.3v in gateway for vcc rs485 module i see (in serial monitor) node is connect to gateway. so i think this is ok always. but today i try for new node and i see same problem again
    do you think this is related to power ?


  • i found a thing about this . i think all of problem is related to power ! when power of node is with a adaptor 1A and power of gateway is with usb of raspberry so i have this error "!TSM:FPAR:NO REPLY" but when connect both ( node and gateway to laptop with usb) after several test i see all of connect is ok ( several reset and connect/disconnect usb cable) . i am beginner sorry , so for this what am i do ? can i use another power for vcc and gnd rs485 module ? how ? or you have better solution ?


  • i tested again . connected gateway to my laptop (use domoticz for laptop) and use a 30 meter wire between gateway and first node. and again use a 5 meter wire for second node ( without any resistor). when start domoticz , nodes detect easy and start working well. i test again and again (with reset and power off/on)but this is ok and dont any problem(relay give command and send ack and all of thing is true) . then i connect gateway to raspberry (2 nodes is connect to laptop yet) so for a short time relay worked ( 2 - 3 command send and relay on without ack ) then all command can not send....
    again i connect gateway to laptop and all command send and ok .
    so i think this is related to power of usb port (raspberry)
    can i use rx-tx gpio on raspberry and arduino and use other power for arduino ?how configure on raspberry ? thank you


  • Many hours I solved why MySe485 example does not work 😠 ... I tried Mega, Uno, Mini, Nano, reinstallation of IDE, libraries, ClearEepromConfig, HWserial / AltSoftSerial / direct (Tx <> Rx) + (Rx <> TX) without MAX485 ...

    The other day I came across this forum and the solution is:

    #define MY_NODE_ID xx

    I saw a bug that RS485 communication is bad, because it is illegible. My mistake, the communication between GW and the node is not readable ASCII ...

    RS485 communication: Node waiting to GW respone:
    0_1485894929734_upload-fb5458be-c704-4c5a-9377-61558ce658c5


  • @Reza
    Maybe stupid question from me, but have got you connected ground wires between nodes?
    Not only A and B?
    http://www.chipkin.com/rs485-cables-why-you-need-3-wires-for-2-two-wire-rs485/


  • @vikmad Are your gateway and receiving node baud rates the same? You can get gibberish like that if your baud rates differ between nodes.


  • @dbemowsk It works now. To sketch, I added the line: #define MY_NODE_ID xx

    Arduino IDE 1.8.1, MySensors Library v2.1.1:

    • Upload ClearEepromConfig
    • Upload MotionSensorRS485
      = not working

    • Add #define MY_NODE_ID 1 to MotionSensorRS485 and upload
      = working


  • @kimot said in rs485 on nano:

    @Reza
    Maybe stupid question from me, but have got you connected ground wires between nodes?
    Not only A and B?

    no i use just 2 wire ( A & B ) . but problem is solve. i change power of raspberry. this work well !

    this is compulsion (wire for ground) ? or if i connect ground of 2 nodes is better ?


  • This post is deleted!


  • No, connecting ground is not mandatory.. In fact, i would not recommend it at all, especialy not on longer bus lengts.. Just use A&B

    If you have shielded cables.. Connect the shielding to gnd on 1 side only and leave the other side unconnected..

    This will provide shielding but prevent ground loop issues.


  • Also keepin mind that those cheap rs485 adapters have a 120ohm load resistor and pull up and pulldown resistors installed for the rs485 bus..

    Those should only ve installed on the ends of the data bus.. So remove them from the rest of the adapters if you use more than 2.


  • This post is deleted!


  • This post is deleted!

Log in to reply
 

Suggested Topics

  • 4
  • 9
  • 14
  • 2
  • 1
  • 274

0
Online

11.2k
Users

11.1k
Topics

112.5k
Posts