nRF5 action!
-
@toyman yes
-
It would probably do well as a "one button scene controller," but is it good for anything else I wonder?
-
@neverdie does not seem to be any easy way to get access to any of the pins on the board but who does not need a bunch of "one button scene controllers"?
-
I was tempted to try adding the missing accelerometer too, but in the end it's easier and cheaper to make a board with the 2$ module.
-
Speaking of which, I shrunk the HolyIOT board a bit and added the small buzzer:
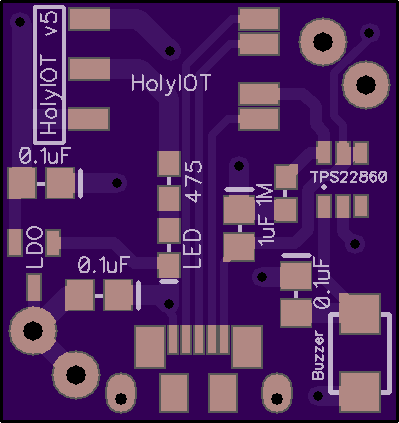
Hopefully this is small enough that it can be used as a locator beacon.It turns out this is pretty nearly the minimum size, even if the HolyIOT were smaller, because of the CR2032 battery underneath it. Anyway, that's an interesting result, because the BC182 is smaller than the HolyIOT, but I wouldn't get the benefit of it.
-
@neverdie said in nRF5 Bluetooth action!:
small buzzer:
CR2032 batteryIf I'm not wrong this buzzer needs over 100mA, not sure it's a good match for a CR2032 ?
-
@mika said in nRF5 Bluetooth action!:
Hi,
Working without problem with mysensors, I use STLink v2 from Aliexpress. LED and Button are mapped on pins 28 and 29

Im just reporting sketch from NeverDie

https://www.openhardware.io/view/510/Multi-Sensor-TempHumidityPIR-LeakMagnetLightAccel
-
@nca78 said in nRF5 Bluetooth action!:
@neverdie said in nRF5 Bluetooth action!:
small buzzer:
CR2032 batteryIf I'm not wrong this buzzer needs over 100mA, not sure it's a good match for a CR2032 ?
I like how nothing slips past you! Yes, it's a pretty severe trade-off in exchange for its small size. So, I'll be using two CR2032's and make it run only in very short bursts. I honestly don't know how well or badly it will turn out.
-
@neverdie said in nRF5 Bluetooth action!:
I like how nothing slips past you! Yes, it's a pretty severe trade-off in exchange for its small size. So, I'll be using two CR2032's and make it run only in very short bursts. I honestly don't know how well or badly it will turn out.
I don't see anything to co trim such a high current on your board ? Maybe it's the reason the sound level is low on your other board, max current of the MCU pin is much lower than what the buzzer needs ?
-
@nca78 said in nRF5 Bluetooth action!:
@neverdie said in nRF5 Bluetooth action!:
I like how nothing slips past you! Yes, it's a pretty severe trade-off in exchange for its small size. So, I'll be using two CR2032's and make it run only in very short bursts. I honestly don't know how well or badly it will turn out.
I don't see anything to co trim such a high current on your board ? Maybe it's the reason the sound level is low on your other board, max current of the MCU pin is much lower than what the buzzer needs ?
What does "co trim" mean?
-
@neverdie said in nRF5 Bluetooth action!:
What does "co trim" mean?
Sorry phone rewriting what I type.
"Control".
MCU pins can't source that much current and I see no transistor on your board to do it ?
If you put a reserve capacitor big enough to supply 100+mA long enough to make some sound on the buzzer, will you not fry the pin ?
-
The present design uses a TPS22860 load switch to turn on and off the buzzer. I'm not trying to power the buzzer directly from one of the nRF52832 pins, because the current would be outside the maximum limits for the nRF52832 pin. I'm hoping the two CR2032's will give enough headroom that the voltage (after the LDO) will be stable.
-
@neverdie didn't now this chip, nice one thank you I've added it to my next order.
Seems I should have a better look at your designs
-
@nca78 said in nRF5 Bluetooth action!:
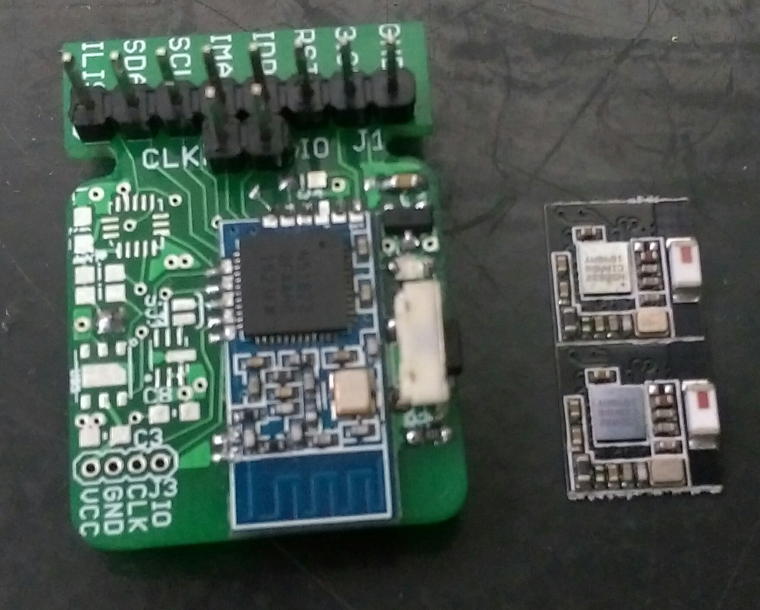
I received the "holyiot" modules and they are really, really tiny. 2 attached together are exactly the same size than the 51822-04 module. WL-CSP package is very impressive: small, very thin and with a cool shinny surface.
This module has inductors for DC/DC mode, and pins .00 and .01 are mapped so it's possible to add low frequency crystal for Bluetooth mode.
Have you tried uploading anything to the HolyIOT modules? I've now tried on two different HolyIOT modules, both without success.

-
@neverdie said in nRF5 Bluetooth action!:
Have you tried uploading anything to the HolyIOT modules? I've now tried on two different HolyIOT modules, both without success.

Sorry not yet, I've just re-plugged my NRF5 board and I'm figuring out how to program external board. I'll do it with a board I know works, then try the holyiot module;
-
@nca78 It's a tricky module to solder (probably the most tricky of them all that I've tried so far), so to eliminate that concern on the second module I flipped it over and soldered wires directly to the four essential pads. That way I could visually confirm that it was soldered correctly. Still fails. So, just FYI.
-
I think I see the problem. These pinouts are inconsistent:
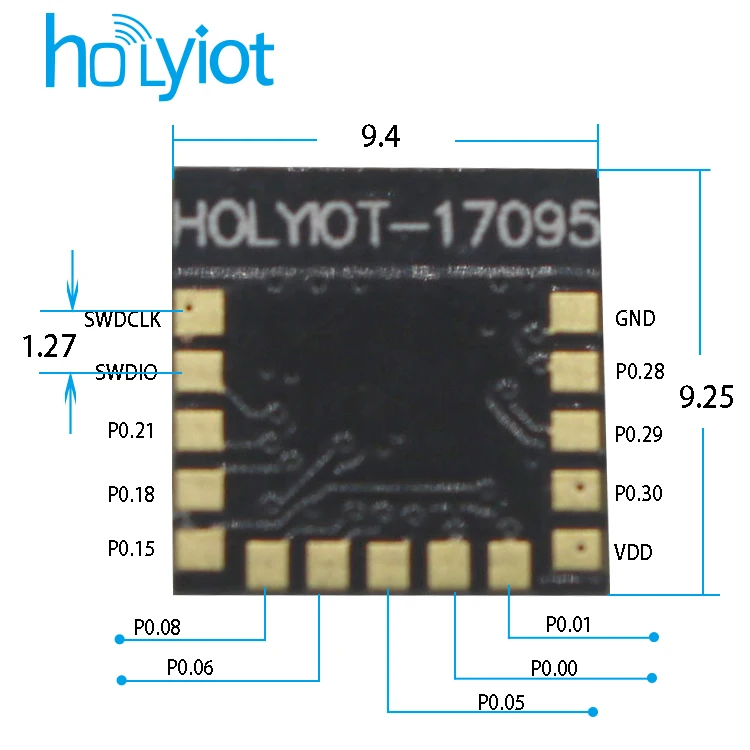

I had been basing it on the first one, whereas I'm now guessing that the second one is probably the correct one.
-
Confirmed. That was the problem. Using the second pinout, it now uploads.
-
I have the HolyIOT blinking an LED and receiving packets now. Range, as I suspected, is rather mediocre, but that's probably an inherent trade-off for its small size. For my purposes I don't think it will matter.
-
@neverdie was the difference that they were mirrored along vertical axis? Or am I missing a difference in labelling?
-
@mfalkvidd said in nRF5 Bluetooth action!:
@neverdie was the difference that they were mirrored along vertical axis? Or am I missing a difference in labelling?
Yes, in the first picture the pin labels should have been mirrored, but weren't. Or, to put it your way, they were mirrored from what they should have been. Either way, it's just wrong.
The second picture is the correct one.
-
Anyone heard anything about when the nrf52840 might be released? I had thought we'd have heard something by now. Surely sometime in 2018 at least? What's the nearest competing chip?
-
afaik (and I got a confirmation from Nordic too), there is no plan for other nrf52840 package than AQFN.
If you're searching for the ic, you'll have to use this footprint, which needs premium pcbs (micros vias, and multilayers for escaping routes and better plane).
It's also more tricky to solder than a fanstel BT840s and its bottom pins. BT840s edge pins are easy to solder sure but there are not so many. All others pins are on bottom as you know. Of course, it's the same for BT840, easier&better perf when using 4layers, but that can be done with 2layers (also explained in datasheet though).
From what I saw, others nrf52840 module sellers are going on same road, lot of tiny pads on bottom of the module, yes you can't do small things with big things, and there are lot of pins!There is another thing to know. no arduino core for nrf52840 yet. Yes, it's possible to use radio, some pins too, but no spi, i2c etc. that's because it needs some code refactoring to handle multiple io ports (nrf52832 one io port, whereas 840 has two).
imho there are better mcu
 some silabs mcu for example.. but not arduino compatible, out of scope here, and lot of people would say, "not interested, it's two bucks more expensive", way of talking (not mine) as i don't remember the exact price .
-
@scalz To get smaller size, I expect we'll see modules with reduced pin counts for the 52840, just as we already do for the 52832. Have you heard anything about when final silicon for the 840 will be shipping?
-
@neverdie said in nRF5 Bluetooth action!:
@scalz To get smaller size, I expect we'll see modules with reduced pin counts for the 52840, just as we already do for the 52832. Have you heard anything about when final silicon for the 840 will be shipping?
yes sure. reduced IO pin counts.. and maybe even more reduced if they try to fit new features instead of IO (like usb etc). The above holyiot module example:
- replace two IOs by USB pins.
- keep same pinouts, but no USB, pity for a new interesting feature, but i can imagine not all people interested in it
- need to enlarge the module for same pinout + usb pins
- same module size and pinout, +usb, -> add bottom pads
I still don't get the point of a holyiot module, and chip antenna modules, when it's not for wearables though!
Complete waste of specs
 a 840 like that would be "funny", not much pins, with a chip ant..what would be the point then to buy a 840?? short ble5 range, no usb or just a few ios etc, yuk!
If you're after range, then take a look at the range comparison fanstel made. it's explicit how their different module design impact range. But if you don't need all the new bells&whistles of 840, then it may be smarter to use 832 or nrf24pa, and a good module, too bad to buy a module with degraded RF..I asked Nordic two months ago, I don't think their eta changed. should be soon I imagine.
-
@scalz said in nRF5 Bluetooth action!:
I still don't get the point of a holyiot module, and chip antenna modules, when it's not for wearables though!
Not really disagreeing with you, but it's nonetheless interesting that if you do a search on Aliexpress for nrf52832 and sort the results by number of orders, the HolyIOT has gotten by far the biggest number of orders:https://www.aliexpress.com/premium/nrf52832.html?spm=2114.search0204.0.0.631303423oXjxi&site=glo&groupsort=1&SortType=total_tranpro_desc&g=y&SearchText=nrf52832&tc=ppc&initiative_id=SB_20180117073832&needQuery=n&filterCat=100000201,200010206,200084026[Edit: I'm wrong. The Ebyte module got the most orders.]
-
I measured the Fanstel BTC832X at maximum Tx, and it draws more current than I had thought: around 330ma. As you would expect, though, the range and coverage is excellent, even at 2mbps, and even for diminutive receivers like the HolyIOT.

For that reason, I think it generally beats the RFM69's performance, which IIRC consumes around 100ma at max Tx power, but has a max transmit speed of 300kbps. i.e. Total mah to transmit a payload should be less with the Fanstel BT832X.
-
Since the Fanstel's don't come with the low frequency crystal oscillators already installed, when it is worthwhile to install them? I'm blithely running off the built-in RC oscillator, and I'm not noticing problems.
-
Even with two CR2032's in series, I can't get 330ma out of them for very long, if at all, before internal resistance becomes severe and it plummets to 110ma or less. Nonetheless, at least some of the preliminary testing suggests that the initial burst may be good enough to extend the Tx range for long enough (100ms) to reliably wake a sleeping receiver node that sits outside the range of a non-amplified transmitter.
-
@neverdie The internal RC Osc will allow you to keep your BOM costs lower. However when using the Bluetooth Softdevice the Crystal will lower the power consumption as the BT window will be narrower.
-
@jokgi said in nRF5 Bluetooth action!:
@neverdie The internal RC Osc will allow you to keep your BOM costs lower. However when using the Bluetooth Softdevice the Crystal will lower the power consumption as the BT window will be narrower.
Is the choice of RC osc or crystal of any consequence at all for Nordic's proprietary radio modes? For instance, I wasn't sure whether or not the cyrstal's greater accuracy might achieve a lower bit error rate at 2mbps.
-
@neverdie I suppose the radio is using the high frequency clock, so it doesn't have any influence ?
-
@nca78 said in nRF5 Bluetooth action!:
@neverdie I suppose the radio is using the high frequency clock, so it doesn't have any influence ?
The LFCLK is required for BLE timing. Without the MCU required more energy to generate (synthetic) or calibrate (RC) the 32kHz signal.
-
@d00616 said in nRF5 Bluetooth action!:
@nca78 said in nRF5 Bluetooth action!:
@neverdie I suppose the radio is using the high frequency clock, so it doesn't have any influence ?
The LFCLK is required for BLE timing. Without the MCU required more energy to generate (synthetic) or calibrate (RC) the 32kHz signal.
Since Mysensors isn't using BLE, then it doesn't matter?
-
Where can i get a Kicad component for Ebyte nrf52832?
-
You can find it in my kicad repo: symbol and footprint
I didn't used it in any design so please double check.
-
Any suggestions how can I get serial debug messages out of the NRF52832 (Fanstel BT832)? I can upload the program over the SWD interface. I'm using a black magic probe with the Arduino NRF5 package on Windows 10. I know it works because the node shows up in my controller.
-
@nagelc said in nRF5 Bluetooth action!:
Any suggestions how can I get serial debug messages out of the NRF52832 (Fanstel BT832)?
Define one of the pins as serial TXO. Then connect it to RXI on an FTDI TTL-USB converter and read it that way. That's what I do, and it works.
-
@neverdie
Do you define the pins in MyBoardNRF5? In MyBoadNRF5.cpp, I replaced the 0 in the first line with10, thinking this will map Arduino TX0 to P010. This did not seem to work. How do you map the TX0 pin?
-
@nagelc No, you want to change the values in the MyBoardNRF5.h file instead. For an example, see the source code in: https://www.openhardware.io/view/499/10-years-wireless-PIR-Sensor-on-just-one-set-of-3-AAs#tabs-source
So, in your case, you'd want:
#define PIN_SERIAL_TX (10)and, to avoid conflicts, make sure that pin P0.10 isn't defined anywhere in the same .h file as something else already. If it is, you may need to change that as well.
-
Thanks. I'll give that a try.
-
Yesterday, I 've got a mailing from my components' supplier featuring new type of cells, Li-MnO2. The cell has all the features needed for nRF5:
- 1200mah capacity
- 1.8-3.0v range
- low cost (ca. $3)
- 41,0 x 24,5 x 5,2 dimensions and, importantly
- up to 120mah peak discharge current.
The link to manufacturer:
http://www.fanso-battery.com/Ultra-thin-Li-MnO2-battery-CP502440-3V1200mAh-pd1905.html
-
@toyman said in nRF5 Bluetooth action!:
Yesterday, I 've got a mailing from my components' supplier featuring new type of cells, Li-MnO2. The cell has all the features needed for nRF5:
- 1200mah capacity
- 1.8-3.0v range
- low cost (ca. $3)
- 41,0 x 24,5 x 5,2 dimensions and, importantly
- up to 120mah peak discharge current.
The link to manufacturer:
http://www.fanso-battery.com/Ultra-thin-Li-MnO2-battery-CP502440-3V1200mAh-pd1905.htmlMhmhmh, a disposable battery that you have to solder I can't see it as a good idea for a node...
-
@nca78 said in nRF5 Bluetooth action!:
@toyman said in nRF5 Bluetooth action!:
Yesterday, I 've got a mailing from my components' supplier featuring new type of cells, Li-MnO2. The cell has all the features needed for nRF5:
- 1200mah capacity
- 1.8-3.0v range
- low cost (ca. $3)
- 41,0 x 24,5 x 5,2 dimensions and, importantly
- up to 120mah peak discharge current.
The link to manufacturer:
http://www.fanso-battery.com/Ultra-thin-Li-MnO2-battery-CP502440-3V1200mAh-pd1905.htmlMhmhmh, a disposable battery that you have to solder I can't see it as a good idea for a node...
well, 1200mah will last AT LEAST for a year (two in real life). I have no issues resoldering 2 joints once a year, given it gives AAA capacity in a much smaller package
-
Speaking of batteries, I found only one proper holder for holding two CR2032's in series:
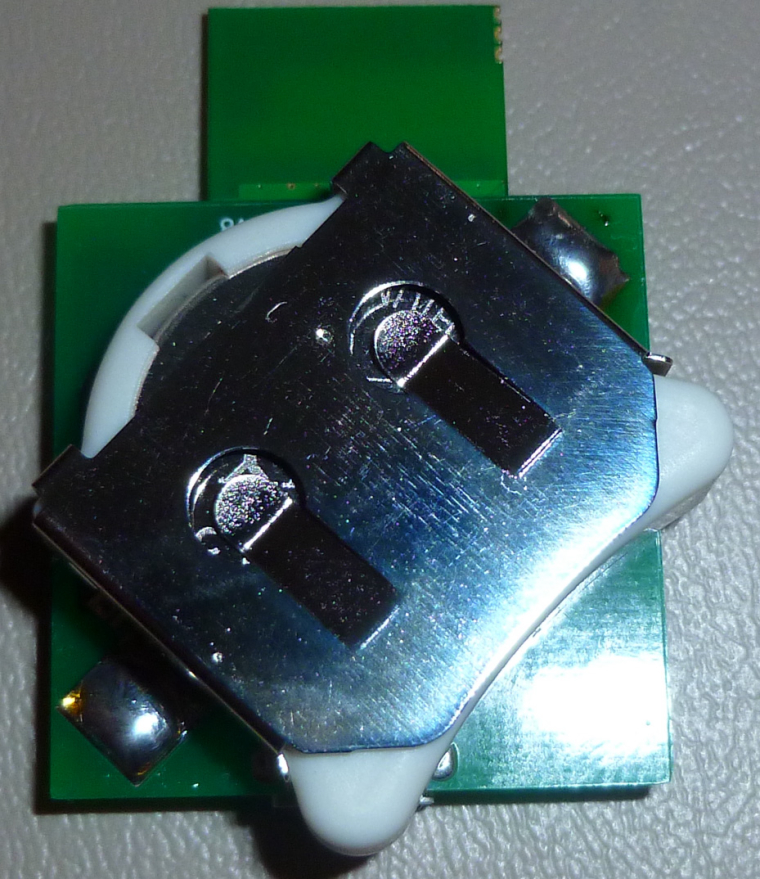
It turns out you pretty much need the plastic carrier to guarantee that the edge of the button cell doesn't short out against the side of the metal holding bracket.
-
@neverdie said in nRF5 Bluetooth action!:
Speaking of batteries, I found only one proper holder for holding two CR2032's in series:
There are CR2477 (560mAh) or CR2450 (950mAh) 3V cells. Maybe its's better to handle.
-
@toyman said in nRF5 Bluetooth action!:
41,0 x 24,5 x 5,2 dimensions and, importantly
Footprint seems kinda large, at least for nodes intended to be small. It trades off length in order to get thin. In contrast, a CR123 is shorter (34.5mm), but thicker (17mm), but can deliver 1.5a continuous (which makes it very tempting for powering a PA):
https://www.batteryjunction.com/energizer-cr123a.html
On the other hand, when you add the CR123 holder, the length may be comparable.If you decide to try out the fanso, please do let us know how you like it.
-
@d00616 said in nRF5 Bluetooth action!:
There are CR2477 (560mAh) or CR2450 (950mAh) 3V cells. Maybe its's better to handle.
Good point. I think maybe the only actual justified use of two CR2032's in series is to power the AM612, which requires a voltage of at least 2.7v.
-
Did someone get an NRF52 working with an ESP8266(ESP32) and successfully connected it to a controller?
Since my controller is something stuffed away in a closet, Id like to have a gateway that's positioned more centralized. An ESP+NRF52832 would be a lovely cost-efficient solution.
-
@omemanti said in nRF5 Bluetooth action!:
Did someone get an NRF52 working with an ESP8266(ESP32) and successfully connected it to a controller?
Yes: https://www.openhardware.io/view/491/PA-LNA-nRF52832-ESP-LINK-Shield-for-Wemos-D1-Mini-ESP8266
Works great!

-
@neverdie ah thnx. I'll try it out with my nodemcu+ebyte
-
@neverdie
It worked! I used pin 26 as in your example and now can get the debug messages. Also thanks for the many other NRF5 routines you had in the example.
-
How can I connect to DEC5 as an I/O when using MyBoardNRF5?
The Ebyte Module Datasheet says: 14 DEC5 Input/Output MCU GPIO to it should be possible?
-
@omemanti Suggest you check the Nordic datasheet on that rather than rely on the Ebyte documentation. IIRC, the DECT pins are not GPIO, but it's worth your double checking the nRF52 datasheet if it's important to you.
-
@neverdie, Indeed, I checked and it was false. well goes to show that late-night prototyping has some disadvantages, my bad,

Deleted Following up question..
DK =>Ebyte module
GND(detect) => GND
SWDIO => SWDIO
SWDCLK => SWCLK
VTG => 3,3V
3,3V => 3,3V
GND =>GND
-
Has anyone succeeded in programming the WT51822-S4AT module (the cheapest and tiny nrf51822 module on AliExpress) using NRF52 DK ?
I pulled a lot of hair trying to find out what I did wrong with my board, I soldered an adapter to make sure I didn't have problems with faulty jumper wires etc, I reinstalled JLink and Nordic software, in the end I desoldered everything on my board, then the module itself to program it independantly. It always failed and JLink couldn't connect to it. I tried the other spare one I had, same result. I tried the one I'm sure I managed to program long ago with a jlink clone, always the same result.
Then I tried with an old nrf51822 module I bought long ago on AliExpress, and no problem !Has anyone had similar problems ? Is there something special hardware wise that I should check ?
-
@nca78 said in nRF5 Bluetooth action!:
Has anyone succeeded in programming the WT51822-S4AT module (the cheapest and tiny nrf51822 module on AliExpress) using NRF52 DK ?
Yes. Haven't had a problem.
A couple things:
- Are you powering the nRF51 module externally (separate from the nRF52DK)? It's highly advisable that you do, even though by random luck, you can sometimes succeed without it.
- Especially for new, unprogrammed modules, you need to do a bulk erase at the beginning. I do this by the d00616 trick of saying "Burn bootloader" with a null bootloader. The burning bootloader process fails, as expected, but the side-effect is that it does a bulk-erase before failing.
I know you know these things, but sometimes we forget to do what we know.
-
@Nca78
Do you have the J-Link with only 4 pins? And if so, is the module a QFAAH0? In this konstalation I have the same problem, but with the J-Link V8 and ST-Link V2, the module can be programmed without any problem.
-
@Nca78
Also, what board type in the arduino IDE are you using to program it? That could be throwing you off as well.
-
@neverdie said in nRF5 Bluetooth action!:
- Especially for new, unprogrammed modules, you need to do a bulk erase at the beginning. I do this by the d00616 trick of saying "Burn bootloader" with a null bootloader. The burning bootloader process fails, as expected, but the side-effect is that it does a bulk-erase before failing.
if bulk erase is needed, then it means it was programmed
 a fresh new mcu is usually not programmed unless you ask for it to the manufacturer..
Like said above, it could be a problem with module, power issue, usb & cable, dupont cable, jlink, jlink setup, arduino core etc.
-
@neverdie said in nRF5 Bluetooth action!:
- Are you powering the nRF51 module externally (separate from the nRF52DK)? It's highly advisable that you do, even though by random luck, you can sometimes succeed without it.
I was at the beginning, but after that I tried with power from the DK. I will try again with external power.
- Especially for new, unprogrammed modules, you need to do a bulk erase at the beginning. I do this by the d00616 trick of saying "Burn bootloader" with a null bootloader. The burning bootloader process fails, as expected, but the side-effect is that it does a bulk-erase before failing.
I can't even reach that step, JLink can't establish the SWD connection so there's no way to erase the chip.
-
@nca78 said in nRF5 Bluetooth action!:
I was at the beginning, but after that I tried with power from the DK. I will try again with external power.
I use a battery pack with a 3.3v regulator as the external power source. Don't just use 2xAA. If the voltage is too low, it will fail to program.
-
@scalz said in nRF5 Bluetooth action!:
if bulk erase is needed, then it means it was programmed a fresh new mcu is usually not programmed unless you ask for it to the manufacturer..
Well, you would think so, and yet it seems I always need to do it anyway on a new module. Go figure.
-
@sarg666 said in nRF5 Bluetooth action!:
Do you have the J-Link with only 4 pins? And if so, is the module a QFAAH0? In this konstalation I have the same problem, but with the J-Link V8 and ST-Link V2, the module can be programmed without any problem.
I use the JLink included on the NRF52DK.
@scalz said in nRF5 Bluetooth action!:
if bulk erase is needed, then it means it was programmed
 a fresh new mcu is usually not programmed unless you ask for it to the manufacturer..
No because the <3$ modules are made to be controlled with an external MCU using serial commands, the same way than ESP8266 for Wifi, so they have a firmware installed.
-
For those interested, only 2.55$ for the CDEByte NRF52832 modules

[edit] Limited to 2 / customer, but you can buy 2 more in the other CDEByte store here

https://www.aliexpress.com/store/product/CDEBYTE-E73-2G4M04S-BLE-4-2-5-0-long-distance-100m-2-4GHz-SMD-ARM-Core/2077046_32820692238.html
-
@NeverDie @Nca78
then buy a fresh mcu on Mouser and you'll see by yourself
You don't get what I meant, I'm not talking about a specific module design, but in general. the mcu can be accessed by jlink no matter, else how would you program it in first place ..
-
@scalz said in nRF5 Bluetooth action!:
@NeverDie @Nca78
then buy a fresh mcu on Mouser and you'll see by yourself etc
You don't get what I meant, I'm not talking about a specific module design, but in general. the mcu can be accessed by jlink no matter, else how would you program it in first place ..Yes, but when there's a firmware it can be locked, so you must unlock it and erase it to remove softdevice and be able to write something.
-
@nca78 said in nRF5 Bluetooth action!:
I tried with power from the DK.
I don't know why, but I seem to recollect that doing it that way may confuse it. Otherwise, I don't know how I would have ended up using a battery pack instead.
-
@nca78 said in nRF5 Bluetooth action!:
@scalz said in nRF5 Bluetooth action!:
@NeverDie @Nca78
then buy a fresh mcu on Mouser and you'll see by yourself etc
You don't get what I meant, I'm not talking about a specific module design, but in general. the mcu can be accessed by jlink no matter, else how would you program it in first place ..Yes, but when there's a firmware it can be locked, so you must unlock it and erase it to remove softdevice and be able to write something.
are you sure it's locked? I thought neverdie suggested to erase it with jlink.
well, you should choose a better module than funky design modules.. just my opinion, for saving?? 2bucks!
-
@scalz Well, what do you think he should use instead? Bare chips? That's not as easy to solder.
-
By the way, any update as to when Nordic will be shipping final silicon on the nRF52840? Seems overdue. I just checked Digikey, and still all they have are the ancient PDK's.
-
@scalz said in nRF5 Bluetooth action!:
well, you should choose a better module than funky design modules.. just my opinion, for saving?? 2bucks!
Well I was about to complain about my limited choice on Arrow (others ask 75$ shipping
 ), but after checking (again) I see that Arrow now has the Fanstel modules, so I have no reason to complain anymore
Too bad the BT832F is not in stock, but BT832 at 4.6$ is great, with the XE version in the gateway to compensate the lower range.
-
@neverdie said in nRF5 Bluetooth action!:
@scalz Well, what do you think he should use instead? Bare chips? That's not as easy to solder.
Frankly, I'm lazy answering to this question, same for technical stuff. sometimes I feel people miss what I'm trying to explain even if they haven't xp, and I keep repeating it... And the same for my designs, I'm wondering if it's worth the effort when i hear people trying to save 2-5bucks (not rewarding for time&money spent, not asking money btw), or want to reinvent cheaper&less quality variants (why not teamworking, not interested in infinite challenge, waste money&time) or complaining it's too hard to solder, did you read my many redondant advice in the forum, I don't handsolder tiny dfn, I reflow them, far far easier&quicker.
So that's settled, this is why I delayed my releases, until i change my mind, and I'm playing with software.
Sorry I don't want to look pedantic, not targeted against you especially, just tired
@Nca78 cool
-
@scalz For comparison, I feel like the nRF24L01 is also pretty much a waste of time, given that better performing alternatives exist, and yet it's the most popular radio on the mysensors forum, possibly because it's so cheap and easy to wire up.
You have unusually high skills. A lot of people on this forum just want a list of throughole parts from Aliexpress that they can connect together using dupont wires. So, there's quite a range of skill levels. The biggest barrier I see is people not wanting to hand solder (let alone reflow) SMD parts onto a custom PCB. I think that's partly why the openhardware thing hasn't gotten much traction.
-
@scalz said in nRF5 Bluetooth action!:
@neverdie said in nRF5 Bluetooth action!:
@scalz Well, what do you think he should use instead? Bare chips? That's not as easy to solder.
Frankly, I'm lazy answering to this question, same for technical stuff. sometimes I feel people miss what I'm trying to explain even if they haven't xp, and I keep repeating it... And the same for my designs, I'm wondering if it's worth the effort when i hear people trying to save 2-5bucks (not rewarding for time&money spent, not asking money btw), or want to reinvent cheaper&less quality variants (why not teamworking, not interested in infinite challenge, waste money&time) or complaining it's too hard to solder, did you read my many redondant advice in the forum, I don't handsolder tiny dfn, I reflow them, far far easier&quicker.
So that's settled, this is why I delayed my releases, until i change my mind, and I'm playing with software.
Sorry I don't want to look pedantic, not targeted against you especially, just tired
Reflow is nice and easy when you know how to do it, but not everyone has the space and money for it, and is willing to spend the necessary time to learn how to do it well. You need oven (that you usually need to modify), you need to buy stencils, you need to buy solder paste and keep it fresh in a separate fridge if you don't want to intoxicate your family when putting it in the kitchen fridge, you need to test/tune the process etc etc It's not for everyone. I tried, I have bought a hotplate (oven is too big and too expensive) and hot air gun, I ordered stencils to make some tests, but I can't get decent quality solder paste. Local shops sold me stuff that was way too old, when it comes from AliExpress it's low quality and it spent weeks at 30+ degrees, at Arrows it's either 50-100$ (that will end mostly wasted because I have no space for dedicated fridge), unavailable (maker paste) or "hazmat" so only sent by ground meaning not available for me. Life is hard

About the price I dont think everyone is ready to sacrifice quality to save a few $, I see people buying NModule PCBs at 25$ or more through openhardware.io for example, when they could buy much cheaper when ordering directly. I don't think those people will cry if components on a board cost 15-20$ instead of 10-15 but offer better range or reliability, lower power consumption etc.
About the "funky modules", yes they are not high quality but they still do the job (and way better than atmega + nrf24 clone), and when I first bought them I had no good alternative to get such a compact module, I would have bought them even if more expensive because compact modules on AliExpress or Ebay were either much bigger or with chip antenna, Arrow only had a Rigado module with LGA pins and other reputable shops have rip off shipping costs. Now I see Fanstel modules nearly as small, with better quality, FCC registration, low EMI etc etc at Arrow it would be stupid to continue, so of course I will not buy them anymore and redesign my board for the Fanstel. And if I make it public then I can provide a reliable source for the module, everyone can order from them with no shipping costs and 100% reliability. Way worth the few extra $.
And it's not always about reinventing things, it's about making things yourself and learning, too. I want to learn about ARM processors, bluetooth etc so to avoid having to learn anything at the same time I leave the reflowing, antenna tuning etc aside at the moment and use modules. If in the middle of this process I make a board that people with basic soldering skills can make themselves then how is it negative ? Those who take the MySensors hobby seriously will still favor your board because of the top notch quality and components used, there will also be a bunch of people interested in the complete board, but I think it's also great if people with lower technical skills but thirst for DIY can have something, too, even if "lower quality". Of course that won't be my "22" board, that's why I was thinking about a "33" version with more space to put bigger components (big SMDs or sensor breakout boards) and extension via MySX connector. Not sure if I will ever make it, and I hope it's not part of what is making you lose your motivation to release AEOS, because I'm waiting for it and it would be a good occasion to retry reflow soldering

-
@nca78 said in nRF5 Bluetooth action!:
you need to buy solder paste and keep it fresh in a separate fridge if you don't want to intoxicate your family when putting it in the kitchen fridge
Yikes! I didn't know there was a risk of that happening.
-
@neverdie said in nRF5 Bluetooth action!:
@nca78 said in nRF5 Bluetooth action!:
you need to buy solder paste and keep it fresh in a separate fridge if you don't want to intoxicate your family when putting it in the kitchen fridge
Yikes! I didn't know there was a risk of that happening.
Well it's probably not a real problem, but I don't want to take risks with my 4yo chidren.
-
I do think a lot of people really underestimate the toxicity of getting solder paste onto their hands. I always use disposable neoprene gloves when handling it, and try to throw away anything that comes into contact with it. You definitely don't want to run the risk of unintentionally ingesting that stuff. AFAIK, the neurotoxicity is permanent damage.
-
By the way, I never got to the point where reflow was "nice and easy" with tiny pad chips. But that's just me. Operator error, I'm sure. It ended up taking so long to get a good outcome that I just decided it wasn't worth the time. Maybe I'll revisit it at a future date.
Anyway, everyone has their limits. I mean reflowing the gazillion tiny components on a HopeRF module, for instance. That doesn't look easy to me, even if I knew what I was doing.
@scalz Anyway, it's great that you are doing it. You're an inspiration for us all.
-
@Nca78
Here's the board settings that I use:
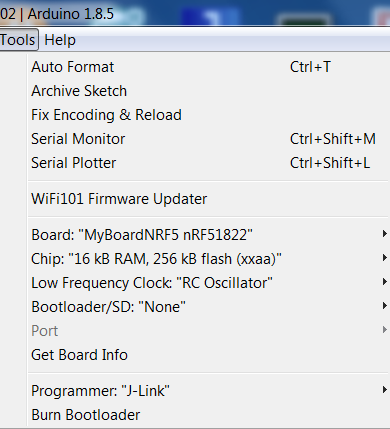
-
Like NeverDie I am also having some trouble getting started with the NRF5 programming.
Here is my setup:
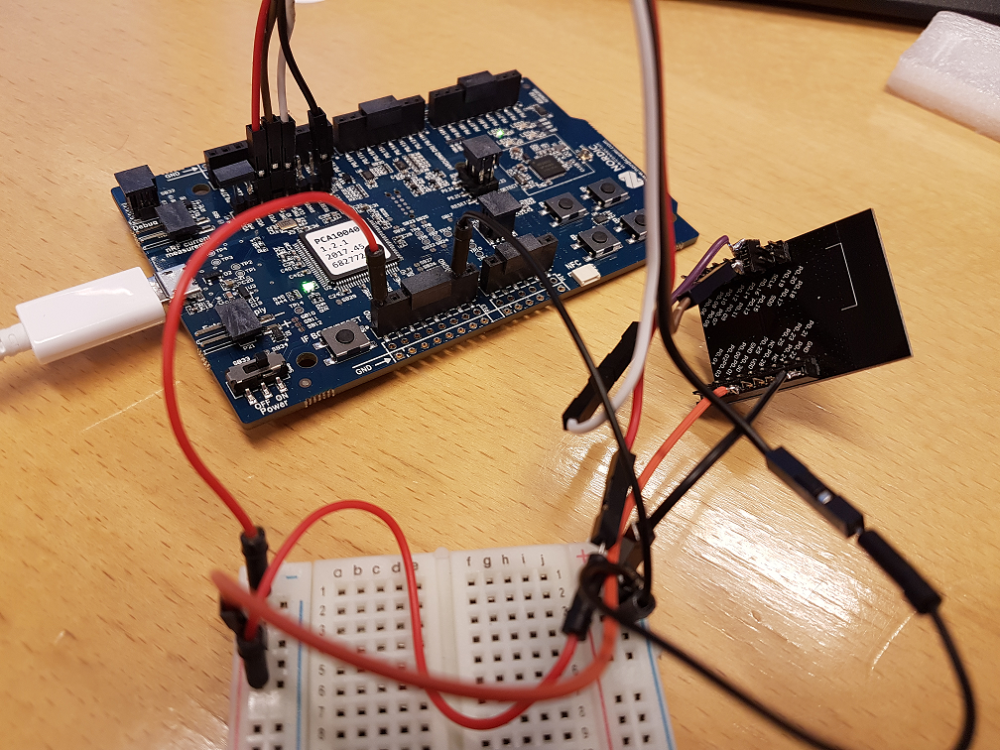
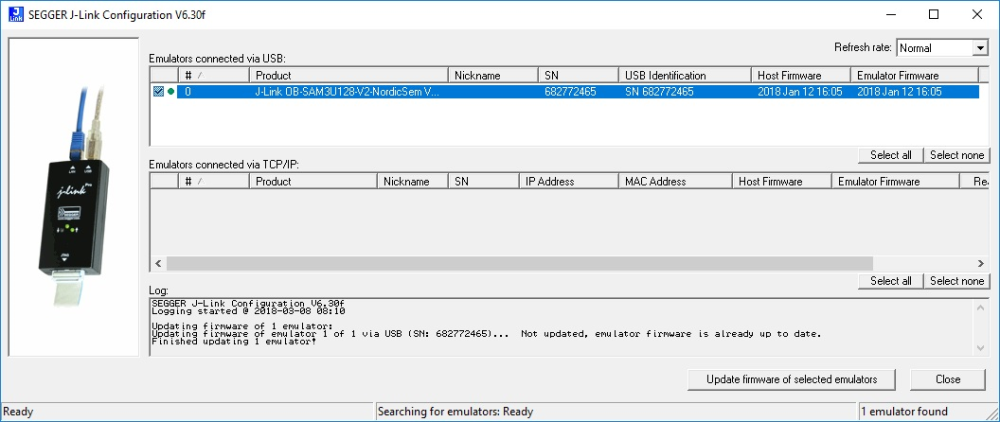
The problem "No valid JTAG Interface Configured":
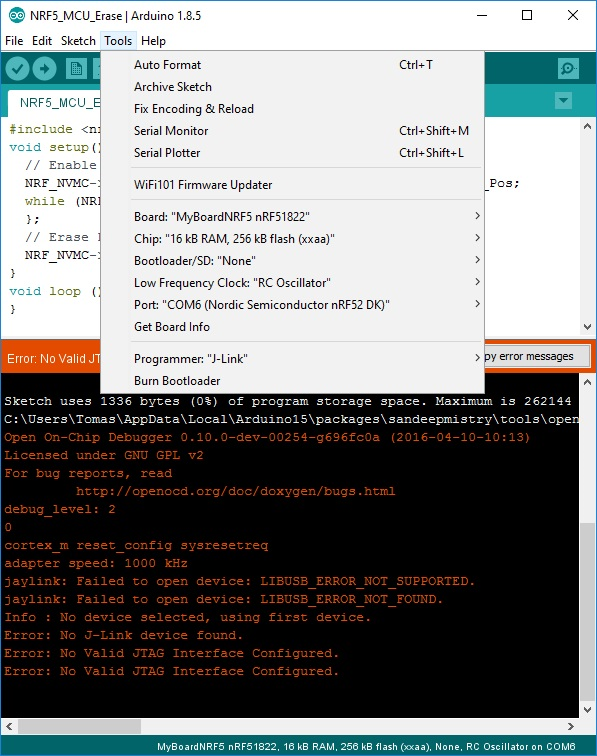
Did I miss some step to configure the J-Link somewhere?
-
I've always used the IDC connector. I'm not sure that it works if you don't.
-
@korttoma I have the same problem with the official jlink drivers. So I drag/drop the hex file from output directory to the Jlink drive at the moment.
-
@nca78
 that worked! thank you thank you thank you!
My first NFR5 node is ALIVE!
-
@neverdie said in nRF5 Bluetooth action!:
I've always used the IDC connector.
i.e. the 10-pin connector.
-
@neverdie thank you for pointing to the power problem. I had one jumper left for my adapter to connect GND to GND and "as usual" it had a contact problem, I just replaced it and I can see the module in nRFgo Studio, even without external power.
-
Question;
I've been using the Ebyte modules and I'm making progress. But somehow the energy consumption is far too much. 11,7 mA when I use a clean sketch with hwSleep().
When I change to "Normal" Sleep() I get 0.1mA.
which one should be the right one to use, keeping in mind, I would like to wake up from an interrupt.
-
@omemanti sleep. See https://www.mysensors.org/download/sensor_api_20#sleeping for details.
-
@Mika what is your experience regarding battery consumption on these?
I put together a sketch witch seems to work fine but one CR2032 just lasts a couple of days.
Sketch:
/**
 * The MySensors Arduino library handles the wireless radio link and protocol
 * between your home built sensors/actuators and HA controller of choice.
 * The sensors forms a self healing radio network with optional repeaters. Each
 * repeater and gateway builds a routing tables in EEPROM which keeps track of the
 * network topology allowing messages to be routed to nodes.
 *
 * Created by Henrik Ekblad <henrik.ekblad@mysensors.org>
 * Copyright (C) 2013-2015 Sensnology AB
 * Full contributor list: https://github.com/mysensors/Arduino/graphs/contributors
 *
 * Documentation: http://www.mysensors.org
 * Support Forum: http://forum.mysensors.org
 *
 * This program is free software; you can redistribute it and/or
 * modify it under the terms of the GNU General Public License
 * version 2 as published by the Free Software Foundation.
 *
 *******************************
 */

// Enable debug prints to serial monitor
//#define MY_DEBUG

// Define a static node address, remove if you want auto address assignment
//#define MY_NODE_ID 26                                                          // Kök
#define MY_NODE_ID 27                                                          // Test device


// Enable and select radio type attached

#define MY_RADIO_NRF5_ESB

#include <MySensors.h>

#define SN "NRF5 Scene"
#define SV "1.0"

#define CHILD_ID_SCENE 1

// PIN for the buttons
byte buttonOne = 28;

//Bounce debouncer[NUMBUTTONS];
int buttonOneoldValue;


// Pin definitions
#define DIGITAL_INPUT_INT 28   // The digital input you attached your interrupt  (Only 2 and 3 generates interrupt!)


// Sensor messages
MyMessage msgOn(CHILD_ID_SCENE, V_SCENE_ON);

// Global settings
uint16_t SceneOne = 0;
uint16_t SceneTwo = 1;


void blinkityBlink(uint8_t repetitions) {
  for (int x=0;x<repetitions;x++) {
    digitalWrite(LED_BUILTIN,HIGH);
    wait(20);
    digitalWrite(LED_BUILTIN,LOW);
    wait(100);
    digitalWrite(LED_BUILTIN,HIGH);
    wait(20);
    digitalWrite(LED_BUILTIN,LOW);
    if (x<(repetitions-1)) {  //skip waiting at the end of the final repetition
      wait(500);
    }
  }
}


/****************************************************
 *
 * Setup code
 *
 ****************************************************/

void setup() {

  hwPinMode(LED_BUILTIN,OUTPUT_D0H1);
  blinkityBlink(2);  //signify power-up and start of operations

  NRF_CLOCK->INTENSET=B11;  //enable interrupts for EVENTS_HFCLKSTARTED and  EVENTS_LFCLKSTARTED
  NRF_CLOCK->TASKS_HFCLKSTART=1;  //start the high frequency crystal oscillator clock
  while (!(NRF_CLOCK->EVENTS_HFCLKSTARTED)) {} //wait until high frequency crystal oscillator clock is up to speed and working

  hwPinMode(DIGITAL_INPUT_INT, INPUT_PULLUP);

    /// Make input & enable pull-up resistors on switch pins
  hwPinMode(buttonOne, INPUT_PULLUP);
  buttonOneoldValue = -1;


  sendBattLevel();


}

void presentation()  {
  sendSketchInfo(SN, SV);
  //present the scene controller to gateway
  wait(10);
  present(CHILD_ID_SCENE, S_SCENE_CONTROLLER);

  wait(10);
}


/***********************************************
 *
 *  Main loop function
 *
 ***********************************************/
void loop() {

  // Check for button activity

  int value = digitalRead(buttonOne);

  if (value != buttonOneoldValue)
    {
      // Send in the new value
      if (value == LOW)
      {
        send(msgOn.set(SceneOne));

        wait(20);

        send(msgOn.set(SceneTwo));

        sendBattLevel();


      }
      buttonOneoldValue = value;
    }

  sleep(digitalPinToInterrupt(DIGITAL_INPUT_INT), CHANGE, 0);

}


/********************************************
 *
 * Sends battery information (battery percentage)
 *
 * Parameters
 * - force : Forces transmission of a value
 *
 *******************************************/
void sendBattLevel()
{
    long vcc = hwCPUVoltage();

    // Calculate percentage

    vcc = vcc - 1800; // subtract 1.9V from vcc, as this is the lowest voltage we will operate at

    long percent = vcc / 14.0;
    sendBatteryLevel(percent);

}
I noticed that the chip sais:
N51822
QFABC0
1646UUQFAB translates to 16kB RAM, 128kB flash and I can not even select this option in the arduino IDE. Can this be the problem?
@d00616 refer to his document for some high current consumption issue but I'm not sure what to do with the info.
Is there something wrong with my sketch or is there just an old crappy chip on the device??
-
Same result, battery out within few days, I want to do a check of current consumption, but not yet free time...
I want to try this:
https://github.com/ThingPulse/ESP8266PowerMonitor
https://thingpulse.com/2018/02/25/esp8266-monitoring-power-consumption/
-
@korttoma have you tried the code @NeverDie put together using the LPCOMP ? With a QFAAH0 (which I believe is the same version than QFABC0, but with 256K flash) he went down to something like 4µA.
From the document you link, anomaly 70, it will be necessary to add an extra wait of 36us after that line, it's strange that @NeverDie never had any problem with it. Or maybe I misunderstand the document
void activateLpComp() {
...
  while (!(NRF_LPCOMP->EVENTS_READY)) {}  //wait until ready
...
}
Test code from @NeverDie using LPCOMP is here:
https://forum.mysensors.org/topic/6961/nrf5-bluetooth-action/1307I will try it on my board (using a module with QFAAH0) tomorrow, if power consumption is as low as expected I'll try on the beacon board.
[Edit] Just checked quickly my "beacon" board and it's using a QFAAH1 chip (made in 2017), so the test might not be relevant...
-
I don't remember. I've lately been using LoRa modules, plus getting distracted by CNC, so my nRF5 work has been on hold. I'm hoping that d00616 continues to work on the software though so that more than one nRF5 interrupt can be active at a time.
-
@nca78 thanks for the hint.
I tried to merge my sketch with the code provided by @NeverDie but I can not seem to get it to detect my button and I don't quite understand where I should attach my button that is on pin 28 to the interrupt thingie.
Here is my code now:
//This sketch is applicable to Coincell Multisensor nRF51822, version 10

// Define a static node address, remove if you want auto address assignment
//#define MY_NODE_ID 26                                                          // Kök
#define MY_NODE_ID 27                                                          // Test device


// Enable and select radio type attached

#define MY_RADIO_NRF5_ESB

#define SN "NRF5 Scene"
#define SV "1.0"

#define CHILD_ID_SCENE 1

//#define MY_CORE_ONLY


#define IS_NRF51  //true iff the target is an nRF51.  If an nRF52, then comment this line out!

// PIN for the buttons
byte buttonOne = 28;

//Bounce debouncer[NUMBUTTONS];
int buttonOneoldValue;


// Pin definitions
//#define DIGITAL_INPUT_INT 28   // The digital input you attached your interrupt  (Only 2 and 3 generates interrupt!)


//#define I2C_INTERRUPT_PIN PIN_BUTTON1
//#define LEAK_DETECTION_PIN PIN_BUTTON1

#include <nrf.h>
#include <MySensors.h>

volatile bool button_pressed=false;

// Sensor messages
MyMessage msgOn(CHILD_ID_SCENE, V_SCENE_ON);

// Global settings
uint16_t SceneOne = 0;
uint16_t SceneTwo = 1;

void blinkityBlink(uint8_t pulses, uint8_t repetitions) {
  for (int x=0;x<repetitions;x++) {
    for (int i=0;i<pulses;i++) {
      digitalWrite(LED_BUILTIN,HIGH);
      wait(20);
      digitalWrite(LED_BUILTIN,LOW);
      wait(100);
    }
      wait(500);
  }
}

void disableNfc() {  //only applied to nRF52

#ifndef IS_NRF51
  //Make pins 9 and 10 usable as GPIO pins.
  NRF_NFCT->TASKS_DISABLE=1;  //disable NFC
  NRF_NVMC->CONFIG=1;  // Write enable the UICR
  NRF_UICR->NFCPINS=0; //Make pins 9 and 10 usable as GPIO pins.
  NRF_NVMC->CONFIG=0;  // Put the UICR back into read-only mode.
#endif
}


void turnOffRadio() {
  NRF_RADIO->TASKS_DISABLE=1;
  while (!(NRF_RADIO->EVENTS_DISABLED)) {}  //until radio is confirmed disabled
}

void turnOffUarte0() {
#ifndef IS_NRF51
  NRF_UARTE0->TASKS_STOPRX = 1;
  NRF_UARTE0->TASKS_STOPTX = 1;
  NRF_UARTE0->TASKS_SUSPEND = 1;
  NRF_UARTE0->ENABLE=0;  //disable UART0
  while (NRF_UARTE0->ENABLE!=0) {};  //wait until UART0 is confirmed disabled.
#endif

#ifdef IS_NRF51
  NRF_UART0->TASKS_STOPRX = 1;
  NRF_UART0->TASKS_STOPTX = 1;
  NRF_UART0->TASKS_SUSPEND = 1;
  NRF_UART0->ENABLE=0;  //disable UART0
  while (NRF_UART0->ENABLE!=0) {};  //wait until UART0 is confirmed disabled.
#endif
}

void turnOffAdc() {
#ifndef IS_NRF51
  if (NRF_SAADC->ENABLE) { //if enabled, then disable the SAADC
    NRF_SAADC->TASKS_STOP=1;
    while (NRF_SAADC->EVENTS_STOPPED) {} //wait until stopping of SAADC is confirmed
    NRF_SAADC->ENABLE=0;  //disable the SAADC
    while (NRF_SAADC->ENABLE) {} //wait until the disable is confirmed
  }
#endif
}


void turnOffHighFrequencyClock() {
    NRF_CLOCK->TASKS_HFCLKSTOP = 1;
    while ((NRF_CLOCK->HFCLKSTAT) & 0x0100) {}  //wait as long as HF clock is still running.
}


void mySleepPrepare()
{
  turnOffHighFrequencyClock();
  turnOffRadio();
  turnOffUarte0();
}


void activateLpComp() {
  //NRF_LPCOMP->PSEL=1; // monitor AIN1 (pin P0.03 on nRF52832 test board).
  //while (!(NRF_LPCOMP->PSEL==1)) {} //wait until confirmed
  NRF_LPCOMP->PSEL=3; // monitor AIN3 (pin P0.02 on nRF51822 for coincell_multisensor_v10)
  while (!(NRF_LPCOMP->PSEL==3)) {} //wait until confirmed
  NRF_LPCOMP->REFSEL=1;  // choose 1/4 VDD as the reference voltage
  while (!(NRF_LPCOMP->REFSEL==1)) {} //wait until confirmed
  NRF_LPCOMP->ANADETECT=1;  //detect UP events.
  while (NRF_LPCOMP->ANADETECT!=1) {} //wait until confirmed
  NRF_LPCOMP->INTENSET=B0100;  //Enable interrupt for UP event
  while (!(NRF_LPCOMP->INTENSET==B0100)) {} //wait until confirmed
  NRF_LPCOMP->ENABLE=1;  //Enable LPCOMP
  while (!(NRF_LPCOMP->ENABLE==1)) {} //wait until confirmed
  NRF_LPCOMP->TASKS_START=1;  //start the LPCOMP
  while (!(NRF_LPCOMP->EVENTS_READY)) {}  //wait until ready

  NVIC_SetPriority(LPCOMP_IRQn, 15);
  NVIC_ClearPendingIRQ(LPCOMP_IRQn);
  NVIC_EnableIRQ(LPCOMP_IRQn);
}

void suspendLpComp() { //suspend getting more interrupts from LPCOMP before the first interrupt can be handled
  if ((NRF_LPCOMP->ENABLE) && (NRF_LPCOMP->EVENTS_READY)) {  //if LPCOMP is enabled
    NRF_LPCOMP->INTENCLR=B0100;  //disable interrupt from LPCOMP
    while (NRF_LPCOMP->INTENCLR==B0100) {} //wait until confirmed
  }
}

void resumeLpComp() { //suspend getting interrupts from LPCOMP
  NRF_LPCOMP->INTENSET=B0100;  //Enable interrupt for UP event
  while (!(NRF_LPCOMP->INTENSET==B0100)) {} //wait until confirmed
}

/****************************************************
 *
 * Setup code
 *
 ****************************************************/

void setup() {

  hwInit();
  hwPinMode(LED_BUILTIN,OUTPUT_D0H1);
  disableNfc();
  turnOffAdc();
  activateLpComp();
  blinkityBlink(2,1);  //Signify end of setup with two quick pulses.
  mySleepPrepare();
  button_pressed=false;

  //NRF_CLOCK->INTENSET=B11;  //enable interrupts for EVENTS_HFCLKSTARTED and  EVENTS_LFCLKSTARTED
 // NRF_CLOCK->TASKS_HFCLKSTART=1;  //start the high frequency crystal oscillator clock
 // while (!(NRF_CLOCK->EVENTS_HFCLKSTARTED)) {} //wait until high frequency crystal oscillator clock is up to speed and working

  //hwPinMode(DIGITAL_INPUT_INT, INPUT_PULLUP);

    /// Make input & enable pull-up resistors on switch pins
  hwPinMode(buttonOne, INPUT_PULLUP);
  //buttonOneoldValue = -1;


  //sendBattLevel();


}

void presentation()  {
  sendSketchInfo(SN, SV);
  //present the scene controller to gateway
  wait(10);
  present(CHILD_ID_SCENE, S_SCENE_CONTROLLER);

  wait(10);
  sendBattLevel();

}

void sendBattLevel()
{
    long vcc = hwCPUVoltage();

    // Calculate percentage

    vcc = vcc - 1800; // subtract 1.9V from vcc, as this is the lowest voltage we will operate at

    long percent = vcc / 14.0;
    sendBatteryLevel(percent);

}

void loop() {

  sleep(10000);  //sleep for 5 seconds.
  mySleepPrepare();  //An ounce of prevention: Turn-off HF clock, etc, ASAP to save power, just in case the library's sleep() routine resumed them.
  if (button_pressed) {   //if a leak is detected
    suspendLpComp(); //suspend LPCOMP to prevent multiple interrupts
    //blinkityBlink(10,3);  //blink a lot to show that a leak was detected.
    send(msgOn.set(SceneOne));

        wait(20);

        send(msgOn.set(SceneTwo));

        sendBattLevel();
    button_pressed=false;  //Clear the semaphore
    NRF_LPCOMP->EVENTS_UP=0;  //Clear the semaphore
    resumeLpComp();  //operations of LPCOMP were suspended after detecting the LPCOMP iterrupt
  }
  else {
    blinkityBlink(1,1);  //otherwise, just one short blink to indicate the wakeup was scheduled by the RTC
  }
}


// * Reset events and read back on nRF52
//* http://infocenter.nordicsemi.com/pdf/nRF52_Series_Migration_v1.0.pdf

#if __CORTEX_M == 0x04
#define NRF5_RESET_EVENT(event)                                                 \
        event = 0;                                                                   \
        (void)event
#else
#define NRF5_RESET_EVENT(event) event = 0
#endif


// This must be in one line
extern "C" { void LPCOMP_IRQHandler(void) {button_pressed=true; NRF5_RESET_EVENT(NRF_LPCOMP->EVENTS_UP); NRF_LPCOMP->EVENTS_UP=0; MY_HW_RTC->CC[0]=(MY_HW_RTC->COUNTER+2);}}
I thought that I should do it like this:
void activateLpComp() {
   NRF_LPCOMP->PSEL=28; // monitor AIN3 (pin P0.02 on nRF51822 for coincell_multisensor_v10)
  while (!(NRF_LPCOMP->PSEL==28)) {} //wait until confirmed
But then it does not seem to run the loop anymore because I do not get the 10s blink.
-
Guys, help me understand: when do I need to enable DC-DC?
My breakout board consists of Ebyte module and a couple of buttons. Battery is CR2450 directly connected to the module.
Do I need DC-DC?
-
@toyman With DC-DC, it uses roughly half the current during Tx and Rx. Seems like a no brainer to me, but you don't literally "need" to have it. I'm not aware of any downsides to it.
-
@neverdie thx. What is needed hardware-wise? Two inductors between dc and dec4? Like in your breakout board?
-
@toyman Correct. You can review the schematic for this project: https://www.openhardware.io/view/472/Ebyte-nRF52832-Prototyping-Board
-
I guess this is why I cant get LPCOMP to work on the device.
Eight input options (AIN0 to AIN7)I would have to use the analog inputs because pin 28 is just a general purpose I/O pin.
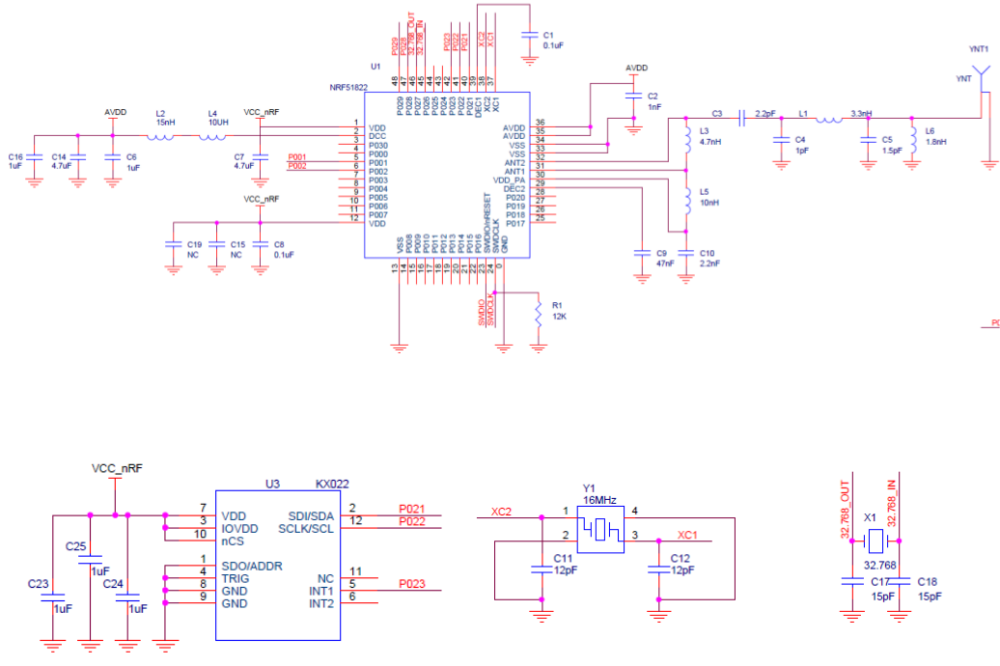
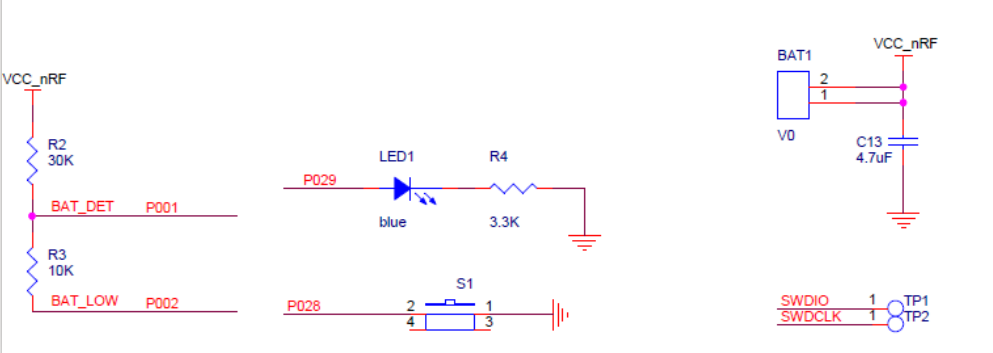
-
ebyte module is currently on sale at roughly $2.5
Total bargain!
-
@korttoma using MySensors NRF5 boards you should be able to assign one AINx pin to physical pin 28.
The index you need to put in the code is the AIN index not the pin number.
Suggested Topics
-
Welcome
Announcements • • hek