Skip to content
  • MySensors
  • OpenHardware.io
  • Categories
  • Recent
  • Tags
  • Popular
Skins
  • Light
  • Brite
  • Cerulean
  • Cosmo
  • Flatly
  • Journal
  • Litera
  • Lumen
  • Lux
  • Materia
  • Minty
  • Morph
  • Pulse
  • Sandstone
  • Simplex
  • Sketchy
  • Spacelab
  • United
  • Yeti
  • Zephyr
  • Dark
  • Cyborg
  • Darkly
  • Quartz
  • Slate
  • Solar
  • Superhero
  • Vapor

  • Default (No Skin)
  • No Skin
Collapse
Brand Logo
tekkaT

tekka

@tekka
Admin
About
Posts
834
Topics
14
Shares
0
Groups
5
Followers
30
Following
0

Posts

Recent Best Controversial

  • MySensors 2.3.2 released
    tekkaT tekka

    Yet another early holiday gift, MySensors 2.3.2 has finally been released!

    Highlights

    • Add support for RPI4
    • Transport and crypto HAL update
    • Rename "soft ack" to echo
    • Add log parser
    • RF24 improvements

    ...and many other bug fixes and tweaks

    Release notes and changelog: https://github.com/mysensors/MySensors/releases/tag/2.3.2

    Important information:

    If you encounter compilation issues, update your board definitions:

    • AVR 1.8.2
    • ESP8266 2.6.2
    • ESP32 1.0.4
    • SAMD 1.8.4
    • nRF5 0.6.0 (Sandeep Mistry)
    • STM32F1 2019.12.8 (stm32duino)

    Special thanks to the following people who have contributed code to this release:

    • Alfredo
    • desander
    • hannesweisbach
    • ltigges
    • Mikael Falkvidd
    • Patrick Fallberg
    • pragtich
    • Rik Jansen
    • tekka
    • Yveaux

    ...and a little teaser: 2.4 will come with a set of new features some of you have been waiting for... stay tuned :)

    Announcements

  • Windows GUI/Controller for MySensors
    tekkaT tekka

    Hi all,

    I've been working on this project since some time, basically it's a GUI for controlling/updating/debugging a network of MySensors nodes. OTA functionality is supported via MYSBootloader - read posts for further instructions/troubleshooting or PM.

    link updated: MYSController Version 1.0.0.3316 released

    New features:

    • support OTA FW update Sensebender board
    • metric/imperial system I_CONFIG
    • save nodes

    Update via update button in MYSController or download here.

    MYSController_0_1_2_282.png

    Controllers myscontroller mysbootloader

  • MySensors 2.1.0 Released
    tekkaT tekka

    :star2: We are happy to announce the release of MySensors 2.1.0! :loudspeaker:

    Major changes:

    • Bug fixes and lots of improvements under the hood
    • Added support for Raspberry Pi
    • New transport layer: RFM95 (LoRa mode)
    • Improved transport layer debug messages, see here.

    For additional release notes, see here.
    Documentation can be found here.

    :tada: Happy New Year 2017! Have lots of fun and stay tuned for new features coming... :smile:

    Announcements

  • Something's cooking in the MySensors labs...
    tekkaT tekka

    20200501_181009.jpg

    Sensbender, Janus, and HALO - they all support multiple RF modules, but the MySensors framework doesn't...until now :)

    Example of a dualRF Sensebender serial gateway configuration - as simple as that:

    #define MY_GATEWAY_SERIAL
    
    #define MY_RADIO_RF24
    #define MY_RADIO_RFM69
    #define MY_RFM69_NEW_DRIVER // required for multitransport
    
    // optional (but recommended)
    #define MY_RF24_USE_INTERRUPTS
    

    Some of the new features:

    • multiple transports with RX queue
    • GW does radio-specific routing, however, the network is still limited to 254 nodes
    • RFM95 radio driver can run in RFM69 compatibility mode

    This is still WIP (and will be for a while) but you can already get your hands dirty and test the PR.

    Kudos to @scalz (Janus and HALO) and @tbowmo (Sensebender) for their cool boards!

    Have fun!

    https://github.com/mysensors/MySensors/pull/1414

    Announcements

  • MYSBootloader 1.3 pre-release & MYSController 1.0.0beta
    tekkaT tekka

    Hi all,
    Here is the first public pre-release of MYSBootloader 1.3 together with MYSController 1.0.0beta for testing purposes.

    Download here. Thanks for your feedback.

    MYSBootloader 1.3pre (1.3NS)

    • requires dev branch 2.0.0 (lib 1.5 not tested)
    • supports OTA FW AND serial FW updates
    • no external flash needed for OTA FW updates (thus, offline update)
    • bootloader commands (clear eeprom, re-assign ID, re-assign parent ID)
    • communicates via assigned parent node (if found)
    • 2kb bootloader size
    • source code will be published to repo once final

    upcoming bootloader release (1.3S):

    • secure bootloader (singing and locking feature)
    • 4kb bootloader size

    Attached bootloader file, compiled with these settings:

    • nRF24 (Channel 76, base address 0xA8A8E1FC00, data rate 250kbs)
    • 115200 baud (16Mhz) or 57600 (8Mhz)

    MYSBootloader 1.0.0beta

    • requires dev branch 2.0.0 (lib 1.5 not tested)
    • RX only mode
    • GW mode: Relay traffic to server socket
    • I_VERSION handling
    • I_DISCOVER
    • add node & sensor ID
    • node persistence
    • lots of improvements

    Flashing MYSBootloader using Arduino IDE and USBasp:

    1. Add these lines to the boards.txt file in your Arduino IDE installation folder

    ######## settings for ext XTAL 16Mhz, EESAVE, BOD1V8, no lock
    proMYSBL16.name=ATmega328 external 16Mhz with MYSBootloader
    proMYSBL16.upload.tool=avrdude
    proMYSBL16.upload.protocol=arduino
    proMYSBL16.upload.maximum_size=30720
    proMYSBL16.upload.maximum_data_size=2048
    proMYSBL16.upload.speed=115200
    proMYSBL16.bootloader.tool=avrdude
    proMYSBL16.bootloader.low_fuses=0xFF
    proMYSBL16.bootloader.high_fuses=0xD2
    proMYSBL16.bootloader.extended_fuses=0x06
    proMYSBL16.bootloader.unlock_bits=0x3F
    proMYSBL16.bootloader.lock_bits=0x3F
    proMYSBL16.bootloader.file=MySensors/MYSBootloaderV13pre.hex
    proMYSBL16.build.mcu=atmega328p
    proMYSBL16.build.f_cpu=16000000L
    proMYSBL16.build.board=AVR_UNO
    proMYSBL16.build.core=arduino
    proMYSBL16.build.variant=standard

    ######## settings for 8Mhz internal clock, EESAVE, BOD1V8, no lock
    proMYSBL8.name=ATmega328 internal 8Mhz with MYSBootloader
    proMYSBL8.upload.tool=avrdude
    proMYSBL8.upload.protocol=arduino
    proMYSBL8.upload.maximum_size=30720
    proMYSBL8.upload.maximum_data_size=2048
    proMYSBL8.upload.speed=57600
    proMYSBL8.bootloader.tool=avrdude
    proMYSBL8.bootloader.low_fuses=0xE2
    proMYSBL8.bootloader.high_fuses=0xD2
    proMYSBL8.bootloader.extended_fuses=0x06
    proMYSBL8.bootloader.unlock_bits=0x3F
    proMYSBL8.bootloader.lock_bits=0x3F
    proMYSBL8.bootloader.file=MySensors/MYSBootloaderV13pre.hex
    proMYSBL8.build.mcu=atmega328p
    proMYSBL8.build.f_cpu=8000000L
    proMYSBL8.build.board=AVR_UNO
    proMYSBL8.build.core=arduino
    proMYSBL8.build.variant=standard

    1. Copy MYSBootloaderV13pre.hex (from MYSController/Bootloader folder) to the [Arduino IDE installation folder]/hardware/arduino/avr/bootloaders/MySensors/
    2. Restart Arduino IDE, choose under Tools | Board | ATmega328 external 16Mhz with MYSBootloader or Tools | Board | ATmega328 internal 8Mhz with MYSBootloader depending on your HW settings
    3. Connect USBasp to sensor node and select Tools | Programmer | USBasp and hit "Burn Bootloader"

    Please use the AVR fuse calculator to retrieve the individual fuse settings. If you need to change frequency, BOD or other settings, change the fuse settings based on the fuse calculator.

    OTA FW updates using MYSController:

    1. Start MYSController, hit config and adjust settings (COM-Port & baud or IP address:port)
    2. Hit connect: Connection to gateway should be established (gateway answers with gateway ready message), the node should appear and request an ID & FW.
    3. Right-mouse click on that node, select assign FW, choose for example TimeReporter (demo firmware included in the MYSController/Firmware folder). Then click reboot and wait until FW is uploaded and node boots.
      TimeReporter firmware reports every few seconds some values such as time, millis, and voltage.

    Custom firmware: compile your sketch and retrieve the generated .hex file (activate verbose mode in the Arduino IDE to get compiler messages and output path).

    Copy .hex file to MYSController/Firmware folder and edit firmware_config.csv file according to the existing lines.

    Hit "Refresh Repo" in MYSController and the newly copied firmware should appear in the Assign FW dropdown list, ready to be uploaded.

    Development ota myscontroller mysbootloader

  • New nRF24 driver in MySensors 2.0.0
    tekkaT tekka

    MySensors 2.0.0 will feature a refactored nRF24 driver having:

    • reduced code size (-2kb)
    • two-fold speed increase (processing)
    • fewer register writing/polling
    • fully defined init state
    • SPI transactions

    Please feel free to test MySensors 2.0.0-beta and provide feedback if you encounter any issues.

    Announcements mysensors 2.0.0 nrf24

  • Introducing MySensors on nRF24LE1
    tekkaT tekka

    First impression of MySensors running on nRF24LE1. Reporting temperature / humidity from DHT22, VCC voltage and millis() timer.

    This SoC has many interesting features (SPI, 2-Wire, Serial, GPIO, ADC, RNG, AES accelerator, etc. ) and sub uA sleeping modes - without the need to solder a RF module. However, flash size limited to 16kB - still more than enough for many (peripheral) sensors... :)

    20150810_nRF24LE1_DHT22.jpg

    Readings in MYSController:

    20150810_nRF24LE1.png

    Compiling with SDCC and nRF24LE1 SDK.
    Source (Proof of concept/POC, non-optimized) here.

    My Project myscontroller nrf24le1 soc

  • MYSBootloader 1.3pre2 testing
    tekkaT tekka

    Hi all,
    Here is the second pre-release of MYSBootloader 1.3 for testing purposes.

    Download here. Thanks for your feedback.

    MYSBootloader 1.3pre2 (1.3NS)

    • requires MySensors 2.0.x
    • supports OTA FW AND serial FW updates
    • no external flash needed for OTA FW updates (thus, offline update)
    • communicates via assigned parent node (if found)
    • 2kb bootloader size
    • bootloader commands removed (size constraints, STK500 code instead)
    • nRF24 (Channel 76, base address 0xA8A8E1FC00, data rate 250kbs)
    • serial uploads: 115200 baud (16Mhz), 38400 (8Mhz) or 9600 (1Mhz)

    Using Arduino IDE 1.6.12:

    Add these lines (or copy from included add_to_boards.txt file) to the boards.txt file in your Arduino IDE installation folder:

    
    ##############################################################
    
    MYSBL13.name=ATmega328 with MYSBootloader
    
    MYSBL13.upload.tool=avrdude
    MYSBL13.upload.protocol=arduino
    
    MYSBL13.bootloader.tool=avrdude
    MYSBL13.bootloader.unlock_bits=0x3F
    MYSBL13.bootloader.lock_bits=0x0F
    
    MYSBL13.build.mcu=atmega328p
    MYSBL13.build.board=AVR_PRO
    MYSBL13.build.core=arduino
    MYSBL13.build.variant=standard
    
    ## Arduino with MYSBootloader 1.3pre
    ## -------------------------------------------------
    MYSBL13.menu.cpu.16MHzatmega328=ATmega328 16MHz (XTAL, BOD1V8)
    MYSBL13.menu.cpu.16MHzatmega328.upload.maximum_size=30720
    MYSBL13.menu.cpu.16MHzatmega328.upload.maximum_data_size=2048
    MYSBL13.menu.cpu.16MHzatmega328.upload.speed=115200
    MYSBL13.menu.cpu.16MHzatmega328.bootloader.low_fuses=0xFF
    MYSBL13.menu.cpu.16MHzatmega328.bootloader.high_fuses=0xDA
    MYSBL13.menu.cpu.16MHzatmega328.bootloader.extended_fuses=0x06
    MYSBL13.menu.cpu.16MHzatmega328.bootloader.file=MYSBootloader/MYSBL13pre_atmega328_16Mhz.hex
    MYSBL13.menu.cpu.16MHzatmega328.build.mcu=atmega328p
    MYSBL13.menu.cpu.16MHzatmega328.build.f_cpu=16000000L
    
    MYSBL13.menu.cpu.8MHzatmega328=ATmega328 8MHz (RC, BOD1V8)
    MYSBL13.menu.cpu.8MHzatmega328.upload.maximum_size=30720
    MYSBL13.menu.cpu.8MHzatmega328.upload.maximum_data_size=2048
    MYSBL13.menu.cpu.8MHzatmega328.upload.speed=38400
    MYSBL13.menu.cpu.8MHzatmega328.bootloader.low_fuses=0xE2
    MYSBL13.menu.cpu.8MHzatmega328.bootloader.high_fuses=0xDA
    MYSBL13.menu.cpu.8MHzatmega328.bootloader.extended_fuses=0x06
    MYSBL13.menu.cpu.8MHzatmega328.bootloader.file=MYSBootloader/MYSBL13pre_atmega328_8Mhz.hex
    MYSBL13.menu.cpu.8MHzatmega328.build.mcu=atmega328p
    MYSBL13.menu.cpu.8MHzatmega328.build.f_cpu=8000000L
    
    MYSBL13.menu.cpu.1MHzatmega328=ATmega328 1MHz (RC/8, BOD1V8)
    MYSBL13.menu.cpu.1MHzatmega328.upload.maximum_size=30720
    MYSBL13.menu.cpu.1MHzatmega328.upload.maximum_data_size=2048
    MYSBL13.menu.cpu.1MHzatmega328.upload.speed=9600
    MYSBL13.menu.cpu.1MHzatmega328.bootloader.low_fuses=0x62
    MYSBL13.menu.cpu.1MHzatmega328.bootloader.high_fuses=0xDA
    MYSBL13.menu.cpu.1MHzatmega328.bootloader.extended_fuses=0x06
    MYSBL13.menu.cpu.1MHzatmega328.bootloader.file=MYSBootloader/MYSBL13pre_atmega328_1Mhz.hex
    MYSBL13.menu.cpu.1MHzatmega328.build.mcu=atmega328p
    MYSBL13.menu.cpu.1MHzatmega328.build.f_cpu=1000000L
    
    ##############################################################
    

    Please read this excellent guide written by @scalz about MySensors OTA programming.

    In brief:

    Copy bootloader *.hex files (from Bootloader folder) to the [Arduino IDE installation folder]/hardware/arduino/avr/bootloaders/MYSBootloader/

    Restart Arduino IDE, choose under Tools | Board | ATmega328 with MYSBootloader |, select correct board under Processor tab. Connect USBasp to sensor node and select Tools | Programmer | USBasp and hit "Burn Bootloader"
    Please use the AVR fuse calculator to retrieve the individual fuse settings. If you need to change frequency, BOD or other settings, change the fuse settings based on the fuse calculator.

    OTA FW updates using MYSController 3315 (included) (refer to @scalz's guide):

    Copy Arduino FW .hex file to MYSController/Firmware folder and edit firmware_config.csv file according to the existing lines.

    Hit "Refresh Repo" in MYSController and the newly copied firmware should appear in the Assign FW dropdown list, ready to be uploaded.

    Read this thread for discussions on MYSBootloader 1.3pre1

    Have fun!

    Development ota myscontroller mysbootloader

  • Windows GUI/Controller for MySensors
    tekkaT tekka

    For completeness, here are the MYSBootloader instructions for OTA updates via MYSController:

    1. Load gw sketch and connect arduino either via serial or ethernet port. No special bootloader needed for that part (i.e. standard optiboot bootloader will do the job).

    2. Add these lines to the boards.txt file in your Arduino IDE installation folder (located somewhere like C:/Program Files/Arduino/hardware/arduino/avr)

      proMYSBL16.name=ATmega328 external 16Mhz with MYSBootloader
      proMYSBL16.upload.tool=avrdude
      proMYSBL16.upload.protocol=arduino
      proMYSBL16.upload.maximum_size=30720
      proMYSBL16.upload.maximum_data_size=2048
      proMYSBL16.upload.speed=115200
      proMYSBL16.bootloader.tool=avrdude
      proMYSBL16.bootloader.low_fuses=0xF7
      proMYSBL16.bootloader.high_fuses=0xDA
      proMYSBL16.bootloader.extended_fuses=0x06
      proMYSBL16.bootloader.unlock_bits=0x3F
      proMYSBL16.bootloader.lock_bits=0x3F
      proMYSBL16.bootloader.file=MySensors/MYSBootloader.hex
      proMYSBL16.build.mcu=atmega328p
      proMYSBL16.build.f_cpu=16000000L
      proMYSBL16.build.board=AVR_UNO
      proMYSBL16.build.core=arduino
      proMYSBL16.build.variant=standard

      ######## settings for 8Mhz internal clock

      proMYSBL8.name=ATmega328 internal 8Mhz with MYSBootloader
      proMYSBL8.upload.tool=avrdude
      proMYSBL8.upload.protocol=arduino
      proMYSBL8.upload.maximum_size=30720
      proMYSBL8.upload.maximum_data_size=2048
      proMYSBL8.upload.speed=57600
      proMYSBL8.bootloader.tool=avrdude
      proMYSBL8.bootloader.low_fuses=0xE2
      proMYSBL8.bootloader.high_fuses=0xDA
      proMYSBL8.bootloader.extended_fuses=0x06
      proMYSBL8.bootloader.unlock_bits=0x3F
      proMYSBL8.bootloader.lock_bits=0x3F
      proMYSBL8.bootloader.file=MySensors/MYSBootloader.hex
      proMYSBL8.build.mcu=atmega328p
      proMYSBL8.build.f_cpu=8000000L
      proMYSBL8.build.board=AVR_UNO
      proMYSBL8.build.core=arduino
      proMYSBL8.build.variant=standard

    3. Copy MYSBootloader.hex (from MYSController/Bootloader folder) to the Arduino IDE installation folder C:/Program Files/Arduino/hardware/arduino/avr/bootloaders/MySensors/

    4. Restart Arduino IDE, choose under Tools | Board | ATmega328 external 16Mhz with MYSBootloader or Tools | Board | ATmega328 internal 8Mhz with MYSBootloader depending on your HW settings

    5. Connect USBasp to sensor node and select Tools | Burn Bootloader

    6. If everything worked well until here, you now have the MYSBootloader with the fuse settings from above burnt to your sensor node (16Mhz extXTAL or 8Mhz intRC, BOOTSZ 1024W, BOD 1V8).

    7. Please use the AVR fuse calculator to retrieve the individual fuse settings. If you need to change frequency, BOD or other settings, change the fuse settings based on the fuse calculator.
      Important: The MYSBootloader.hex file was compiled for 16Mhz oscillators but it should also work at 8Mhz. If you intend to go below 8Mhz, I highly recommend to compile the bootloader with adjusted frequency settings.

    8. Start MYSController, hit config and adjust settings (COM-Port & baud or IP address:port)

    9. Hit connect: Connection to gateway should be established (gateway answers with gateway ready message), the node should appear and request an ID & FW.

    10. Right-mouse click on that node, select assign FW, choose for example **TimeReporter ** (demo firmware included in the MYSController/Firmware folder). Then click reboot and wait until FW is uploaded and node boots.

    11. TimeReporter firmware reports every few seconds some values such as time, millis, and voltage.

    12. Custom firmware: compile your sketch and retrieve the generated .hex file (activate verbose mode in the Arduino IDE to get compiler messages and output path).

    13. Copy .hex file to MYSController/Firmware folder and edit firmware_config.csv file according to the existing lines.

    14. Hit Refresh Repo in MYSController and the newly copied firmware should appear in the Assign FW dropdown list, ready to be uploaded.

    Have fun :)

    Controllers myscontroller mysbootloader

  • bootloader
    tekkaT tekka

    For completeness, here are the MYSBootloader instructions for OTA updates via MYSController:

    1. Load gw sketch and connect arduino either via serial or ethernet port. No special bootloader needed for that part (i.e. standard optiboot bootloader will do the job).

    2. Add these lines to the boards.txt file in your Arduino IDE installation folder (located somewhere like C:/Program Files/Arduino/hardware/arduino/avr)

      proMYSBL16.name=ATmega328 external 16Mhz with MYSBootloader
      proMYSBL16.upload.tool=avrdude
      proMYSBL16.upload.protocol=arduino
      proMYSBL16.upload.maximum_size=30720
      proMYSBL16.upload.maximum_data_size=2048
      proMYSBL16.upload.speed=115200
      proMYSBL16.bootloader.tool=avrdude
      proMYSBL16.bootloader.low_fuses=0xF7
      proMYSBL16.bootloader.high_fuses=0xDA
      proMYSBL16.bootloader.extended_fuses=0x06
      proMYSBL16.bootloader.unlock_bits=0x3F
      proMYSBL16.bootloader.lock_bits=0xFF
      proMYSBL16.bootloader.file=MySensors/MYSBootloader.hex
      proMYSBL16.build.mcu=atmega328p
      proMYSBL16.build.f_cpu=16000000L
      proMYSBL16.build.board=AVR_UNO
      proMYSBL16.build.core=arduino
      proMYSBL16.build.variant=standard

      ######## settings for 8Mhz internal clock

      proMYSBL8.name=ATmega328 internal 8Mhz with MYSBootloader
      proMYSBL8.upload.tool=avrdude
      proMYSBL8.upload.protocol=arduino
      proMYSBL8.upload.maximum_size=30720
      proMYSBL8.upload.maximum_data_size=2048
      proMYSBL8.upload.speed=57600
      proMYSBL8.bootloader.tool=avrdude
      proMYSBL8.bootloader.low_fuses=0xE2
      proMYSBL8.bootloader.high_fuses=0xDA
      proMYSBL8.bootloader.extended_fuses=0x06
      proMYSBL8.bootloader.unlock_bits=0x3F
      proMYSBL8.bootloader.lock_bits=0xFF
      proMYSBL8.bootloader.file=MySensors/MYSBootloader.hex
      proMYSBL8.build.mcu=atmega328p
      proMYSBL8.build.f_cpu=8000000L
      proMYSBL8.build.board=AVR_UNO
      proMYSBL8.build.core=arduino
      proMYSBL8.build.variant=standard

    3. Copy MYSBootloader.hex (from MYSController/Bootloader folder) to the Arduino IDE installation folder C:/Program Files/Arduino/hardware/arduino/avr/bootloaders/MySensors/

    4. Restart Arduino IDE, choose under Tools | Board | ATmega328 external 16Mhz with MYSBootloader or Tools | Board | ATmega328 internal 8Mhz with MYSBootloader depending on your settings

    5. Connect USBasp to sensor node and select Tools | Burn Bootloader

    6. If everything worked well until here, you now have the MYSBootloader with the fuse settings from above burnt to your sensor node (16Mhz extXTAL or 8Mhz intRC, BOOTSZ 1024W, BOD 1V8).

    7. Please use the AVR fuse calculator to retrieve the individual fuse settings. If you need to change frequency, BOD or other settings, change the fuse settings based on the fuse calculator.
      Important: The MYSBootloader.hex file was compiled for 16Mhz oscillators but it should also work at 8Mhz. If you intend to go below 8Mhz, I highly recommend to compile the bootloader with adjusted frequency settings.

    8. Start MYSController, hit config and adjust settings (COM-Port & baud or IP address:port)

    9. Hit connect: Connection to gateway should be established (gateway answers with gateway ready message), the node should appear and request an ID & FW.

    10. Right-mouse click on that node, select assign FW, choose for example **TimeReporter ** (demo firmware included in the MYSController/Firmware folder). Then click reboot and wait until FW is uploaded and node boots.

    11. TimeReporter firmware reports every few seconds some values such as time, millis, and voltage.

    12. Custom firmware: compile your sketch and retrieve the generated .hex file (activate verbose mode in the Arduino IDE to get compiler messages and output path).

    13. Copy .hex file to MYSController/Firmware folder and edit firmware_config.csv file according to the existing lines.

    14. Hit Refresh Repo in MYSController and the newly copied firmware should appear in the Assign FW dropdown list, ready to be uploaded.

    Have fun :)

    Development bootloader firmware otg

  • Can't get sensors talking
    tekkaT tekka

    @linus72982 looks like you have an issue with your GW radio:

    0;255;3;0;9;!TSP:SANCHK:FAIL


    GW and repeater nodes have by default regular sanity checks enabled. In your case, the sanity check fails, most likely due to cable and/or power issues. Try fixing/reseating the radio cables and/or add a larger cap to the GW radio.

    Also, please post the node sketch for further analysis.


    As for the debug messages, here the most important ones:

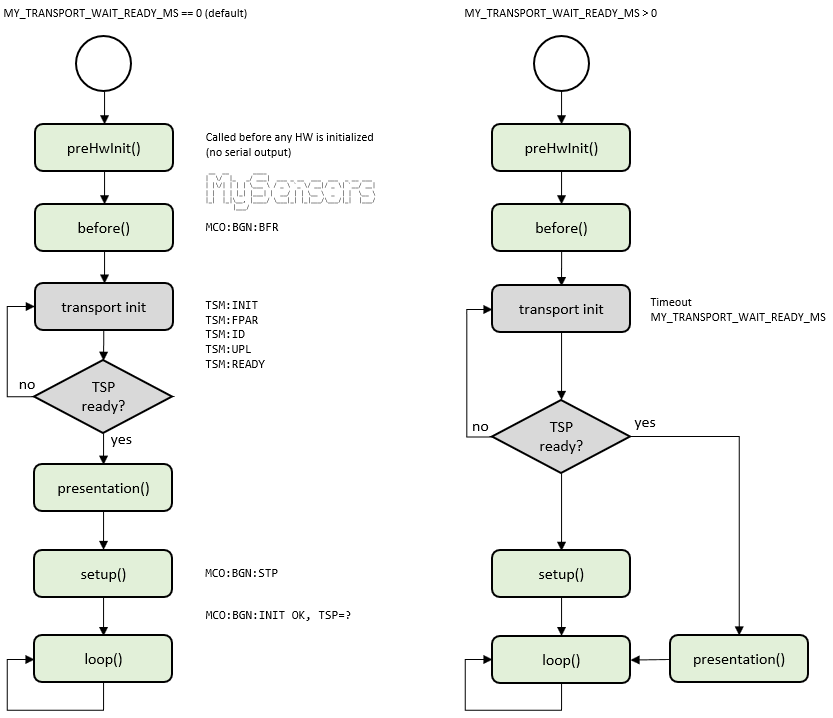
    TSM:FPAR => Transport State Machine:Find PARent
    !TSM:UPL FAIL, SNP => Uplink failed, Search New Parent
    !TSP:SEND:TNR => Transport:SEND:Transport Not Ready
    TSM:PDT => PowerDown Transport

    I'm currently working on a PR to unify and document all transport debug log messages for troubleshooting

    In your case, this is what happened:

    1. Node initializes and assigns ID 3, then it fails to find a parent...
    TSM:INIT
    TSM:RADIO:OK
    TSP:ASSIGNID:OK (ID=3)
    TSM:FPAR
    TSP:MSG:SEND 3-3-255-255 s=255,c=3,t=7,pt=0,l=0,sg=0,ft=0,st=bc:
    TSM:FPAR
    TSP:MSG:SEND 3-3-255-255 s=255,c=3,t=7,pt=0,l=0,sg=0,ft=0,st=bc:
    TSM:FPAR
    TSP:MSG:SEND 3-3-255-255 s=255,c=3,t=7,pt=0,l=0,sg=0,ft=0,st=bc:
    TSM:FPAR
    TSP:MSG:SEND 3-3-255-255 s=255,c=3,t=7,pt=0,l=0,sg=0,ft=0,st=bc:
    !TSM:FPAR:FAIL
    !TSM:FAILURE
    TSM:PDT
    
    1. Later on it receives a response to the find parent request from node ID 0 (=GW)
    TSP:MSG:FPAR RES (ID=0, dist=0)
    TSP:MSG:PAR OK (ID=0, dist=1)
    TSM:FPAR:OK
    
    1. and finally, the TSM is fully operational.
    TSM:READY
    
    1. Then the node starts sending the presentation messages...
    
    TSP:MSG:SEND 3-3-0-0 s=255,c=3,t=15,pt=6,l=2,sg=0,ft=0,st=ok:0100
    TSP:MSG:SEND 3-3-0-0 s=255,c=0,t=17,pt=0,l=5,sg=0,ft=0,st=ok:2.0.0
    TSP:MSG:SEND 3-3-0-0 s=255,c=3,t=6,pt=1,l=1,sg=0,ft=0,st=ok:0
    
    1. ...and fails again to (successfully) send the messages to the GW
    !TSP:MSG:SEND 3-3-0-0 s=255,c=3,t=11,pt=0,l=13,sg=0,ft=0,st=fail:Binary Sensor
    !TSP:MSG:SEND 3-3-0-0 s=255,c=3,t=12,pt=0,l=3,sg=0,ft=1,st=fail:1.0
    !TSP:MSG:SEND 3-3-0-0 s=3,c=0,t=0,pt=0,l=0,sg=0,ft=2,st=fail:
    !TSP:MSG:SEND 3-3-0-0 s=4,c=0,t=0,pt=0,l=0,sg=0,ft=3,st=fail:
    
    
    1. Hence, start searching for a new parent...
    !TSM:UPL FAIL, SNP
    TSM:FPAR
    TSP:MSG:SEND 3-3-255-255 s=255,c=3,t=7,pt=0,l=0,sg=0,ft=0,st=bc:
    
    1. ...and (again) no reply from the GW, therefore...
    !TSP:SEND:TNR
    
    1. Transport not ready, and starting from the beginning...
    Troubleshooting

  • Are we initializing the nRF24L01+ correctly?
    tekkaT tekka

    @Yveaux The current implementation does not initialize all registers properly, or modifies single bits (thus, the possibility of undefined conditions). The major changes are not necessarily in the init code, but rather in the pipe handling (all active RX pipes have now unique addresses) and less frequent register reading/writing.
    Over all, the library is faster, optimized to the specs and uses ~2kb less flash. However, this is still WIP and a few more pending changes before PR to dev.

    Development

  • MYSController supports Sensebender Micro OTA FW updates
    tekkaT tekka

    Hi all, short update from MYSController:

    • Sensebender Micro OTA FW update is now supported

    Download here or via update button in MYSController.

    *** IMPORTANT: these instructions are only for sensebender boards or boards with the same hardware setup. For regular boards, use MYSBootloader.

    For OTA FW updates, use the dev branch (currently 1.5 b1) and uncomment
    #define MY_OTA_FIRMWARE_FEATURE
    in MyConfig.h

    MYSController will guess the board/bootloader combination based on available information during startup. If the recognition fails you can manually adjust the settings (see screenshot).

    Note: FW updates are handled in gw.process() or gw.wait().
    Battery-powered / sleeping nodes do not handle incoming commands by default - in order to handle FW updates, add gw.wait(100) after sending packages to the controller and select battery-powered / sleeping in the settings (see screenshot and supplemented SensebenderMicro.ino).

    MYSController_0_1_2_282.png

    Have fun :)

    Controllers

  • Battery sensor and re-connecting to gateway
    tekkaT tekka

    @karl261 yes, in the example you mentioned, the node won't sleep at all if connection is lost and cannot be re-established. For battery powered nodes I recommend using MY_PARENT_NODE_ID and MY_PARENT_NODE_IS_STATIC to prevent the transport state machine from entering the SNP (search new parent) state.
    MySensors 2.0.1 introduces an enhanced sleeping function with a reconnection timeout: https://github.com/mysensors/MySensors/pull/558

    Troubleshooting

  • Are we initializing the nRF24L01+ correctly?
    tekkaT tekka

    @stevebus I'm doing a major RF24 lib refactoring to fully meet the nRF24L01+ specs.
    Please feel free to test it, feedbacks are appreciated.

    Development

  • Unable to initialize NRF24L01+ when using an ATmega328P-PU
    tekkaT tekka

    @bearwithbeard Your bare at328p runs at 8Mhz [intRC] but you compile with 16Mhz settings (according to platformio nanoatmega328 boards). You may resolve your issue with e.g. pro8MHzatmega328 settings (3V3, 8Mhz). Ideal baudrate 38400 or 57600.

    Troubleshooting

  • MYSBootloader 1.3 pre-release & MYSController 1.0.0beta
    tekkaT tekka

    To summarize recent discussions and open questions:

    MySensors offers two OTA FW update solutions:

    Dualoptiboot requires external flash: OTA FW updates are transmitted online, i.e. while the node is active. Once all FW packets are transmitted and CRC verified, the node reboots, dualoptiboot copies FW from external flash to MCU and hands over to the new sketch/FW.

    Pro: Radio agnostic, online (while node processes sensor data)
    Cons: Faulty FW (e.g. freezing sketch) cannot be recovered OTA => recovery via serial port necessary, external flash required

    MYSBootloader does not require external flash: OTA FW updates are transmitted offline, i.e. MYSBootloader communicates with the controller and receives new FW which is directly written to MCU, once FW is transmitted and CRC verified, MYSBootloader hands over to the new sketch/FW.

    Pro: recovery OTA possible, also with a faulty/buggy sketch (if sketch freezes, watchdog resets and MYSBootloader takes over), no external flash required
    Cons: Radio specific, i.e. different bootloader for RF24 and RFM69 radio (work in progess) necessary, offline (no sensor data processing possible)

    Development ota myscontroller mysbootloader

  • NRF24 transport status not initialized
    tekkaT tekka

    @skywatch Here is a simplified flowchart that illustrates the two most common MySensors bootup scenarios (but as @mfalkvidd pointed out, there are many more possibilities depending on the transport configuration and/or defines):

    0_1562772587482_d16c6501-500b-41f1-9c9a-44c578789a9a-image.png

    Troubleshooting

  • MYSBootloader 1.3.0-beta.3
    tekkaT tekka

    And here comes another release for public testing:

    MYSBootloader v1.3.0-beta.3

    Source / compiled .HEX and additional information can be found here.

    One more (and last) time: :tada: Happy New Year 2017!

    Development

  • [Solved] Strange behavior of RFM69 OTA burning firmware after some research
    tekkaT tekka

    @yury Please try with this, I've quickly added a check:

    ~~https://github.com/tekka007/MySensors/tree/OTAUpdate~~
    ~~PR: https://github.com/mysensors/MySensors/pull/718~~

    Edit: PR merged, try with the latest development: https://github.com/mysensors/MySensors/tree/development

    Bug Reports
  • Login

  • Don't have an account? Register

  • Login or register to search.
  • First post
    Last post
0
  • MySensors
  • OpenHardware.io
  • Categories
  • Recent
  • Tags
  • Popular