nRF5 action!
-
@d00616 Well, I suppose that's consistent with what I'm seeing, isn't it? i.e. not much effect.
-
So far, UARTE is the biggest offender. Turning off and disabling that saves a lot of current.
-
So, here is code which works! Many thanks to @d00616 and others for their helpful comments above.
To keep from distracting, I stripped out the radio code, but you can easily insert your favorite brand of that.
Basically, the sketch blinks an LED very briefly once every 5 seconds. Between blinks, it sleeps. However, if a leak is detected (which is equivalent to a button push), it wakes up immediately and blinks a lot. It runs on both nRF52832 and nRF51822. The sleep current is ~2.6ua on an nRF52832. To get sleep current that low, it is using the Low Power Comparator (LPCOMP) to watch for a change on the leak detector pin while the CPU sleeps.
I haven't yet measured the sleep current consumption on an nRF51822, but I expect it would be something comparable.
//This sketch is applicable to Coincell Multisensor nRF51822, version 10

#define MY_CORE_ONLY


#define IS_NRF51  //true iff the target is an nRF51.  If an nRF52, then comment this line out!

#define I2C_INTERRUPT_PIN 3
#define LEAK_DETECTION_PIN 2

#include <nrf.h>
#include <MySensors.h>

volatile bool button_pressed=false;

void blinkityBlink(uint8_t pulses, uint8_t repetitions) {
  for (int x=0;x<repetitions;x++) {
    for (int i=0;i<pulses;i++) {
      digitalWrite(LED_BUILTIN,HIGH);
      wait(20);
      digitalWrite(LED_BUILTIN,LOW);
      wait(100);
    }
      wait(500);
  }
}

void disableNfc() {  //only applied to nRF52

#ifndef IS_NRF51
  //Make pins 9 and 10 usable as GPIO pins.
  NRF_NFCT->TASKS_DISABLE=1;  //disable NFC
  NRF_NVMC->CONFIG=1;  // Write enable the UICR
  NRF_UICR->NFCPINS=0; //Make pins 9 and 10 usable as GPIO pins.
  NRF_NVMC->CONFIG=0;  // Put the UICR back into read-only mode.
#endif
}


void turnOffRadio() {
  NRF_RADIO->TASKS_DISABLE=1;
  while (!(NRF_RADIO->EVENTS_DISABLED)) {}  //until radio is confirmed disabled
}

void turnOffUarte0() {
#ifndef IS_NRF51
  NRF_UARTE0->TASKS_STOPRX = 1;
  NRF_UARTE0->TASKS_STOPTX = 1;
  NRF_UARTE0->TASKS_SUSPEND = 1;
  NRF_UARTE0->ENABLE=0;  //disable UART0
  while (NRF_UARTE0->ENABLE!=0) {};  //wait until UART0 is confirmed disabled.
#endif

#ifdef IS_NRF51
  NRF_UART0->TASKS_STOPRX = 1;
  NRF_UART0->TASKS_STOPTX = 1;
  NRF_UART0->TASKS_SUSPEND = 1;
  NRF_UART0->ENABLE=0;  //disable UART0
  while (NRF_UART0->ENABLE!=0) {};  //wait until UART0 is confirmed disabled.
#endif
}

void turnOffAdc() {
#ifndef IS_NRF51
  if (NRF_SAADC->ENABLE) { //if enabled, then disable the SAADC
    NRF_SAADC->TASKS_STOP=1;
    while (NRF_SAADC->EVENTS_STOPPED) {} //wait until stopping of SAADC is confirmed
    NRF_SAADC->ENABLE=0;  //disable the SAADC
    while (NRF_SAADC->ENABLE) {} //wait until the disable is confirmed
  }
#endif
}


void turnOffHighFrequencyClock() {
    NRF_CLOCK->TASKS_HFCLKSTOP = 1;
    while ((NRF_CLOCK->HFCLKSTAT) & 0x0100) {}  //wait as long as HF clock is still running.
}


void mySleepPrepare()
{
  turnOffHighFrequencyClock();
  turnOffRadio();
  turnOffUarte0();
}


void activateLpComp() {
  //NRF_LPCOMP->PSEL=1; // monitor AIN1 (pin P0.03 on nRF52832 test board).
  //while (!(NRF_LPCOMP->PSEL==1)) {} //wait until confirmed
  NRF_LPCOMP->PSEL=3; // monitor AIN3 (pin P0.02 on nRF51822 for coincell_multisensor_v10)
  while (!(NRF_LPCOMP->PSEL==3)) {} //wait until confirmed
  NRF_LPCOMP->REFSEL=1;  // choose 1/4 VDD as the reference voltage
  while (!(NRF_LPCOMP->REFSEL==1)) {} //wait until confirmed
  NRF_LPCOMP->ANADETECT=1;  //detect UP events.
  while (NRF_LPCOMP->ANADETECT!=1) {} //wait until confirmed
  NRF_LPCOMP->INTENSET=B0100;  //Enable interrupt for UP event
  while (!(NRF_LPCOMP->INTENSET==B0100)) {} //wait until confirmed
  NRF_LPCOMP->ENABLE=1;  //Enable LPCOMP
  while (!(NRF_LPCOMP->ENABLE==1)) {} //wait until confirmed
  NRF_LPCOMP->TASKS_START=1;  //start the LPCOMP
  while (!(NRF_LPCOMP->EVENTS_READY)) {}  //wait until ready

  NVIC_SetPriority(LPCOMP_IRQn, 15);
  NVIC_ClearPendingIRQ(LPCOMP_IRQn);
  NVIC_EnableIRQ(LPCOMP_IRQn);
}

void suspendLpComp() { //suspend getting more interrupts from LPCOMP before the first interrupt can be handled
  if ((NRF_LPCOMP->ENABLE) && (NRF_LPCOMP->EVENTS_READY)) {  //if LPCOMP is enabled
    NRF_LPCOMP->INTENCLR=B0100;  //disable interrupt from LPCOMP
    while (NRF_LPCOMP->INTENCLR==B0100) {} //wait until confirmed
  }
}

void resumeLpComp() { //suspend getting interrupts from LPCOMP
  NRF_LPCOMP->INTENSET=B0100;  //Enable interrupt for UP event
  while (!(NRF_LPCOMP->INTENSET==B0100)) {} //wait until confirmed
}

void setup() {
  hwInit();
  hwPinMode(LED_BUILTIN,OUTPUT_D0H1);
  disableNfc();
  turnOffAdc();
  activateLpComp();
  blinkityBlink(2,1);  //Signify end of setup with two quick pulses.
  mySleepPrepare();
  button_pressed=false;
}


void loop() {

  sleep(5000);  //sleep for 5 seconds.
  mySleepPrepare();  //An ounce of prevention: Turn-off HF clock, etc, ASAP to save power, just in case the library's sleep() routine resumed them.
  if (button_pressed) {   //if a leak is detected
    suspendLpComp(); //suspend LPCOMP to prevent multiple interrupts
    blinkityBlink(10,3);  //blink a lot to show that a leak was detected.
    button_pressed=false;  //Clear the semaphore
    NRF_LPCOMP->EVENTS_UP=0;  //Clear the semaphore
    resumeLpComp();  //operations of LPCOMP were suspended after detecting the LPCOMP iterrupt
  }
  else {
    blinkityBlink(1,1);  //otherwise, just one short blink to indicate the wakeup was scheduled by the RTC
  }
}


// * Reset events and read back on nRF52
//* http://infocenter.nordicsemi.com/pdf/nRF52_Series_Migration_v1.0.pdf

#if __CORTEX_M == 0x04
#define NRF5_RESET_EVENT(event)                                                 \
        event = 0;                                                                   \
        (void)event
#else
#define NRF5_RESET_EVENT(event) event = 0
#endif


// This must be in one line
extern "C" { void LPCOMP_IRQHandler(void) {button_pressed=true; NRF5_RESET_EVENT(NRF_LPCOMP->EVENTS_UP); NRF_LPCOMP->EVENTS_UP=0; MY_HW_RTC->CC[0]=(MY_HW_RTC->COUNTER+2);}}
-
@NeverDie Nice stuff! Perhaps you could file a PR and include it as a example in the repo?
-
Here's the hardware I developed it on:
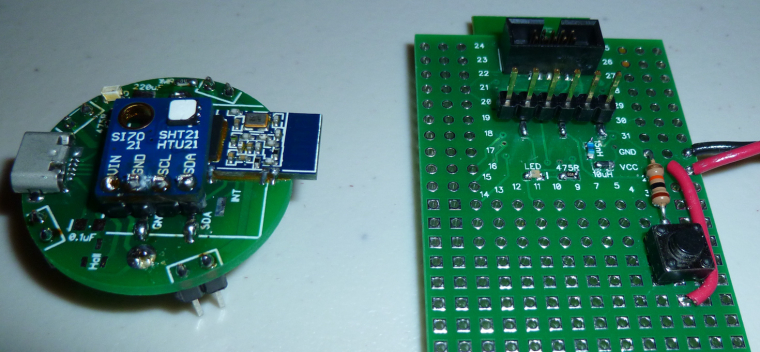
For the nRF52832 (on the right), I literally used a button push to simulate a leak detection. However, for the nRF51822 (on the left), I did use the leak detection pins. I've tried putting it on a flooded surface and, indeed, it does detect water. By that I mean a water leak is enough to wake it up from sleep and trigger a detection event.
-
I just now measured the sleep current on the nRF51822 (above), and it is 3.9ua. So, higher than the nRF52822. Go figure.
BTW, I'm using a uCurrent Gold paired to a Fluke 87V for my current measurements, so I think my measurements are probably reasonably accurate (and repeatable by anyone else with similar equipment).
-
@Anticimex said in nRF5 Bluetooth action!:
@NeverDie Nice stuff! Perhaps you could file a PR and include it as a example in the repo?
I think instead of that I'll bake it into an improved demo script for the multisensor node and post it there. So, instead of waking up every 5 seconds to blink an LED, it will instead wake-up every 5 minutes to take a temperature/humidity reading and report it back wirelessly to the gateway. Meanwhile, if it happens to detect a water leak, it will report that the instant it is detected. That will be the practical upshot of the above script, which is a boilerplate for how to quickly respond to interrupts while sleeping and yet still remain miserly with respect to battery consumption.
Or, better yet, I'll do it for the PIR demo code, since it doesn't yet have demo code. Same basic idea.
-
@Anticimex said in nRF5 Bluetooth action!:
@NeverDie Nice stuff! Perhaps you could file a PR and include it as a example in the repo?
I posted an enhanced version of it here as the demo sketch--it includes proper MySensors radio code as well: https://www.openhardware.io/view/499/10-years-wireless-PIR-Sensor-on-just-one-set-of-3-AAs#tabs-source
-
Need your help, guys. I am trying to reprogram a smart socket based on nrf51 module. The schematic is:
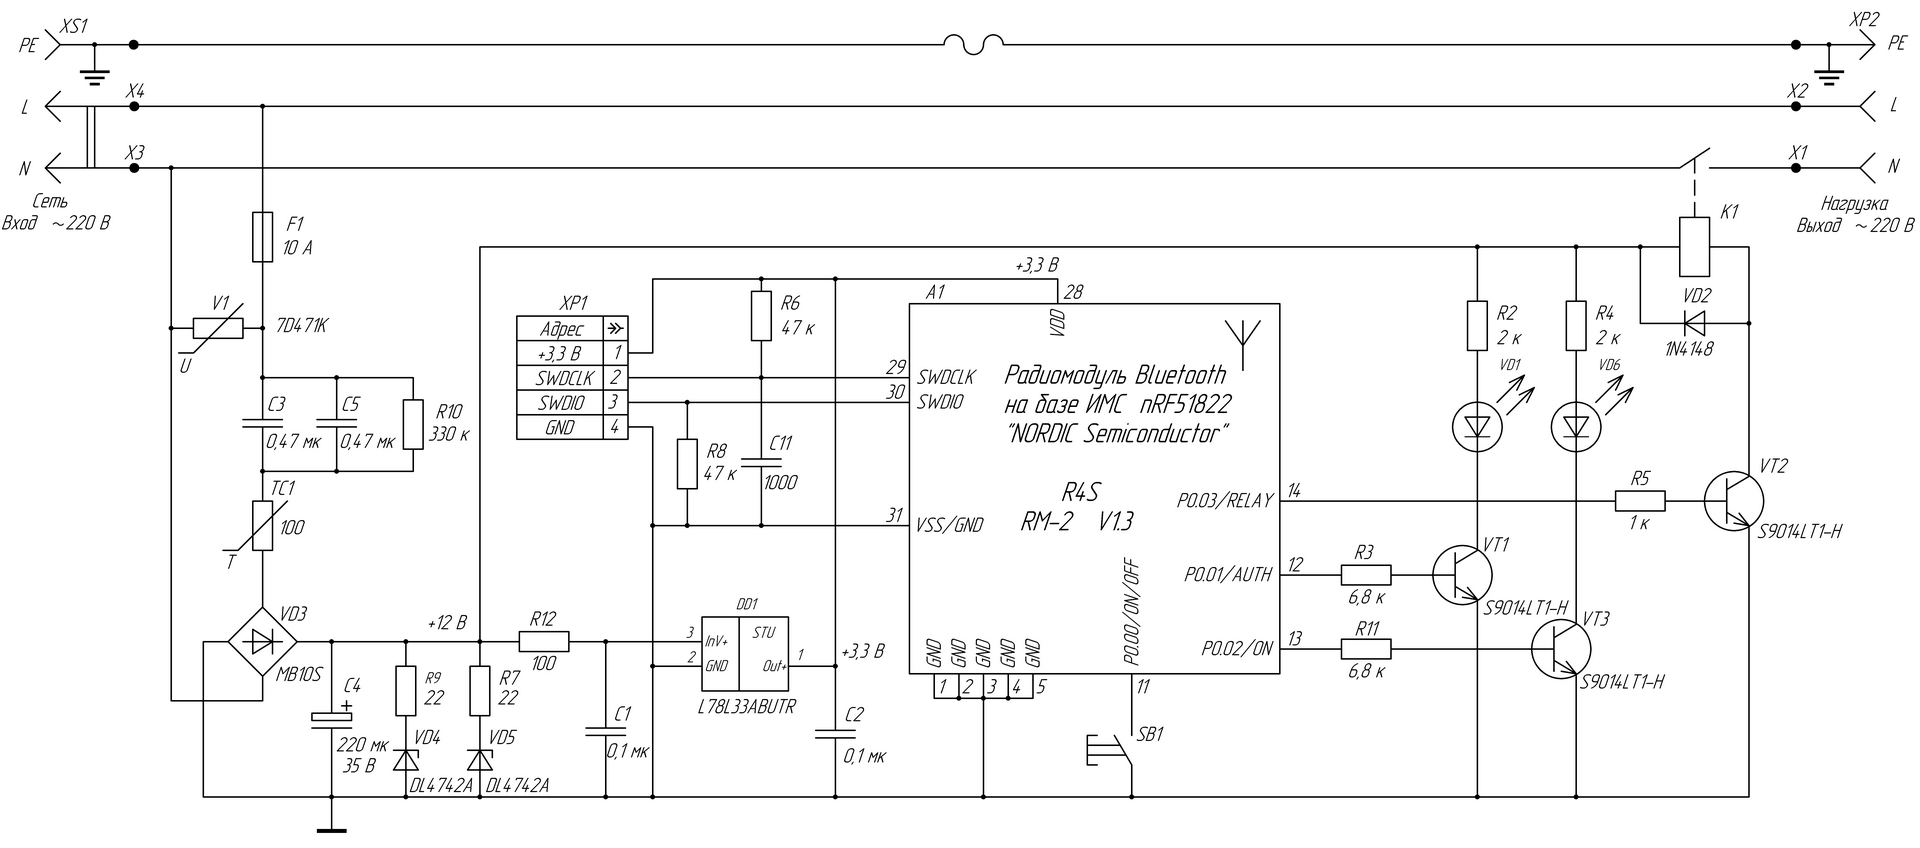
I successfully did it using conventional BT Arduino core (Sandeep's) and I was able to switch the relay on/off.
However, when I tried to use Mysensors ESB5 implementation, the relay just switches On briefly and then immediately Off.
I believe this is because the pin doesn't supply enough current for the transistor to saturate (3.3v/1k=3.3ma).
Questions:
a ) shall I use hwPinMode(PIN, OUTPUT_S0H1)? if yes,
b ) why in non-MySensors sketch a simple pinMode(PIN, OUTPUT) worked?
Does MuSensors implementation overrides Sandeep's definitions so the pin supplies less current?
-
@Toyman I don't know the answers, but section 20.4.1 GPIO Electrical Specification from the datasheet might give you some insight. What I notice from it is that there's quite a spread between the min and max driver current rating, with no real explanation as to why. So, for that reason, if your target currents are higher than the minimum ratings, perhaps you're better off using an nRF5 pin to control a load switch, which in turn should easily handle your desired currents?
-
The schematic is given. I just don't understand why it worked with BLE core and why it doesn't with d0016's.
I always thought Mysensors is an extension of vanilla nrf5 arduino core.
-
@Toyman said in nRF5 Bluetooth action!:
The schematic is given. I just don't understand why it worked with BLE core and why it doesn't with d0016's.
I always thought Mysensors is an extension of vanilla nrf5 arduino core.You have to remove the SoftDevice. The EEPROM Emulation, included in MySensors, is incompatible and the radio and RTC interrupt is blocked by the SoftDevice. The system call to disable the SoftDevice is not available in the Arduino port. Here is some example to erase the MCU.
-
@d00616 everything is working EXCEPT relay control.
So the node is recognized in Domoticz, I can switch it on and off, but the relay just doesn't switch on permanently when I send HIGH to the pin. It switches on and almost immediately off.
-
@Toyman said in nRF5 Bluetooth action!:
@d00616 everything is working EXCEPT relay control.
So the node is recognized in Domoticz, I can switch it on and off, but the relay just doesn't switch on permanently when I send HIGH to the pin. It switches on and almost immediately off.With the extended output mode, you are on the safe side, but I think this isn't the problem. Maybe domoticz sends the off command or there is something in the sketch logic. Please try to switch on the port outside the MySensors logic like in setup() or by the button.
Your design has connected a button to P0.00 and an transistor to P0.01. These pins are for the 32kHz clock. Please check, that you have to choosen the RC oscillator as LFCKL source.
-
I received a battery clip designed to hold two CR2032's in series, but I was surprised to find how much wider it is than a single cell holder:
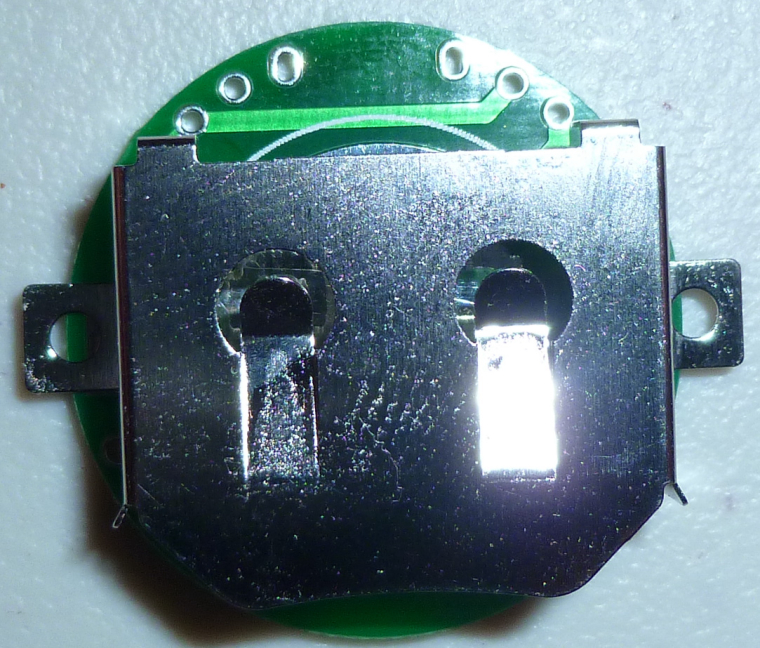
Why? And, is that how they all are?So, at this point, I either need to increase the PCB diameter again, or else go square and hang this clip diagonally.
You may ask, why do this at all? One of the reasons is that the AM612 PIR requires a minimum of 2.7v, and a single CR2032 doesn't leave much headroom, especially given the dippy discharge nature of coincells. I figure two CR2032's in series with a voltage regulator should, in theory, manage the issue a lot better. Indeed, with that in mind, I already have PCB's with the pads for a voltage regulator on them, but I didn't expect the battery clip to be so big.
-
@neverdie said in nRF5 Bluetooth action!:
else go square
if you ask me, go this way given the BT module itself is already beyond the circular footprint
-
@neverdie frankly, I would revive CR2450 idea. 620mah vs 200mah is HUGE difference
-
I did a quick hack for testing purposes:
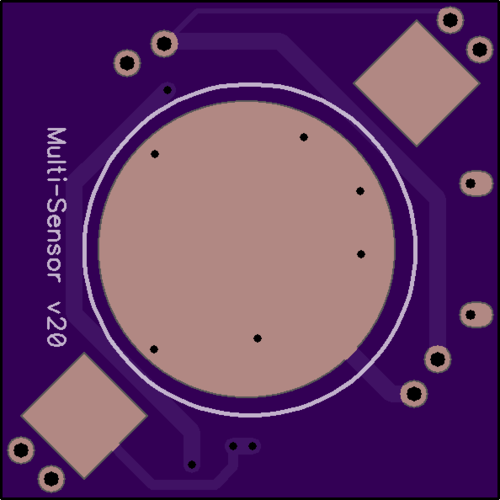
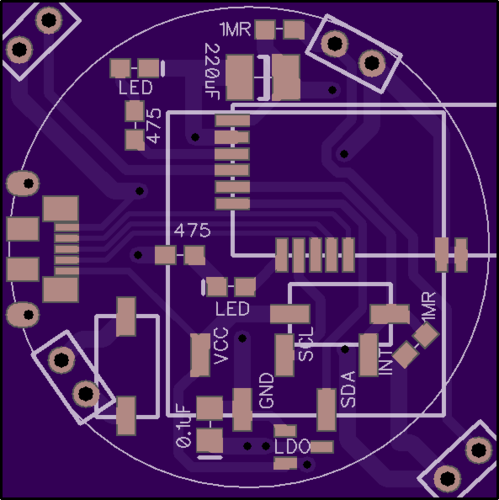
With all this extra space, I could probably add the hall sensor back in. I had taken it out so that I'd have the option of adding an extra LED, plus two pushbuttons.
-
I found a much better 2x battery clip made by Linx. Even though it's through-hole rather than surface mount, its footprint is much smaller. https://www.mouser.com/Search/ProductDetail.aspx?R=BAT-HLD-001-THMvirtualkey66280000virtualkey712-BAT-HLD-001-THM
Using it, I don't have to enlarge the diameter or go square. I can keep the same size.
-
@toyman said in nRF5 Bluetooth action!:
@neverdie frankly, I would revive CR2450 idea. 620mah vs 200mah is HUGE difference
If I can keep the footprint the same (and I don't see why not), I could attach a 2x battery clip for a 2450, and then you'd have the best of both worlds. I have a hunch that finding such a clip, though, won't be easy.
-
@neverdie
maybe check out: https://www.aliexpress.com/item/5pcs-20-0mm-CR2032-2032-Battery-Button-Cell-Holder-Coin-Cell-Retainer-Battery-Holder-Through-hole/32741947070.html?spm=a2g0s.9042311.0.0.E38CWgor if you need 50... :
https://www.aliexpress.com/item/50pcs-20-0mm-CR2032-2032-Battery-Button-Cell-Holder-Coin-Cell-Retainer-Battery-Holder-Through-hole/32739802992.htmlprice wise,, i would say, go for the second one

-
@omemanti Thanks.
I ordered the Linx from mouser yesterday, though. It uses four smaller pins instead of two larger pins. That actually helps keep the footprint small. Also, Linx has practically identical holders for holding a single CR2032 versus holding two CR2032's. That means I can use a single PCB board and decide which configuration I want. The mouser price is quite reasonable (about 25 cents each).
I did try looking for a holder that can hold two CR2450's in series, but I didn't find any.
-
I received the Linx parts today. I like them more than any other battery holders I've yet seen, because they elevate the sides just a smidge, which eliminates any risk of short-circuiting to nearby through-holes. For instance, the ones from Aliexpress (linked above by Omemtani) don't do that. Nor do any of the other ones I've tried so far.
On Tuesday I should receive PCB's specifically designed to use the Linx holders. I can hardly wait.
-
I just noticed these small and fairly cheap nRF52 modules on Aliexpress:
https://www.aliexpress.com/item/wholesale-Holyiot-TinyBLE-nRF52832-Bluetooth-low-energy-module-BLE-5-0-for-Bluetooth-mesh/32840369737.html?spm=2114.search0204.3.2.eQaXfB&ws_ab_test=searchweb0_0,searchweb201602_4_10152_10065_5000015_10151_10344_10068_10130_10345_10324_10342_10547_10325_10343_51102_10546_10340_10341_10548_10545_5130015_10541_10084_10083_10307_5690015_10539_5080015_10312_10059_10313_10314_10534_100031_10604_10603_10103_10605_10594_5060015_10596_10142_10107,searchweb201603_14,ppcSwitch_4_ppcChannel&algo_expid=f4f4f444-b2af-44da-9380-676cdca3c65f-0&algo_pvid=f4f4f444-b2af-44da-9380-676cdca3c65f&rmStoreLevelAB=0
But how would one solder it? Is solder paste the only option?
-
Here's one for the blooper reel:
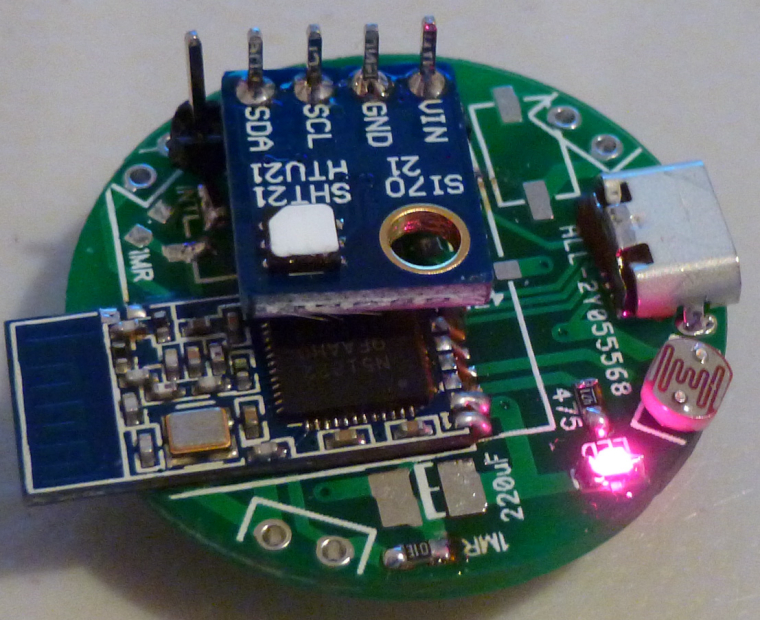
I blithely put the photoresistor in one of the vacant leak detection slots. Of course, in retrospect, it's an obvious mistake: too close to the LED. So, when the LED lights, the photoresistor thinks it's suddenly bright out.
-
@neverdie said in nRF5 Bluetooth action!:
I just noticed these small and fairly cheap nRF52 modules on Aliexpress:
But how would one solder it? Is solder paste the only option?I have bought two to check the range but I don't have very high expectations about that

For soldering it should work the same way than with qfn chips:- put a bit of solder on each pad of the module, then use solder wick to remove excess so it's just lightly tinned
- put a bit of solder on PCB pads
- put chip in place, then heat up with hot air gun
Here as it's a module the hot air might unsolder some components, so using regular iron, flux and a bit oversized pads (so you can heat them up with soldering iron) should do the trick. I will try and tell you the result.
-
@nca78 "At first I was afraid, I was petrified" :-), but then I relialized that if "recepting" pads are long enough even plain soldering iron will do.
The solder will just flow under the module provided module pads are pretinned Ias you recommended)
-
@neverdie said in nRF5 Bluetooth action!:
I received the Linx parts today. I like them more than any other battery holders I've yet seen, because they elevate the sides just a smidge, which eliminates any risk of short-circuiting to nearby through-holes. For instance, the ones from Aliexpress (linked above by Omemtani) don't do that. Nor do any of the other ones I've tried so far.
On Tuesday I should receive PCB's specifically designed to use the Linx holders. I can hardly wait.
I received the PCB's a day early. Unfortunately, it's almost total fiction to say that the Linx holder is designed to hold two CR2032's. Instead, it can hold one CR2032 comfortably, or, with finessing, it can hold two CR2025's. With extreme finessing I did get it to hold two CR2032's, but it will be touch-and-go as to whether the solder joints will hold long-term under the strain. Aside from the small footprint, I'm not happy with it.

-
I guess for now, until something better can be found, I'll simply make do with either 1x CR2032 (240mah) or 2x CR2016 (effectively 100mah).
-
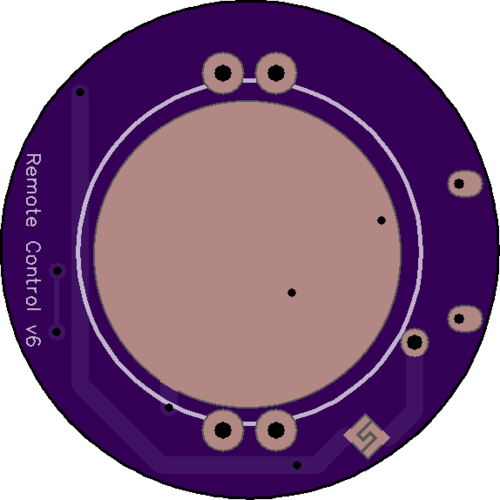
Here's my latest remote control:
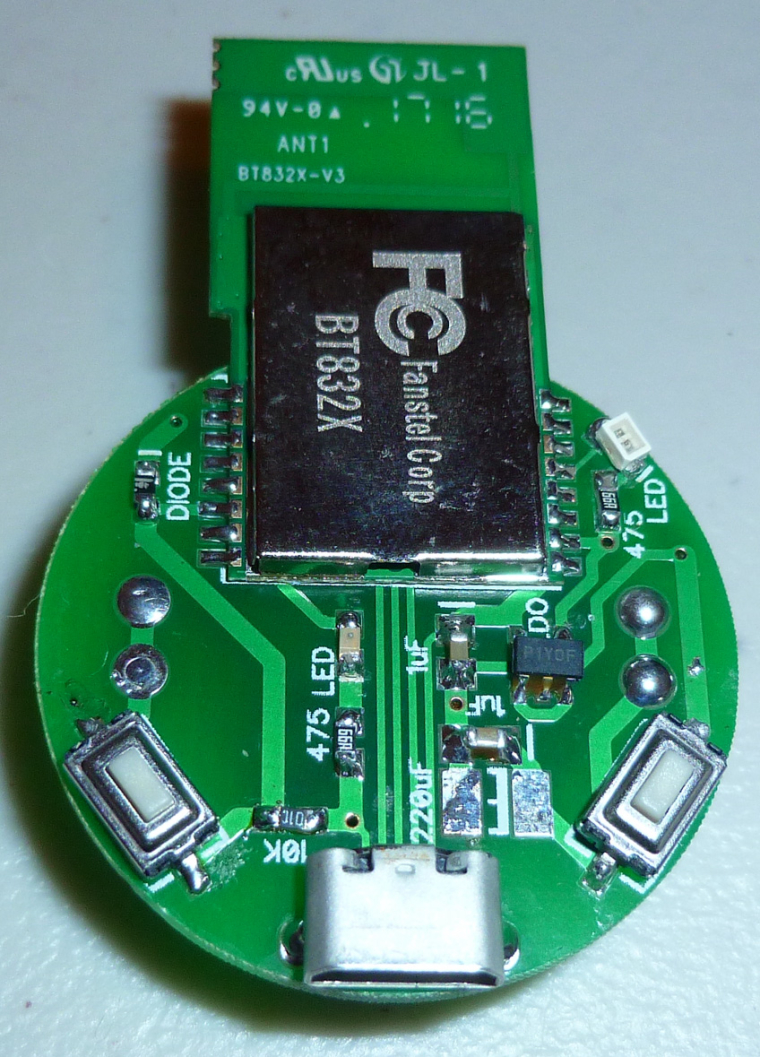
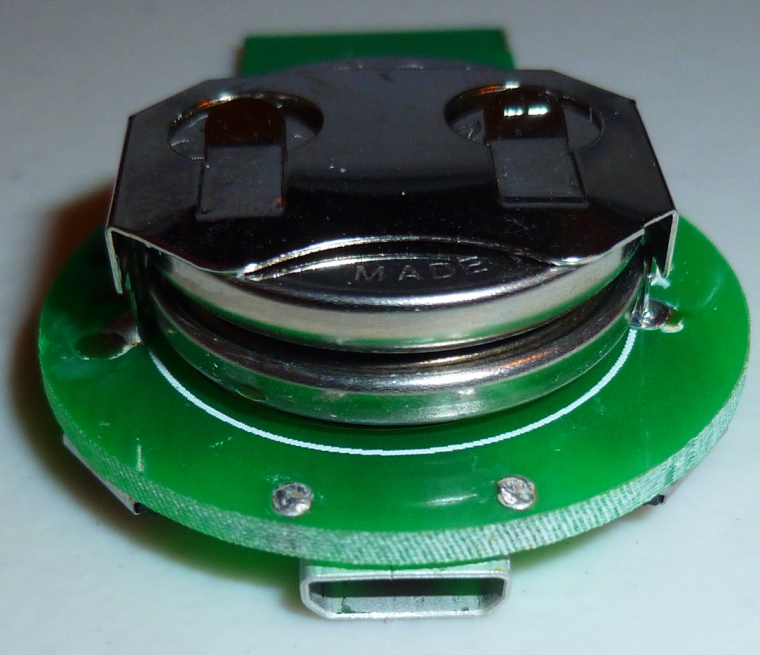
It has a pa-lna nRF52832 which can draw up to 250ma during Tx. It's powered by two CR2032's but draws absolutely zero current unless one of the buttons is pressed.
If powered through the connector, however, it can run continuously, without either button being pressed. In that case, it could also serve as a transceiver, sending serial output over the connector.
It's small and has a nice feel to it. I'm happy with it.

-
In the next version I'm going to use a somewhat unusual shaped solder jumper, in case I want to use just a single coin cell battery (not two) and therefore bypass the LDO (well, not install an LDO at all).
-
@NeverDie I'm thinking about making the jump from NRF24s and RFM69s to the NRF5 eco system. I see you have tried quite a few different modules. If you had to pick now, would you go with the Fanstel BT832X for a gateway and BT832 for most modules?
-
@nagelc said in nRF5 Bluetooth action!:
@NeverDie I'm thinking about making the jump from NRF24s and RFM69s to the NRF5 eco system. I see you have tried quite a few different modules. If you had to pick now, would you go with the Fanstel BT832X for a gateway and BT832 for most modules?
Yes. If cost and space were no issue, I'd probably use the BT832X on everything, because it also has the best antenna. For nRF52's, for what I'm doing I like Fanstel's stuff the best. If I needed a module with more exposed pins, then the EByte would be my choice. But nothing I'm doing requires that many exposed pins, and I think the Fanstel will likely be drop-in upgradeable to the final nRF52840 modules when final silicon for that becomes available. Of course, there's no guarantee of that, but it seems very likely.
Also important, at least to me, is that the Fanstel modules have FCC approval, and being based in the US, I don't think they're lying about it (unlike random stuff from China).
That said, the nRF51822-04's are a lot of fun, because they're small and relatively cheap.
-
Great. I have some on order. Can't wait go start playing around with them.
-
@nagelc said in nRF5 Bluetooth action!:
Great. I have some on order. Can't wait go start playing around with them.
Great! I invite you to start making posts to this thread when you do, as fresh perspectives are always welcome.
-
Hello, I want to build battery powered modules (with sleep). I found on Ebay NRF51822 round module with case (https://www.ebay.com/itm/hello/112650665753) - only $6.50 with shipping. Is this module is good choice? Any pitfalls?
I planning to use water leak sensor, BME280 (I2C), ds18b20(1-wire), maybe MH-Z19 later.
I don't have enough experience, I have only used ESP8266 NodeMcu V3 and Arduino before.
I can see one I2C (for programator and sensors?) and one GPIO as button for water leak (right?) + LED pin. Does this module have more pins? Shall I connect to chip legs to obtain more pins (GPIO) (does I need to connect resistors?) for 1-wire or better use some sort of I2C GPIO expander?
-
@alexey-strelnikov
Looks nice, but any hardware mods and it probably won't fit the case anymore.
-
@alexey-strelnikov I have one and there are pads to program it but nothing more, it's not really a "module" but a Bluetooth beacon, the only 2 I/Os available are those from the button and the led, there's a footprint for an accelerometer also but the pads are too tiny to solder any wire.
If you're planning to use other sensors don't buy that one. It's great as a button sensor but any other use will need soldering to LGA-sized pads...
-
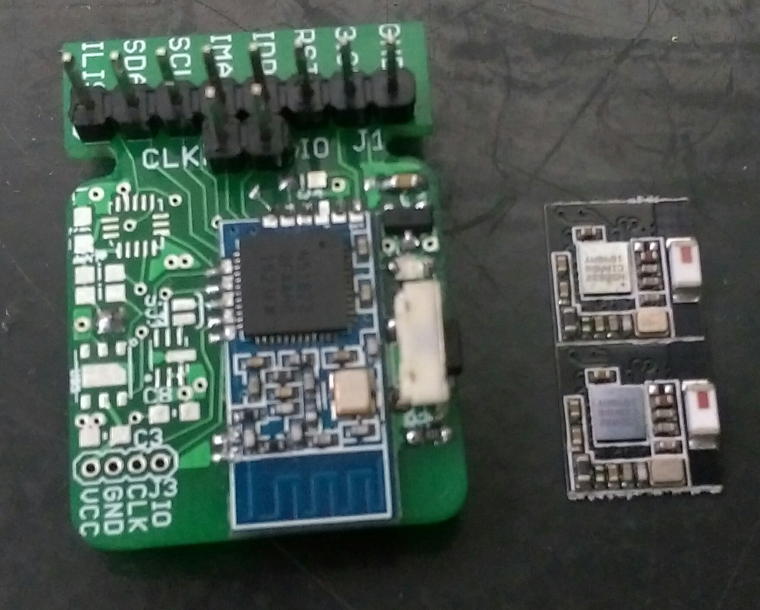
I received the "holyiot" modules and they are really, really tiny. 2 attached together are exactly the same size than the 51822-04 module. WL-CSP package is very impressive: small, very thin and with a cool shinny surface.
This module has inductors for DC/DC mode, and pins .00 and .01 are mapped so it's possible to add low frequency crystal for Bluetooth mode.
-
Nice!
I'll be very interested to know how the range compares. At least so far, in my own comparisons, smaller has meant less range. Not necessarily a deal killer though, as you only need range that's "good enough," and you can compensate with a better antenna on the gateway.
-
@neverdie said in nRF5 Bluetooth action!:
Nice!
I'll be very interested to know how the range compares. At least so far, in my own comparisons, smaller has meant less range. Not necessarily a deal killer though, as you only need range that's "good enough," and you can compensate with a better antenna on the gateway.
Yes I'll try to test next week to have an idea of the range, if it's "good enough" to be usable at least with a central pa/lna gateway or if it's better to stick with bigger PCB antennas.
nrf51822-04 is small enough but this one has a better chip and 11 I/Os available, that's precious for a multisensor board.
-
@nca78 said in nRF5 Bluetooth action!:
nrf51822-04
What I've noticed is that Rx range was much more compromised with a reduction in size than the Tx range is. Or, to put it differently, Tx range isn't as dramatically compromised. That's potentially good news for a sensor, which may Tx only anyway (i.e. "passive" in the mysensors jargon). But even if it does Rx, your gateway can be much more powerful on its Tx. So, it potentially works out rather nicely, if you know what I mean.
-
Just received my Fanstell modules. Yikes! 1.1mm pin pitch didn't look that small in the pictures. Do you solder these by hand? I thought my soldering skills were getting pretty good, but I can see I'm going to have to up my game.
-
@nagelc Yes, I solder it by hand. It's easier than it looks. Just use a narrow tip and maybe extra flux if you need it.
-
Here's my latest gateway sheild for the Wemos D1 Mini:
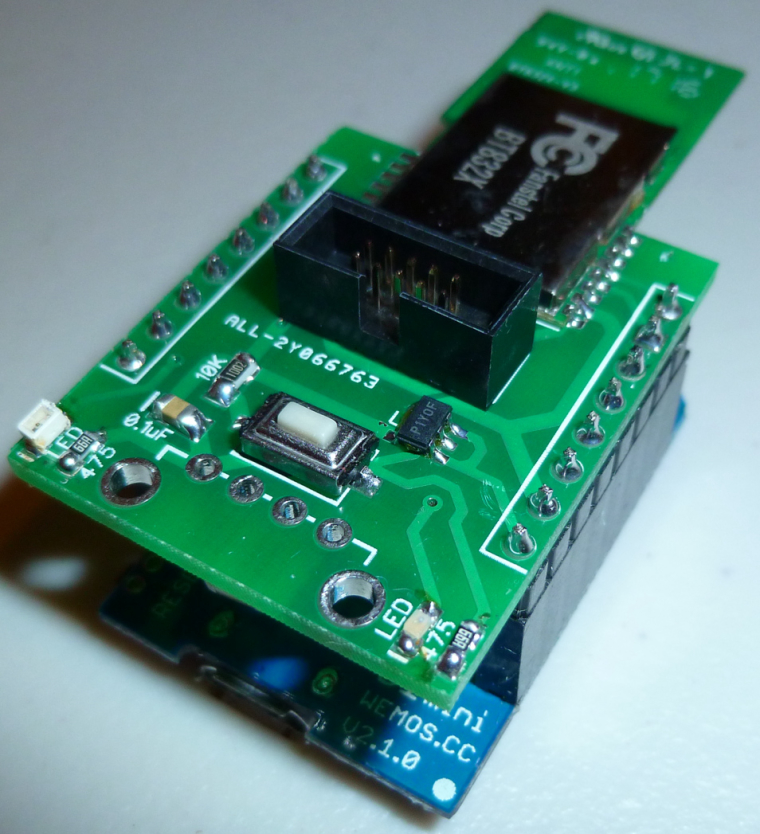
In the interest of both belt and suspenders, I gave it its own 300ma LDO so that it won't be competing with the Wemos D1 Mini for current. Earlier measurements of this Fanstel ldo-pa nRF52832 shows that it can draw up to 250ma.
It's designed to work well with ESP-LINK, which can also be used to remotely reset the nRF52832 if that's ever needed. Presently, I'm using ESP-LINK's built-in MQTT to send MQTT to a Mosquito MQTT broker. This offloads that task from the nRF52832, which just inputs/outputs serial.
By the way, I soldered the entire thing using a wide chisel point solder tip, so it turns out you don't really need a narrow solder tip after all. I do use Rosin flux, though, and it does a great job. The only inconvenience is that the excess Rosin flux should be cleaned off afterward, but, meh, I don't find that to be much of a bother.
-
@nca78 said in nRF5 Bluetooth action!:
@neverdie said in nRF5 Bluetooth action!:
Nice!
I'll be very interested to know how the range compares. At least so far, in my own comparisons, smaller has meant less range. Not necessarily a deal killer though, as you only need range that's "good enough," and you can compensate with a better antenna on the gateway.
Yes I'll try to test next week to have an idea of the range, if it's "good enough" to be usable at least with a central pa/lna gateway or if it's better to stick with bigger PCB antennas.
nrf51822-04 is small enough but this one has a better chip and 11 I/Os available, that's precious for a multisensor board.Any update?
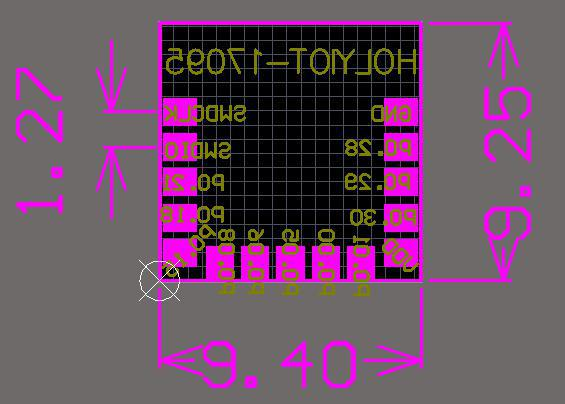
Also, what is the size of the pads? The only info I've found is what appears on the aliexpress website, which only seems to express the distance (center to center) between the pads. I just received some of these modules, so I'd like to maybe do a prototype PCB using my CNC machine.

BTW, I notice that the price went up from $3.20/module to $4/module.
 And something tells me it will probably go higher still.
-
@neverdie said in nRF5 Bluetooth action!:
@nca78 said in nRF5 Bluetooth action!:
@neverdie said in nRF5 Bluetooth action!:
Nice!
I'll be very interested to know how the range compares. At least so far, in my own comparisons, smaller has meant less range. Not necessarily a deal killer though, as you only need range that's "good enough," and you can compensate with a better antenna on the gateway.
Yes I'll try to test next week to have an idea of the range, if it's "good enough" to be usable at least with a central pa/lna gateway or if it's better to stick with bigger PCB antennas.
nrf51822-04 is small enough but this one has a better chip and 11 I/Os available, that's precious for a multisensor board.Any update?
Also, what is the size of the pads? The only info I've found is what appears on the aliexpress website, which only seems to express the distance (center to center) between the pads. I just received some of these modules, so I'd like to maybe do a prototype PCB using my CNC machine.

BTW, I notice that the price went up from $3.20/module to $4/module.
 And something tells me it will probably go higher still.
Sorry I was busy with other things. Now my switch seems to work I will quickly finish other atmega projects and make the switch to nrf5x.
For pad sizes, I believe from the pictures below it's 1mm width (grid size is obviously 0.5mm)
-
@nca78 do you move your fantastic Nmodules to nrf5 platform?
-
@toyman said in nRF5 Bluetooth action!:
@nca78 do you move your fantastic Nmodules to nrf5 platform?
Probably, and I will switch to MYSX connector too.
-
I was just about to make a test board using my CNC when out of the blue my CNC died during setup. So, I did this board instead and will have it fabbed:
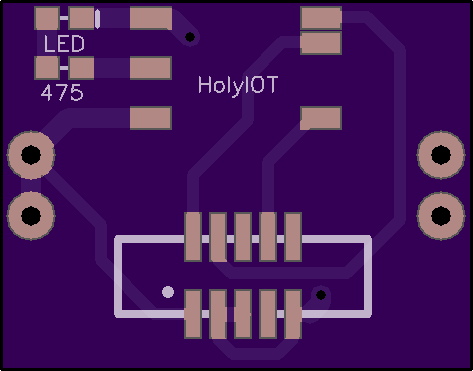
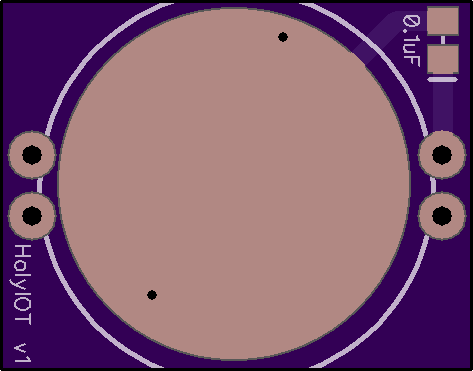
-
@neverdie for a test board why are you not using standard headers and mapping all pins available ?
-
@nca78 Because originally I was going to do the board on my CNC (that is, before my CNC dropped dead on me), and I wanted to make it as easy as possible for the CNC to succeed. Also, for testing purposes, I'm most interested in how well it sends/receives, and I don't need many pins to test that. Also, soldering this module may be tricky, so I wanted only the minimum number of pins in case soldering it proves to be difficult.
-
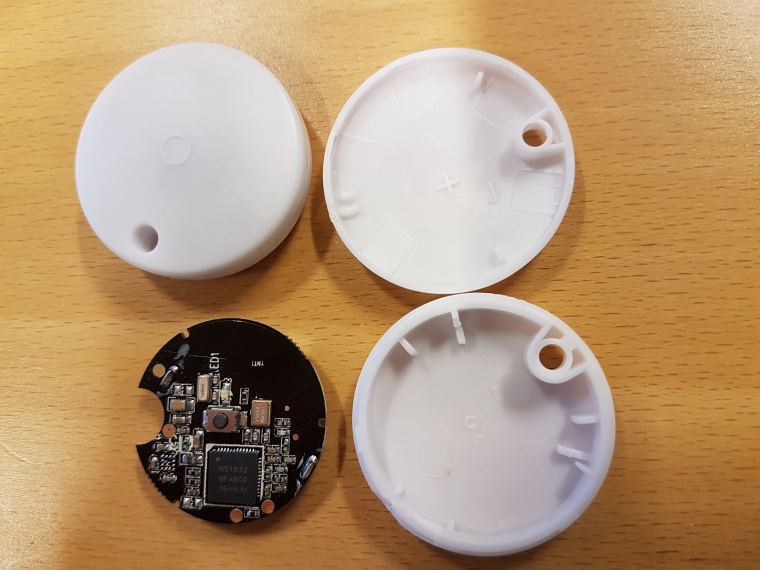
Just received these tiny NRF51822 devices and would like to turn them in to MySensors 1 button scencontroller.
Where should I start?- I guess I will need some kind of USB adapter ti program them. Think I read somewhere about JLink. Would this do?
-
@korttoma did you check here ?
https://forum.mysensors.org/topic/6705/mysensors-nrf5-platformFor programming the best solution is probably the NRF52 DK, it's not very expensive (30€) and you avoid all the problems related to license of the fake JLINKs (and bricking of the device if you happen to accept the invitation to update the outdated firmware on it), as it includes official licence for programming all nrf5 chips.
https://www.arrow.com/en/products/nrf52-dk/nordic-semiconductor
-
Hi,
Working without problem with mysensors, I use STLink v2 from Aliexpress. LED and Button are mapped on pins 28 and 29

-
Now I feel stupid ordering the NRF52 DK for 28€. Well atleast I don't need to worry about bricking any devices.
Do you have an example sketch for the device you can share?
Is it possible to somehow monitor the battery status?
-
@korttoma said in nRF5 Bluetooth action!:
Is it possible to somehow monitor the battery status?
One of @d00616 's demo sketches allows you to read the voltage that's powering the nRF5. Assuming there is no booster involved on this device (seems unlikely), that would be the same as the battery voltage.
-
@korttoma do you have an Aliexpress link to them?
-
-
@korttoma thx. Do they have a CR2032 slot? Sorry, it's not clear from the pictures
-
@toyman yes
-
It would probably do well as a "one button scene controller," but is it good for anything else I wonder?
-
@neverdie does not seem to be any easy way to get access to any of the pins on the board but who does not need a bunch of "one button scene controllers"?
-
I was tempted to try adding the missing accelerometer too, but in the end it's easier and cheaper to make a board with the 2$ module.
-
Speaking of which, I shrunk the HolyIOT board a bit and added the small buzzer:
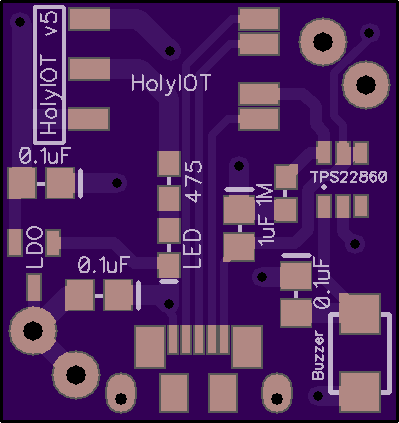
Hopefully this is small enough that it can be used as a locator beacon.It turns out this is pretty nearly the minimum size, even if the HolyIOT were smaller, because of the CR2032 battery underneath it. Anyway, that's an interesting result, because the BC182 is smaller than the HolyIOT, but I wouldn't get the benefit of it.
-
@neverdie said in nRF5 Bluetooth action!:
small buzzer:
CR2032 batteryIf I'm not wrong this buzzer needs over 100mA, not sure it's a good match for a CR2032 ?
-
@mika said in nRF5 Bluetooth action!:
Hi,
Working without problem with mysensors, I use STLink v2 from Aliexpress. LED and Button are mapped on pins 28 and 29

Im just reporting sketch from NeverDie

https://www.openhardware.io/view/510/Multi-Sensor-TempHumidityPIR-LeakMagnetLightAccel
-
@nca78 said in nRF5 Bluetooth action!:
@neverdie said in nRF5 Bluetooth action!:
small buzzer:
CR2032 batteryIf I'm not wrong this buzzer needs over 100mA, not sure it's a good match for a CR2032 ?
I like how nothing slips past you! Yes, it's a pretty severe trade-off in exchange for its small size. So, I'll be using two CR2032's and make it run only in very short bursts. I honestly don't know how well or badly it will turn out.
-
@neverdie said in nRF5 Bluetooth action!:
I like how nothing slips past you! Yes, it's a pretty severe trade-off in exchange for its small size. So, I'll be using two CR2032's and make it run only in very short bursts. I honestly don't know how well or badly it will turn out.
I don't see anything to co trim such a high current on your board ? Maybe it's the reason the sound level is low on your other board, max current of the MCU pin is much lower than what the buzzer needs ?
-
@nca78 said in nRF5 Bluetooth action!:
@neverdie said in nRF5 Bluetooth action!:
I like how nothing slips past you! Yes, it's a pretty severe trade-off in exchange for its small size. So, I'll be using two CR2032's and make it run only in very short bursts. I honestly don't know how well or badly it will turn out.
I don't see anything to co trim such a high current on your board ? Maybe it's the reason the sound level is low on your other board, max current of the MCU pin is much lower than what the buzzer needs ?
What does "co trim" mean?
-
@neverdie said in nRF5 Bluetooth action!:
What does "co trim" mean?
Sorry phone rewriting what I type.
"Control".
MCU pins can't source that much current and I see no transistor on your board to do it ?
If you put a reserve capacitor big enough to supply 100+mA long enough to make some sound on the buzzer, will you not fry the pin ?
-
The present design uses a TPS22860 load switch to turn on and off the buzzer. I'm not trying to power the buzzer directly from one of the nRF52832 pins, because the current would be outside the maximum limits for the nRF52832 pin. I'm hoping the two CR2032's will give enough headroom that the voltage (after the LDO) will be stable.
-
@neverdie didn't now this chip, nice one thank you I've added it to my next order.
Seems I should have a better look at your designs
-
@nca78 said in nRF5 Bluetooth action!:
I received the "holyiot" modules and they are really, really tiny. 2 attached together are exactly the same size than the 51822-04 module. WL-CSP package is very impressive: small, very thin and with a cool shinny surface.
This module has inductors for DC/DC mode, and pins .00 and .01 are mapped so it's possible to add low frequency crystal for Bluetooth mode.

Have you tried uploading anything to the HolyIOT modules? I've now tried on two different HolyIOT modules, both without success.

-
@neverdie said in nRF5 Bluetooth action!:
Have you tried uploading anything to the HolyIOT modules? I've now tried on two different HolyIOT modules, both without success.

Sorry not yet, I've just re-plugged my NRF5 board and I'm figuring out how to program external board. I'll do it with a board I know works, then try the holyiot module;
-
@nca78 It's a tricky module to solder (probably the most tricky of them all that I've tried so far), so to eliminate that concern on the second module I flipped it over and soldered wires directly to the four essential pads. That way I could visually confirm that it was soldered correctly. Still fails. So, just FYI.
-
I think I see the problem. These pinouts are inconsistent:
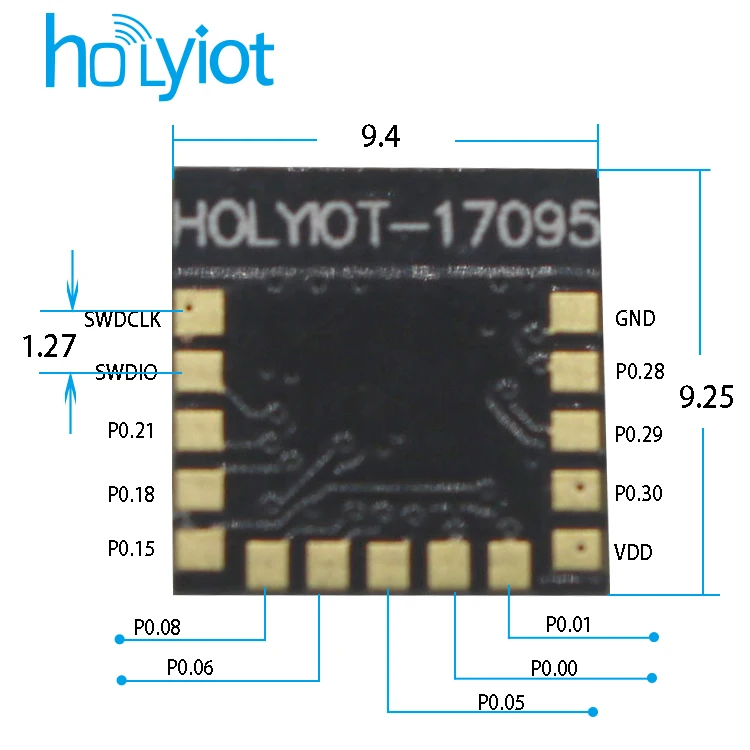

I had been basing it on the first one, whereas I'm now guessing that the second one is probably the correct one.
-
Confirmed. That was the problem. Using the second pinout, it now uploads.
-
I have the HolyIOT blinking an LED and receiving packets now. Range, as I suspected, is rather mediocre, but that's probably an inherent trade-off for its small size. For my purposes I don't think it will matter.
-
@neverdie was the difference that they were mirrored along vertical axis? Or am I missing a difference in labelling?
-
@mfalkvidd said in nRF5 Bluetooth action!:
@neverdie was the difference that they were mirrored along vertical axis? Or am I missing a difference in labelling?
Yes, in the first picture the pin labels should have been mirrored, but weren't. Or, to put it your way, they were mirrored from what they should have been. Either way, it's just wrong.
The second picture is the correct one.
-
Anyone heard anything about when the nrf52840 might be released? I had thought we'd have heard something by now. Surely sometime in 2018 at least? What's the nearest competing chip?
-
afaik (and I got a confirmation from Nordic too), there is no plan for other nrf52840 package than AQFN.
If you're searching for the ic, you'll have to use this footprint, which needs premium pcbs (micros vias, and multilayers for escaping routes and better plane).
It's also more tricky to solder than a fanstel BT840s and its bottom pins. BT840s edge pins are easy to solder sure but there are not so many. All others pins are on bottom as you know. Of course, it's the same for BT840, easier&better perf when using 4layers, but that can be done with 2layers (also explained in datasheet though).
From what I saw, others nrf52840 module sellers are going on same road, lot of tiny pads on bottom of the module, yes you can't do small things with big things, and there are lot of pins!There is another thing to know. no arduino core for nrf52840 yet. Yes, it's possible to use radio, some pins too, but no spi, i2c etc. that's because it needs some code refactoring to handle multiple io ports (nrf52832 one io port, whereas 840 has two).
imho there are better mcu
 some silabs mcu for example.. but not arduino compatible, out of scope here, and lot of people would say, "not interested, it's two bucks more expensive", way of talking (not mine) as i don't remember the exact price .
-
@scalz To get smaller size, I expect we'll see modules with reduced pin counts for the 52840, just as we already do for the 52832. Have you heard anything about when final silicon for the 840 will be shipping?
-
@neverdie said in nRF5 Bluetooth action!:
@scalz To get smaller size, I expect we'll see modules with reduced pin counts for the 52840, just as we already do for the 52832. Have you heard anything about when final silicon for the 840 will be shipping?
yes sure. reduced IO pin counts.. and maybe even more reduced if they try to fit new features instead of IO (like usb etc). The above holyiot module example:
- replace two IOs by USB pins.
- keep same pinouts, but no USB, pity for a new interesting feature, but i can imagine not all people interested in it
- need to enlarge the module for same pinout + usb pins
- same module size and pinout, +usb, -> add bottom pads
I still don't get the point of a holyiot module, and chip antenna modules, when it's not for wearables though!
Complete waste of specs
 a 840 like that would be "funny", not much pins, with a chip ant..what would be the point then to buy a 840?? short ble5 range, no usb or just a few ios etc, yuk!
If you're after range, then take a look at the range comparison fanstel made. it's explicit how their different module design impact range. But if you don't need all the new bells&whistles of 840, then it may be smarter to use 832 or nrf24pa, and a good module, too bad to buy a module with degraded RF..I asked Nordic two months ago, I don't think their eta changed. should be soon I imagine.
-
@scalz said in nRF5 Bluetooth action!:
I still don't get the point of a holyiot module, and chip antenna modules, when it's not for wearables though!
Not really disagreeing with you, but it's nonetheless interesting that if you do a search on Aliexpress for nrf52832 and sort the results by number of orders, the HolyIOT has gotten by far the biggest number of orders:https://www.aliexpress.com/premium/nrf52832.html?spm=2114.search0204.0.0.631303423oXjxi&site=glo&groupsort=1&SortType=total_tranpro_desc&g=y&SearchText=nrf52832&tc=ppc&initiative_id=SB_20180117073832&needQuery=n&filterCat=100000201,200010206,200084026[Edit: I'm wrong. The Ebyte module got the most orders.]
-
I measured the Fanstel BTC832X at maximum Tx, and it draws more current than I had thought: around 330ma. As you would expect, though, the range and coverage is excellent, even at 2mbps, and even for diminutive receivers like the HolyIOT.

For that reason, I think it generally beats the RFM69's performance, which IIRC consumes around 100ma at max Tx power, but has a max transmit speed of 300kbps. i.e. Total mah to transmit a payload should be less with the Fanstel BT832X.
-
Since the Fanstel's don't come with the low frequency crystal oscillators already installed, when it is worthwhile to install them? I'm blithely running off the built-in RC oscillator, and I'm not noticing problems.
-
Even with two CR2032's in series, I can't get 330ma out of them for very long, if at all, before internal resistance becomes severe and it plummets to 110ma or less. Nonetheless, at least some of the preliminary testing suggests that the initial burst may be good enough to extend the Tx range for long enough (100ms) to reliably wake a sleeping receiver node that sits outside the range of a non-amplified transmitter.
-
@neverdie The internal RC Osc will allow you to keep your BOM costs lower. However when using the Bluetooth Softdevice the Crystal will lower the power consumption as the BT window will be narrower.
-
@jokgi said in nRF5 Bluetooth action!:
@neverdie The internal RC Osc will allow you to keep your BOM costs lower. However when using the Bluetooth Softdevice the Crystal will lower the power consumption as the BT window will be narrower.
Is the choice of RC osc or crystal of any consequence at all for Nordic's proprietary radio modes? For instance, I wasn't sure whether or not the cyrstal's greater accuracy might achieve a lower bit error rate at 2mbps.
-
@neverdie I suppose the radio is using the high frequency clock, so it doesn't have any influence ?
-
@nca78 said in nRF5 Bluetooth action!:
@neverdie I suppose the radio is using the high frequency clock, so it doesn't have any influence ?
The LFCLK is required for BLE timing. Without the MCU required more energy to generate (synthetic) or calibrate (RC) the 32kHz signal.
-
@d00616 said in nRF5 Bluetooth action!:
@nca78 said in nRF5 Bluetooth action!:
@neverdie I suppose the radio is using the high frequency clock, so it doesn't have any influence ?
The LFCLK is required for BLE timing. Without the MCU required more energy to generate (synthetic) or calibrate (RC) the 32kHz signal.
Since Mysensors isn't using BLE, then it doesn't matter?
-
Where can i get a Kicad component for Ebyte nrf52832?
-
You can find it in my kicad repo: symbol and footprint
I didn't used it in any design so please double check.
-
Any suggestions how can I get serial debug messages out of the NRF52832 (Fanstel BT832)? I can upload the program over the SWD interface. I'm using a black magic probe with the Arduino NRF5 package on Windows 10. I know it works because the node shows up in my controller.
-
@nagelc said in nRF5 Bluetooth action!:
Any suggestions how can I get serial debug messages out of the NRF52832 (Fanstel BT832)?
Define one of the pins as serial TXO. Then connect it to RXI on an FTDI TTL-USB converter and read it that way. That's what I do, and it works.
-
@neverdie
Do you define the pins in MyBoardNRF5? In MyBoadNRF5.cpp, I replaced the 0 in the first line with10, thinking this will map Arduino TX0 to P010. This did not seem to work. How do you map the TX0 pin?
-
@nagelc No, you want to change the values in the MyBoardNRF5.h file instead. For an example, see the source code in: https://www.openhardware.io/view/499/10-years-wireless-PIR-Sensor-on-just-one-set-of-3-AAs#tabs-source
So, in your case, you'd want:
#define PIN_SERIAL_TX (10)and, to avoid conflicts, make sure that pin P0.10 isn't defined anywhere in the same .h file as something else already. If it is, you may need to change that as well.
