DIY CNC mill from mainly salvaged and 3D printed parts


  • So I have a couple posts in some other threads on this subject, but wanted to move it to it's own thread in the interest of not Hijacking one of the other threads.The other project with posts are the "What did you build today" and the "CNC PCB milling" posts.

    So as not to be too repetitive, I will not do a lengthy first post for this repeating what I said in other posts, but I will post some of the pics that I posted in the other threads so people can get a visual as they start to read this.
    0_1517783145836_f7c11e3f-5a0d-4623-a4aa-bcaec43ba6bb-image.png 0_1517783162627_f8049541-2a33-4336-9d45-dc05ce944c3f-image.png 0_1517783182634_ff92ad83-8ccf-490b-83dd-dddec5a3e86c-image.png 0_1517783214723_7a67953c-c7a3-46dd-a3bf-5f29aee56ac6-image.png 0_1517783191959_8837a4b7-18d8-4a94-8a52-b19f37184855-image.png

    I will have more to post here later tonight as I am in the process of 3D printing the bearing mounts for the platter. Once I have that done I will probably shoot a short video showing the current workings so far.


  • Hero Member

    @dbemowsk Do you use special software for designing the 3D printed gears? Also, what kind of material do you make them out of?


  • @neverdie The software that I am using for designing the whole thing is OpenSCAD. Within OpenSCAD, I found a gear library that seems to work pretty good. Right now the parts are just printed in PLA. When I designed the front and rear frame braces, the plan was to print them with 10% infill just to test them for fit and then print them with either a slightly higher infill or solid plastic. I was surprised to find how sturdy the parts were with just that 10% infill, so I left them at that. If I find any part that isn't sturdy enough, I can re-print it with higher infill, or in ABS or PETG which are a bit stronger.


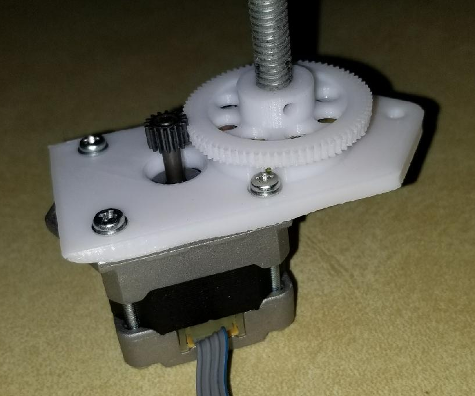
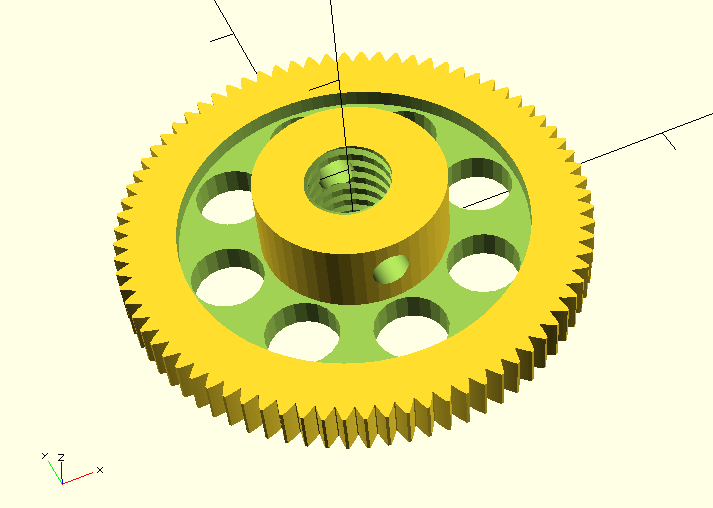
  • @neverdie The one thing that I like about OpenScad is that it is structured like a programming language. This is how I call the module to make a gear:

       difference() {
            gear (number_of_teeth=78,
                        circular_pitch=90,
                        gear_thickness=2.5,
                        rim_thickness=4,
                        rim_width=4,
                        hub_thickness=9,
                        hub_diameter=16,
                        bore_diameter=7,
                        circles=8);
            translate([0, 19, 6]) {
                rotate([90, 0, 0]) {
                    cylinder($fn=360, 38, d=3.15);
                }
            }
            english_thread (diameter=5/16, threads_per_inch=18, length=0.4);
        }
    

    This produces a gear like this which even has the center part with the threads already on it so I can just thread it on to the Y axis rod.
    0_1517959204795_94362ae3-d0cc-4fdd-9e0d-970db77c07ec-image.png


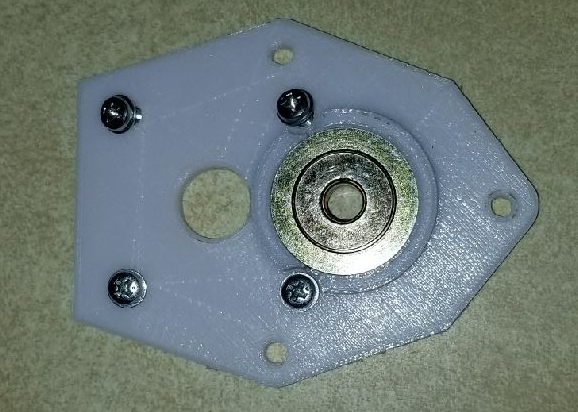
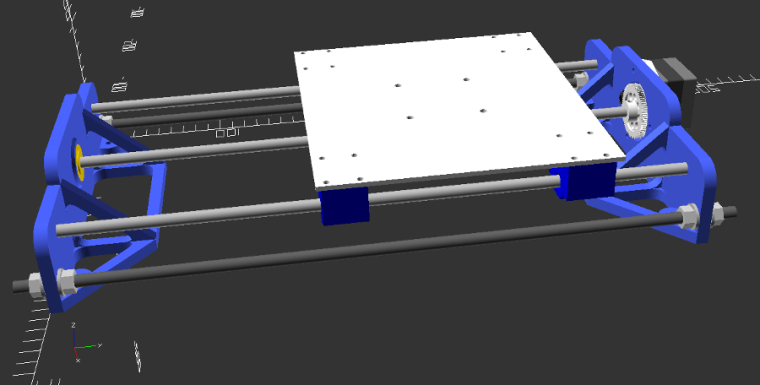
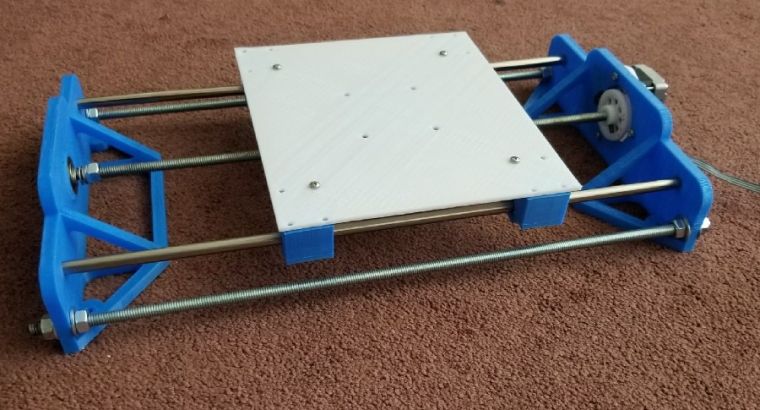
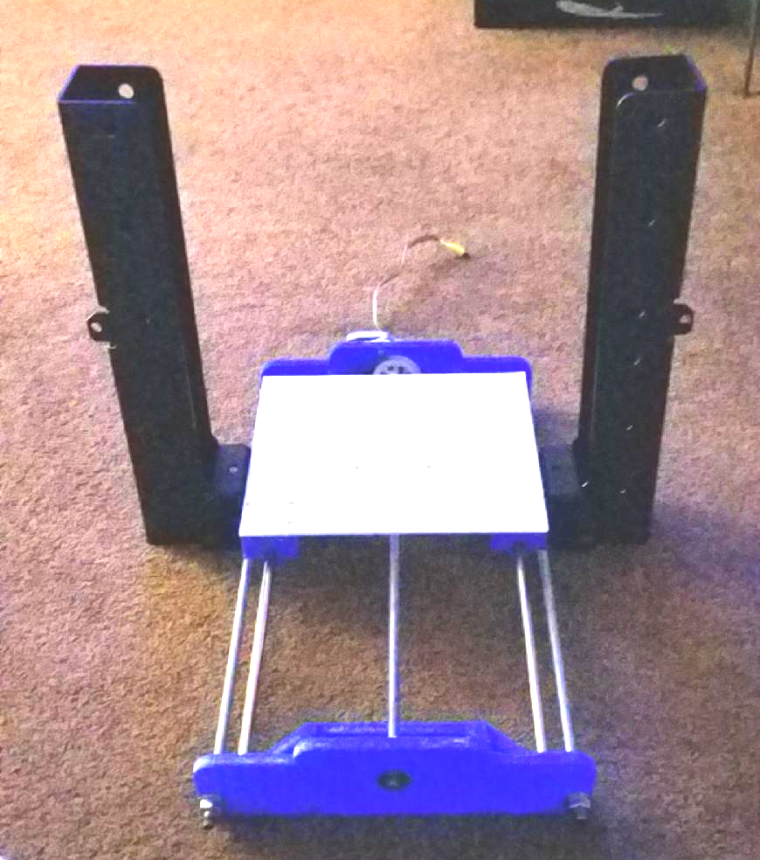
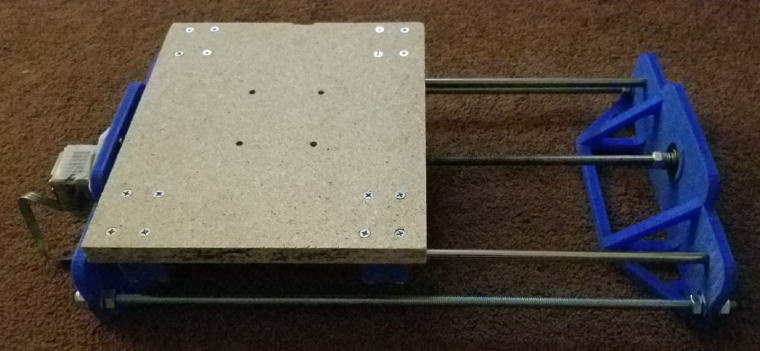
  • So last night I tested the limits of my 3D printer bed. I printed a thin platter that I will mainly use as a drill guide for the MDF that I will cut today. I haven't posted anything in a while on this because I was working with a guy from work that has a metal lathe to make me a new Y axis threaded rod/lead screw. Here is a set of side by side pictures showing my OpenSCAD 3D rendering with a picture of the actual setup so far at the same angle.
    0_1518284895442_3df63842-2dd6-4365-87c0-f43bbb777a93-image.png
    0_1518284913489_c45e360b-4720-4464-b92e-674df833f3ea-image.png

    I will also be working on figuring out a set of X/Z axis uprights today. I have done a little work on an X axis motor assembly the past couple days, but it was mainly playing with some ideas. More on that later.


  • Hero Member

    Are you planning to build any closed-loop feedback into your design? I think the z-axis on my CNC might benefit from it, but I suppose it might require different software to take advantage of it. Perhaps there are other ways of getting the same result though.


  • @neverdie What kind of closed loop feedback are you referring to? I just have the standard GRBL software on an arduino uno with a CNC shield on top. I haven't looked into everything that the board can do but there are a lot of options that I will have to figure out.
    0_1518299055530_ed443944-cf85-46dd-8166-fb4c414afdb5-image.png

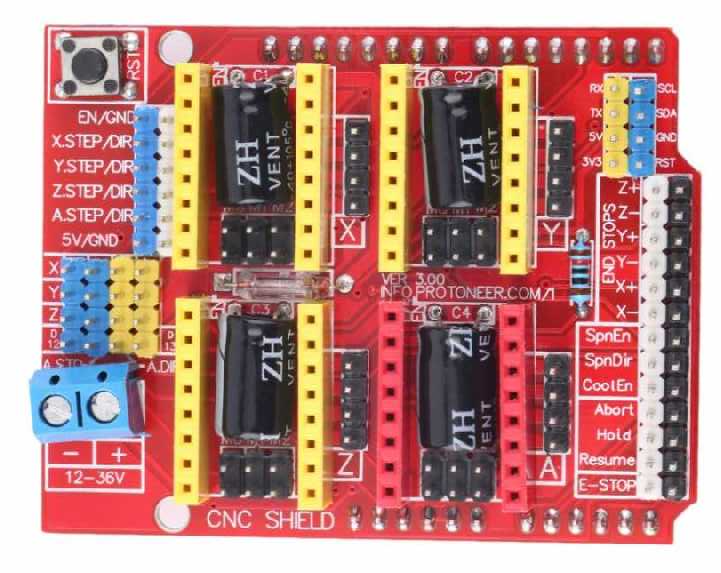
    One question I have related to your CNC setup and this shield. Do you have end stop switches on both ends of your X, Y and Z axes? I noticed that there is + and - end stop switch inputs for all 3. My 3D printer only has end stops on one end of each, but maybe a CNC is different.


  • Hero Member

    No end stops at all.


  • @neverdie I was curious too about what kind of closed loop feedback you were referring to in your earlier post.


  • So I am toying with an idea for the uprights that will hold the X and Z axis. I salvaged these old DLP projector wall mount brackets and got 2 of these parts.
    0_1518320666194_6ed50cef-9187-42e8-b025-9071c112f211-image.png
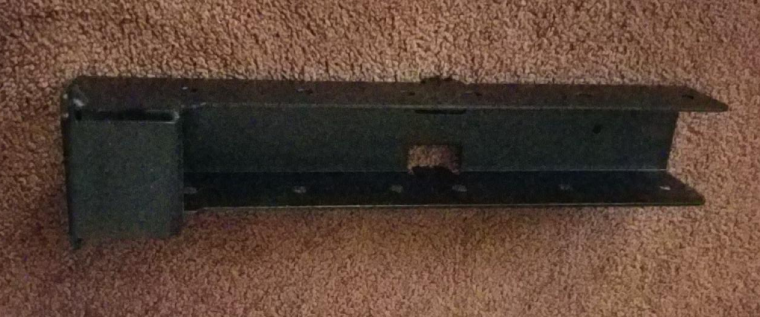
    The idea is to have them mounted on the sides of the Y axis frame to hold the X and Z axis vertically. I guess my main issue that's leaning me away from using them is that they are quite heavy. If I do use them, I will have to design some sort of bracket that would mount them to the Y axis frame. One nice thing is that they have some holes pre-drilled at a few different levels that might help in mounting the cross rails for the X axis.
    0_1518324588668_dcd7f401-37b8-4483-947d-5c9d2fa40d57-image.png

    Ahhhh the dilemas of designing something from scratch....


  • Hero Member

    @dbemowsk Looks promising. The Trinus 3D printer (http://www.trinus3d.com/) went all steel on everything, and maker's muse attributed that as the reason why it could print in such fine detail.

    As to the closed-loop versus open-loop feedback, I had written about that in the CNC PCB milling thread, but @andrew didn't think it was needed, so it probably isn't. But anyway, if you look inside, say, modern inkjet printers, they don't even use stepper motors anymore for head positioning in the x-axis. Instead, they rely on a kind of quadrature linear tape that it reads to position the head very precisely. Well, why? In the past, they used to use stepper motors for that. Is it purely a manufacturing cost saving, or did they need to go that route to get more precise control as DPI's increased?

    So, since you're salvaging parts anyway, you could extract such linear positioning tapes from used inkjet printers (which are practically free, because people upgrade and throw out their old equipment because it's so cheap now). Just a thought....

    How to use linear encoders with Arduino. hardware, code, and demo. – 09:52
    — Cheap Science


  • @neverdie I get what you are going for now with the closed loop feedback. The problem in it is that I plan to use the standard GRBL firmware to run this, and if I were to go with that approach, I would probably have to modify the GRBL firmware to accommodate that as I don't think it is something native to it. If I am wrong on that, please correct me. Along with that, I don't know if I would have to make modifications to the CNC shield to do it, or if I could tone out some available pins to use for that. I don't know how encoders like that would work with steppers anyway. When steppers move one position, that equates to a certain distance based on it's direct drive, or as in my case the gear ratio. The fine encoder discs or strips used in ink jet printers may be able to be matched to the steps of the stepper, but if one step of the motor matched to a half step position on the encoder, that could throw things off slightly. I think the encoders would only be needed if the steppers were prone to missing steps, which if they are set up correctly, shouldn't. I think the steppers will be accurate enough for this application. Besides, the extra work it would take to salvage the parts and implement them into the design would be more work than I would care to take on at this point.


  • Still working on the X/Z axis uprights getting things figured out. In the mean time, I got a piece of MDF cut and fit for the work platter.
    0_1518409956932_61f0fcc4-39ef-4bca-abee-633b7659a0f2-image.png


  • Just a concern, the MDF plate could/might contains sand particles (manufactures use cheap wood materials), so don't let your expensive endmills cut down to the MDF as this will ware out the sharp endmills


  • Hero Member

    @bjacobse What material do you recommend instead?


  • Trying to find a stepper that will work for the X axis is proving to be a bit troublesome. I may end up ordering one. I wish I could find a larger junk laser printer.


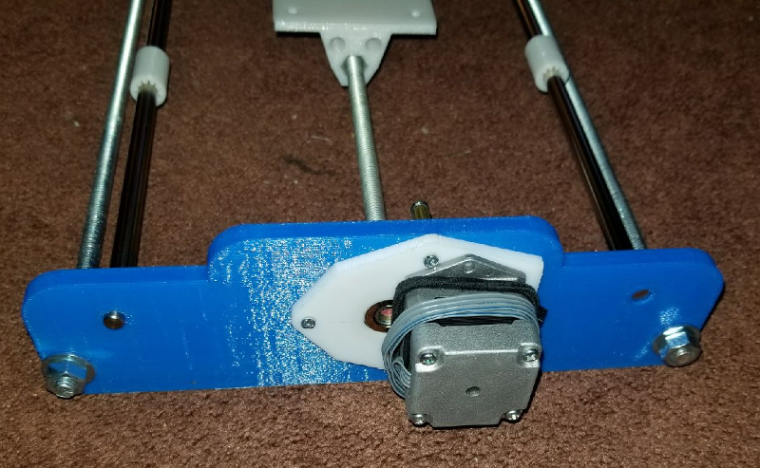
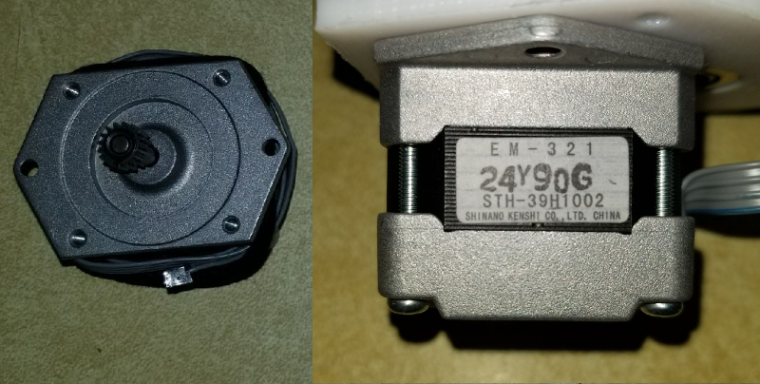
  • After some further review and thought, I am thinking of just getting a set of 3 motors. I figure that way I have a matched set and I am not fighting things like too slow speed on one axis that is fighting the others when milling a job. This will require some modifications to my current Y axis, but I will only have to modify the bracket on the motor side which won't be hard at all.

    The question I have is, will these motors be good enough? They are 0.9° which is 400 steps/rev vs the somewhat standard 1.8° @200 steps/rev. They are 65 oz-in bipolar motors.
    https://www.ebay.com/itm/3pcs-NEMA17-0-9-Stepper-Motor-65-oz-in-Robot-Reprap-Makerbot-Arduino/122627614293?hash=item1c8d2ce655:g:z1MAAOSwX9FZH06R


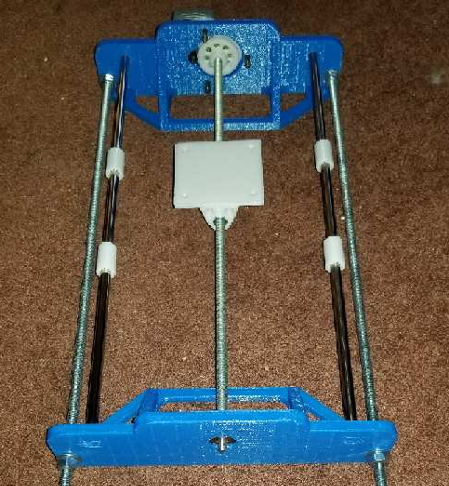
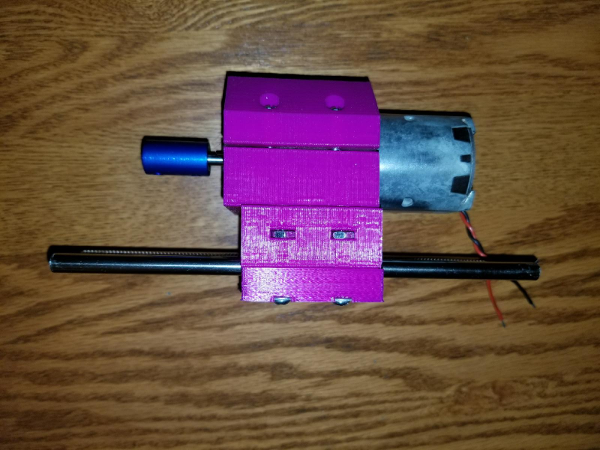
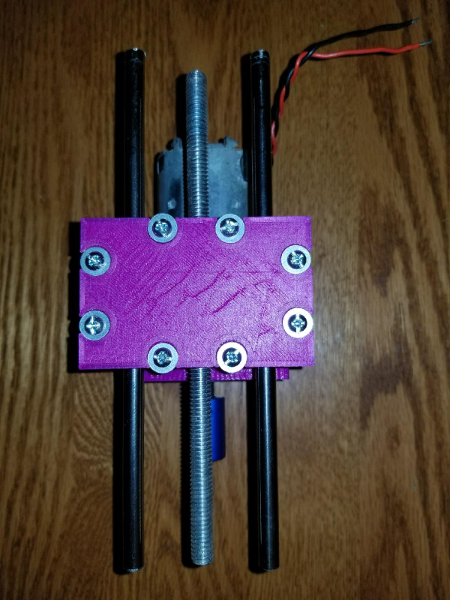
  • Well, haven't posted to my thread in a while so I thought I'd give an update. I am close to having the Z axis complete. Below are some pictures of the spindle assembly as I have it right now.
    0_1519629445785_0ea7bc4a-55ec-4531-b443-451772d05d2f-image.png
    0_1519629461406_66672fd9-3a0b-4388-9f7f-db5060f3ce07-image.png
    0_1519629494067_08d76f89-3b1b-4939-a8a0-f61498ff44c1-image.png

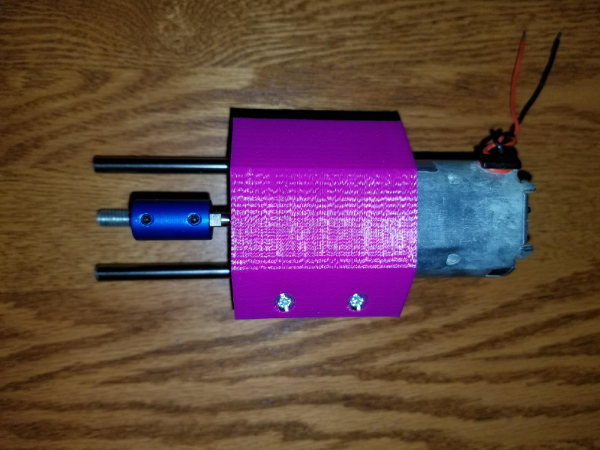
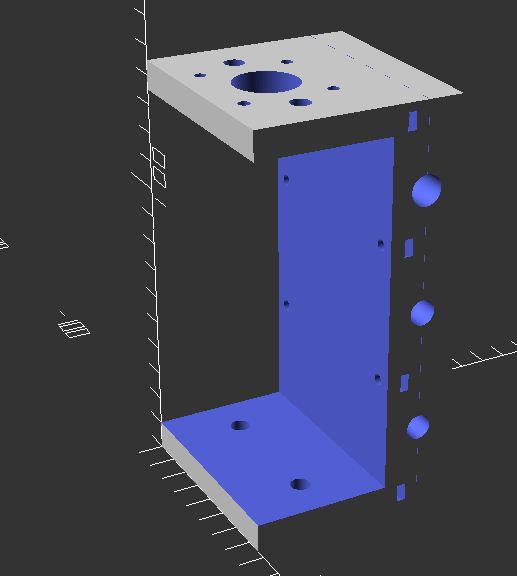
    This is the next part in line to be printed is the Z axis motor mount and X axis carriage. Below is a pic of the design. I have it printing now and there is 11 hours to go in the print. The longest printed part so far.
    0_1519630176063_73bcfa87-ab38-49bc-8fe6-bcb500aad10e-image.png


  • Hero Member

    @dbemowsk said in DIY CNC mill from mainly salvaged and 3D printed parts:

    I figure that way I have a matched set and I am not fighting things like too slow speed on one axis that is fighting the others when milling a job.

    From what I've read, your GRBL controller would compensate, as it knows the speed of each motor (well, after you tell it, that is).


  • @neverdie said in DIY CNC mill from mainly salvaged and 3D printed parts:

    From what I've read, your GRBL controller would compensate, as it knows the speed of each motor (well, after you tell it, that is).

    I figured that, but I was having trouble with a couple of the steppers that I was trying to use. Couldn't seem to get them to run reliably from the GRBL controller. The other part would have been figuring out a drive system for them as they all had geared heads. I would have had to figure out a gearing and mounting system. The motors I got were only $33 US, so basically $11/motor, so not a bad price, and I can direct couple them to the threaded rods making things easier.


  • So I would call today's part of the build pretty significant. I have the Z axis mostly assembled and did a drive test. Below are some pics of the assembly.
    0_1519793838032_d75dde6c-6708-4a79-9322-b84e3babe900-image.png
    0_1519793925038_58d39d2d-d5bc-4234-bc58-56bd0e688771-image.png
    0_1519793979809_c39e3514-2513-46e1-b54a-53b7c54a5ca8-image.png

    Here is the assembly taking it's first steps. It still needs some adjustment, but from what I am seeing, things should work. The next part of the build is going to be getting the uprights made that will hold the X axis rods and drive assembly. Once that is done, I should be able to do some more solid testing and calibration.
    CNC Z axis short test – 00:44
    — Dan Bemowski


  • As some of you may have noticed, based on the earlier cad drawing, I had to make some adjustments to the large white bracket. The adjustments were there to let the spindle motor pass by the bracket. On the first attempt, the back of the spindle motor was hitting the bracket restricting travel. Also, the lower lip of the spindle motor assembly was hitting the lower part of the bracket. A few tweaks later and this was born.
    0_1519796458462_0896fde2-2138-4121-b63e-e4cd5d316043-image.png


  • So, the project is nearing completion. I have an amalgam of colors used in the setup as I was trying to use up some rolls of plastic that I had on hand. I now have a gantry assembly that is held together at the top with some 3D printed T-Slot channel that was part of a failed print. There are 3 pieces strung together with some 10-24 threaded rods run through the center holes.
    0_1520144932507_fa2e8246-42be-407e-b578-34d9c2fd8461-image.png

    The bottom is strung together with a custom 3D printed I support that also has a piece of 10-24 threaded rod through it. That too was done in two pieces because I could not fit the whole thing on my print bed.
    0_1520145413839_a0af6d26-765d-435c-926f-f17b915347d1-image.png

    I am in the process of printing the drill guides to drill the holes in the MDF sides that will hold the smooth rods and the X axis stepper.
    0_1520146410672_096a0741-01b0-4044-a4a5-59ed2dfcf047-image.png

    Here are the latest pics of the assembly so far.
    0_1520146643475_3b29f325-e4ba-4dd0-9460-f0bcbd6f66a5-image.png
    0_1520146770892_2c37acac-8e4d-45f8-b3ce-6458238af65b-image.png
    0_1520146721843_0ff2e35e-00e6-4197-82ff-5979b527a740-image.png

    Once I have the gantry X axis rods in place with the Z axis carriage, I will then be able to do a full test of the electronics. I opted for now to keep the salvaged Y axis motor assembly since I had that working. Once I have everything working, I will post a video.


  • @dbemowsk MDF? That is chipboard or particle board, no?
    I very much doubt you will get sufficient rigidity even were you to glue/screw ribs on those side plates, and as a material it behaves badly with vibrating bolts etc...


  • Hero Member

    If it doesn't work out, maybe you will want to build an MPCNC instead?


  • @zboblamont I'll see how it goes. It is a big experiment at this point. If it doesn't work out I may be able to have a frame milled pretty cheap. I work for our local school district and I know the shop teachers at our high school that run the large CNC mill that they have. I may be able to have them mill me some parts. I do have all the needed steppers and things, I may just need a frame, worst case.


  • So the CNC is near ready for testing. I need to solder a connector on to the X axis stepper and I should be able to run some tests. I think the next step is going to be figuring out how to calibrate the GRBL controller.

    Here are some pics of the build so far.
    0_1520435634637_d55a543c-c83e-45c2-baf1-88b9dffe4bf7-image.png 0_1520435645089_b6649401-63a5-4317-83fb-e3ffde4c1535-image.png 0_1520435653054_883b5d94-af50-4211-8b3c-13f5d682457e-image.png


  • Hero Member

    @dbemowsk A+ for sticking with it all the way to completion.

    The main calibration number will probably be the revolutions per inch for each of the axises (axi?). From there you can start air carving.


  • @neverdie Thanks. I appreciate the tip and the compliment. Are you sure it is revolutions per inch and not steps per inch? The larger black motors I have for the X and Z axes are 400 steps per rev, but I think the Y axis motor is only 200 steps per rev. The Y axis is running on the large geared assembly though, so that should help more with both torque and revolution step count.

    There is the talk about the rigidity of it. I am thinking if I run it a bit slower, the rigidity will matter a little bit less, but I'll see once I get it going. The MDF I used is 3/4", and it feels pretty rigid, but only tests will tell. I have my spindle chuck, a set of 7 coletts and some bits on order from amazon. Those should be here tomorrow I am thinking, since everything was prime.


  • Hero Member

    @neverdie said in DIY CNC mill from mainly salvaged and 3D printed parts:

    @dbemowsk A+ for sticking with it all the way to completion.

    The main calibration number will probably be the revolutions per inch for each of the axises (axi?). From there you can start air carving.

    I'm just going from memory. I think you're right, though: steps per inch. Or something like that. 😉


  • So here is it's maiden voyage... It's first simultaneous run of all axes, AKA the initial X, Y and Z axis test.
    Initial axis test – 00:23
    — Dan Bemowski


  • I believe these are the settings that I need to change: https://github.com/grbl/grbl/wiki/Configuring-Grbl-v0.9
    I will be trying to configure things tonight. From the tracking information, I should have my chuck, coletts and the drills tonight, but the V bits won't be here til Monday. I am wondering if there are any test files that I can try to test my calibration? I will try to set up software on my WIndows laptop for now, but may migrate to a laptop running linux for the final setup.


  • I haven't had a chance to test the accuracy of the machine yet, but I did find a web page that has a VERY useful calculator for figuring out your steps per mm for a lead screw type system.
    https://www.prusaprinters.org/calculator
    Scroll down to the section labeled "Steps per millimeter - leadscrew driven systems". You just enter the parameters of your motor, microstepping, gear ratio (if any) and lead screw type/size. From that it calculates the steps per mm that is needed to configure your X, Y and Z axes for your GRBL controller.

    Figured this may be useful to others.


  • Hero Member

    Or use a dial gauge and get an exact measurement.


  • @neverdie I'll check things with my micrometer once I get my bits and get a print on something.


  • Hero Member

    That should work. Here's what I meant though:

    CNC 6040 Router Accuracy vs Speed Testing – 08:08
    — MBcreates


  • @neverdie Interesting video. It appears that I may have to get myself a dial indicator tool. Looks as if it will prove very useful. Using that calculator page that I found can at least get me to a starting point, and I can adjust from there.


  • So I am trying to get my spindle control set up and I am having an issue. I am checking with a volt meter between the spindle enable (SpnEn) and ground and I am reading 5v. No matter what spindle commands I am sending (M03, M04 or M05) I am always reading 5v. Is there a different command for spindle enable? If I check the spindle direction pin (SpnDir), I read 5v when I send M03, and 0v when I send M04. So that appears to be working.

    0_1520794359319_77a64f0c-8d90-446e-92f9-cd619ff12095-image.png


  • Hero Member

    @dbemowsk
    On my board,
    M3 SP1000
    spins the spindle at maximum speed. Just M3 by itself doesn't.
    It's not obvious from looking at your board where the spindle OUT voltage is. Maybe on the opposite side? I guess you'll have to probe around to find it.


  • @neverdie The SpnEn and SpnDir are control signals. For this board you need to have an external motor driver. After some looking, I may have found my answer. I am running GRBL 1.1. It appears that they swapped 2 of the pins. Pin 12 used to be the spindle enable pin in GRBL 0.9. In 1.1, they swapped 11 and 12 because pin 12 cannot be used for PWM which is how the controller limits the speed. I have not tried it yet, but I am going to try the Z+ pin which is pin 11. If that works, I may do a slight board mod.
    Here is the post that explains it. https://github.com/grbl/grbl/issues/1187
    0_1520804676897_8cee2644-8a98-4ff6-a564-84430a436c6f-image.png


  • BTW, I am using an external H- Bridge to control the spindle.


  • Just tried that and it worked perfect. I don't use SP though, I just use S. So M3 S1000 is full speed, M3 S500 slows the motor, and M5 stops it.


  • Hero Member

    Yes, my typo, just S, not SP.

    I do wonder whether some of the more "advanced" boards, like the Duet WiFi, actually perform better, or whether the results are the same.

    I think I may get a RAMPS board, if only because it supports Marlin, and that's what the MPCNC uses.

    On the other hand, there is a smoothieboard clone on aliexpress for $40. . Hmm... It's tempting....

    The jump from GRBL 0.9 to 1.1 convinced me that the firmware can make a difference, that it's not just all equivalent.


  • @neverdie I have always said, at least for 3D printers, that RAMPS was the way to go if you had to change your main board. Many of these 3D printer main boards have everything integrated into them. With RAMPS, it is all modular. If something dies, you are replacing 1 part rather than an entire board.


  • Hero Member

    @dbemowsk I'll give it a shot. I ordered a mildly upgraded RAMPs board (so called "version 1.6"). It doesn't have the re-settable fuses, which I guess have a dodgy reputation (or so Tom Sanlanderer seems to imply).
    https://www.aliexpress.com/item/Bigtreetech-upgrade-Ramps-1-5-Base-on-Ramps-1-4-3D-control-panel-printer-Control-Reprap/32822038995.html?spm=a2g0s.9042311.0.0.9zbnJj
    I'll be curious as to whether it can accept either the TMC2130 or the TMC2660 modules.


  • @neverdie I think most of those stepper driver modules run the same footprint. Check out this link. It is from Tom's 3D forum. People there are talking about those as replacements for the DRV88256's, which are the ones that I have. May be some useful info for you.
    https://discuss.toms3d.org/hardware-f6/drv8825-vs-tmc2100-vs-tmc2130-vs-tmc2208-t250.html


  • Hero Member

    @dbemowsk Short of making a very careful study of the datasheets, the other info that's available is awfully sketchy, so I ordered one of each module, and I'll see if I can get either one to work on the RAMPS board that I ordered. I'm not completely sure, but I get the impression that after they are properly configured, they can maybe just plug and play.


  • So, here is the latest update with pictures. I have the whole setup mounted on a leftover piece of MDF. I am using an ATX computer power supply to run everything. The fan pulls air from the back of the setup and blows it over the heatsinks for all of the modules.
    0_1520946272163_131786b5-061d-4b94-87f0-51fd63e651f5-image.png

    For spindle control I have 3 different modules. The first is a buck converter to boost the 12 volts to 24 for running the spindle motor.
    0_1520946618766_8dcfa79c-88e3-47ea-96c4-c7fcc2d79c60-image.png

    Next I have a dual H-Bridge that I had in my parts bin. I am only using one side of it. This handles the motor direction and speed. One problem with it that I had to overcome was that it had separate logic inputs for forward and reverse. The problem was that the CNC shield had a single output for spindle direction. To overcome this, I made a simple not gate circuit using an NPN switching transistor which sends a normal logic level to one input pin and an inverted signal to the other. I then use the enable line to start and stop the spindle. This setup works well.
    0_1520946877139_dc380f67-1b86-4d3f-ac22-fb6b71e70cba-image.png
    0_1520946841439_23a33cb6-099e-40ec-b23e-7428844f63eb-image.png
    This is the entire spindle drive circuity.
    0_1520947331423_88fe41df-a8ce-4e92-b13b-b748b5cbfeef-image.png

    Here is an angled front view.
    0_1520947428887_66a64c7c-abfd-43d8-a904-1299598725f4-image.png


  • Hero Member

    Don't forget to include a snub diode on the motor, if you haven't already.


  • @neverdie I thought that that was integrated on to the H-Bridge controller.
    0_1520952967198_15ac4a99-26fa-4c20-b0c6-ad75ddd26065-image.png


  • Hero Member

    @dbemowsk If that's what it is, then I guess you're covered. 🙂


  • Hero Member

    I like the idea of recycling an old PC power supply with a boost converter. For instance, a lot of the 48v power supplies don't come with regular 110VAC plugs, and you're even left with semi-exposed 110VAC wiring, so this kinda works around that. It's a bit ungainly, but it works.

    The only problem is you probably can't get to more than 240w, as that would be 20amps at 12v to the input of the boost converter. Actually less than 240w because of conversion inefficiency. At best probably just 0.85*240=204w. Maybe it would be good enough for milling PCBs though.


  • So I am trying to test the new machine and am having some trouble. I am running into an issue with some gcode I am testing. The gcode was generated from inkscape and I am including the gcode below. The way I am testing this is just using a terminal connection to the CNC and pasting the gcode into the terminal window. If there is a better way to test this let me know.

    When I paste in the gcode below, the CNC runs through part of it and then stops. If I then hit enter in the terminal window I get this:

    error: Invalid gcode ID:35
    

    From my research on this error I found this:
    A G2 or G3 arc, traced with the offset definition, is missing the IJK offset word in the selected plane to trace the arc.

    After testing in chunks, I have found the line that appears to be causing the error.
    This will cause the error:

    G01 Z-0.125000 F100.0
    G03 X44.448347 Y19.159901 Z-0.125000 I-203.958107 J224.353401 F400.000000
    G03 X45.751092 Y20.363421 Z-0.125000 I-235.328819 J256.037427
    G03 X47.053649 Y21.586232 Z-0.125000 I-48.170466 J52.617095
    G03 X47.737750 Y22.275812 Z-0.125000 I-14.623944 J15.191857
    G03 X49.369789 Y24.042092 Z-0.125000 I-12.444180 J13.135542
    G03 X50.077180 Y25.172247 Z-0.125000 I-4.326712 J3.494655
    G03 X50.505064 Y26.430623 Z-0.125000 I-5.413285 J2.542606
    G03 X50.652755 Y27.790183 Z-0.125000 I-6.183798 J1.359560
    G03 X50.459010 Y29.287714 Z-0.125000 I-5.884361 J0.000000
    G03 X50.002913 Y30.259582 Z-0.125000 I-2.876467 J-0.756965
    

    If I run it just to the line that ends in J0.000000, I don't get the error. From all the testing I am doing, it almost seems like a problem with the version og GRBL that I am running. If anyone can help, it would be greatly appreciated.

    Here is the full gcode file I am trying to run.

     %
    (Header)
    (Generated by gcodetools from Inkscape.)
    (Using default header. To add your own header create file "header" in the output dir.)
    M3
    (Header end.)
    G21 
    G00 Z5.000000
    G00 X43.225993 Y18.042555
    
    
    G01 Z-0.125000 F100.0
    G03 X44.448347 Y19.159901 Z-0.125000 I-203.958107 J224.353401 F400.000000
    G03 X45.751092 Y20.363421 Z-0.125000 I-235.328819 J256.037427
    G03 X47.053649 Y21.586232 Z-0.125000 I-48.170466 J52.617095
    G03 X47.737750 Y22.275812 Z-0.125000 I-14.623944 J15.191857
    G03 X49.369789 Y24.042092 Z-0.125000 I-12.444180 J13.135542
    G03 X50.077180 Y25.172247 Z-0.125000 I-4.326712 J3.494655
    G03 X50.505064 Y26.430623 Z-0.125000 I-5.413285 J2.542606
    G03 X50.652755 Y27.790183 Z-0.125000 I-6.183798 J1.359560
    G03 X50.459010 Y29.287714 Z-0.125000 I-5.884361 J0.000000
    G03 X50.002913 Y30.259582 Z-0.125000 I-2.876467 J-0.756965
    G03 X49.239064 Y30.916004 Z-0.125000 I-1.644692 J-1.141216
    G03 X48.146224 Y31.169360 Z-0.125000 I-1.092840 J-2.230286
    G03 X47.289509 Y31.048092 Z-0.125000 I-0.000000 J-3.086831
    G03 X46.475200 Y30.686621 Z-0.125000 I0.908316 J-3.144182
    G03 X45.866393 Y30.136858 Z-0.125000 I1.149043 J-1.884428
    G03 X45.713957 Y29.684007 Z-0.125000 I0.596437 J-0.452850
    G03 X45.985338 Y29.064178 Z-0.125000 I0.843529 J-0.000000
    G03 X46.679436 Y28.792797 Z-0.125000 I0.694099 J0.751942
    G02 X47.335454 Y28.673230 Z-0.125000 I-0.000000 J-1.859443
    G02 X47.812019 Y28.365758 Z-0.125000 I-0.474548 J-1.258585
    G02 X48.135474 Y27.903550 Z-0.125000 I-0.880288 J-0.960310
    G02 X48.257626 Y27.288877 Z-0.125000 I-1.485457 J-0.614672
    G02 X48.104631 Y26.518211 Z-0.125000 I-2.017507 J0.000000
    G02 X47.682050 Y25.896359 Z-0.125000 I-1.707278 J0.705676
    G02 X47.046759 Y25.486928 Z-0.125000 I-1.345892 J1.390756
    G02 X46.270965 Y25.339351 Z-0.125000 I-0.775794 J1.965345
    G02 X45.292182 Y25.503034 Z-0.125000 I-0.000000 J3.008278
    G02 X44.544242 Y25.933491 Z-0.125000 I0.740151 J2.151068
    G02 X44.042842 Y26.629349 Z-0.125000 I1.319262 J1.479165
    G02 X43.857268 Y27.530245 Z-0.125000 I2.093979 J0.900896
    G02 X44.053076 Y28.610069 Z-0.125000 I3.075347 J0.000000
    G02 X44.637076 Y29.609740 Z-0.125000 I3.204798 J-1.201795
    G02 X45.497064 Y30.450999 Z-0.125000 I4.328411 J-3.564579
    G02 X46.382366 Y30.983691 Z-0.125000 I2.558297 J-3.249731
    G02 X47.382290 Y31.355341 Z-0.125000 I3.964670 J-9.135984
    G02 X48.109089 Y31.522132 Z-0.125000 I1.448687 J-4.645789
    G02 X48.873231 Y31.617913 Z-0.125000 I1.459799 J-8.550217
    G02 X49.724411 Y31.652101 Z-0.125000 I0.851180 J-10.578908
    G02 X51.889847 Y31.372996 Z-0.125000 I0.000000 J-8.539831
    G02 X53.549194 Y30.649487 Z-0.125000 I-1.488545 J-5.678518
    G02 X54.704159 Y29.414339 Z-0.125000 I-1.811549 J-2.851516
    G02 X55.127380 Y27.753048 Z-0.125000 I-3.048959 J-1.661291
    G02 X54.936373 Y26.631768 Z-0.125000 I-3.386657 J-0.000000
    G02 X54.384704 Y25.636421 Z-0.125000 I-3.198858 J1.122406
    G02 X53.586077 Y24.796888 Z-0.125000 I-4.668650 J3.641547
    G02 X52.750815 Y24.225335 Z-0.125000 I-2.952589 J3.418787
    G02 X51.827360 Y23.791569 Z-0.125000 I-7.103306 J13.922514
    G02 X49.947214 Y23.018488 Z-0.125000 I-24.534815 J56.996312
    G03 X48.140362 Y22.212394 Z-0.125000 I6.972211 J-18.056198
    G03 X47.867719 Y21.960175 Z-0.125000 I0.309378 J-0.607900
    G01 X47.867719 Y21.885905 Z-0.125000
    G02 X48.332245 Y21.916706 Z-0.125000 I1.362590 J-17.031956
    G02 X48.926032 Y21.941607 Z-0.125000 I1.463551 J-27.806724
    G02 X49.538817 Y21.955270 Z-0.125000 I1.159694 J-38.263217
    G02 X50.225717 Y21.960178 Z-0.125000 I0.686900 J-48.074419
    G01 X53.159290 Y21.960178 Z-0.125000
    G03 X54.047826 Y22.036865 Z-0.125000 I0.000000 J5.185830
    G03 X54.440406 Y22.182978 Z-0.125000 I-0.196020 J1.127129
    G03 X54.758038 Y22.451881 Z-0.125000 I-0.663402 J1.105664
    G03 X54.978847 Y22.814255 Z-0.125000 I-1.019962 J0.869964
    G03 X55.149683 Y23.228183 Z-0.125000 I-5.791228 J2.632369
    G03 X55.275917 Y23.612631 Z-0.125000 I-4.868337 J1.811474
    G02 X55.407546 Y24.001962 Z-0.125000 I45.628782 J-15.209704
    G02 X55.498720 Y24.262473 Z-0.125000 I20.519916 J-7.035405
    G01 X55.740088 Y24.262473 Z-0.125000
    G01 X54.551808 Y17.912589 Z-0.125000
    G01 X43.225993 Y17.912589 Z-0.125000
    G01 X43.225993 Y18.042555 Z-0.125000
    G00 Z5.000000
    
    (End cutting path id: path4518)
    
    
    (Start cutting path id: path4516)
    (Change tool to Default tool)
    
    G00 Z5.000000
    G00 X35.980838 Y21.607403
    
    G01 Z-0.125000 F100.0(Penetrate)
    G01 X35.980838 Y25.190815 Z-0.125000 F400.000000
    G01 X35.999408 Y27.233175 Z-0.125000
    G03 X35.574593 Y26.748497 Z-0.125000 I52.703425 J-46.622391
    G03 X34.773990 Y25.822090 Z-0.125000 I191.750900 J-166.520630
    G02 X33.983162 Y24.922179 Z-0.125000 I-36.848082 J31.584152
    G02 X32.917298 Y23.761165 Z-0.125000 I-62.405165 J56.220956
    G02 X31.819666 Y22.649912 Z-0.125000 I-29.726417 J28.264352
    G02 X30.726405 Y21.625970 Z-0.125000 I-26.328768 J27.015589
    G01 X33.028700 Y21.607400 Z-0.125000
    G01 X35.980838 Y21.607403 Z-0.125000
    G00 Z5.000000
    
    (End cutting path id: path4516)
    
    
    (Start cutting path id: path4516)
    (Change tool to Default tool)
    
    G00 Z5.000000
    G00 X40.399760 Y21.607403
    
    G01 Z-0.125000 F100.0(Penetrate)
    G01 X42.590657 Y21.607403 Z-0.125000 F400.000000
    G01 X42.590657 Y20.809024 Z-0.125000
    G01 X40.399760 Y20.809024 Z-0.125000
    G01 X40.399760 Y20.084915 Z-0.125000
    G03 X40.407178 Y19.750985 Z-0.125000 I7.520648 J-0.000000
    G03 X40.436895 Y19.249405 Z-0.125000 I17.002115 J0.755670
    G03 X40.546108 Y18.791102 Z-0.125000 I1.970229 J0.227339
    G03 X40.696833 Y18.543863 Z-0.125000 I0.702969 J0.258990
    G03 X40.941182 Y18.384755 Z-0.125000 I0.600616 J0.655210
    G03 X41.290973 Y18.283925 Z-0.125000 I0.555297 J1.269242
    G03 X41.662590 Y18.250282 Z-0.125000 I1.978264 J19.782188
    G03 X41.977950 Y18.228226 Z-0.125000 I1.153236 J14.223609
    G02 X42.293361 Y18.222789 Z-0.125000 I0.000000 J-9.150730
    G02 X42.516390 Y18.209656 Z-0.125000 I-0.158205 J-4.587139
    G01 X42.516390 Y17.912583 Z-0.125000
    G01 X33.715674 Y17.912583 Z-0.125000
    G01 X33.715674 Y18.209656 Z-0.125000
    G01 X34.198412 Y18.209656 Z-0.125000
    G03 X34.458043 Y18.231591 Z-0.125000 I-0.716004 J10.022311
    G03 X34.959656 Y18.283923 Z-0.125000 I-3.655306 J37.467340
    G03 X35.448552 Y18.416918 Z-0.125000 I-0.290338 J2.032389
    G03 X35.683768 Y18.580993 Z-0.125000 I-0.249659 J0.608548
    G03 X35.843078 Y18.850674 Z-0.125000 I-0.547342 J0.505231
    G03 X35.962270 Y19.416503 Z-0.125000 I-2.408402 J0.802798
    G01 X35.999405 Y20.809021 Z-0.125000
    G01 X29.723789 Y20.809021 Z-0.125000
    G01 X29.723789 Y21.198928 Z-0.125000
    G03 X31.120862 Y22.513291 Z-0.125000 I-26.402073 J29.463183
    G03 X32.713060 Y24.151066 Z-0.125000 I-39.419679 J39.915522
    G03 X34.252508 Y25.840106 Z-0.125000 I-70.593355 J65.887243
    G03 X36.017970 Y27.864447 Z-0.125000 I-99.645628 J88.684620
    G03 X37.748161 Y29.937732 Z-0.125000 I-142.627488 J120.783656
    G03 X39.025809 Y31.522129 Z-0.125000 I-82.011066 J67.440569
    G01 X40.399760 Y31.522129 Z-0.125000
    G01 X40.399760 Y21.607403 Z-0.125000
    G00 Z5.000000
    
    (End cutting path id: path4516)
    
    
    (Start cutting path id: path4514)
    (Change tool to Default tool)
    
    G00 Z5.000000
    G00 X18.865337 Y24.225335
    
    G01 Z-0.125000 F100.0(Penetrate)
    G01 X20.480658 Y31.559267 Z-0.125000 F400.000000
    G01 X20.647760 Y31.559267 Z-0.125000
    G03 X21.301879 Y31.370938 Z-0.125000 I4.220657 J13.429377
    G03 X22.207381 Y31.150795 Z-0.125000 I6.684447 J25.522464
    G03 X23.141733 Y31.001820 Z-0.125000 I1.740292 J7.910320
    G03 X24.249741 Y30.946556 Z-0.125000 I1.108007 J11.079935
    G03 X25.672326 Y31.009030 Z-0.125000 I0.000000 J16.228010
    G03 X26.570605 Y31.150795 Z-0.125000 I-0.580218 J6.593308
    G03 X27.163172 Y31.377624 Z-0.125000 I-16.345032 J43.587248
    G03 X27.758887 Y31.614966 Z-0.125000 I-17.300215 J44.288718
    G02 X27.874660 Y31.545070 Z-0.125000 I-0.000000 J-0.130829
    G02 X27.944556 Y31.262194 Z-0.125000 I-0.537466 J-0.282876
    G02 X27.858000 Y30.728811 Z-0.125000 I-1.686705 J0.000000
    G02 X27.517517 Y29.981077 Z-0.125000 I-3.699295 J1.233098
    G02 X27.036658 Y29.338516 Z-0.125000 I-2.958736 J1.712955
    G02 X26.087865 Y28.477160 Z-0.125000 I-6.317281 J6.005326
    G02 X24.999472 Y27.947358 Z-0.125000 I-1.799138 J2.313175
    G02 X22.968624 Y27.697349 Z-0.125000 I-2.030848 J8.123382
    G02 X22.023587 Y27.724483 Z-0.125000 I0.000000 J16.470844
    G02 X21.353303 Y27.790183 Z-0.125000 I0.479583 J8.344780
    G02 X20.698448 Y27.945130 Z-0.125000 I0.823870 J4.943211
    G02 X20.090753 Y28.180087 Z-0.125000 I1.386162 J4.488536
    G01 X19.496612 Y25.562154 Z-0.125000
    G02 X20.420767 Y26.277720 Z-0.125000 I3.544856 J-3.623633
    G02 X21.371870 Y26.694735 Z-0.125000 I2.068978 J-3.425688
    G02 X22.425760 Y26.915093 Z-0.125000 I1.767117 J-5.821095
    G02 X24.045505 Y27.010372 Z-0.125000 I1.619745 J-13.720196
    G02 X26.002310 Y26.698984 Z-0.125000 I-0.000000 J-6.304103
    G02 X27.684619 Y25.822090 Z-0.125000 I-1.793851 J-5.493667
    G02 X28.853132 Y24.429454 Z-0.125000 I-2.426172 J-3.222266
    G02 X29.262806 Y22.721416 Z-0.125000 I-3.355793 J-1.708038
    G02 X28.719685 Y20.623608 Z-0.125000 I-4.322955 J0.000000
    G02 X27.201879 Y19.008034 Z-0.125000 I-3.955337 J2.195212
    G02 X25.055324 Y18.043352 Z-0.125000 I-4.247338 J6.580391
    G02 X22.467318 Y17.689786 Z-0.125000 I-2.588006 J9.294965
    G02 X20.516310 Y17.965951 Z-0.125000 I-0.000000 J7.029654
    G02 X19.125274 Y18.655265 Z-0.125000 I1.211062 J4.192136
    G02 X18.167632 Y19.798729 Z-0.125000 I2.094628 J2.726975
    G02 X17.844157 Y21.124661 Z-0.125000 I2.555779 J1.325932
    G02 X18.001470 Y21.835020 Z-0.125000 I1.682496 J0.000000
    G02 X18.475432 Y22.480048 Z-0.125000 I1.845992 J-0.859776
    G02 X19.163765 Y22.908353 Z-0.125000 I1.503460 J-1.648961
    G02 X19.942218 Y23.055620 Z-0.125000 I0.778453 J-1.983804
    G02 X20.910521 Y22.903307 Z-0.125000 I-0.000000 J-3.154065
    G02 X21.668941 Y22.498615 Z-0.125000 I-0.744739 J-2.308701
    G02 X22.184274 Y21.866063 Z-0.125000 I-1.061617 J-1.391084
    G02 X22.374483 Y21.031827 Z-0.125000 I-1.734336 J-0.834236
    G02 X22.212395 Y20.170622 Z-0.125000 I-2.368924 J0.000000
    G02 X21.780342 Y19.509343 Z-0.125000 I-1.793062 J0.699732
    G03 X21.254269 Y18.887006 Z-0.125000 I3.449199 J-3.449189
    G03 X21.186201 Y18.673830 Z-0.125000 I0.299780 J-0.213176
    G03 X21.278233 Y18.397734 Z-0.125000 I0.460159 J0.000000
    G03 X21.576106 Y18.153956 Z-0.125000 I0.643932 J0.482949
    G03 X21.992550 Y18.027396 Z-0.125000 I0.884662 J2.162523
    G03 X22.393050 Y17.986856 Z-0.125000 I0.400500 J1.958017
    G03 X23.573351 Y18.312863 Z-0.125000 I-0.000000 J2.299628
    G03 X24.286875 Y19.119436 Z-0.125000 I-0.912880 J1.526457
    G03 X24.642008 Y20.282923 Z-0.125000 I-4.628727 J2.048777
    G03 X24.788181 Y21.941607 Z-0.125000 I-9.337783 J1.658684
    G03 X24.614609 Y23.704630 Z-0.125000 I-9.040542 J0.000000
    G03 X24.156906 Y25.116548 Z-0.125000 I-6.224224 J-1.237565
    G03 X23.309525 Y26.128896 Z-0.125000 I-2.201031 J-0.981541
    G03 X22.133113 Y26.490499 Z-0.125000 I-1.176411 J-1.732823
    G03 X20.931989 Y26.297380 Z-0.125000 I0.000000 J-3.831820
    G03 X20.220721 Y25.859224 Z-0.125000 I0.566382 J-1.715806
    G03 X19.619208 Y25.205500 Z-0.125000 I7.557493 J-7.557497
    G03 X19.403778 Y24.893745 Z-0.125000 I1.484653 J-1.256244
    G03 X19.256083 Y24.552361 Z-0.125000 I3.008082 J-1.504041
    G03 X19.143841 Y24.188203 Z-0.125000 I3.312064 J-1.220236
    G01 X18.865337 Y24.225335 Z-0.125000
    G00 Z5.000000
    
    (End cutting path id: path4514)
    
    
    (Start cutting path id: path4512)
    (Change tool to Default tool)
    
    G00 Z5.000000
    G00 X14.904203 Y20.233452
    
    G01 Z-0.125000 F100.0(Penetrate)
    G01 X14.941337 Y19.379374 Z-0.125000 F400.000000
    G03 X15.057746 Y18.793506 Z-0.125000 I2.825055 J0.256823
    G03 X15.201274 Y18.543863 Z-0.125000 I0.629513 J0.195849
    G03 X15.445033 Y18.383087 Z-0.125000 I0.623587 J0.680268
    G03 X15.776848 Y18.283925 Z-0.125000 I0.534255 J1.182988
    G03 X16.129803 Y18.248805 Z-0.125000 I3.255779 J30.929087
    G03 X16.370989 Y18.228226 Z-0.125000 I1.351946 J14.421104
    G02 X16.630791 Y18.223896 Z-0.125000 I0.000000 J-7.796989
    G02 X16.927996 Y18.209656 Z-0.125000 I-0.340681 J-10.218602
    G01 X16.927996 Y17.912583 Z-0.125000
    G01 X8.164415 Y17.912583 Z-0.125000
    G01 X8.164415 Y18.209656 Z-0.125000
    G01 X8.572887 Y18.209656 Z-0.125000
    G03 X8.795484 Y18.230346 Z-0.125000 I-0.974770 J11.695148
    G03 X9.296997 Y18.283923 Z-0.125000 I-6.094603 J59.423063
    G03 X9.785893 Y18.416919 Z-0.125000 I-0.290337 J2.032380
    G03 X10.021106 Y18.580993 Z-0.125000 I-0.249656 J0.608537
    G03 X10.180418 Y18.850674 Z-0.125000 I-0.547335 J0.505231
    G03 X10.299610 Y19.416503 Z-0.125000 I-2.408361 J0.802788
    G01 X10.336743 Y20.270581 Z-0.125000
    G01 X10.336743 Y28.997033 Z-0.125000
    G01 X10.299610 Y29.851111 Z-0.125000
    G03 X10.182971 Y30.400736 Z-0.125000 I-2.487771 J-0.240753
    G03 X10.021106 Y30.686621 Z-0.125000 I-0.810657 J-0.270219
    G03 X9.776926 Y30.897553 Z-0.125000 I-0.581679 J-0.426566
    G03 X9.389831 Y31.020826 Z-0.125000 I-0.534986 J-1.010529
    G03 X8.980496 Y31.066901 Z-0.125000 I-1.187543 J-8.708864
    G03 X8.554320 Y31.095093 Z-0.125000 I-0.836645 J-9.412371
    G02 X8.127360 Y31.133065 Z-0.125000 I9.469020 J108.890844
    G02 X7.941612 Y31.150795 Z-0.125000 I1.875189 J20.626530
    G01 X7.941612 Y31.447865 Z-0.125000
    G01 X14.904203 Y31.447865 Z-0.125000
    G01 X14.904203 Y20.233452 Z-0.125000
    G00 Z5.000000
    
    (End cutting path id: path4512)
    
    
    (Footer)
    M5
    G00 X0.0000 Y0.0000
    M2
    (Using default footer. To add your own footer create file "footer" in the output dir.)
    (end)
    %
    

  • Hero Member

    @dbemowsk said in DIY CNC mill from mainly salvaged and 3D printed parts:

    The way I am testing this is just using a terminal connection to the CNC and pasting the gcode into the terminal window. If there is a better way to test this let me know.

    This may be your problem, or at least a contributing factor. Try using a gcode sender, such as ChiliPeppr, instead.


  • @neverdie Thanks a million. I tried the online version of chilipeppr and it seem s to be working.


  • So I did a test run of an old style font carving my house number into a piece of wood. I created the gcode using Inkscape which is a popular vector graphics program. For a test run I think it went fairly well.
    0_1521143564833_31bf19b1-9808-409b-acd4-2a11afab0107-image.png

    I did a video of it carving. The spindle is spinning much faster than it looks like in the video. It has to do with the recording frame rate on my phone.
    Test run of my CNC – 12:00
    — Dan Bemowski


  • Hero Member

    Looks like your spindle may have really bad runout.


  • @neverdie I don't think it's runout. If you look, a lot of the video is shaky. I think it is vibration from the V bit cutting into the wood. The tip of that bit may be bent a little which would cause vibration like that. I guess I'l find out when I try cutting a PCB. When I do one, I'll change to a new bit. I ordered a pack of 10. I have to see if I have any copper clad laying around.


  • Hero Member

    @dbemowsk As it turns out, I too will have to make something similar to:
    alt text
    in order to install my new brushless motor on the z-axis. What parts should I order to go inside the plastic? I mean, obviously two ball bearing something's and some kind of threaded nut or something. I'm just not sure exactly which something's I should get, if you know what I mean. Did you buy your something's, or were they junk-drawer parts that you had laying around?

    The z-axis that came with the 2418 is just a unit that came pre-assembled. I'm not even sure how I will take it apart. I suppose I could maybe extract the parts that are in it and re-use them, but they're melted into the plastic, so if I do that, I'm burning my bridges back to the system as it currently is. It does work, so I'm reluctant to wreck it.


  • @neverdie I wouldn't advise tearing apart your old one. As you mentioned, you could at least fall back to that if it came down to it. I am assuming that you are getting a different spindle motor?

    To make that part I just used 3D printed linear bearings that the smooth rods slide into. For the threaded rod/lead screw, I used a threaded rod coupler nut like this one:
    0_1521260695608_1d54e571-a58c-4005-a638-b606728de255-image.png
    I just hollowed out the hex shape inside the plastic so that when it is tightened on it holds it snug. I designed the part in OpenSCAD. Because I was designing the part myself, I had free reign on the design.
    0_1521261478663_1b390f58-9d2e-4b69-95bd-09c049fa30e7-image.png


  • Sorry, meant to include a pic of the bearings. These fit into the outer recessed areas in the frame. I did it this way so I could change them if I had to.
    0_1521262288843_954aaf5b-6b6e-469a-9348-602519750317-image.png


  • So, I was doing some reading on how to use auto-leveling with GRBL and the CNC shield that I have. What I read was that for GRBL on an arduino, the probe needed to be connected to analog pin 5 and ground. For the shield that I have, this is the arduino pinout that I found on it:
    0_1521435650092_f82b44f4-2a5c-48a9-96cb-a14321d67052-image.png
    Turns out that A5 is not connected on my shield and is labeled (not used/reserved). Luckily, in my parts bin I had a couple arduino uno prototyping boards. So I made a board that stacks in between the CNC shield and the uno. Here is the board with the probe attached:
    0_1521437115736_80013433-c6f1-4cce-98ad-b9d217684319-image.png
    The probe wires are made from an old dupont header cable that was salvaged out of an old PC. I figured that fit right in with the theme of the project.

    And here is the stack.
    0_1521437202914_8e39b474-f716-4a8d-a821-f226f8e6cb9d-image.png
    I did a test and the probe seems to work. Tomorrow I will probably do a test mill of a small pcb to see how that works out.

    For a junk parts build, I am pretty happy with the way it is turning out.


  • So, turns out the shaft couplers that I got are kind of crappy and seem to come loose every so often. These are the ones that I got which have their set screws on opposite sides from each other:
    0_1522022918230_b47d57af-9aa1-4af0-8b2d-ea96a4936ec3-image.png

    I am looking to get some replacements, but am wondering which style would be best to get. There is this style which has set screws at 90 degrees to each other:
    0_1522023192845_17eea504-30d6-48b7-9dc8-0b9fb2b364f4-image.png

    There is this style which actually clamps around the shaft:
    0_1522023269708_edf18238-769d-4f01-a74c-6ca01d45738c-image.png

    Then there is this style that also is a clamp style which says that it is somewhat flexible. The thing with this style is that I don't know if it separates at the red part:
    0_1522023350226_60608f23-eada-4381-9571-1ba409e8ee84-image.png

    The shaft on my stepper is a D shaft, so I am wondering how well the clamp style ones will work, at least on the motor side. The lead screw is round, so that should be fine for the one clamp.

    Any thoughts?


  • Hero Member

    @dbemowsk My kit came with the same blue couplers, and they came loose too. However, loctite fixed the problem.


  • @neverdie I'm assuming you used loctite blue?


  • Hero Member

    @dbemowsk Yes.


  • Hero Member

    I believe the flexible couplers are for when the stepper axis isn't co-linear with the threaded rod.


  • @neverdie I still may buy another set. I think the clamping style would be the best, but as I said, not sure how that would be on the D shaft.


  • Hero Member

    @dbemowsk Are these not something you can 3D print? Then you could customize to the D shaft if you like.


  • Hero Member

    BTW, I suspect that using longer linear bearings will lead to less slop:
    http://a.co/0yWkPgi


  • @neverdie said in DIY CNC mill from mainly salvaged and 3D printed parts:

    @dbemowsk Are these not something you can 3D print? Then you could customize to the D shaft if you like.

    I guess I hadn't thought about 3D printing them. I did order a pack of two though.
    https://www.amazon.com/uxcell-Encoder-Coupler-Coupling-8mmx5mm/dp/B01E0CTI42/ref=sr_1_14?ie=UTF8&qid=1522050398&sr=8-14&keywords=5mm+8mm+coupler


    @neverdie said in DIY CNC mill from mainly salvaged and 3D printed parts:

    BTW, I suspect that using longer linear bearings will lead to less slop:
    I would tend to agree. Does your CNC use linear bearings?


  • Hero Member

    @dbemowsk said in DIY CNC mill from mainly salvaged and 3D printed parts:

    Does your CNC use linear bearings?

    Yes.


  • Just a note to everyone. These style couplers are NOT good for the X axis, or Z axis if the motor is vertical and facing down.
    0_1522357570149_33880ba6-808f-49d8-bee1-1195a01d3b63-image.png
    The problem is that the spiral part is actually quite springy. When say the X axis motor spins to pull the X axis to one side, the springy part seems to really stretch. Pushing the X axis works fine. Since my Z axis motor is mounted on top with the weight of the axis being downward, this will cause the coupler to stretch even more. My 3D printer uses these on it's Z axis which works fine because the motors face up with the pressure of the Z axis down on the couplers.

    The only thing about the ones that I got that I liked was the way that it clamps to the shaft. I think the clamping action is better because you get more surface area grabbing the shaft.

    Something like this may be the best because it is solid and there is no stretching. It also has the clamping action.
    0_1522359308915_35e83148-b7ef-4cf1-a442-b3d959f8cf32-image.png


  • @dbemowsk they should work if used as intended. These couplings are supposed to be stiff in only one direction of freedom: Rotation of the axis (=transfer the torque of the motor to the axis). The other 5 degrees of freedom should be of low stiffness to absorb misalignment between motor and axis. So the correct type of bearings should actually constrain the axis to only rotate in one DoF and not translate into the coupling.


  • @technovation DIDn't think about that when I bought them. I will save them for spares for my 3D printer.


  • Hero Member

    I notice that the kit from CNCrouterParts does appear to use the springy couplers:
    John Park's Workshop: CNC Machine Kit Build @adafruit @johnedgarpark #adafruit – 09:28
    — Adafruit Industries

    So, I guess it can't be bad, because they seem to make very nice kits.


Log in to reply
 

Suggested Topics

0
Online

11.2k
Users

11.1k
Topics

112.5k
Posts