@adds666
I am still in "testing mode".
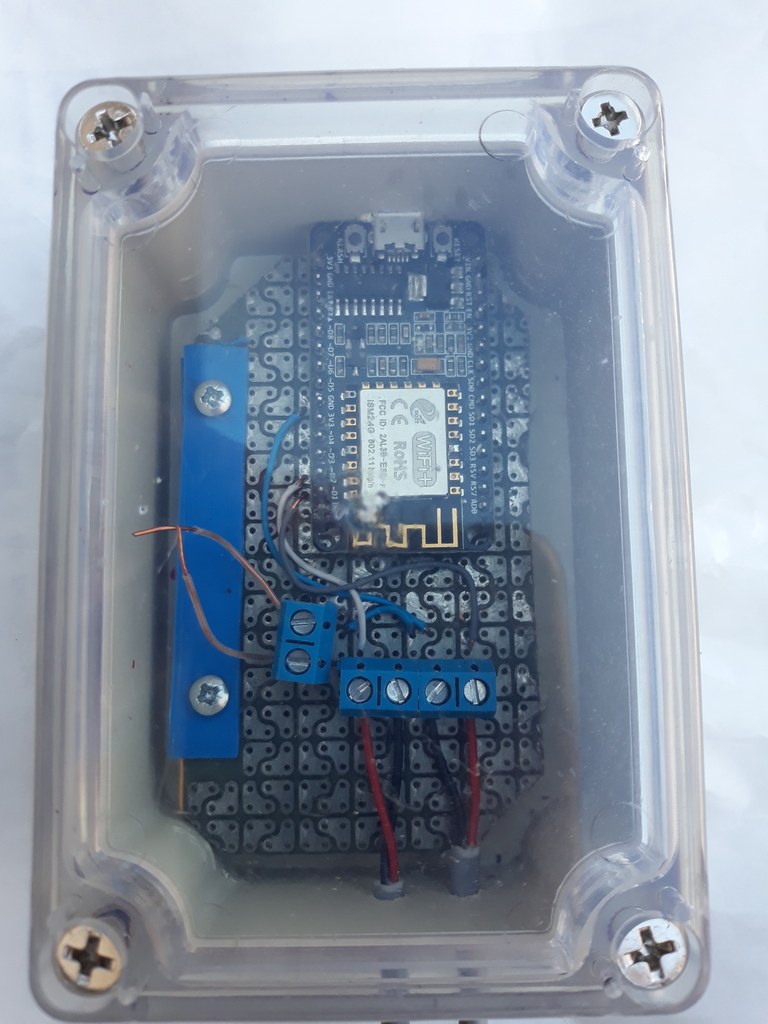
I had some problems with the node, it stoped receiving messages but did always work with the button.
Yesterday i built a new node and uploaded the sketch and it seems to work better.
Here is the sketch i use, I changed the pin for the button due to missing digital pins on my pcb.
And I am back on using digital pins for the stepper driver for the same reason.
I greyed out buttonpin 2. I don't think it is needed.
I also greyed out the heartbeat-part as I had problems. Just for testing. Don't know if it is suitable when using Home Assistant.
/*
PROJECT: MY Sensors curtain controller
PROGRAMMER: AWI
DATE: march 11, 2016
FILE: AWI stepper1.ino
LICENSE: Public domain
Hardware: ATMega328p board w/ NRF24l01
and MySensors 2.0 (Development)
Special:
uses AccelStepper library
Summary:
Curtain control with stepper motor.
Manual operation with 1 push button
Calibration with manual button
Remarks:
Fixed node-id
Change log:
20160312 - Cleanup
*/
// Enable debug prints to serial monitor
#define MY_DEBUG
#define MY_NODE_ID 8 // fixed node number
// Enable and select radio type attached
#define MY_RADIO_RF24
#define MY_RF24_PA_LEVEL RF24_PA_HIGH
//#define MY_RADIO_RFM69
#include <SPI.h>
#include <MySensors.h>
// stepper library
#include <AccelStepper.h> // http://www.airspayce.com/mikem/arduino/AccelStepper/
#define HALFSTEP 8 // Stepper uses "Halfstep" mode
// button library
// used for:
// - manual open close - single click: close/ stop/ open/ stop
// - calibration - after long press: open calibarion- until single press - closed calibration - until single press (stop)
#include <Button.h> // https://github.com/JChristensen/Button - Använd gammal version. testat med V0.9 och det funkar
#define CHILD_ID 1 // Id of the sensor child
#define SN "Curtain control"
#define SV "1.0"
#define buttonPin1 A0 // Arduino pin connected to buttonPin1
//#define buttonPin2 A0 // Arduino pin connected to buttonPin2 (fixed to ground)
// Motor pin definitions
#define motorPin1 2 // IN1 on the ULN2003 driver 1
#define motorPin2 3 // IN2 on the ULN2003 driver 1
#define motorPin3 5 // IN3 on the ULN2003 driver 1
#define motorPin4 6 // IN4 on the ULN2003 driver 1
//const unsigned long heartbeatInterval = 1 * 3600UL * 1000UL ; // heartbeatinterval
//unsigned long heartbeatCounter = 0 ;
//
// helper routines to store and retrieve long in mysensors EEPROM
union { // used to convert long to bytes for EEPROM storage
long longInt;
uint8_t LongByte[4];
} convLongInt ;
void saveStateL(int EEposition, long StateL){
convLongInt.longInt = StateL ;
for (int y = 0; y < 4 ; y++){ // convert to bytes
saveState(EEposition + y , convLongInt.LongByte[y]) ;
}
Serial.print("State saved: "); Serial.println(StateL);
}
long loadStateL(int EEposition){
for (int y = 0; y < 4 ; y++){ // convert from bytes
convLongInt.LongByte[y] = loadState(EEposition + y) ;
}
Serial.print("State read: "); Serial.println(convLongInt.longInt);
return convLongInt.longInt ;
}
// Initialize with pin sequence IN1-IN3-IN2-IN4 for using the AccelStepper with 28BYJ-48
AccelStepper stepper1(HALFSTEP, motorPin1, motorPin3, motorPin2, motorPin4);
// Initialize button active low, debounce and internal pull-up
Button myBtn(buttonPin1, true, true, 40); // Initiate the button (pin, pull_up, invert, debounce_ms)
MyMessage percentageMsg(CHILD_ID, V_PERCENTAGE); // used to send updates to controller
const long maxRun = 4000000L ; // maximum runway
long setPosition = 0 ; // remembers set position, need to be saved in EEPROM
const int setPositionEE = 4 ; // eeprom location
long openPosition = 0 ; // Position at open, need to be saved in EEPROM?
const int openPositionEE = setPositionEE + 4 ; // eeprom location
long closedPosition = 120000UL ; // Position at full close, need to be saved in EEPROM
const int closedPositionEE = openPositionEE + 4 ; // eeprom location
unsigned long idleTimer = millis() ; // return to idle timer
unsigned long idleTime = 100000UL ; // return to idle after 100 secs
unsigned long printTimer = millis() ; // print timer
unsigned long printTime = 1000UL ; // print after 1 secs
enum position_t {Open, Close, Idle, Running} ;
position_t lastDirection = Open ; // lastDirection only for buttonpress
position_t runStatus = Idle ; // indicates current status for running motor. used for status reporting to controller
enum State_t {sIdle, sCalibrateOpen, sCalibrateClose} ;
State_t State = sIdle ;
void setup() {
// setup buttons
pinMode(buttonPin1, OUTPUT);
stepper1.setMaxSpeed(1000.0);
stepper1.setAcceleration(1000.0);
//saveStateL(closedPositionEE, closedPosition) ; // INIT: save closed position in EEPROM
closedPosition = loadStateL(closedPositionEE) ; // need to get last values from EEPROM and assume the current position is correct
setPosition = loadStateL(setPositionEE) ;
stepper1.setCurrentPosition(setPosition );
}//--(end setup )---
void presentation() {
present(CHILD_ID, S_COVER, "Curtain"); // Window Cover sub-type, commands: V_UP, V_DOWN, V_STOP
// Register the LED Dimmable Light with the gateway
sendSketchInfo(SN, SV);
}
void loop() {
unsigned int now = millis() ; // current time for loop
// simple state machine for button press
myBtn.read();
switch (State) {
// Idle state, waiting for some action
// - button press
// - idleTimer
case sIdle:
if (myBtn.wasReleased()){ // idle
Serial.println("Button release") ;
// if running stop
if (stepper1.isRunning()){
setPosition = stepper1.currentPosition();
stepper1.moveTo(setPosition) ; // move to current position (was already there..)
} else if (lastDirection == Open) {
stepper1.moveTo(closedPosition) ;
lastDirection = Close ;
} else { // lastDirection == Close
stepper1.moveTo(openPosition) ;
lastDirection = Open ;
}
} else if (myBtn.pressedFor(3000)){ // move to calibratete state with long press
Serial.println("Button press long") ;
idleTimer = now ; // return to idle after ...
State = sCalibrateOpen ;
stepper1.move(-maxRun) ; // let the stepper open with maximum
}
break ;
// if not running and last action was open close ; else open
// if longpress Calibrate open
case sCalibrateOpen: // calibration going on
if (myBtn.wasPressed()){
stepper1.setCurrentPosition(0 ); // set new 0 position ??
openPosition = setPosition = 0 ;
State = sCalibrateClose ; // next is close calibarion
stepper1.move(maxRun) ; // let the stepper close with maximum
} else if (now > idleTimer + idleTime) { // timer expired -> abort calibration
State = sIdle ;
}
break ;
case sCalibrateClose: // calibrate closed position, end with keypress
if (myBtn.wasPressed()) {
closedPosition = setPosition = stepper1.currentPosition() ;
saveStateL(closedPositionEE, closedPosition) ; // save closed position in EEPROM
State = sIdle ;
stepper1.moveTo(openPosition) ; // return to open after calibration
} else if (now > idleTimer + idleTime) { // timer expired -> abort calibration
State = sIdle ;
}
break ;
default :
break ;
}
// power off stepper if not running (no need to reenable))
if (!stepper1.isRunning()){
if (runStatus != Idle){ // there was a change in runningstatus, so report to controller
setPosition = stepper1.currentPosition() ; // store in EEPROM and report ready to controller
saveStateL(setPositionEE, setPosition) ;
send( percentageMsg.set((100 * setPosition)/(closedPosition - openPosition))) ;
runStatus = Idle ;
}
stepper1.disableOutputs();
} else {
runStatus = Running ;
}
stepper1.run();
/*
if (printTimer++ > now + printTime){
printTimer = now ;
Serial.println(stepper1.currentPosition());
}
*/
}
// This is called when a message is received
void receive(const MyMessage &message) {
// We only expect few types of messages from controller, check which
switch (message.type) {
case V_PERCENTAGE:
// Curtain should be opened
stepper1.moveTo(message.getInt() * (closedPosition - openPosition)/100);
Serial.print("Message: "); Serial.print(message.sensor); Serial.print(" , value: % "); Serial.println( message.getInt());
Serial.print("Moving to: "); Serial.println(message.getInt() * (closedPosition - openPosition)/100);
break ;
case V_STATUS:
// Curtain should be opened or closed full
stepper1.moveTo((message.getInt() == HIGH)?openPosition:closedPosition);
Serial.print("Message - valid: ");
Serial.print(message.sensor);
Serial.print(" , value: % ");
break ;
default :
// not recognizable message
Serial.print("Message - valid: ");
Serial.print(message.sensor);
Serial.print(", Unrecognized ");
break ;
}
}