What version of the PCB did you order? The NRF24 or the RFM69?
I used the NRF24 but found it very unreliable and swapped all my sensors to RFM69.
As almost every NRF24 from china is fake you will find out that the range between sensor and gateway is a couple of meters.
The RFM69 (on 868 MHz) will have a range up to 50 meters and above. If used indoors it will easy go over 30 meters.
M
mickecarlsson
@mickecarlsson
Posts
-
💬 Easy/Newbie PCB for MySensors -
Windows GUI/Controller for MySensorsHere is a version that I downloaded a long time ago.
EDIT: It seems that I can't upload files. Bummer. PM me if you want the file. -
Windows GUI/Controller for MySensorsBug in MYScontroller.
When I edit the file firmware_config.csv and set a version number with a decimal the output in the debug is wrong.
This is my file:Type,Name,Version,File,Comments 10,Blink,1,Blink.ino.hex,blinking example 20,Tvattstugan-2,3,Tvattstugan-2.ino.hex,Testar Flash 30,Tvattstugan,2,Tvattstugan.ino.hex,Tvattstugan 40,Sovrummet,2.1,Sovrummet.ino.hex,SovrummetNote that I have 2.1 as the version in 40, Sovrummet.
But when I load the repo in MYSController v is 65535:2021-02-13 17:06:37 REPO FW "Blink" loaded. t=10, v=1, blocks=80, crc=0x46D4 2021-02-13 17:06:37 REPO FW "Tvattstugan-2" loaded. t=20, v=3, blocks=1488, crc=0x6D13 2021-02-13 17:06:37 REPO FW "Tvattstugan" loaded. t=30, v=2, blocks=960, crc=0xBB4F 2021-02-13 17:06:37 REPO FW "Sovrummet" loaded. t=40, v=65535, blocks=936, crc=0x6AB3 2021-02-13 17:06:37 REPO FW repository loaded. Items=4And in the GUI the version is also 65535.
Actually there are two bugs.
If I add (sloppy I know) more empty lines at the end in the firmware_config.csv file I get this in the debug:2021-02-13 17:13:35 REPO FW "Blink" loaded. t=10, v=1, blocks=80, crc=0x46D4 2021-02-13 17:13:35 REPO FW "Tvattstugan-2" loaded. t=20, v=3, blocks=1488, crc=0x6D13 2021-02-13 17:13:35 REPO FW "Tvattstugan" loaded. t=30, v=2, blocks=960, crc=0xBB4F 2021-02-13 17:13:35 REPO FW "Sovrummet" loaded. t=40, v=65535, blocks=936, crc=0x6AB3 2021-02-13 17:13:35 ERROR 2107-15-31 is not a valid date specificationOther than that, great piece of software. Thanks.
-
Faulty Easy PCB boards modifiedI bought 20 of the Rev 10 Easy PCB boards from Openhardware, but could not get them to work with the flash memory.
See thread here: Bug in Easy PCB
So I just bite the dust and forgot about them. Until a couple of days ago when I decided to see if I could get them to work.
I modified the PCB and got them to work.
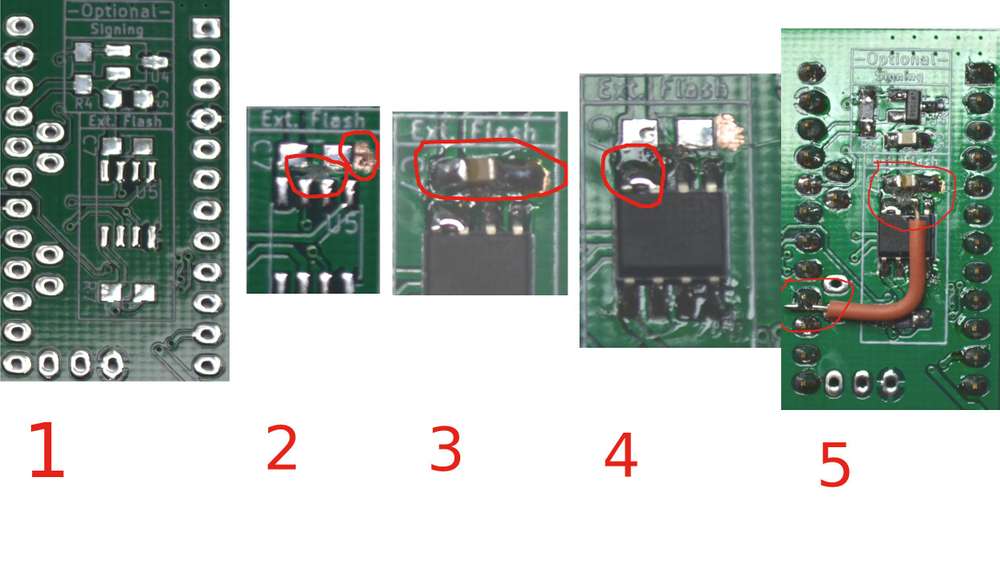
- The unmodified board
- Cut line between pin 7 and the capacitor and scrape of at the right of the C7.
- Solder the capacitor, solder a blob from the capacitor to the scraping.
- Solder a blob between pin 7 and 8 on the flash chip
- Solder a piece of wire between pin 6 of the flash chip and pin 13 of the Arduino.
I then started to try to flash the Sensebender OTA firmware to my Arduinos. It was a No Go, I had tons of trouble until I decided to change the Arduino to another version that I had.
Sad to say, all Funduino Mini pro's that I have are all faulty.
I had some other Mini pro that was marked Deek-Robot, those worked like a charm.
I did some testing yesterday and was able to flash new firmware via OTA and MYSController.
More about that in an another thread as I found some quirks in the process of doing OTA. -
Started with MySensors and about to give up (some feedback)I started with MySensors, Pro Mini and NRF24. I had tons of problems. I borrowed from work our WiFi scanner equipment and checked the 2.4 GHz. It was a total mess. Our DECT-phone almost killed the channel that was used for MySensors. And I discovered, as many has, the NRF24 was all counterfeit.
So, i trashed all NRF24 and moved to RFM69. That was nearly three years ago. My gateway is a Raspberry Pi.
My controller is Domoticz.
Conclusion, and a note to all MySensors users out there. Move away from NRF24 and go with RFM69, you will never look back. -
What does 1 and 0 in send(msg.set(value==HIGH ? 1 : 0)) really means?The code that you posted:
send(msg.set(value==HIGH ? 1 : 0))
Translates to this
If ”value” is HIGH (true) then send 1, if not send 0It has nothing to do with PIN 0 or 1
The same goes for
digitalWrite(RELAY_PIN_1, loadState(CHILD_ID_RELAY1)?RELAY_ON:RELAY_OFF);
It translates to
On RELAY_PIN_1, if it’s state is 1 write HIGH to RELAY_PIN_1 else write LOW.If you use serial in your sketch you can’t use PIN 0 or 1 as those pins are TX and RX.
-
My experiences with MySensorsI started out with NRF 2.4 MHz radios for my 8 nodes MySensors and Domoticz. As I also install WiFi networks for customers and have access to our equipment at work I did a measurement at home because I could not get a reliable network.
First measurement revealed that my DECT wireless phone occupied the same channel that was the default for the NRF radios. And that my neighbors run their WiFi occupying all other channels. Equipment used was Ekahau.
I tried to tweak the channels but no avail.
So, I bought new radios, RFM833, and that was the end of my troubles. For two year now my eight nodes have not skipped a beat. I measure temperature, humidity, light (lux), UV and radioactivity.And all my WiFi at home is at 5GHz as the 2.4 was exhausted.
I have about 40 NRF radios in a box with no use for them. -
My experiences with MySensors@rodaman if you have bought real NRF modules you have been satisfied.
Or if you have bought RFM 433, 833 or 915 MHz radios you had been more that pleased.
Not MySensors fault. -
My experiences with MySensorsBe aware that most of the cheap NRF boards from China are counterfeit. If you have those in an environment with a lot of WiFi you won’t get any range at all. And all “modifications” to improve range posted on YouTube are not any improvement.
You need to buy real NRF modules with external antenna.
Just my two cents. -
Magic mirrorI do, really easy to setup. I have decided to only show the temperatures and battery status when battery level is low.
-
💬 Easy/Newbie PCB for MySensors@sundberg84 if you look at the schematic you have connected MySX pin 10 to D2, but according to the spec for the MySX 2.4 it should go to D4.
-
💬 Easy/Newbie PCB for MySensorsI have now checked the PCB, and you are right @JPM
Pin 6 of the flash chip is not connected at all. No wonder I could not get that to work. Strangely is that the schematic is OK.
Thanks for finding this, I will modify my boards to get them working. -
💬 Easy/Newbie PCB for MySensorsI checked the schematic, and:
First mistake: Seems that the schematic is OK, the label for SCK (pin 6) is connected to physical pin 16 which is PCINT13 on the Arduino,
Second mistake: that is a bug, filter capacitor is not connected correctly.
Third mistake: That is also a bug, pin 7 and 3 should be connected to VCC
Now I am going to check the PCB, be back shortly, -
💬 Easy/Newbie PCB for MySensorsI just checked my batch of Rev 10, random check of the batch checked out OK. I have 20 boards.
-
Anyone using FlashForge Finder?@dbemowsk the Flashforge Finder dont have a heatbed and only uses PLA. And if you dont clean the bed with IPA it will lift. I always print with brim just to be sure.
-
Anyone using FlashForge Finder?Just do a regular calibration. Just hand tight the knobs, no force needed. Then start the calibration. Slowly rotate the knob until it the printer beeps. When the calibration is done. Print one of these that fits the bed thingiverse calibration
Carefully check the result. You should have a consistent print. If not, twist the knob closest to where you need to move re-calibrate. Thin line, the bed need to be closer to the nozzle, thick line that curls, move the bed away.
Note, when turning the knobs, just move it 1/4th turn each time. And make a note wich knob, the direction (clock wise or counter clock wise).To get more info, search on youtube for flash forge finder calibration, there are a lot of videos there.
-
Anyone using FlashForge Finder?I bought Buildtak that I replaced the bed with. I don’t use glue. I did print out a couple of calibration figures that I downloaded from Thingiverse. After a couple of re-calibrations and printing with the calibration figures I have not touched the calibration again.
However, when I printed the MySensors box from Thingiverse the corners still lifted.
That was when I found the suggestion to print with a rim.
Now my prints never lift.
I also clean the bed after each print with IPA. -
Anyone using FlashForge Finder?Print with a rim. There is a tickbox for it.
-
Anyone using FlashForge Finder?Yes, and I am very pleased with it.
-
cannot save water meter in arduino EEPROM@ahmedhodhod did it work with the suggested links?