110v-230v AC to Mysensors PCB board


  • Hero Member

    Hi all,

    **UPDATE April 17 2016 **
    The latest version of this board is available HERE.

    After spending a few months on this forum and a few prototypes later, I decided I wanted to build a small but cheap PCB which could be placed in either the wall behind the light switch, or above the lamp.

    Besides the boards I've seen on this forum, I wanted these boards to contain a module to go from 230v AC to 5/3.3v DC in order to power an Arduino nano and the NRF module. I eventually ended up with a PCB which is about 4 by 4.5cm. So with all components attached I'm hoping to get in stuffed in a 5x5x3cm plastic printed case.

    Modules which I've used to power the board:
    [http://www.aliexpress.com/item/5-pcs-HLK-PM01-AC-DC-220V-to-5V-Step-Down-Power-Supply-Module-Intelligent-Household/32319202093.html?spm=2114.32010308.4.19.8oKfZg

    UPDATE: 2015/09/18
    As promised, I've got an update for this project. The board has been tested in the past week, and everything is working as expected. Compared to the previous board I've posted, I have updated the following:
    • Solder pads of LE33CZ have been placed a little wider apart to avoid short circuit while soldering.
    • Solder pads of the resettable fuse (Fuse2) has been placed closer together to better fit the fuses of the BOM.
    • Moved the NRF24L01 connector a bit away from the solid state relay. Should make it easier to solder.
    • Moved Fuse2 to another location on the board, away from the 230v circuit.

    Some 3D pictures (Top and bottom):
    Top.png
    Bottom.png

    Anyone who is interested can order the PCB HERE

    Some documentation, complete list of required components and all gerber / DipTrace files (in case you would like to make some modifications) can be found here: MySensors board v3.2.3.zip.


  • Admin

    Nice module, following your project with interest.


  • Hardware Contributor

    Hi,

    nice project.
    your component ref (step down module) is interesting. I think it is a little bigger than china transfo. But i was searching something cheap like this.

    I have done a relay board too (not tested yet as I am waiting for pcb). It is different. It uses atmel instead nano. But it is 43*38. Maybe I can try to add the step down now I know it, and keep same size.
    There is nrf and rfm footprint, astsha, eeprom, acs712, 10amp relay. I will present it when full tested (I have to make some changes). But if you want to see it:
    https://github.com/scalz/MySensors-HW/tree/master/OneRelayMysensors
    (Note : all my github work is in dev, nothing released, so be careful for the moment. I think i will put it in a dev branch.)


  • Hero Member

    @aproxx what is the size of the step down module? i don't think it was mentioned anywhere but i might have missed it among all the useful data provided.... also, forgive the hopelessly noob question, but how do you connect these modules? are the dots soldering points?


  • Hardware Contributor


  • Hero Member

    @aproxx found the datasheet http://www.hlktech.net/product_detail.php?ProId=54
    its 34x20.2x15 and there are legs at the bottom


  • Hero Member

    @aproxx also re-read my post and it might have come out bad - I didn't mean to criticize your data - I meant that on aliexpress they dumped heaps of data a bit badly formatted so it was hard to find things. apologies...


  • Hero Member

    Thanks for the positive feedback already! Last night I managed to replace some of the components in order to fit some extra pin-outs in case it is needed.

    I still need to test the AC/DC converter+stepdown module, but I have high hopes on this one. I know that really cheap China transfos are cheaper and a bit smaller, but I'd rather go for something a bit more expensive, hopefully has a bit better components and has short circuit protection (it is supposed to be powered on for years and years).

    @scalz , you project absolutely seems interesting as well! Unfortunately I don't feel confident enough to do any SMD soldering, so I'm currently sticking to regular Arduino Pro Mini Boards. Maybe I'll try adding an SMD microcontroller and relay in the future.

    @Moshe-Livne No worries. AliExpress sure ins't the best source to get specific device information. Glad you found the datasheet!


  • Mod

    It was another discussion http://forum.mysensors.org/topic/687/230v-power-supply-to-arduino/23
    You are adding a valuable solution.
    This module looks very interesting in case it will meet all stated characteristics,

    I also thinkin on something small to fit into standard wall box but I have some complication.
    I need a solution for 2-wire lighting, It is because All lighting in my house is a two-wire system.
    Otherwise I will need to feed third wire to each wall box.


  • Hardware Contributor

    @aproxx : of course I am interested with your files. It could be useful.

    @axillent : when you say 2-wire lighting, do you mean for one main??? I have done some tests last month to make something like fibaro fgd211. But I jumped onto another project. I had problems I remember. To test I was using a little china transfo and incandescent bulb. First test, zero cross detect with triac. Arduino rebooted always at start (I think about drop voltage and brownout reset arduino, because of a reset of the transfo. but not sure it was that, or maybe it was a no good zerocross....). Then I tried with mosfet pwm. Arduino booted right, but when I increased pwm to something like 192-200, arduino resetted. So I was thinking to use lnk306 but no time (and I think lnk306 need same input voltage so I don't know if it could resolve the problem. So I now am thinking to disconnect my light network and connect it to dc 48 and using led instead.
    Do you have idea, to power (steal energy) nodes with one main???


  • Hero Member

    @scalz
    May I make a suggestion? I would look for a solution for both 230v AND 120v for us yanks.. 🙂 I know I would make the purchase.


  • If you have a look at the datasheet you see:

    All voltage input (AC: 90 ~ 264V)

    110 should work.


  • Hero Member

    @Andreas-Maurer Thats Great. You may want to change the title to reflect that.


  • Hardware Contributor

    @ServiceXp : are you talking about my relay board? if yes, I will check what I can do in the end of the week and post my project in a new topic (I think I have to rearrange the board to fit the step down).


  • Mod

    @scalz two wire ligting menas that a wall switch is feeded only with two wires. One wire is a L source and second wire is from the load (from the lamp). Classical switch just need to short this two for the light to startup. In this case ay smart switch need some advanced technique on to power itself. For example fibaro dimmers do so.

    Do you plan to use single 48V power supply for the lighting? I'm working on the prokect for the guest house because it is just on building stage. I have a plan to use single 48V AC-DC power source with wired mysensors network. I will use 3 wires accross all lamps and switches and sensors. They will communicate with each othe P2P using a single wire interface based on Manchester encoding. I also plan to have Mysensors gateway.


  • Hardware Contributor

    @axillent Ok. thank you. At my home it is like that. sure it needs a smart switch. and fibaro seems to be very smart (very small, small transfo, and steal energy, but z wave so I think it may use sync comm to use less energy. Maybe I am wrong and don't know how it is inside).
    You are right. I am thinking to use 48v power supply lighting. But I cannot change my electrical network. So two wire. And I hope it will be easier to steal energy and power the in wall switch node for leds. Maybe I am wrong. I will power my lightings with energy harvesting (solar, or maybe I have another idea but i have to make experiments.

    Your lighting project is very smart too. can't wait to see it too.


  • Hero Member

    @scalz Sorry, No I was referring to the OP.


  • Hero Member

    @ServiceXp , I'm also looking for a way to power a node from the available-standard two wire switch. It should be possible to steal some milliamps from there, but I don't know even from where to start researching it.


  • Hero Member

    Hi All,

    I'm not sure if I understand the 2-wire thing completely, but in my house (which is kind of standard I guess in Europe) I have 3 wires going from the electricity cabinet, to the light switch and then to the light bulb. These cables are Phase, Neutral and Ground.

    As I don't want to rewire my entire grid, I decided to build these boards so I can reuse the current wiring. I ended up with the following "schematic" if I can call my paintskills like that.
    The enclosure at the bottom of the drawing would be placed behind the current light switch, while the enclosure at the top of the drawing would be placed right above the light bulb. This requires little to no modification of my current wiring.

    Connection overview.jpg

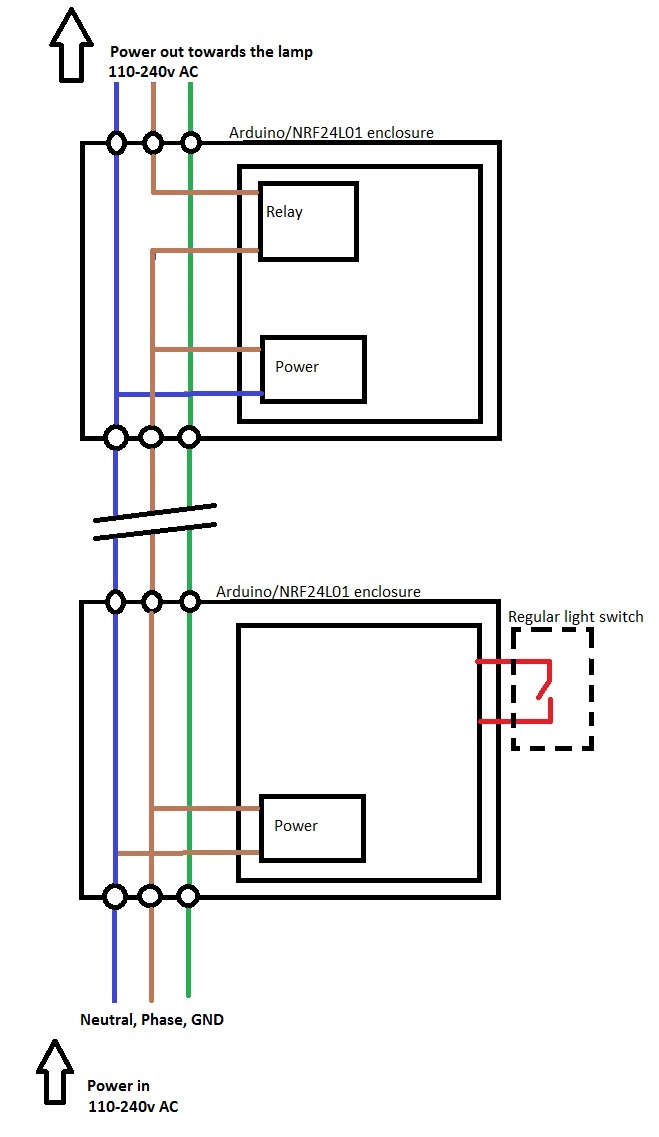
    @ServiceXP, I'll update the title to include the 110v information.


  • Why don't you place the relay behind the switch, too? This way you could save half of the nodes.

    I have just ordered some of those power supply modules. Very interesting, cheapest similar ones I found before were about 14 €.


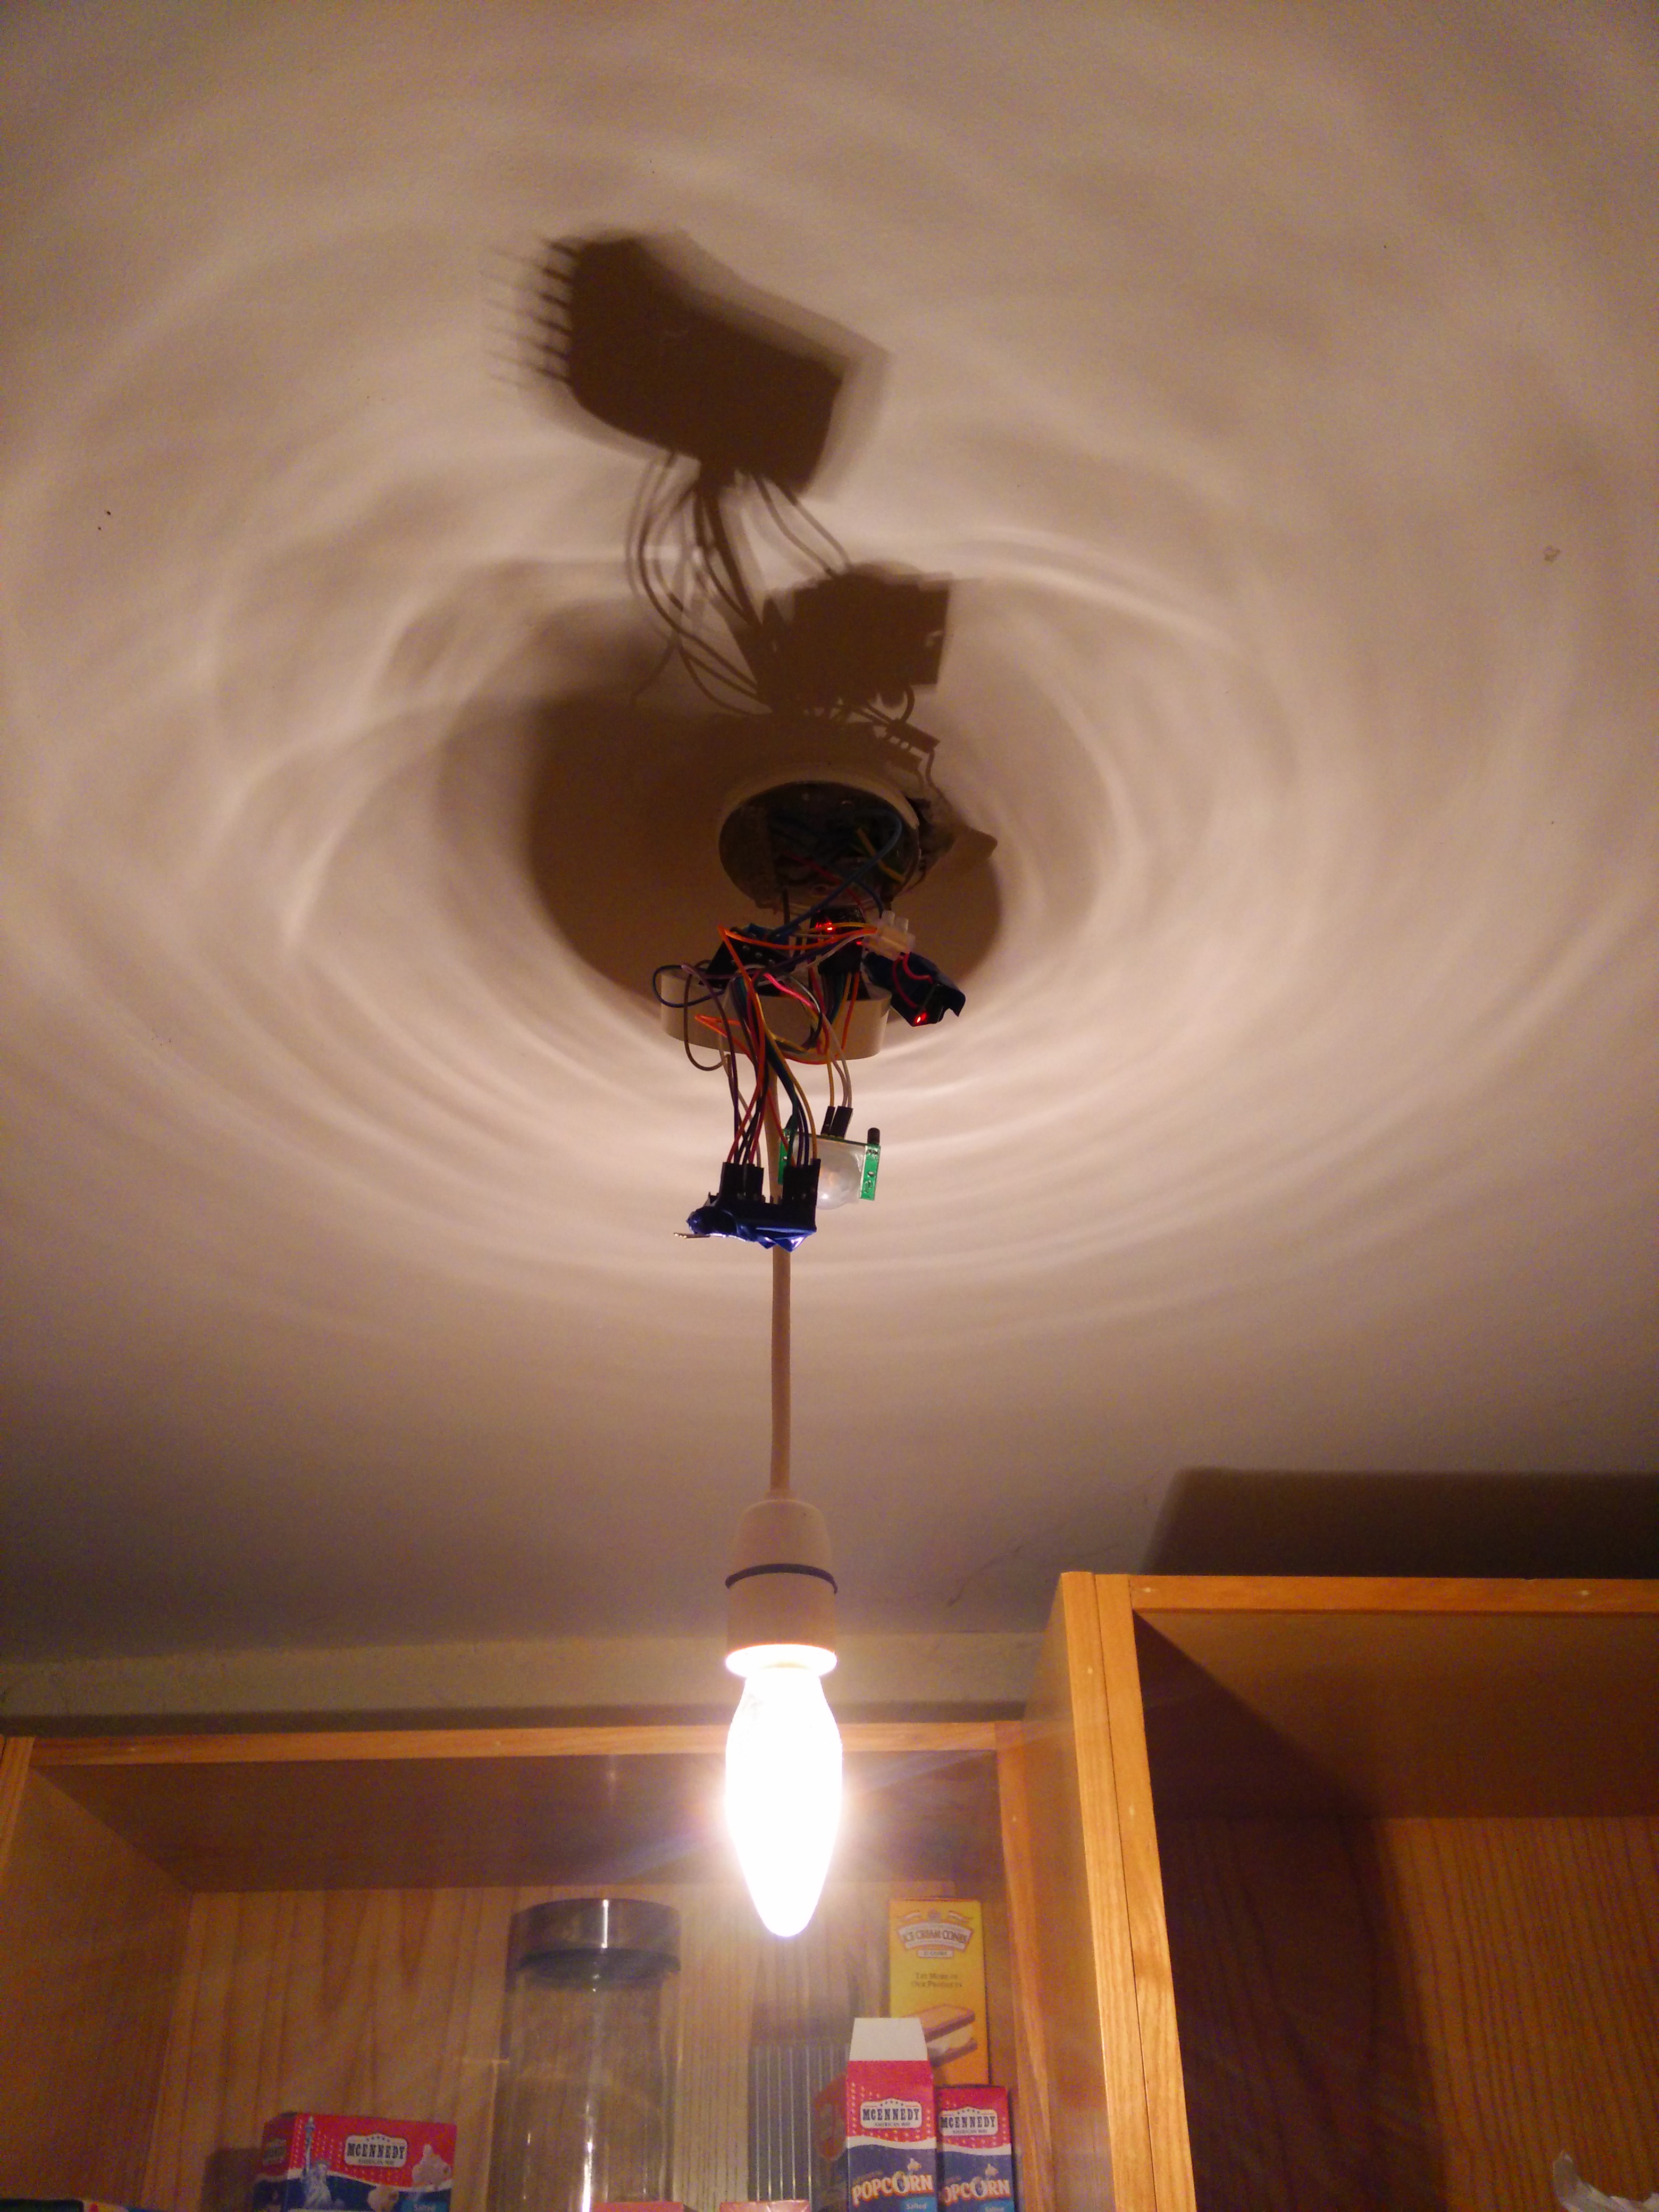
  • This is what I have done for a light bulb in the pantry with a motion sensor. Its a mess as it is a proof of concept.

    I have a 5 separate "modules" as such. Arduino Pro Mini, Motion Sensor, Radio, 5V AC/DC transformer and a 5V Relay. So clearly it is too big and a bit of a mess! So I am really interested in your PCB @aproxx! Do let us know how it works for you.

    2015-06-17 20.02.09.jpg


  • Hero Member

    @shabba It looks like you are trying to build something to "pop your corn" on the shelf 😄


  • Admin

    @shabba

    That picture makes me a bit worried... 😓 Please don't let any kids near it.


  • Hardware Contributor

    There is something similar I'm working on. Although mine is more like a solid state relay. And it can be used as an AC dimmer. But has the same concept with AC-DC converter. I used one from Vigortronix. It has a 3.3V output.
    20150619_152947.jpg

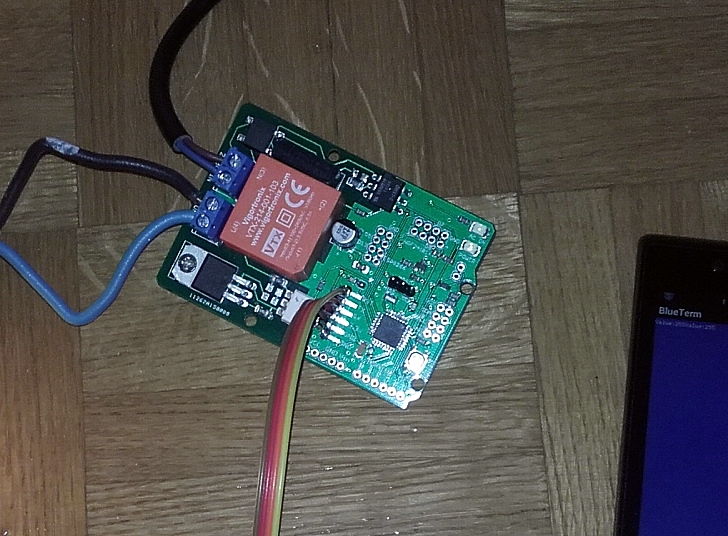
    Here it is controlled with Bluetooth serial connection
    20150619_153015-1.jpg
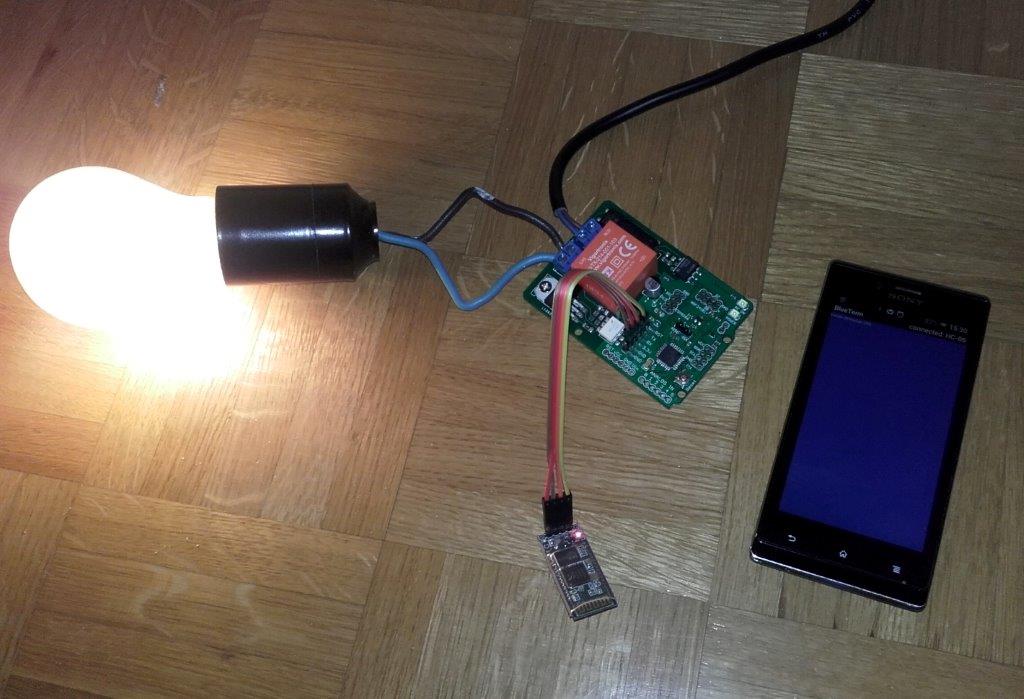
    This is how the board looks like
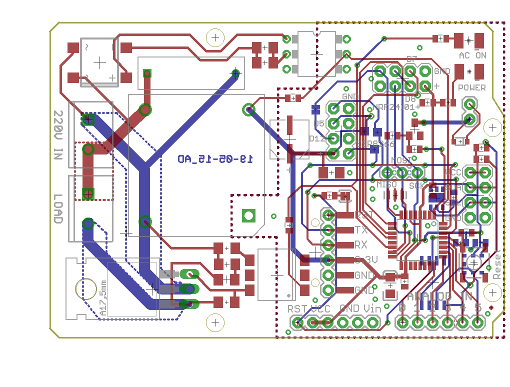
    board_01.png
    If anyone wants it, let me know.

    @aproxx I like your form factor. Great find with that AC-DC converter.


  • Hardware Contributor

    Too bad these Ac Dc are so expensive and little big. But good quality for sure.

    @ceech : looks like a pretty board. I am interested in your files please. It could be useful..😉


  • Hardware Contributor


  • Hardware Contributor

    thank you!


  • @aproxx Where could one get that board and what is required to populate it? I would like perhaps half a dozen or so for a few things I'm doing and to replace the mess in the picture I posted above 🙂


  • Hardware Contributor

    This is really interesting.

    If this PCB succeeds i will order maybe 10-15 of them. They need to be so small it can be mounted inside/behind the wallswitch and i also want to combine it with some sort of motion detector fittet in the wallswitch as well...

    Cool really looking forward to this... keep up the good work!


  • Hero Member

    @Jan-Gatzke You are absolutely right. No idea on why I've never thought about that!
    I have now redesigned the board to fit a relay as well. Size is still limited to 45 by 45mm, so it should be quite easy to place them behind a light switch.

    I hope to receive my PCB boards next week, after which I'll add all components to the board and start testing it. If all goes well, I'll be submitting the new design with relay to dirtyPCBs to have those printed too.
    Just a sneak peak of the new board:
    Top:
    Top2.png
    Bottom:
    Bottom2.png

    In the following days I'll start designing a 3d-printable casing to fit the board.
    As soon as I have confirmed that the board with relay is working fine, I'll submit the PCB design here together with the 3d printable casing. Due to slow shipping and limited spare time I expect this to happen in about 4 to 7 weeks.


  • Hardware Contributor

    YES - this is really what im looking for!! 🙂
    Well done @aproxx - i will follow this closely.

    If you have the space - the pcb could have a input/hole for an external sensor to pin 3 (if unused or another one). so you can add say external motion sensor or temp as well.

    Can you list the parts so there is a possibility to start ordering those?


  • Hero Member

    @sundberg84 Thanks for the kind words!
    The new design (with relay) indeed has a few digital pins available. I've included the following in this design:

    • 4 digital in and output pins. Pin 3, 4, 5 and 6. Pin 3 is also used to switch the relay, so 3 other digital pins are available to connect other things like motion sensors and switches.
    • 1 Analog input pin. Pin A0.
    • 2 5v pins.
    • 2 Ground pins.
    • A few extra empty pins which aren't connected to anything, but can be used to add some custom things if needed.

    Bill of materials is available below, together with Gerber files, and DIP file (as I'm using Diptrace to design my PCBs).
    Please keep in mind that this is only my second time designing PCBs, so if you'd like to be 100% sure it works I would recommend to wait until I've tested the board and confirmed that everything is working fine.
    But feedback is always welcome!
    Mysensors v2.1 UNTESTED.rar


  • @aproxx Looks great so far. I am missing a diode and snubber components around the relay. Or are those just not visible? Didn't have a look at the files, yet. In another thread someone posted a diy solid state relay with triacs. This would be a little bit smaller than the relay and would less likely fail. I would add a fuse in front of the power supply, too.

    I will definitly have a look at Diptrace. I like those 3D previews. 🙂


  • Hero Member

    @Jan Gatzke There is a diode in place, but it just isn't visible in that current 3D design. I've used following schematic (minus the LED) to connect the relay to pin 3 of the Arduino :
    D112-D114-D1181V1SCH.png

    What do you mean by "less likely to fail" about these relays? I've been using them for a while now, but never had any issues with these. Or do you think that they might show this problem when using them for a long time?


  • Yes, relays are mechanical parts. Cheap ones are likely to fail over time. The missing snubber protection in your circuit will kill them, too when connecting inductive loads.


  • Hero Member

    Hi all,

    After all input you guys gave me, combined with the findings of this topic, I decided to go back to the drawing board.

    Before submitting my newly designed PCB I would like to make sure it doesn't contain any (obvious) mistakes.
    Two questions I still have are:

    • I assume it is correct that all ground pins are connected to each other? So both for the 5v parts of the circuit and the 3.3v circuit?
    • The HLK-PM01 seems to provide a quite stable voltage somewhere between 4.9 and 5.1 volts. If I understand correctly I should directly connect this to VCC input of the Arduino Pro Mini, and NOT to the RAW input voltage?

    Any other remarks on the current design are welcome as well of course! 🙂

    Schematic
    Schematic.png

    Components (from left to right)
    J1 2 Pin screw terminal (Power input)
    Fuse1 PTC Resettable Fuses 250V 1A TRF250-1000 PPTC Polymeric PTC PolySwitch
    Varistor1 Varistor 10D391K 10D-391K VDR 10K391 Metal voltage dependent resistor
    HLK-PM01 HLK-PM01 230v AC – 5v DC converter
    Fuse2 PTC Resettable Fuses 250V 1A TRF250-1000 PPTC Polymeric PTC PolySwitch
    Varistor2 SMD 1206 5.5V Varistor original Varistor resistor 100pcs/lot
    C1 100nF capacitor
    C2 100uF capacitor
    U3 LE33ACZ 5v to 3.3v converter
    C3 4.7uF capacitor
    NRF24L01 Normal NRF24L01(+) module
    Arduino Arduino Pro Mini 5v
    K1 G3MB-202P 240V AC 2A Solid State relay
    J2 2 Pin screw terminal


  • @aproxx here you use only Relay not a relay with button.
    my suggestion is that make design to use relay with button

    1439321581937-schematic.png

    Here I sketch 2-Relay and 2- switch


  • @aproxx please make this type of board, so that we can control two thing through one module


  • Hardware Contributor

    @aproxx I know my board is different of yours as I am using smd. But if you want to have a look, I have updated my first post here http://forum.mysensors.org/topic/1586/roller-shutter I am waiting for my pcb now..
    Maybe it can help you...

    For your schematics, what I would do is like @jemish said : buttons connector, maybe a resistor between arduino and relay. You are protecting input of HLK (with varistor..) it is ok. But you don't protect at output of relay.


  • Hero Member

    @jemish Yeah it seems like I totally forgot to add the switch in the schematic, but I do have it in place in my PCB design 🙂
    About adding a second relay.. I'm not sure about that yet. Maybe if I can still keep footprint of the board to a size less than 5 by 5 cm I'll add a second one. But it is certainly is a good idea though!

    @scalz I'll definitely have a closer look at your PCB design! Seems really interesting, but unfortunately I don't have the proper tools to go for SMD. Soldering a single SMD component is doable, but I'm not going to start soldering SMD Atmel chips 🙂
    About the resistor you mentioned: I assume the Solid State Relay which I mentioned doesn't need an external resistor between my arduino and the relay.. According to the datasheet the G3MB-202P-DC5 seems to have a build-in input resistor if I'm not mistaken.


  • Hardware Contributor

    @approx: I agree with you. first time I soldered small chips I was afraid as I am not electronician. On youtube there is lots of tutorials for smd soldering. I think maybe one day you should try with solder paste. It is magical! I don't always use it for atmel chips but it is easier.
    and of course flux, desoldering wick, and a magnifier is a must have too. and a 0.2mm tip for soldering iron..
    But your design is cool, I like it too! It could interest people.😃


  • @scalz (sorry OT) I am actually looking at getting a decent (aka not too expensive!) air gun and some paste - preferably with a syringe. Any recommendations on that?


  • Hardware Contributor

    @shabba: I have not an air solder yet, I would like to test it! I have not compared yet existing products. But I think it is useful for desoldering, soldering some chips. Not the best for res, capa...I would prefer solder iron.
    Like many people, I usually use flux and good soldering tin (0.3 with flux in it) with a 0.2 tip. And sometimes I use my solderpaste for fun and for some chips! Something i think I will try to make soon is a smd picker. and then a solder paste dispenser. another thing cool I would like to try is this http://operationalsmoke.blogspot.fr/2014/05/diy-usb-soldering-microscope.html but with a c920. Unfortunately not enough times...

    Sorry for OT too. See you soon


  • @aproxx when you completed the design of PCM board than please share with me as soon as possible.


  • Hero Member

    @jemish Of course I'll share the design and all related documents.. 🙂 I hope to have it finished in a few days, and will sure give an update when completed!


  • Hero Member

    As promised: In the attachment of this post you can find all required information to build this board.
    The zip file includes all required Gerber files, bill of materials, as well as the Schematic and PCB design (drawn using DipTrace).

    One remark: I've slightly adjusted the design to optimize the reception for the NRF24L01. The antenna of this chip is now placed slightly next to the custom PCB. Hopefully this will result in a better RF reception.
    Size is approximately 47 by 42mm.

    Download (Please be aware that this board is still untested at this moment, so please doublecheck things yourself before ordering!):
    Check latest post for updated version.


  • Hardware Contributor

    @approxx: nice board!
    could I give you one or two tips? as I have recently designed an ac board too...

    there is one or two trace which are 90° corner. maybe I am a little old school on this but it is preferable to have 45°. but it should work I think no problem.
    Your board will not draw too much AC current I think, and I don't know what are your trace widths for AC. but you can check here http://circuitcalculator.com/wordpress/2006/01/31/pcb-trace-width-calculator/ if you want to know width of trace regarding current flow. Then if you can't have the right width because of space... you can use soldermask layer stop and then you will be able to add soldering on all the AC trace and give it more strength for more current drawing. Because most of china fabhouse use 1oz copper. Some 2oz but more expensive.

    Just my 2cent tip, maybe you already know it, and have already ordered you board.


  • Hero Member

    @scalz Yeah usually I'm going for 45 degree angles as well, but I guess I just forgot for those few. However I do have full confidence in Dirty PCBs, so I'm sure there wouldn't be any disruptions in the trace.

    Regarding trace thickness/width: I've been doing some calculations as well, but with 1oz copper traces I would need extremely wide traces to come up with a decent copper volume. So my plan is to solder a thin wire at the bottom side of the PCB between the AC connection points. That's why I've got the AC and 5v DC circuits separated as much as possible. 🙂

    But thanks for the feedback anyway! And congrats on taking the first step of ordering the board! I'll be doing the same tomorrow.


  • Looking at your pcbs and looking the same time on my badly soldered dimmer.. i have the gut feeling i should maybe redo this with a proper pcb. 😅

    2015-08-17 23.07.49.jpg


  • @Oitzu said:

    my badly soldered dimmer.

    No way that is just like mine! 🙂 It's Perfect!

    Just Kidding I need to get my dimmers working properly also. You got the zerocross working right? 220v 110v? share sketch? will yours work locally with gateway off?


  • @DrJeff said:

    Just Kidding I need to get my dimmers working properly also. You got the zerocross working right? 220v 110v? share sketch? will yours work locally with gateway off?

    Yes the zerocrossing is working right. Shouldn't working with gateway off only be a matter of programming? ^^
    Built vor 220V, but should also run at 110V (with different resistors), need to check the specifications of the combonents again to verify that.

    I got no working MySensors sketch or a drawn pcb layout yet, but i can describe how it works.
    Left connectors are (up to down): LOAD: Phase, Neutral; Source: Neutral, Phase
    Right connectors are (up to down): GND, PWM Output, Zero-Crossing Input, VCC

    The Zerocrossing detection is done by the bridge rectifier and the zerocrossing detection module 4N25.
    The Signal goes to a INT-Pin of an arduino.

    In a test sketch i use a timer and the interrupt to do the correct pwm output.
    The pwm output goes to the MOC3021 (Opto) that will fire the TRIAC seen left from it.

    Little test sketch:

    #include  <TimerOne.h>
    
    //Config
    int INTPin = 0;
    int outputPin = 11;
    int dimLevel = 64; // Dim level (0(on)-128(off))
    int freqStep = 75; //50Hz, should be 65 for 60Hz
    
    //Global
    volatile int i=0; // Counter. Only fire if i >= dimLevel
    volatile boolean zeroCross=0;
    
    void setup() {                                      
      pinMode(outputPin, OUTPUT);
      attachInterrupt(INTPin, zero_cross_detect, RISING);
      Timer1.initialize(freqStep);
      Timer1.attachInterrupt(dim_check, freqStep);                                           
    }
    
    void zero_cross_detect() {    
      zeroCross = true;
      i=0;
      digitalWrite(outputPin, LOW);
    }                                 
    
    void dim_check() {                   
      if(zeroCross == true) {              
        if(i>=dimLevel) {                     
          digitalWrite(outputPin, HIGH);
          i=0;
          zeroCross = false;
        } 
        else {
          i++;                    
        }                                
      }                                  
    }                                   
    
    void loop() {                        
    }


  • @aproxx If I want to buy this module then.........
    If you sell this module then I am ready to buy ...


  • Hero Member

    @jemish I've made some minor changes to the board (nothing functional has been changed, just some updated silk screen and modified the 90 degree angles to 45 degree angles.)

    Please be aware that at this moment the board still isn't confirmed to be working. If you want to be 100% sure everything works properly, I strongly advise to wait for another 5-7 weeks. That way I can assemble the board myself and confirm everything is working as expected.


  • yes I like to wait for your responce.
    please reply fast as possible.


  • @Oitzu
    I seem to get all this working outside of MYSensors but I have very limited cut and paste ability in code. 🙂 So what I was wondering do you have the sketch for controlling the dimmer and just firing the triac integrated with MYSensors yet?


  • @aproxx so now, what is the progress??
    we will wait for your response.


  • Hero Member

    @jemish
    All components are at my desk at the moment. The only thing missing is.. The PCB itself. 🙂
    DirtyPCBs' website states that the board was shipped to me at August 24. My packets from China usually arrive about 2 or 3 weeks after they have been sent from China, so I expect it to arrive somewhere next week.
    After the boards have arrived I'll make sure to have it assembled in less than a week. 🙂


  • @aproxx please upload new design new that you make now.


  • Hero Member

    @jemish : The design which I've posted 2 weeks ago (A few posts above this one) is the latest design I have.


  • but, you said that you want to change something like 45 degree or 90 degree, so that ....


  • Hero Member

    @jemish : Yes, but that's already included in the design which I posted above.


  • @aproxx can you make design for 2- relay board....


  • @aproxx so, now what is the progress....we are waiting your response.....


  • Hero Member

    I received the newly designed PCB last weekend, and have been soldering/testing the board since it arrived. Just a few minor changes to the layout (not the schematic) and the board should be completely finished! So far the results look promising.
    @jemish: I'm currently re-working the design a bit and working on documentation, but I'll make sure to post the new and completely finished design by the end of the week!


  • Hero Member

    As promised, I've got an update for this project. The board has been tested in the past week, and everything is working as expected. Compared to the previous board I've posted, I have updated the following:
    • Solder pads of LE33CZ have been placed a little wider apart to avoid short circuit while soldering.
    • Solder pads of the resettable fuse (Fuse2) has been placed closer together to better fit the fuses of the BOM.
    • Moved the NRF24L01 connector a bit away from the solid state relay. Should make it easier to solder.
    • Moved Fuse2 to another location on the board, away from the 230v circuit.

    Some 3D pictures (Top and bottom):
    Top.png
    Bottom.png

    Anyone who is interested can order the PCB HERE

    Some documentation, and all gerber / DipTrace files (in case you would like to make some modifications) can be found here: MySensors board v3.2.3.zip.


  • I just ordered 20. Can't think what I will need them all for but better to be looking at them than looking for them 🙂

    Great work! Thanks!


  • Mod

    @aproxx I guess you use a different Arduino Pro Mini as the one in the 3D view, because its row of pins pointing towards us seems to get awfully close to the mains coming from "Power in", right?


  • @Yveaux
    I believe those are for the serial connection that usually are pointing up, or back for programing? It looks like they are just rendered as down in the 3D image? But I am curious how the clearance for the components on the other side (HLK) is when they are soldered, does it need some space off the board?


  • Hero Member

    @aproxx Could you share some photo's of the mounted board to get some feel or the 'real' thing? thanks


  • Hero Member

    @Yveaux: I'm using the standard Arduino Nano, but I agree that the 3D view looks a bit worrying. In real life it isn't needed to solder this row of pins to the Arduino, so it should be safe. So the assumption of @DrJeff is correct!
    The only reason why these pins look connected to the board is because I couldn't find a 3D design of the Arduino nano without these 6 pins soldered. 🙂
    But thanks for pointing this out, I'll add it to the documentation to make sure people aren't getting confused.

    @AWI: I'll try and see if I can take some decent pictures when I get home (in approximately 12 hours) and post them up here!


  • Hero Member

    For those who wanted to see some pictures of the board:
    IMG_20150921_194059 (Small).jpg IMG_20150921_194039 (Small).jpg IMG_20150921_194035 (Small).jpg IMG_20150921_194023 (Small).jpg IMG_20150921_192748 (Small).jpg IMG_20150921_192737 (Small).jpg IMG_20150921_192728 (Small).jpg

    Small notice: These pictures are of a slightly older design. The newer design has a few minor changes like better component placement and a permanent fuse instead of this resettable fuse. But these pictures should at least give you an idea on how everything looks like, and shows how really small it actually is.
    Also, I reinforced the traces of the 230v lines, which I absolutely recommend to do! (Although I do recommend to do it slightly more professional than I did on this prototype :))


  • Very nice. 👍 I ordered 10 boards on Saturday, can't wait for them to arrive.


  • Hero Member

    @aproxx Looks cleaner than the 3D view 👏


  • Hero Member

    @AWI Thanks for the kind words! I did my best on the soldering part, but the reinforcement of the 230v circuit could have done a bit better in my opinion. 🙂 Next time I would use an isolated wire to reinforce the 230v traces, but for a prototype build this was sufficient.


  • nice job....very nice....


  • Nice job. Why do you need to bridge the 230V lines? Can't you just make the traces bigger? Is it really needed? The relay can only switch 2A. So the traces have to survive 2A, too. You can easily calculate the required traces with tools like this: http://circuitcalculator.com/wordpress/2006/01/31/pcb-trace-width-calculator/


  • Hero Member

    @Jan-Gatzke I've used a similar calculator before and according to these calculation it isn't mandatory.

    • Dirtypcbs.com claims to use 1oz/ft2 copper thickness (which seems to be 0.035mm).
    • The traces between the solid state relay and connectors are all 2mm wide.
    • Distance between the solid state relay and the connector on the edge is less than 20mm.

    That would lead to the following calculations:
    Schermafdruk 2015-09-22 13.35.55.png

    So you are right that it isn't mandatory to reinforce these traces. However, to be on the safe side I'm still planning to reinforce them. I know, it probably isn't necessary but it doesn't hurt putting this extra effort in, just to be completely safe. 🙂


  • Keep in mind, that you do not want to run the relay at 2A for a longer period of time. 2A at 230V means 460 W power consumption. Most devices / lights will consume less. So hopefully this will never be a problem.

    Again, great job. I will definitely order some of the pcbs, too.

    What about the other parts? Do you have some kind of link collection for Ebay/Ali? This would make it even easier to build the device.


  • Hero Member

    @Jan-Gatzke Indeed, most of my lights only consume like 10% of the maximum rated power, so I should be on the safe side for sure.

    I have attached a ZIP file which contains all required information in one of my previous posts (HERE). That one contains a Word document with all components and an AliExpress/Ebay link.

    I'll try and see if I can update the first post of this topic as well to include all important information.


  • Ok, lazy me didn't have a look at the zip. Tanks for the hint. 🙂


  • Admin

    @aproxx This looks very cool! I am curious what (if any) heat sink will be used with the solid state relay? I have never used a solid state relay but I have been reading about them and it seems that most are used with a heat sink. Maybe it depends on the amperage that will be switched though. Thanks!


  • Hero Member

    The SSR has an integrated heat sink according to the specs. Don't know if this is a knockoff and follows the same standard of quality though. Given the low A rating, and the fact that most of us will be switching a 10-20W worth of lights, I think it will be fine.

    I noticed the ceramic "Slow Blow Fuse (250v 0.3A)" was out of stock on Ebay. As was the 0.2A version. Someone is stocking up 🙂 Would it have to be a ceramic fuse?


  • Admin

    @bjornhallberg Thanks. I still have some reading to do... 🙂


  • @bjornhallberg said:

    was out of stock on Ebay. As was the 0.2A version. Someone is stocking up

    😔 oops! You wanted some?

    just kidding, let me check I have a line on parts I will see if they have some.


  • Hero Member

    @DrJeff I actually bought the 0.2A version myself before it was gone 🙂 But I was surprised to find how hard it was to find axial ceramic fuses of the right size or at the right price. Maybe we could find some sort of small fuse holder instead?


  • @bjornhallberg said:

    Maybe we could find some sort of small fuse holder instead?

    I know its probably not the best thing to do but I have just soldered on leads, bare wire. I just tin the metal first and scuff it a little. I have done the same thing to batteries with no ill effect.The key is get in and off quickly!


  • @aproxx I'm hoping to receive the boards soon (they were sent almost two weeks ago) and have one question for you.

    I've had a quick look at your example code in the Word document but I'm not familiar with Arduino Debouncing. My question is what kind of switch is the best to use, a standard On/Off switch or a Pulse switch?


  • Hero Member

    @mvdarend I'm not sure if I completely understand what you mean by "pulse switch"..
    I was planning on using a normal light switch, in order to have an on/off (open and closed) circuit.
    But it shouldn't be a problem to modify the code a bit in case you're using some other buttons (like a push button for example). I'm sure me or somebody else on this forum can help you with your code in case it shouldn't work out as expected. 🙂


  • @aproxx said:

    @mvdarend I'm not sure if I completely understand what you mean by "pulse switch"..

    Thanks for your reply, a 'pulse switch' is basically a push button type switch like you mentioned. I'll see if I can get it working when the boards come in. (I've already got all the other parts)


  • NIce little boards! I received mine yesterday 🙂 after a few hiccups I got it working fairly quickyl.

    Two small things that might need your attention:

    • The holes for fuse2 were too small for the resettable fuses I bought, had to drill them out a tiny bit.
    • I think the LE33 is the wrong way around in the pictures. I kept getting a "Check wires" message in the debugger. After checking a number of things I noticed that the voltage to the radio was too high. After looking at the diagrams I noticed that the LE33 is the wrong way around, after desoldering and turning it around (flat side facing Fuse2) the unit worked as expected.

    For anyone else that bought the 5.5v DC varistors from the given link, double check them before using them. I received a few that were defective, there was absolutely no resistance between the two poles. Causing Fuse2 to get a bit warm 🙂

    IMG_20151009_223249.jpg


  • Hardware Contributor

    Hi! Nice! 👍

    Is this board 5x5cm? If so it might be to big for my in-wall projects.
    This is a board thats 5x5 on top of a standard whatsitsname...

    55.jpg


  • Hero Member

    @mvdarend Thanks for the feedback! Happy to hear that it's working fine on your side as well. Although I do find it strange that the LE33 seems to be the other way around on your board? Maybe I just made a mistake with the silkscreen, and should the LE33 be on the bottom side? Anyway, I'll make sure to address this as soon as I possible (probably somewhere during next week). Sorry for the possible inconvenience, but thanks for pointing this out! 🙂

    @sundberg84 The board dimension are about 4.2x4.7cm, so it is quite small. However, I'm afraid that because of the NRF24L01 module, and the 230v connections to it, it wouldn't really fit the box you have on that picture (assuming the board you have there is 5x5cm)..

    Somewhere in the next week or 2 I'll try to design a custom 3d printable plastic box for the board that I've designed. Together with a 2-relay board as requested by @jemish .


  • I spoke too soon... the unit seems to work well, but I hadn't tested if the relay actually switched or not. The status seems to change fine in the serial monitor, but it doesn't seem to be actually switching. I'll have to do some more troubleshooting.


  • Hero Member

    @aproxx My first project with your design, Thanks 👍
    p.s. the regulator needs to be mounted "reversed" from the silk screen. Some puzzling but a lot of fun and top result 💓
    upload-04a945b8-8cc0-4671-becd-0a72580c8b6b


  • Is it possible to add the option to be able to use RFM69 radio also?


  • The board looks really nice! Just one question though; what about temperature protection? In this thread people talks about gluing a thermal fuse on top of the HLK-PM01, is that something you considered or do you think it's unnecessary?


  • @cygnus said:

    The board looks really nice! Just one question though; what about temperature protection? In this thread people talks about gluing a thermal fuse on top of the HLK-PM01, is that something you considered or do you think it's unnecessary?

    Good point, been following this topic because of the other topic about the HLK-PM01 ad to dc regulator. And after extensive testing the outcome was that there should be added the thermal fuse because of additional safety. What do you all think?


  • @krizzziz
    I have seen in some commercial wall switches thermal cutoff/fuses they are usually to the top of the offending (heat producing components) not necessarily directly touching. I have definitely added them to mine for peace of mind. Like this one:
    upload-2d08b952-3efd-4445-a12c-e3c1393fcbcf
    http://i.imgur.com/rqOawGmm.jpg

    Just make sure you heat sink when soldering them into place and check them after installation.


  • Hero Member

    @mvdarend said:

    For anyone else that bought the 5.5v DC varistors from the given link, double check them before using them.

    I wish I would have read this a week ago. Would have spared me from a "WTF!" moment.


Log in to reply
 

Suggested Topics

  • 87
  • 6
  • 1
  • 5
  • 7
  • 7

0
Online

11.2k
Users

11.1k
Topics

112.5k
Posts